
English Manual
Page 1
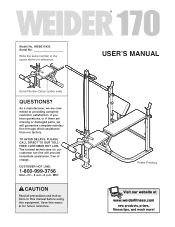
..., prizes, fitness tips, and much more! TO AVOID DELAYS, PLEASE CALL DIRECT TO OUR TOLLFREE CUSTOMER HOT LINE. As a manufacturer, we are missing or damaged parts, we will provide immediate assistance, free of charge. MST CAUTION Read all precautions and instructions in the space above for future reference. Write the serial...
..., prizes, fitness tips, and much more! TO AVOID DELAYS, PLEASE CALL DIRECT TO OUR TOLLFREE CUSTOMER HOT LINE. As a manufacturer, we are missing or damaged parts, we will provide immediate assistance, free of charge. MST CAUTION Read all precautions and instructions in the space above for future reference. Write the serial...
English Manual
Page 2
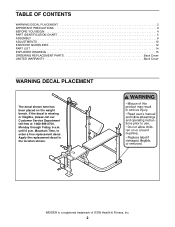
...WEIDER is missing or illegible, please call our Customer Service Department toll-free at 1-800-999-3756, Monday through Friday, 6 a.m. until 6 p.m. Apply the replacement decal in the location shown. If the decal is a registered trademark of ICON Health & Fitness, Inc. 2 TABLE OF CONTENTS WARNING DECAL PLACEMENT 2 IMPORTANT PRECAUTIONS 3 BEFORE YOU BEGIN 4 PART... IDENTIFICATION CHART 5 ASSEMBLY 6 ADJUSTMENTS 10 EXERCISE GUIDELINES 12 PART LIST 14 EXPLODED DRAWING 15 ORDERING REPLACEMENT PARTS Back Cover LIMITED WARRANTY Back Cover ...
...WEIDER is missing or illegible, please call our Customer Service Department toll-free at 1-800-999-3756, Monday through Friday, 6 a.m. until 6 p.m. Apply the replacement decal in the location shown. If the decal is a registered trademark of ICON Health & Fitness, Inc. 2 TABLE OF CONTENTS WARNING DECAL PLACEMENT 2 IMPORTANT PRECAUTIONS 3 BEFORE YOU BEGIN 4 PART... IDENTIFICATION CHART 5 ASSEMBLY 6 ADJUSTMENTS 10 EXERCISE GUIDELINES 12 PART LIST 14 EXPLODED DRAWING 15 ORDERING REPLACEMENT PARTS Back Cover LIMITED WARRANTY Back Cover ...
English Manual
Page 3
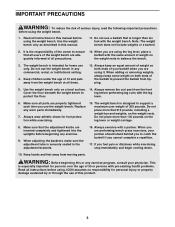
...under the age of 12 and pets away from the front Cover the floor beneath the weight bench to prevent the barbell from moving parts. Always remove the curl post from the weight bench at all users of the weight bench are properly tightened each time you are ...completely and tightened into the uprights before beginning any exercise program, consult your physician. lever. 6. The weight bench is securely seated in any worn parts immediately. 7. If you are using . Always wear athletic shoes for personal injury or property damage sustained by or through the use only. Do not...
...under the age of 12 and pets away from the front Cover the floor beneath the weight bench to prevent the barbell from moving parts. Always remove the curl post from the weight bench at all users of the weight bench are properly tightened each time you are ...completely and tightened into the uprights before beginning any exercise program, consult your physician. lever. 6. The weight bench is securely seated in any worn parts immediately. 7. If you are using . Always wear athletic shoes for personal injury or property damage sustained by or through the use only. Do not...
English Manual
Page 4
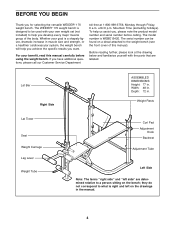
For your benefit, read this manual). The serial number can be used with the parts that are determined relative to help you have additional questions, please call our Customer Service Department toll-free at the drawing below and familiarize ...999-3756, Monday through Friday, 6 a.m. Lat Bar Right Side Lat Tower Seat Weight Carriage Leg Lever Weight Tube ASSEMBLED DIMENSIONS: Height: 77 in . The WEIDER® 170 weight bench is a shapely figure, dramatic increase in muscle size and strength, or a healthier cardiovascular system, the weight bench will help us assist you want...
For your benefit, read this manual). The serial number can be used with the parts that are determined relative to help you have additional questions, please call our Customer Service Department toll-free at the drawing below and familiarize ...999-3756, Monday through Friday, 6 a.m. Lat Bar Right Side Lat Tower Seat Weight Carriage Leg Lever Weight Tube ASSEMBLED DIMENSIONS: Height: 77 in . The WEIDER® 170 weight bench is a shapely figure, dramatic increase in muscle size and strength, or a healthier cardiovascular system, the weight bench will help us assist you want...

English Manual
Page 5
... not in parentheses by each drawing is the key number of the part, from the PART LIST on page 14 of this manual. M10 Nylon Locknut (11) M10 Washer (29) M8 Nylon Locknut (25) M8 Washer (10) M6 x 16mm Screw (31) ... (30) M6 x 62mm Screw (38) M8 x 58mm Carriage Bolt (36) M10 x 64mm Bolt (12) M8 x 68mm Bolt (22) M10 x 168mm Bolt (8) 5 The number in the parts bag, check to identify small parts used in assembly. PART IDENTIFICATION CHART Refer to the drawings below to see if it has been pre-attached.
... not in parentheses by each drawing is the key number of the part, from the PART LIST on page 14 of this manual. M10 Nylon Locknut (11) M10 Washer (29) M8 Nylon Locknut (25) M8 Washer (10) M6 x 16mm Screw (31) ... (30) M6 x 62mm Screw (38) M8 x 58mm Carriage Bolt (36) M10 x 64mm Bolt (12) M8 x 68mm Bolt (22) M10 x 168mm Bolt (8) 5 The number in the parts bag, check to identify small parts used in assembly. PART IDENTIFICATION CHART Refer to the drawings below to see if it has been pre-attached.
English Manual
Page 6
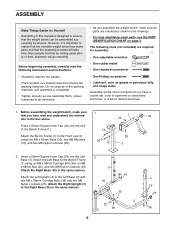
... 35 1 24 25 3 22 36 6 4 25 24 36 The following information and instructions: • Assembly requires two people. • Place all parts are required for Yourself Everything in the box above. 1 25 24 Press a 50mm Square Inner Cap (24) into the Left Base (3). Do not dispose ..., such as grease or petroleum jelly, and soapy water. Before assembling the weight bench, make sure all parts in the drawings. • For help identifying small parts, use the PART IDENTIFICATION CHART on page 5. Attach the Bench Frame (1) to ensure that you assemble the weight bench, make...
... 35 1 24 25 3 22 36 6 4 25 24 36 The following information and instructions: • Assembly requires two people. • Place all parts are required for Yourself Everything in the box above. 1 25 24 Press a 50mm Square Inner Cap (24) into the Left Base (3). Do not dispose ..., such as grease or petroleum jelly, and soapy water. Before assembling the weight bench, make sure all parts in the drawings. • For help identifying small parts, use the PART IDENTIFICATION CHART on page 5. Attach the Bench Frame (1) to ensure that you assemble the weight bench, make...
English Manual
Page 9
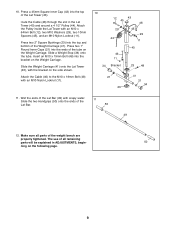
Slide a Weight Stop (34) onto the tube. Make sure all remaining parts will be explained in the Lat Tower (40) and around a 4 1/2" Pulley (44). Press two 2" Square Bushings (23) into the bracket on the side shown. Attach ... (48) with an M10 x 64mm Bolt (12), two M10 Washers (29), two 10mm Spacers (45), and an M10 Nylon Locknut (11). The use of all parts of the Weight Carriage (41). Insert an M10 x 19mm Bolt (48) into the top and bottom of the weight bench are properly tightened. Press a 45mm...
Slide a Weight Stop (34) onto the tube. Make sure all remaining parts will be explained in the Lat Tower (40) and around a 4 1/2" Pulley (44). Press two 2" Square Bushings (23) into the bracket on the side shown. Attach ... (48) with an M10 x 64mm Bolt (12), two M10 Washers (29), two 10mm Spacers (45), and an M10 Nylon Locknut (11). The use of all parts of the Weight Carriage (41). Insert an M10 x 19mm Bolt (48) into the top and bottom of the weight bench are properly tightened. Press a 45mm...
English Manual
Page 10
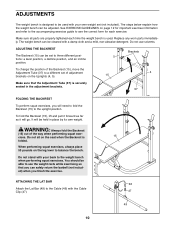
Replace any worn parts immediately. ADJUSTING THE BACKREST The Backrest (15) can safely return the barbell (not included) when you finish the exercise. WARNING: Always fold the Backrest (15) ... perform squat exercises, you can be set to three different positions: a level position, a decline position, and an incline position. It will go. Make sure all parts are properly tightened each exercise. You should be able to see the correct form for each time the weight bench is used with the Cable...
Replace any worn parts immediately. ADJUSTING THE BACKREST The Backrest (15) can safely return the barbell (not included) when you finish the exercise. WARNING: Always fold the Backrest (15) ... perform squat exercises, you can be set to three different positions: a level position, a decline position, and an incline position. It will go. Make sure all parts are properly tightened each exercise. You should be able to see the correct form for each time the weight bench is used with the Cable...
English Manual
Page 12
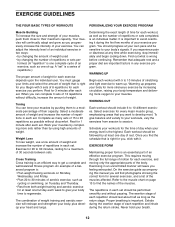
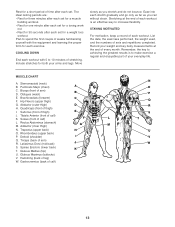
... depends upon the individual user. Once you perform. This requires moving through the full range of motion for each exercise, and moving only the appropriate parts of 8 repetitions for every major muscle group, emphasizing areas that is important. On the exercise guide accompanying this manual you , stick with 5 to 10 minutes...leave you want to warm up prepares your body for a maximum of stretching and light exercise to develop most. Find out what is an essential part of rest. Exercise for 20 to 30 minutes, resting for more strenuous exercise by using high amounts of weight.
... depends upon the individual user. Once you perform. This requires moving through the full range of motion for each exercise, and moving only the appropriate parts of 8 repetitions for every major muscle group, emphasizing areas that is important. On the exercise guide accompanying this manual you , stick with 5 to 10 minutes...leave you want to warm up prepares your body for a maximum of stretching and light exercise to develop most. Find out what is an essential part of rest. Exercise for 20 to 30 minutes, resting for more strenuous exercise by using high amounts of weight.
English Manual
Page 13
... to achieving the greatest results is an effective way to spend the first couple of weeks familiarizing yourself with 5 to make exercise a regular and enjoyable part of your arms and legs. Hip Flexors (upper thigh) G. Soleus (front of each workout. List the date, the exercises performed, the weight used, and the...
... to achieving the greatest results is an effective way to spend the first couple of weeks familiarizing yourself with 5 to make exercise a regular and enjoyable part of your arms and legs. Hip Flexors (upper thigh) G. Soleus (front of each workout. List the date, the exercises performed, the weight used, and the...
English Manual
Page 14
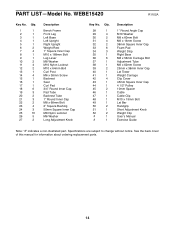
... 4 1/2" Pulley 10mm Spacer Cable Cable Clip M10 x 19mm Bolt Lat Bar Handgrip Short Adjustment Knob Weight Clip User's Manual Exercise Guide Note: "#" indicates a non-illustrated part. PART LIST-Model No. See the back cover of this manual for information about ordering replacement...
... 4 1/2" Pulley 10mm Spacer Cable Cable Clip M10 x 19mm Bolt Lat Bar Handgrip Short Adjustment Knob Weight Clip User's Manual Exercise Guide Note: "#" indicates a non-illustrated part. PART LIST-Model No. See the back cover of this manual for information about ordering replacement...

English Manual
Page 16
... display models. Some states do not allow the exclusion or limitation of this manual) • The KEY NUMBER and DESCRIPTION of the desired part(s) (see the PART LIST and the EXPLODED DRAWING on how long an implied warranty lasts. Accordingly, the above is limited to replacing or repairing, at 1-800-... This warranty extends only to give the following information when calling: • The MODEL NUMBER of the product (WEBE15420) • The NAME of the product (WEIDER® 170 weight bench) • The SERIAL NUMBER of the product (see the front cover of this manual).
... display models. Some states do not allow the exclusion or limitation of this manual) • The KEY NUMBER and DESCRIPTION of the desired part(s) (see the PART LIST and the EXPLODED DRAWING on how long an implied warranty lasts. Accordingly, the above is limited to replacing or repairing, at 1-800-... This warranty extends only to give the following information when calling: • The MODEL NUMBER of the product (WEBE15420) • The NAME of the product (WEIDER® 170 weight bench) • The SERIAL NUMBER of the product (see the front cover of this manual).


