User Manual
Page 1
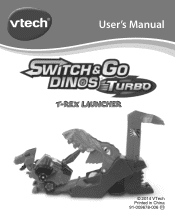
User's Manual T-REX LAUNCHER © 2014 VTech Printed in China 91-009678-006 US
User's Manual T-REX LAUNCHER © 2014 VTech Printed in China 91-009678-006 US
User Manual
Page 2
... a few easy steps. You can help me ! Switch & Go Dinos® are a special breed of the Switch & Go Dinos® crew (each sold separately)! Use the T-Rex Launcher to love playing with me do some dino switchin', road racin' fun! Maybe you know, I go! Try pushing me on a "dino-mite" adventure with me you and am part of the VTech® Switch & Go Dinos® Turbo crew! Just so you 'll even learn a thing...
... a few easy steps. You can help me ! Switch & Go Dinos® are a special breed of the Switch & Go Dinos® crew (each sold separately)! Use the T-Rex Launcher to love playing with me do some dino switchin', road racin' fun! Maybe you know, I go! Try pushing me on a "dino-mite" adventure with me you and am part of the VTech® Switch & Go Dinos® Turbo crew! Just so you 'll even learn a thing...
User Manual
Page 3
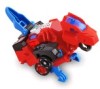
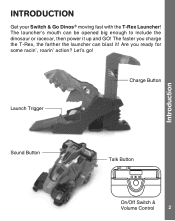
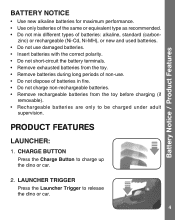
Let's go! The faster you ready for some racin', roarin' action? Are you charge the T-Rex, the farther the launcher can be opened big enough to include the dinosaur or racecar, then power it ! Launch Trigger Charge Button Introduction Sound Button Talk Button On/Off Switch & Volume Control 2 The launcher's mouth can blast it up and GO! INTRODUCTION Get your Switch & Go Dinos® moving fast with the T-Rex Launcher!
Let's go! The faster you ready for some racin', roarin' action? Are you charge the T-Rex, the farther the launcher can be opened big enough to include the dinosaur or racecar, then power it ! Launch Trigger Charge Button Introduction Sound Button Talk Button On/Off Switch & Volume Control 2 The launcher's mouth can blast it up and GO! INTRODUCTION Get your Switch & Go Dinos® moving fast with the T-Rex Launcher!
User Manual
Page 4
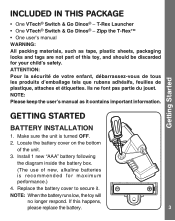
... part of this happens, please replace the battery. 3 Zipp the T-Rex™ • One user's manual WARNING: All packing materials, such as it . Getting Started GETTING STARTED BATTERY INSTALLATION 1. Make sure the unit is recommended for your child's safety. Install 1 new "AAA" battery following the diagram inside the battery box. (The use of the unit. 3. NOTE: When the battery runs low, the toy will no longer respond. T-Rex Launcher • One VTech® Switch & Go Dinos...
... part of this happens, please replace the battery. 3 Zipp the T-Rex™ • One user's manual WARNING: All packing materials, such as it . Getting Started GETTING STARTED BATTERY INSTALLATION 1. Make sure the unit is recommended for your child's safety. Install 1 new "AAA" battery following the diagram inside the battery box. (The use of the unit. 3. NOTE: When the battery runs low, the toy will no longer respond. T-Rex Launcher • One VTech® Switch & Go Dinos...
User Manual
Page 5
CHARGE BUTTON Press the Charge Button to release the dino or car. 4 zinc) or rechargeable (Ni-Cd, Ni-MH), or new and used batteries. • Do not use damaged batteries. • Insert batteries with the correct polarity. • Do not short-circuit the battery terminals. • Remove exhausted batteries from the toy. • Remove batteries during long periods of non-use. • Do not dispose of batteries: alkaline, standard...
CHARGE BUTTON Press the Charge Button to release the dino or car. 4 zinc) or rechargeable (Ni-Cd, Ni-MH), or new and used batteries. • Do not use damaged batteries. • Insert batteries with the correct polarity. • Do not short-circuit the battery terminals. • Remove exhausted batteries from the toy. • Remove batteries during long periods of non-use. • Do not dispose of batteries: alkaline, standard...

User Manual
Page 6
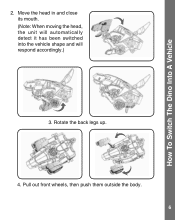
To turn the unit ON or adjust the volume, slide the switch to Low/High. TALK BUTTON Press the Talk Button to hear cool sound effects. 4. SOUND BUTTON Press the Sound Button to hear the dino or driver talk. 3. HOW TO SWITCH THE DINO INTO A VEHICLE 1. Dino shape. 5 AUTOMATIC SLEEP MODE To preserve battery life, the unit will automatically enter sleep mode if there's no input. To turn the unit OFF, slide the switch to Switch ZIPP THE T-REX: 1. Product Features / How...
To turn the unit ON or adjust the volume, slide the switch to Low/High. TALK BUTTON Press the Talk Button to hear cool sound effects. 4. SOUND BUTTON Press the Sound Button to hear the dino or driver talk. 3. HOW TO SWITCH THE DINO INTO A VEHICLE 1. Dino shape. 5 AUTOMATIC SLEEP MODE To preserve battery life, the unit will automatically enter sleep mode if there's no input. To turn the unit OFF, slide the switch to Switch ZIPP THE T-REX: 1. Product Features / How...
User Manual
Page 7
Rotate the back legs up. 4. Pull out front wheels, then push them outside the body. 6 How To Switch The Dino Into A Vehicle 2. Move the head in and close its mouth. (Note: When moving the head, the unit will automatically detect it has been switched into the vehicle shape and will respond accordingly.) 3.
Rotate the back legs up. 4. Pull out front wheels, then push them outside the body. 6 How To Switch The Dino Into A Vehicle 2. Move the head in and close its mouth. (Note: When moving the head, the unit will automatically detect it has been switched into the vehicle shape and will respond accordingly.) 3.
User Manual
Page 8
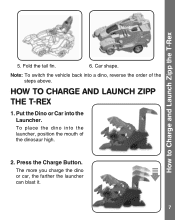
HOW TO CHARGE AND LAUNCH ZIPP THE T-REX 1. The more you charge the dino or car, the farther the launcher can blast it. 7 Car shape. To place the dino into the launcher, position the mouth of the steps above. Fold the tail fin. 6. Press the Charge Button. How to Charge and Launch Zipp the T-Rex 5. Put the Dino or Car into a dino, reverse the order of the dinosaur high. 2. Note: To switch the vehicle back into the Launcher.
HOW TO CHARGE AND LAUNCH ZIPP THE T-REX 1. The more you charge the dino or car, the farther the launcher can blast it. 7 Car shape. To place the dino into the launcher, position the mouth of the steps above. Fold the tail fin. 6. Press the Charge Button. How to Charge and Launch Zipp the T-Rex 5. Put the Dino or Car into a dino, reverse the order of the dinosaur high. 2. Note: To switch the vehicle back into the Launcher.
User Manual
Page 9
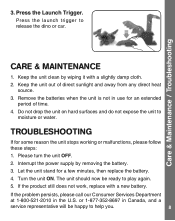
... time. 4. Turn the unit ON. Do not drop the unit on hard surfaces and do not expose the unit to release the dino or car. Remove the batteries when the unit is not in use for a few minutes, then replace the battery. 4. Interrupt the power supply by wiping it with a new battery. 3. Let the unit stand for an extended period of direct sunlight and away from any direct heat source. 3. TROUBLESHOOTING...
... time. 4. Turn the unit ON. Do not drop the unit on hard surfaces and do not expose the unit to release the dino or car. Remove the batteries when the unit is not in use for a few minutes, then replace the battery. 4. Interrupt the power supply by wiping it with a new battery. 3. Let the unit stand for an extended period of direct sunlight and away from any direct heat source. 3. TROUBLESHOOTING...
User Manual
Page 10
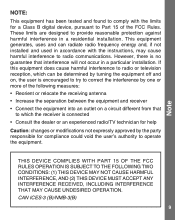
... the instructions, may cause harmful interference to radio communications. However, there is connected • Consult the dealer or an experienced radio/TV technician for help Caution: changes or modifications not expressly approved by the party responsible for compliance could void the user's authority to which can radiate radio frequency energy and, if not installed and used in...
... the instructions, may cause harmful interference to radio communications. However, there is connected • Consult the dealer or an experienced radio/TV technician for help Caution: changes or modifications not expressly approved by the party responsible for compliance could void the user's authority to which can radiate radio frequency energy and, if not installed and used in...

