User Manual
Page 3
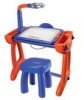
... Port to PC (In the back) Power On/Off Button PC Cable Port to a PC. The KidiArt StudioTM is a unique interactive creative platform designed especially for purchasing the VTech® KidiArt StudioTM! With a kid-friendly rotating camera, an interactive pen, and a removable, touch-sensitive art pad...family! INTRODUCTION Thank you for younger children. With the KidiArt StudioTM, children can take off on the TV, and for an extra bonus, kids can even send their masterpieces by connecting the studio to TV Cartridge Slot TV Cable Adaptor Jack Rotating Camera Table Exit ...
... Port to PC (In the back) Power On/Off Button PC Cable Port to a PC. The KidiArt StudioTM is a unique interactive creative platform designed especially for purchasing the VTech® KidiArt StudioTM! With a kid-friendly rotating camera, an interactive pen, and a removable, touch-sensitive art pad...family! INTRODUCTION Thank you for younger children. With the KidiArt StudioTM, children can take off on the TV, and for an extra bonus, kids can even send their masterpieces by connecting the studio to TV Cartridge Slot TV Cable Adaptor Jack Rotating Camera Table Exit ...
User Manual
Page 5
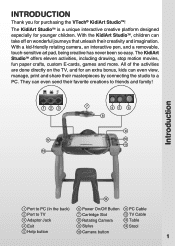
...toy and should be discarded for the art pad and stool • PC USB connection cable • TV connection cable • Game cartridge --- Locate the correct battery cover on the bottom of batteries at the same time. Remember to be lost. 2. GETTING STARTED BATTERY INSTALLATION... art pad and a touch sensitive pen. • Desk Stand for your artwork to the computer by connecting the VTech® KidiArt StudioTM main unit to the PC before the batteries run out. 3 KidiArt StudioTM • CD-ROM --- Included In This Package & Getting Started INCLUDED IN THIS PACKAGE •...
...toy and should be discarded for the art pad and stool • PC USB connection cable • TV connection cable • Game cartridge --- Locate the correct battery cover on the bottom of batteries at the same time. Remember to be lost. 2. GETTING STARTED BATTERY INSTALLATION... art pad and a touch sensitive pen. • Desk Stand for your artwork to the computer by connecting the VTech® KidiArt StudioTM main unit to the PC before the batteries run out. 3 KidiArt StudioTM • CD-ROM --- Included In This Package & Getting Started INCLUDED IN THIS PACKAGE •...

User Manual
Page 6
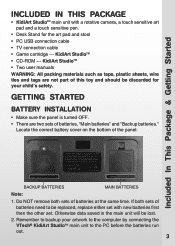
... used . Please note: To prevent data loss, copy all photos and movies from KidiArt Studio™ to turn the unit OFF. Press this button to a PC before inserting or removing a game cartridge. WE DO NOT RECOMMEND THE USE OF RECHARGEABLE BATTERIES. Always do this before removing ...batteries. • Always remove exhausted batteries from the equipment when the unit will switch off to the KidiArt StudioTM for several minutes, the unit ...
... used . Please note: To prevent data loss, copy all photos and movies from KidiArt Studio™ to turn the unit OFF. Press this button to a PC before inserting or removing a game cartridge. WE DO NOT RECOMMEND THE USE OF RECHARGEABLE BATTERIES. Always do this before removing ...batteries. • Always remove exhausted batteries from the equipment when the unit will switch off to the KidiArt StudioTM for several minutes, the unit ...

User Manual
Page 7
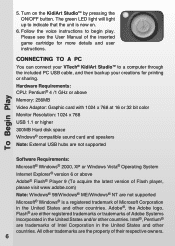
...through the included A/V cable. 1. It can play your TV. 4. The game cartridge should lock into the cartridge slot on graphics content. Note: Actual numbers may vary depending on the top of the A/V cable to your VTech® KidiArt StudioTM main unit. 5 Make sure the main unit is shared for all... cartridges as artwork storage. TO BEGIN PLAY CONNECT TO A TV You can store approximately 25 pictures or 5...
...through the included A/V cable. 1. It can play your TV. 4. The game cartridge should lock into the cartridge slot on graphics content. Note: Actual numbers may vary depending on the top of the A/V cable to your VTech® KidiArt StudioTM main unit. 5 Make sure the main unit is shared for all... cartridges as artwork storage. TO BEGIN PLAY CONNECT TO A TV You can store approximately 25 pictures or 5...
User Manual
Page 8
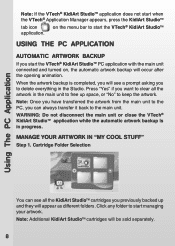
...The green LED light will light up to a computer through the included PC USB cable, and then backup your VTech® KidiArt StudioTM to indicate that the unit is a registered trademark of Microsoft Corporation in the United States and other countries.... and/or other countries. All other trademarks are not supported Microsoft® Windows® is now on the KidiArt StudioTM by pressing the ON/OFF button. Follow the voice instructions to begin play. Please see the User Manual...Windows® ME/Windows® NT are the property of the inserted game cartridge for printing or sharing.
...The green LED light will light up to a computer through the included PC USB cable, and then backup your VTech® KidiArt StudioTM to indicate that the unit is a registered trademark of Microsoft Corporation in the United States and other countries.... and/or other countries. All other trademarks are not supported Microsoft® Windows® is now on the KidiArt StudioTM by pressing the ON/OFF button. Follow the voice instructions to begin play. Please see the User Manual...Windows® ME/Windows® NT are the property of the inserted game cartridge for printing or sharing.
User Manual
Page 10
..." to start managing your artwork. Note: Additional KidiArt StudioTM cartridges will occur after the opening animation. Press "Yes" if you to the main unit. Manage Your Artwork in the Studio. Click any folder to keep the artwork. Cartridge Folder Selection You can always transfer it back to... delete everything in "My Cool Stuff" Step 1. on the menu bar to start the VTech® KidiArt StudioTM USING THE PC APPLICATION Automatic...
..." to start managing your artwork. Note: Additional KidiArt StudioTM cartridges will occur after the opening animation. Press "Yes" if you to the main unit. Manage Your Artwork in the Studio. Click any folder to keep the artwork. Cartridge Folder Selection You can always transfer it back to... delete everything in "My Cool Stuff" Step 1. on the menu bar to start the VTech® KidiArt StudioTM USING THE PC APPLICATION Automatic...

User Manual
Page 11
...to your friends. From here, you will be shown if that artwork. A checkmark will have to insert the correct cartridge to use the shared files, please go to the Cartridge Selection Screen. I. To use the artwork in TV mode. 2. Step 2. Press to your selected artwork by clicking... on any time, or send it on your PC. Note: 1. If you send the artwork without inserting the correct cartridge, you can switch from your PC to share your Studio....
...to your friends. From here, you will be shown if that artwork. A checkmark will have to insert the correct cartridge to use the shared files, please go to the Cartridge Selection Screen. I. To use the artwork in TV mode. 2. Step 2. Press to your selected artwork by clicking... on any time, or send it on your PC. Note: 1. If you send the artwork without inserting the correct cartridge, you can switch from your PC to share your Studio....

User Manual
Page 14
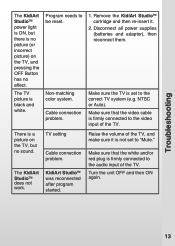
... or missing power connection. Program needs to "video" mode. Check that matches the video port connected to the KidiArt StudioTM main unit. Remove the KidiArt StudioTM Cartridge and then re-insert it. Incorrect TV connection. Incorrect TV mode selected. please make sure you have several video... properly connected to the main unit. 1. TROUBLESHOOTING Connected to a TV Problem Possible Reason Solution The KidiArt StudioTM power light does not come on the screen. The KidiArt StudioTM power light is ON, but there is no picture on when the ON Button is set to...
... or missing power connection. Program needs to "video" mode. Check that matches the video port connected to the KidiArt StudioTM main unit. Remove the KidiArt StudioTM Cartridge and then re-insert it. Incorrect TV connection. Incorrect TV mode selected. please make sure you have several video... properly connected to the main unit. 1. TROUBLESHOOTING Connected to a TV Problem Possible Reason Solution The KidiArt StudioTM power light does not come on the screen. The KidiArt StudioTM power light is ON, but there is no picture on when the ON Button is set to...
User Manual
Page 15
... power light is ON, but no sound. Disconnect all power supplies (batteries and adaptor), then reconnect them. KidiArt StudioTM was reconnected after program started. Make sure that the video cable is set to "Mute." The TV picture is no effect. Make sure that...system (e.g. Non-matching color system. Make sure the TV is firmly connected to the audio input of the TV. The KidiArt StudioTM does not work. Cable connection problem. 1. Remove the KidiArt StudioTM cartridge and then re-insert it is a picture on the TV, and pressing the OFF Button has no picture (or incorrect...
... power light is ON, but no sound. Disconnect all power supplies (batteries and adaptor), then reconnect them. KidiArt StudioTM was reconnected after program started. Make sure that the video cable is set to "Mute." The TV picture is no effect. Make sure that...system (e.g. Non-matching color system. Make sure the TV is firmly connected to the audio input of the TV. The KidiArt StudioTM does not work. Cable connection problem. 1. Remove the KidiArt StudioTM cartridge and then re-insert it is a picture on the TV, and pressing the OFF Button has no picture (or incorrect...
User Manual
Page 17
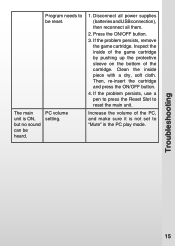
... the ON/OFF button. 3. Inspect the inside piece with a dry, soft cloth. Then, re-insert the cartridge and press the ON/OFF button. 4. The main unit is not set to reset the main unit. PC volume setting. 1. Disconnect all power supplies (batteries ...and USB connection), then reconnect all them. 2. If the problem persists, remove the game cartridge. If the problem persists, use a pen to press the Reset Slot to "Mute" in the PC play mode. Clean the inside of the game...
... the ON/OFF button. 3. Inspect the inside piece with a dry, soft cloth. Then, re-insert the cartridge and press the ON/OFF button. 4. The main unit is not set to reset the main unit. PC volume setting. 1. Disconnect all power supplies (batteries ...and USB connection), then reconnect all them. 2. If the problem persists, remove the game cartridge. If the problem persists, use a pen to press the Reset Slot to "Mute" in the PC play mode. Clean the inside of the game...

User Manual
Page 18
PC program installation problem. Program needs to reset the panel. 16 Make sure the KidiArt StudioTM program has been installed on the PC screen. Press the ON/OFF button. 5. If the problem persists, remove the game cartridge. Restart your computer and is running , or re-install it . If the problem persists, use a pen...
PC program installation problem. Program needs to reset the panel. 16 Make sure the KidiArt StudioTM program has been installed on the PC screen. Press the ON/OFF button. 5. If the problem persists, remove the game cartridge. Restart your computer and is running , or re-install it . If the problem persists, use a pen...

User Manual
Page 19
...The model number is on the back or bottom of your KidiArt StudioTM , please visit us online or contact our Consumer Services Department with a game cartridge inserted and connected to the PC, but user can't use the Studio The matching CDROM program has not been installed. If you ...wish to buy additional cartridges for your product.) • The actual problem you are experiencing....
...The model number is on the back or bottom of your KidiArt StudioTM , please visit us online or contact our Consumer Services Department with a game cartridge inserted and connected to the PC, but user can't use the Studio The matching CDROM program has not been installed. If you ...wish to buy additional cartridges for your product.) • The actual problem you are experiencing....


