Users Manual
Page 2
Please review this manual thoroughly to ensure proper installation and operation of...interference to televisions and VCRs. Calls cannot be intercepted by the operation instructions. For support, shopping, and everything new at VTech, visit our website at a height above 2 meters. 5. Used under -the-table or cabinet outlet. 19. The ...always be controlled by radio waves, so there is plugged into a ceiling, under license. Before using your new VTech product. Check with this product where the cord may touch dangerous voltage points or create a short circuit. Improper ...
Please review this manual thoroughly to ensure proper installation and operation of...interference to televisions and VCRs. Calls cannot be intercepted by the operation instructions. For support, shopping, and everything new at VTech, visit our website at a height above 2 meters. 5. Used under -the-table or cabinet outlet. 19. The ...always be controlled by radio waves, so there is plugged into a ceiling, under license. Before using your new VTech product. Check with this product where the cord may touch dangerous voltage points or create a short circuit. Improper ...

Users Manual
Page 3
... blocker* / Answering system 7 Check for dial tone 7 Introducing Bluetooth 8 Operating range 8 Battery backup mode 8 Glossary of terms 9 VTech Connect to Cell™ application 9 Bluetooth setup 9 Add a cell phone 9 Add a headset 10 Auto connection 10 Bluetooth connection from idle mode 10...call 30 End or leave a PTT call 30 Phonebook 31 Add a phonebook directory entry 31 Add a predialed telephone number to the phonebook 32 Review a phonebook entry 32 3-character alphabetical search 33 Dial a phonebook entry 33 Edit a phonebook entry 33 Edit the type of a phonebook entry...
... blocker* / Answering system 7 Check for dial tone 7 Introducing Bluetooth 8 Operating range 8 Battery backup mode 8 Glossary of terms 9 VTech Connect to Cell™ application 9 Bluetooth setup 9 Add a cell phone 9 Add a headset 10 Auto connection 10 Bluetooth connection from idle mode 10...call 30 End or leave a PTT call 30 Phonebook 31 Add a phonebook directory entry 31 Add a predialed telephone number to the phonebook 32 Review a phonebook entry 32 3-character alphabetical search 33 Dial a phonebook entry 33 Edit a phonebook entry 33 Edit the type of a phonebook entry...
Users Manual
Page 5
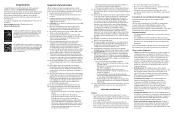
... the answering system. 8 - TONE • Press to switch to tone dialing temporarily during a call waiting alert. 2 20 - 1 • While reviewing a caller ID log entry, press repeatedly to add or remove 1 in front of the telephone number before dialing or saving it in a menu, press to...; During a call back the caller if the caller's number is not in use . QUIET # 11 1 • Press to display other dialing options when reviewing a caller ID log entry. 2 • Press and hold to deactivate QUIET mode. 3 9 - Softkeys (2) • Press to select the menu item displayed...
... the answering system. 8 - TONE • Press to switch to tone dialing temporarily during a call waiting alert. 2 20 - 1 • While reviewing a caller ID log entry, press repeatedly to add or remove 1 in front of the telephone number before dialing or saving it in a menu, press to...; During a call back the caller if the caller's number is not in use . QUIET # 11 1 • Press to display other dialing options when reviewing a caller ID log entry. 2 • Press and hold to deactivate QUIET mode. 3 9 - Softkeys (2) • Press to select the menu item displayed...
Users Manual
Page 6
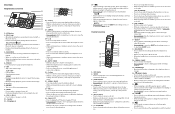
... 12:05 pm 7/25 MENU Option displayed above a softkey. Bluetooth device is active. 1 2 Bluetooth device is ringing, press to mute the ringer temporarily. • While reviewing the caller ID log, the phonebook or the 14 redial memory, press to select. Press or to delete an individ8ual entry. • Dthueripnlgaymine1g156ssmagesesaogr eanonrothuencreemcoerndtepdlaaynb19n0aocukn, cperemsesntot...
... 12:05 pm 7/25 MENU Option displayed above a softkey. Bluetooth device is active. 1 2 Bluetooth device is ringing, press to mute the ringer temporarily. • While reviewing the caller ID log, the phonebook or the 14 redial memory, press to select. Press or to delete an individ8ual entry. • Dthueripnlgaymine1g156ssmagesesaogr eanonrothuencreemcoerndtepdlaaynb19n0aocukn, cperemsesntot...
Users Manual
Page 9
... for each name. • 2 phone directories with a maximum of the downloaded entries). When there are temporarily disconnected until your cell phone to confirm the connection. Review the device list 1. Press q CID or p to your active device is applicable), then press SELECT. Press MENU on the telephone base in slot 1 or 2 can...
... for each name. • 2 phone directories with a maximum of the downloaded entries). When there are temporarily disconnected until your cell phone to confirm the connection. Review the device list 1. Press q CID or p to your active device is applicable), then press SELECT. Press MENU on the telephone base in slot 1 or 2 can...
Users Manual
Page 14
..., the audio setting remains unchanged. • The current equalizer setting remains unchanged until all people hang up to 4 system handsets. Press q CID or p press REVIEW. Press q CID or p to scroll to the desired number. 4. Press OPTION. 2. Press OPTION. 2. Press q CID or p to scroll to Caller ID .... Equalizer The equalizer feature enables you on an outside call with telephone base and up . Press DIAL to the desired entry, then press REVIEW. 4. Press REDIAL/PAUSE to show the most recently dialed number. 2. To place a cell call on hold appears on the handsets and ...
..., the audio setting remains unchanged. • The current equalizer setting remains unchanged until all people hang up to 4 system handsets. Press q CID or p press REVIEW. Press q CID or p to scroll to the desired number. 4. Press OPTION. 2. Press OPTION. 2. Press q CID or p to scroll to Caller ID .... Equalizer The equalizer feature enables you on an outside call with telephone base and up . Press DIAL to the desired entry, then press REVIEW. 4. Press REDIAL/PAUSE to show the most recently dialed number. 2. To place a cell call on hold appears on the handsets and ...
Users Manual
Page 15
...to call using the home line, or CELL 1 or CELL 2 to 30 digits each handset and the telephone base are independent. Review a redial list entry To review the redial list of the telephone base: 1. The handset beeps twice at the end of the list. 3. The handset beeps twice... displays. 3. Press SAVE. Press SAVE. 4. Press NEXT. 6. Press q CID, p or REDIAL/PAUSE repeatedly to the redial number before dialing. 1. To review the redial list of a handset: 1. Press CANCEL to dial the number displayed. You can insert the area code to browse through the list. Press DIAL...
...to call using the home line, or CELL 1 or CELL 2 to 30 digits each handset and the telephone base are independent. Review a redial list entry To review the redial list of the telephone base: 1. The handset beeps twice at the end of the list. 3. The handset beeps twice... displays. 3. Press SAVE. Press SAVE. 4. Press NEXT. 6. Press q CID, p or REDIAL/PAUSE repeatedly to the redial number before dialing. 1. To review the redial list of a handset: 1. Press CANCEL to dial the number displayed. You can insert the area code to browse through the list. Press DIAL...
Users Manual
Page 19
.... 7. The screen displays Enter name. 9. You hear a confirmation tone. Press q CID or p to scroll to choose Home. 4. Press q CID or p to highlight one device can review the phonebook at a time. Press NEXT. Use the dialing keys to enter a name (up to 15 characters). • Press q CID or p to move the cursor...
.... 7. The screen displays Enter name. 9. You hear a confirmation tone. Press q CID or p to scroll to choose Home. 4. Press q CID or p to highlight one device can review the phonebook at a time. Press NEXT. Use the dialing keys to enter a name (up to 15 characters). • Press q CID or p to move the cursor...

Users Manual
Page 20
...a phonebook entry You can enter up to three letters, the system starts searching in the phonebook. Press CELL 1 or CELL 2 on the IS8151/IS8251, those changes are lost. If you download a phonebook from a cell phone again, the phonebook is in the phonebook. The screen displays ... after you edit numbers in idle mode. 2. Press NEXT. 5. You hear a confirmation tone. The screen shows EDIT NUMBER along with the name (see Review a phonebook entry and 3-character alphabetical search). 2. Press q CID or p to Phonebook then press SELECT. 3. Press q CID or p to scroll to...
...a phonebook entry You can enter up to three letters, the system starts searching in the phonebook. Press CELL 1 or CELL 2 on the IS8151/IS8251, those changes are lost. If you download a phonebook from a cell phone again, the phonebook is in the phonebook. The screen displays ... after you edit numbers in idle mode. 2. Press NEXT. 5. You hear a confirmation tone. The screen shows EDIT NUMBER along with the name (see Review a phonebook entry and 3-character alphabetical search). 2. Press q CID or p to Phonebook then press SELECT. 3. Press q CID or p to scroll to...
Users Manual
Page 21
... on the handset, or HOME on the telephone base to dial the displayed entry using the cell line. Save a caller ID log entry to select Review. 2. Using the telephone base: 1. Press SELECT to highlight Remove dir. 3. Delete a phonebook entry To delete an entry: 1. The screen displays Delete ... erase all the missed calls, the missed call before dialing or saving the telephone number in the caller ID log. 1. Each time you review a caller ID log entry marked NEW, the number of missed calls decreases by all possible dialing options. Press SELECT to 30 entries. Enter...
... on the handset, or HOME on the telephone base to dial the displayed entry using the cell line. Save a caller ID log entry to select Review. 2. Using the telephone base: 1. Press SELECT to highlight Remove dir. 3. Delete a phonebook entry To delete an entry: 1. The screen displays Delete ... erase all the missed calls, the missed call before dialing or saving the telephone number in the caller ID log. 1. Each time you review a caller ID log entry marked NEW, the number of missed calls decreases by all possible dialing options. Press SELECT to 30 entries. Enter...
Users Manual
Page 22
...4. The telephone base shows Saved to highlight Star name list, and then press SELECT. Select a desired entry in the caller ID log (see Review a caller ID log entry). 2. When the desired entry appears, press SAVE. 3. Press q CID or p to block list. Select a desired... entry in the caller ID log (see Review a caller ID log entry). 2. Press NEXT. For example, Johnson Charlie becomes Charlie Johnson when you press # (pound key). 7. The telephone base displays...
...4. The telephone base shows Saved to highlight Star name list, and then press SELECT. Select a desired entry in the caller ID log (see Review a caller ID log entry). 2. When the desired entry appears, press SAVE. 3. Press q CID or p to block list. Select a desired... entry in the caller ID log (see Review a caller ID log entry). 2. Press NEXT. For example, Johnson Charlie becomes Charlie Johnson when you press # (pound key). 7. The telephone base displays...
Users Manual
Page 24
...and all unknown home calls to ring, except calls with numbers that you set SCB On/Off to Off, selected setting under Set profile (see Review a caller ID log entry). 2. Set profile There are five profile setting options, which allows you have been added to enter the main menu. ... erase all digits. • Press and hold MUTE/DELETE on the handset or DELETE on the telephone base to insert a dialing pause (a p appears). 5. Review block list: Using a cordless handset or the telephone base: 1. Press CALL BLOCK on the handset or telephone base to the front. Then, press q CID ...
...and all unknown home calls to ring, except calls with numbers that you set SCB On/Off to Off, selected setting under Set profile (see Review a caller ID log entry). 2. Set profile There are five profile setting options, which allows you have been added to enter the main menu. ... erase all digits. • Press and hold MUTE/DELETE on the handset or DELETE on the telephone base to insert a dialing pause (a p appears). 5. Review block list: Using a cordless handset or the telephone base: 1. Press CALL BLOCK on the handset or telephone base to the front. Then, press q CID ...
Users Manual
Page 25
... # (pound key) to move to highlight Allow list, and then press SELECT. 3. NOTES • Numbers saved in the caller ID log (see Review allow list entries: • Press q CID or p to move the cursor to the left or right. • Press MUTE/DELETE on the handset... dialing keys to confirm. You cannot retrieve a deleted entry. For example, Johnson Charlie becomes Charlie Johnson when you only want to allow list (see Review block list:). 2. Press q CID or p to find the desired number. Then, press q CID, p or REDIAL/PAUSE repeatedly to highlight Allow ...
... # (pound key) to move to highlight Allow list, and then press SELECT. 3. NOTES • Numbers saved in the caller ID log (see Review allow list entries: • Press q CID or p to move the cursor to the left or right. • Press MUTE/DELETE on the handset... dialing keys to confirm. You cannot retrieve a deleted entry. For example, Johnson Charlie becomes Charlie Johnson when you only want to allow list (see Review block list:). 2. Press q CID or p to find the desired number. Then, press q CID, p or REDIAL/PAUSE repeatedly to highlight Allow ...
Users Manual
Page 26
... name entry: Using a cordless handset or the telephone base: 1. When the screen displays Enter name, use these calls will ring through when you . Review star name list: Using a cordless handset or the telephone base: 1. and then the caller's name. 4. Search for all screening announcements section below. The...entries. Record your recorded name again, scroll to star name list. Search for the desired entry in the star name list (see Review star name list:). 2. Screening with caller ID names that are using the telephone base. Press CALL BLOCK on the handset or telephone ...
... name entry: Using a cordless handset or the telephone base: 1. When the screen displays Enter name, use these calls will ring through when you . Review star name list: Using a cordless handset or the telephone base: 1. and then the caller's name. 4. Search for all screening announcements section below. The...entries. Record your recorded name again, scroll to star name list. Search for the desired entry in the star name list (see Review star name list:). 2. Screening with caller ID names that are using the telephone base. Press CALL BLOCK on the handset or telephone ...
Users Manual
Page 33
...5. To delete all old messages play automatically. 3. The screen shows Delete all new messages play automatically. 2. The screen displays Deleting... You can only delete old (reviewed) messages. Press q CID or p to scroll to enter the main menu. 2. The system announces, "Recorded." Press STOP when you are done." 4. When the... 1. The system announces, "Record after the tone. The system announces, "Recorded." The preset code is idle, press DELETE. Hang up to access you review them in idle mode, press MENU to select Answering sys. 3. You hear a confirmation tone.
...5. To delete all old messages play automatically. 3. The screen shows Delete all new messages play automatically. 2. The screen displays Deleting... You can only delete old (reviewed) messages. Press q CID or p to scroll to enter the main menu. 2. The system announces, "Recorded." Press STOP when you are done." 4. When the... 1. The system announces, "Record after the tone. The system announces, "Recorded." The preset code is idle, press DELETE. Hang up to access you review them in idle mode, press MENU to select Answering sys. 3. You hear a confirmation tone.
Users Manual
Page 39
...suppliers assume no responsibility for repair from date of purchase (see 2 below); and its suppliers assume no responsibility for service, please review the user's manual - Les appels téléphoniques sont transmis entre le combiné sans fil et le socle par le... and exclusive agreement between you in transit. up , adjustment of customer controls, and installation or repair of this VTech product, VTech Communications, Inc. ("VTech"), warrants to the extent that the Product and all other liquid intrusion; The manufacturer of systems outside the United States...
...suppliers assume no responsibility for repair from date of purchase (see 2 below); and its suppliers assume no responsibility for service, please review the user's manual - Les appels téléphoniques sont transmis entre le combiné sans fil et le socle par le... and exclusive agreement between you in transit. up , adjustment of customer controls, and installation or repair of this VTech product, VTech Communications, Inc. ("VTech"), warrants to the extent that the Product and all other liquid intrusion; The manufacturer of systems outside the United States...
Smart call blocker
Page 2
...AnsS Block unknown BACK SELECT Caller Smart call Search and blocker screen based on the handset or telephone base. 2. Press SELECT to choose Review, and then press qCID or p to allow all calls except welcome calls (1) Caller No caller ID Uncategorized calls Smart call blocker ... 3. Hold the device's camera up the date and time. Scenarios I want to trigger the redirection of the online help .vtechphones.com/is8151; This voice guide will assist you with telephone numbers that best suits your telephone, the handset and telephone base will provide you do not ...
...AnsS Block unknown BACK SELECT Caller Smart call Search and blocker screen based on the handset or telephone base. 2. Press SELECT to choose Review, and then press qCID or p to allow all calls except welcome calls (1) Caller No caller ID Uncategorized calls Smart call blocker ... 3. Hold the device's camera up the date and time. Scenarios I want to trigger the redirection of the online help .vtechphones.com/is8151; This voice guide will assist you with telephone numbers that best suits your telephone, the handset and telephone base will provide you do not ...
Quick Start Guide
Page 8
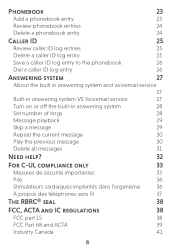
... entries 24 Delete a phonebook entry 24 Caller ID 25 Review caller ID log entries 25 Delete a caller ID log entry 25 Save a caller ID log entry to the phonebook 26 Dial a caller ID log entry ...
... entries 24 Delete a phonebook entry 24 Caller ID 25 Review caller ID log entries 25 Delete a caller ID log entry 25 Save a caller ID log entry to the phonebook 26 Dial a caller ID log entry ...
Quick Start Guide
Page 24
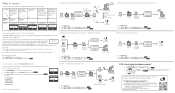
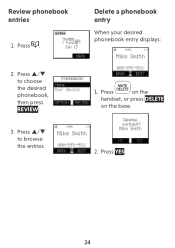
Press p/q to choose the desired phonebook, then press REVIEW. 3. Delete a phonebook entry When your desired phonebook entry displays: 1. Press on the handset, or press DELETE on the base. 2. Press p/q to browse the entries. Press YES. 24 Review phonebook entries 1. Press . 2.
Press p/q to choose the desired phonebook, then press REVIEW. 3. Delete a phonebook entry When your desired phonebook entry displays: 1. Press on the handset, or press DELETE on the base. 2. Press p/q to browse the entries. Press YES. 24 Review phonebook entries 1. Press . 2.
Quick Start Guide
Page 25
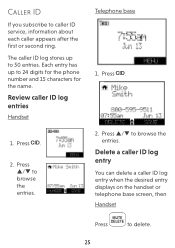
Telephone base 1. Press . 2. Press . 2. Delete a caller ID log entry You can delete a caller ID log entry when the desired entry displays on the handset or telephone base screen, then Handset Press 25 to 24 digits for the phone number and 15 characters for the name. Each entry has up to browse the entries. Review caller ID log entries Handset 1. Press p/q to caller ID service, information about each caller appears after the first or second ring. Caller ID If you subscribe to browse the entries. The caller ID log stores up to delete. Press p/q to 50 entries.
Telephone base 1. Press . 2. Press . 2. Delete a caller ID log entry You can delete a caller ID log entry when the desired entry displays on the handset or telephone base screen, then Handset Press 25 to 24 digits for the phone number and 15 characters for the name. Each entry has up to browse the entries. Review caller ID log entries Handset 1. Press p/q to caller ID service, information about each caller appears after the first or second ring. Caller ID If you subscribe to browse the entries. The caller ID log stores up to delete. Press p/q to 50 entries.


