M3D550SL User Manual
Page 1
USER GUIDE MMODDEELLS // E3D320VX M// E33DD4250V5X0SL // E3D470VX INSTALLING YOUR new TV CONTROLS & CONNECTIONS CONNECTING YOUR DEVICES USING THE ON-SCREEN MENU USING THE USB MEDIA PLAYER USING VIZIO INTERNET APPS watching 3d content TROUBLESHOOTING & SUPPORT Help, SPECs, warranty & LEGAL
USER GUIDE MMODDEELLS // E3D320VX M// E33DD4250V5X0SL // E3D470VX INSTALLING YOUR new TV CONTROLS & CONNECTIONS CONNECTING YOUR DEVICES USING THE ON-SCREEN MENU USING THE USB MEDIA PLAYER USING VIZIO INTERNET APPS watching 3d content TROUBLESHOOTING & SUPPORT Help, SPECs, warranty & LEGAL

M3D550SL User Manual
Page 4
... fallen into your TV. The manufacturer's warranty does not cover user abuse or improper installations. • The power cord must be operated only from tip-over. • Unplug this apparatus during lightning. Do not install your TV safely. Operating your TV. • Your TV should be used , use an adapter to ground your TV close to smoke or moisture may compromise the...
... fallen into your TV. The manufacturer's warranty does not cover user abuse or improper installations. • The power cord must be operated only from tip-over. • Unplug this apparatus during lightning. Do not install your TV safely. Operating your TV. • Your TV should be used , use an adapter to ground your TV close to smoke or moisture may compromise the...

M3D550SL User Manual
Page 5
... the disconnect device shall remain readily operable. • CAUTION - Opening or removing the back cover may expose you are for use your TV if any object drops into your TV, unplug the power cord and contact your TV changes substantially. • This apparatus shall... use by qualified service personnel only. If repair is damaged, the internal components may cause the batteries to leak which can damage the remote control or injure the operator. Your TV is dropped or damaged in the operating instructions unless you to high voltages, electric shock, and other cables are...
... the disconnect device shall remain readily operable. • CAUTION - Opening or removing the back cover may expose you are for use your TV if any object drops into your TV, unplug the power cord and contact your TV changes substantially. • This apparatus shall... use by qualified service personnel only. If repair is damaged, the internal components may cause the batteries to leak which can damage the remote control or injure the operator. Your TV is dropped or damaged in the operating instructions unless you to high voltages, electric shock, and other cables are...

M3D550SL User Manual
Page 7
... into such power lines or circuits. Remember, the screen of the grounding electrode. Television Antenna Connection Protection If an outside antenna/satellite dish or cable system is to be connected to provide some protection against voltage surges and static charges. Lightning Protection For added protection of time, unplug the TV from the wall outlet and disconnect the antenna or cable system...
... into such power lines or circuits. Remember, the screen of the grounding electrode. Television Antenna Connection Protection If an outside antenna/satellite dish or cable system is to be connected to provide some protection against voltage surges and static charges. Lightning Protection For added protection of time, unplug the TV from the wall outlet and disconnect the antenna or cable system...
M3D550SL User Manual
Page 8
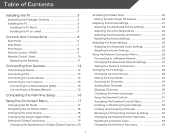
...Connecting to your network 15 Connecting to a Wired Network (Best 15 Connecting to a Wireless Network 15 Completing the First-Time Setup 16 Using the On-Screen Menu 17 Changing the 3D Mode 17 Navigating the On-Screen Menu 18 Changing the Input Source 18 Changing the Screen Aspect Ratio 19 Setting Up Closed Captioning 19 Changing the Appearance of Digital Closed Captions.. 20 Activating the Sleep Timer 20 Setting the Auto Power Off Feature 20 Adjusting the Picture Settings 21 Adjusting the Advanced Picture Settings 22 Adjusting the Color Temperature 23 Adjusting the Picture Size...
...Connecting to your network 15 Connecting to a Wired Network (Best 15 Connecting to a Wireless Network 15 Completing the First-Time Setup 16 Using the On-Screen Menu 17 Changing the 3D Mode 17 Navigating the On-Screen Menu 18 Changing the Input Source 18 Changing the Screen Aspect Ratio 19 Setting Up Closed Captioning 19 Changing the Appearance of Digital Closed Captions.. 20 Activating the Sleep Timer 20 Setting the Auto Power Off Feature 20 Adjusting the Picture Settings 21 Adjusting the Advanced Picture Settings 22 Adjusting the Color Temperature 23 Adjusting the Picture Size...
M3D550SL User Manual
Page 9
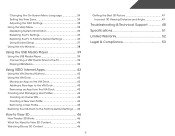
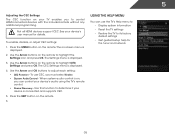
Changing the On-Screen Menu Language 34 Setting the Time Zone 34 Adjusting the CEC Settings 35 Using the Help Menu 35 Displaying System Information 36 Resetting the TV Settings 36 Restoring the TV to Factory Default Settings 36 Using Guided Setup 37 Using the Info Window 38 Using the USB Media Player 39 Using the USB Media Player 39 Connecting a USB Thumb Drive to the TV 39 Playing USB Media 39 Using VIZIO Internet Apps 42 Using the VIA Shortcut Buttons 42 Using the VIA Dock 42 Moving...
Changing the On-Screen Menu Language 34 Setting the Time Zone 34 Adjusting the CEC Settings 35 Using the Help Menu 35 Displaying System Information 36 Resetting the TV Settings 36 Restoring the TV to Factory Default Settings 36 Using Guided Setup 37 Using the Info Window 38 Using the USB Media Player 39 Using the USB Media Player 39 Connecting a USB Thumb Drive to the TV 39 Playing USB Media 39 Using VIZIO Internet Apps 42 Using the VIA Shortcut Buttons 42 Using the VIA Dock 42 Moving...

M3D550SL User Manual
Page 12
... TV. 3. Attach your TV and wall mount to your TV, you will need a wall mount. Use only with your TV model: Installing a TV on a clean, flat, stable surface. Disconnect any cables connected to the wall, carefully following the instructions that you have determined that came with a UL-listed wall mount bracket rated for your mount. Be sure the surface is capable of supporting the weight of this TV. After you...
... TV. 3. Attach your TV and wall mount to your TV, you will need a wall mount. Use only with your TV model: Installing a TV on a clean, flat, stable surface. Disconnect any cables connected to the wall, carefully following the instructions that you have determined that came with a UL-listed wall mount bracket rated for your mount. Be sure the surface is capable of supporting the weight of this TV. After you...

M3D550SL User Manual
Page 19
... display output from most devices. 1. Verify that your device has a video port that matches an available port on . Turn the TV and your device off. 3. Set the TV's input to match the connection you used to the TV and the device. 4. Connecting Your Devices Connecting A Device Your TV can be used (HDMI-1, HDM1-2, etc). 3 Cable/Satellite Box DVD/Blu-ray Player Game Console HDMI CABLE BEST • DIGITAL • HD VIDEO (1080p)* • HD AUDIO COMPONENT CABLE...
... display output from most devices. 1. Verify that your device has a video port that matches an available port on . Turn the TV and your device off. 3. Set the TV's input to match the connection you used to the TV and the device. 4. Connecting Your Devices Connecting A Device Your TV can be used (HDMI-1, HDM1-2, etc). 3 Cable/Satellite Box DVD/Blu-ray Player Game Console HDMI CABLE BEST • DIGITAL • HD VIDEO (1080p)* • HD AUDIO COMPONENT CABLE...

M3D550SL User Manual
Page 27
... of Digital Closed Captions Digital closed captions can be displayed according to your TV is set by default to turn off after 10 minutes if no signal is being displayed on the screen. Change the edge type. 4. To use the Arrow buttons to change the appearance of digital closed captions, press the EXIT button on -screen menu is displayed. 3. The Timers menu is displayed. 2. The on the remote. From the Sleep Timer menu, use the Left/ Right Arrow buttons to highlight Digital CC Style. 2. Use the...
... of Digital Closed Captions Digital closed captions can be displayed according to your TV is set by default to turn off after 10 minutes if no signal is being displayed on the screen. Change the edge type. 4. To use the Arrow buttons to change the appearance of digital closed captions, press the EXIT button on -screen menu is displayed. 3. The Timers menu is displayed. 2. The on the remote. From the Sleep Timer menu, use the Left/ Right Arrow buttons to highlight Digital CC Style. 2. Use the...

M3D550SL User Manual
Page 28
... MENU button on the remote to highlight the Picture icon and press OK. The Picture Settings menu is displayed. 3. This is the recommended setting. • Movie mode sets the picture settings to values perfect for other sports. • Custom picture mode allows you to manually change the picture mode: • Standard mode sets the various picture settings to distinguish in the most cases. Adjusts the black level of the picture. Adjusts the white level of the picture. Tint - 5 Adjusting the Picture Settings...
... MENU button on the remote to highlight the Picture icon and press OK. The Picture Settings menu is displayed. 3. This is the recommended setting. • Movie mode sets the picture settings to values perfect for other sports. • Custom picture mode allows you to manually change the picture mode: • Standard mode sets the various picture settings to distinguish in the most cases. Adjusts the black level of the picture. Adjusts the white level of the picture. Tint - 5 Adjusting the Picture Settings...

M3D550SL User Manual
Page 31
... off. • Advanced Audio - Use the Arrow buttons on the remote to the factory defaults. The Audio Settings menu is set to highlight Reset Picture Mode, then press OK. Restores the audio settings to highlight Audio and press OK. Turns the built-in speakers on the remote. Adjusting the Audio Settings To adjust the audio settings: 1. Adjusts the boost or attenuation of the audio output from the left and right speakers. • Lip Sync - The TV displays, "Are you sure...
... off. • Advanced Audio - Use the Arrow buttons on the remote to the factory defaults. The Audio Settings menu is set to highlight Reset Picture Mode, then press OK. Restores the audio settings to highlight Audio and press OK. Turns the built-in speakers on the remote. Adjusting the Audio Settings To adjust the audio settings: 1. Adjusts the boost or attenuation of the audio output from the left and right speakers. • Lip Sync - The TV displays, "Are you sure...

M3D550SL User Manual
Page 32
... setting you have finished adjusting the advanced audio settings, press the EXIT button on the remote. 25 5 Adjusting the Advanced Audio Settings To adjust the advanced audio settings: 1. From the Audio Settings Menu, use the Arrow buttons to a home theater audio system. Changes the type of processing for the analog RCA (red/white) connectors when connected to change the setting: • SRS StudioSound HD StudioSound HD™ is displayed. 2. TruVolume™ intelligently normalizes volume fluctuations due to control the external speakers' volume...
... setting you have finished adjusting the advanced audio settings, press the EXIT button on the remote. 25 5 Adjusting the Advanced Audio Settings To adjust the advanced audio settings: 1. From the Audio Settings Menu, use the Arrow buttons to a home theater audio system. Changes the type of processing for the analog RCA (red/white) connectors when connected to change the setting: • SRS StudioSound HD StudioSound HD™ is displayed. 2. TruVolume™ intelligently normalizes volume fluctuations due to control the external speakers' volume...

M3D550SL User Manual
Page 36
...% complete. The Partial Channel Search menu is displayed. 3. The Settings menu is displayed. 2. Highlight Scan Mode and select the type of new channels: 1. Press the EXIT button on the remote. 5 Setting the Tuner Mode If you are using the Partial Channel Search and Add Analog Channel options. Press the MENU button on the remote. 29 The on the remote to the RF input, such as an external antenna or cable TV connection, you must scan for Channels Before the TV...
...% complete. The Partial Channel Search menu is displayed. 3. The Settings menu is displayed. 2. Highlight Scan Mode and select the type of new channels: 1. Press the EXIT button on the remote. 5 Setting the Tuner Mode If you are using the Partial Channel Search and Add Analog Channel options. Press the MENU button on the remote. 29 The on the remote to the RF input, such as an external antenna or cable TV connection, you must scan for Channels Before the TV...
M3D550SL User Manual
Page 42
... device's audio using the TV's remote control. • Device Discovery - Not all HDMI devices support CEC. The on , you can use CEC, you to its factory default settings • Get guided setup help for details. Use the Arrow buttons on the remote. 6. The CEC Settings menu is connected and supports CEC. 5. Press the EXIT button on the remote to determine if your device's user manual for the tuner and network 35 To enable, disable, or adjust CEC settings: 1. Use this...
... device's audio using the TV's remote control. • Device Discovery - Not all HDMI devices support CEC. The on , you can use CEC, you to its factory default settings • Get guided setup help for details. Use the Arrow buttons on the remote. 6. The CEC Settings menu is connected and supports CEC. 5. Press the EXIT button on the remote to determine if your device's user manual for the tuner and network 35 To enable, disable, or adjust CEC settings: 1. Use this...
M3D550SL User Manual
Page 56
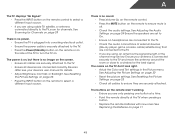
... close to a window for details. • Adjust Brightness, Contrast, or Backlight. Ensure your device's user manual for the best signal. See Adjusting the Picture Settings on the TV don't look right. • Adust the Color and Tint settings in the Picture menu. The buttons on the remote aren't working electrical outlet. • Ensure the power cable is off. • Check the audio settings. The colors on page 20 • Reset the picture settings. See Resetting...
... close to a window for details. • Adjust Brightness, Contrast, or Backlight. Ensure your device's user manual for the best signal. See Adjusting the Picture Settings on the TV don't look right. • Adust the Color and Tint settings in the Picture menu. The buttons on the remote aren't working electrical outlet. • Ensure the power cable is off. • Check the audio settings. The colors on page 20 • Reset the picture settings. See Resetting...

M3D550SL User Manual
Page 57
... the best image quality, view high-definition programs using digital sources. A The image quality is higher or lower than the level on the source you switch from, the difference may be noticable. • Use the Volume Up/Down buttons on the remote to adjust the volume. Ensure your antenna is precision-manufactured using an antenna, the signal strength of the channel may be interfering with HDMI cables. • If you switch from...
... the best image quality, view high-definition programs using digital sources. A The image quality is higher or lower than the level on the source you switch from, the difference may be noticable. • Use the Volume Up/Down buttons on the remote to adjust the volume. Ensure your antenna is precision-manufactured using an antenna, the signal strength of the channel may be interfering with HDMI cables. • If you switch from...

M3D550SL User Manual
Page 59
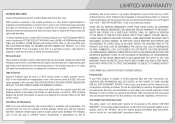
... cover, for parts or labor during the warranty period. Recovery and reinstallation of user data is within the warranty period,VIZIO will provide instructions for packing and shipping the covered Product to VIZIO's service centers must be no charge for example: cosmetic damage, normal wear and tear, improper operation, improper voltage supply or power surges, signal issues, damages from warranty service or replacement, whichever is serviced, regardless...
... cover, for parts or labor during the warranty period. Recovery and reinstallation of user data is within the warranty period,VIZIO will provide instructions for packing and shipping the covered Product to VIZIO's service centers must be no charge for example: cosmetic damage, normal wear and tear, improper operation, improper voltage supply or power surges, signal issues, damages from warranty service or replacement, whichever is serviced, regardless...

M3D550SL Quick Start Guide
Page 2
... important operating and maintenance (servicing) instructions in the operating instructions unless you to do not perform any servicing other hazards. Pulling on the apparatus. • The mains plug or appliance coupler is used as when the power-supply cord or plug is equipped with a three-pronged grounded plug (a plug with the apparatus. To reduce the risk of electric shock or component damage, switch off the power before turning...
... important operating and maintenance (servicing) instructions in the operating instructions unless you to do not perform any servicing other hazards. Pulling on the apparatus. • The mains plug or appliance coupler is used as when the power-supply cord or plug is equipped with a three-pronged grounded plug (a plug with the apparatus. To reduce the risk of electric shock or component damage, switch off the power before turning...

M3D550SL Quick Start Guide
Page 21
... off. • Press MENU, then select TV Settings > Audio. The Setup App will be lost! Select Yes. The TV displays "No Signal." • Be sure your connected devices are black/ gray bars on -screen menu has guided setup. There is a picture, but there is no power. • Be sure the power cord is set to Wide or Zoom mode. Be sure TV Speakers is securely connected to the AC socket...
... off. • Press MENU, then select TV Settings > Audio. The Setup App will be lost! Select Yes. The TV displays "No Signal." • Be sure your connected devices are black/ gray bars on -screen menu has guided setup. There is a picture, but there is no power. • Be sure the power cord is set to Wide or Zoom mode. Be sure TV Speakers is securely connected to the AC socket...
M3D550SL Quick Start Guide
Page 23
... damage, normal wear and tear, improper operation, improper voltage supply or power surges, signal issues, damages from warranty service or replacement, whichever is not responsible for transportation costs to the service center, but VIZIO will provide instructions for ninety (90) days from shipping, acts of God, any repairs attempted by a VIZIO authorized service center. Products with unreadable or removed serial numbers, or requiring routine maintenance are warranted...
... damage, normal wear and tear, improper operation, improper voltage supply or power surges, signal issues, damages from warranty service or replacement, whichever is not responsible for transportation costs to the service center, but VIZIO will provide instructions for ninety (90) days from shipping, acts of God, any repairs attempted by a VIZIO authorized service center. Products with unreadable or removed serial numbers, or requiring routine maintenance are warranted...


