

User Manual English
Page 2
... intended to alert the user to operate within the product's enclosure that the power cord and any object into your Display. h • Please use by a UL Listed Wall Mount Bracket or the equivalent. Misuse may result in environments with the manufacturer's instructions. • Do not install near your Display and easily accessible. • Only power of your Display in electric shock or fire. Install in accordance with...
... intended to alert the user to operate within the product's enclosure that the power cord and any object into your Display. h • Please use by a UL Listed Wall Mount Bracket or the equivalent. Misuse may result in environments with the manufacturer's instructions. • Do not install near your Display and easily accessible. • Only power of your Display in electric shock or fire. Install in accordance with...

User Manual English
Page 3
...Picture Mode Edit Settings 40 Adjusting the Color Calibration Settings 43 Adjusting Audio Settings 45 Adjusting Timer Settings 47 Activating the Sleep Timer 48 Setting the Auto Power Off Feature 48 Adjusting Network Settings 49 Using the Network Connection menu 50 Renaming Devices on the Input Menu 53 Renaming Devices on the Input Menu 54 Enabling HDMI Color Subsampling 54 Changing the Display System Settings 55 Viewing System Information 56 Changing the On-Screen Menu Language 56 Setting the Time and Local Settings 57 Adjusting the CEC Settings 57 Choosing a Power Mode Setting...
...Picture Mode Edit Settings 40 Adjusting the Color Calibration Settings 43 Adjusting Audio Settings 45 Adjusting Timer Settings 47 Activating the Sleep Timer 48 Setting the Auto Power Off Feature 48 Adjusting Network Settings 49 Using the Network Connection menu 50 Renaming Devices on the Input Menu 53 Renaming Devices on the Input Menu 54 Enabling HDMI Color Subsampling 54 Changing the Display System Settings 55 Viewing System Information 56 Changing the On-Screen Menu Language 56 Setting the Time and Local Settings 57 Adjusting the CEC Settings 57 Choosing a Power Mode Setting...

User Manual English
Page 5
The actual number of ports and their locations may be subject to change. Back 1 2 3 1 1 2 Power Button Volume Up/Down Buttons Input Button USB Ports Component Ports HDMI Port Optical/SPDIF Audio Out Port HDMI Ports 3 RCA Audio Out Ports Ethernet Port Note: The images shown here are for illustrative purposes only and may vary, depending on the model. 5 Overview -
The actual number of ports and their locations may be subject to change. Back 1 2 3 1 1 2 Power Button Volume Up/Down Buttons Input Button USB Ports Component Ports HDMI Port Optical/SPDIF Audio Out Port HDMI Ports 3 RCA Audio Out Ports Ethernet Port Note: The images shown here are for illustrative purposes only and may vary, depending on the model. 5 Overview -
User Manual English
Page 13
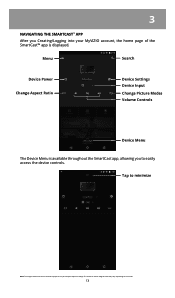
Tap to minimize Note: The images shown here are for illustrative purposes only and may vary, depending on -screen image and text may be subject to easily access the device controls. The actual on the model. 13 Menu Search Device Power Change Aspect Ratio Device Settings Device Input Change Picture Modes Volume Controls Device Menu The Device Menu is available throughout the SmartCast app, allowing you Creating/Logging into your MyVIZIO account, the home page of the SmartCast™ app is displayed. 3 NAVIGATING THE SMARTCAST™ APP After you to change.
Tap to minimize Note: The images shown here are for illustrative purposes only and may vary, depending on -screen image and text may be subject to easily access the device controls. The actual on the model. 13 Menu Search Device Power Change Aspect Ratio Device Settings Device Input Change Picture Modes Volume Controls Device Menu The Device Menu is available throughout the SmartCast app, allowing you Creating/Logging into your MyVIZIO account, the home page of the SmartCast™ app is displayed. 3 NAVIGATING THE SMARTCAST™ APP After you to change.

User Manual English
Page 18
... a source and tap the play button. The actual on-screen image and text may vary, depending on the title you to change. Tap on the model. * Separate user account may be required to see information regarding the cast, meta scores, and etc. 4. D) Your title begins playing on the play button. The Device Menu is displayed − allowing you want to watch to access...
... a source and tap the play button. The actual on-screen image and text may vary, depending on the title you to change. Tap on the model. * Separate user account may be required to see information regarding the cast, meta scores, and etc. 4. D) Your title begins playing on the play button. The Device Menu is displayed − allowing you want to watch to access...

User Manual English
Page 20
... on your device settings and content. The Device Menu is displayed − allowing you want to listen to access content. 20 Your content begins playing on the play button. The actual on-screen image and text may be subject to control your SmartCast device. C) For On Demand: Select a source and tap the play button. Tap on the model. * Separate user account may vary, depending...
... on your device settings and content. The Device Menu is displayed − allowing you want to listen to access content. 20 Your content begins playing on the play button. The actual on-screen image and text may be subject to control your SmartCast device. C) For On Demand: Select a source and tap the play button. Tap on the model. * Separate user account may vary, depending...
User Manual English
Page 28
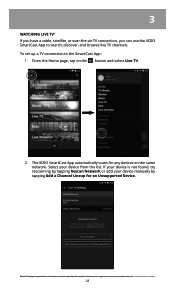
... a cable, satellite, or over-the-air TV connection, you can use the VIZIO SmartCast App to the SmartCast App: 1. hThNeeatcwtuoalrkons-escrrveiecnesim, wagiethanmdoterxet smearyvivcaerys, tdoepbeendaidngdeond.thSeeme ovdizeilo. .com/smartcast for any devices on the button and select Live TV. 2. From the Home page, tap on the same network. The VIZIO SmartCast App automatically scans for details. 28 To set up...
... a cable, satellite, or over-the-air TV connection, you can use the VIZIO SmartCast App to the SmartCast App: 1. hThNeeatcwtuoalrkons-escrrveiecnesim, wagiethanmdoterxet smearyvivcaerys, tdoepbeendaidngdeond.thSeeme ovdizeilo. .com/smartcast for any devices on the button and select Live TV. 2. From the Home page, tap on the same network. The VIZIO SmartCast App automatically scans for details. 28 To set up...

User Manual English
Page 38
... white level of brightness. When this setting is useful in adjusting the flesh tones in dark or bright areas of the picture. • Color • Adjusts the intensity of the picture colors. • Sharpness • Adjusts the edge sharpness of the picture. It can be difficult to compensate for television viewing. • Black Detail • Adjusts the average brightness of the picture to distinguish in the picture. Adjusts...
... white level of brightness. When this setting is useful in adjusting the flesh tones in dark or bright areas of the picture. • Color • Adjusts the intensity of the picture colors. • Sharpness • Adjusts the edge sharpness of the picture. It can be difficult to compensate for television viewing. • Black Detail • Adjusts the average brightness of the picture to distinguish in the picture. Adjusts...

User Manual English
Page 40
... picture mode: 1. Changes made while on -screen keyboard to the factory default values. Use the on any preset picture mode will be set to Calibrated picture mode. (Available after a custom picture mode is saved) • Reset Picture Mode* • Reset the picture mode settings to enter a name for various viewing conditions and video sources. Note: Custom picture modes are done. * Only available on the top right corner of the present mode. Inputs assigned to custom picture modes. (Available after a custom picture mode is locked...
... picture mode: 1. Changes made while on -screen keyboard to the factory default values. Use the on any preset picture mode will be set to Calibrated picture mode. (Available after a custom picture mode is saved) • Reset Picture Mode* • Reset the picture mode settings to enter a name for various viewing conditions and video sources. Note: Custom picture modes are done. * Only available on the top right corner of the present mode. Inputs assigned to custom picture modes. (Available after a custom picture mode is locked...

User Manual English
Page 42
... picture modes that are no longer needed can be deleted. To delete custom picture modes: 1. A dialogue window is displayed. 2. From the Picture Mode Edit menu, Tap Reset Picture Mode. A dialogue window is displayed. 2. From the Picture Mode Edit menu, Tap Delete Picture Mode. Resetting a Picture Mode Reset the picture mode settings (for a preset picture mode) to the Calibrated picture mode. To reset a customized preset picture mode: 1. Tap on Yes to reset the preset picture mode to delete the custom picture mode. Tap on Yes to the factory default values. 42 Inputs...
... picture modes that are no longer needed can be deleted. To delete custom picture modes: 1. A dialogue window is displayed. 2. From the Picture Mode Edit menu, Tap Reset Picture Mode. A dialogue window is displayed. 2. From the Picture Mode Edit menu, Tap Delete Picture Mode. Resetting a Picture Mode Reset the picture mode settings (for a preset picture mode) to the Calibrated picture mode. To reset a customized preset picture mode: 1. Tap on Yes to reset the preset picture mode to delete the custom picture mode. Tap on Yes to the factory default values. 42 Inputs...

User Manual English
Page 46
... as a sound bar) connected to have the display automatically detect if there are controlling the volume with the TV's volume controls, or select Fixed if an external audio device (sound bar or AV receiver) will control the volume. • Mute - Select Auto to the Audio Out output ports. • Surround Sound - 3 To adjust the audio settings: • Speakers (Display Speakers) Turns the built-in speakers on or off . • Balance - Mute all audio from the display's internal speakers. Surround sound uses DTS...
... as a sound bar) connected to have the display automatically detect if there are controlling the volume with the TV's volume controls, or select Fixed if an external audio device (sound bar or AV receiver) will control the volume. • Mute - Select Auto to the Audio Out output ports. • Surround Sound - 3 To adjust the audio settings: • Speakers (Display Speakers) Turns the built-in speakers on or off . • Balance - Mute all audio from the display's internal speakers. Surround sound uses DTS...

User Manual English
Page 57
...; Time Zone - Set time format to the HDMI ARC input. To ensure the correct time is displayed, set the display's time zone: 1. Select ARC Only for plug and play of an audio device connected to 12 or 24 hour format. The ARC setting does not support video devices connected to the audio device (Select Enable to have the display sync the time online. • Date & Time - The Time & Local Settings menu is displayed. 2. Swipe the switch to the right to enable support for details. Adjusting...
...; Time Zone - Set time format to the HDMI ARC input. To ensure the correct time is displayed, set the display's time zone: 1. Select ARC Only for plug and play of an audio device connected to 12 or 24 hour format. The ARC setting does not support video devices connected to the audio device (Select Enable to have the display sync the time online. • Date & Time - The Time & Local Settings menu is displayed. 2. Swipe the switch to the right to enable support for details. Adjusting...

User Manual English
Page 64
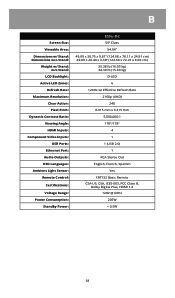
Specifications B Screen Size: Viewable Area: Dimensions w/ Stand: Dimensions w/o Stand: Weight w/ Stand: w/o Stand: LCD Backlight: Active LED Zones: Refresh Rate: Clear Action: Maximum Resolution: Dynamic Contrast Ratio: Pixel Pitch: Viewing Angle: HDMI Inputs: Component Video Inputs: USB Ports: Ethernet Port: Audio Outputs: OSD Languages: Ambient Light Sensor: Remote Control: Certifications: Voltage Range: Power Consumption: Standby Power: E43u-D2 43" Class 42.51" 38.39 x 24.54 x 8.23" (97.50 x 62.33 x 20.90 cm) 38.39 x 22.38 x 3.39" (97.50 x 56.85 x 8....
Specifications B Screen Size: Viewable Area: Dimensions w/ Stand: Dimensions w/o Stand: Weight w/ Stand: w/o Stand: LCD Backlight: Active LED Zones: Refresh Rate: Clear Action: Maximum Resolution: Dynamic Contrast Ratio: Pixel Pitch: Viewing Angle: HDMI Inputs: Component Video Inputs: USB Ports: Ethernet Port: Audio Outputs: OSD Languages: Ambient Light Sensor: Remote Control: Certifications: Voltage Range: Power Consumption: Standby Power: E43u-D2 43" Class 42.51" 38.39 x 24.54 x 8.23" (97.50 x 62.33 x 20.90 cm) 38.39 x 22.38 x 3.39" (97.50 x 56.85 x 8....
User Manual English
Page 68
B Screen Size: Viewable Area: Dimensions w/ Stand: Dimensions w/o Stand: Weight w/ Stand: w/o Stand: LCD Backlight: Active LED Zones: Refresh Rate: Maximum Resolution: Clear Action: Pixel Pitch: Dynamic Contrast Ratio: Viewing Angle: HDMI Inputs: Component Video Inputs: USB Ports: Ethernet Port: Audio Outputs: OSD Languages: Ambient Light Sensor: Remote Control: Certifications: Voltage Range: Power Consumption: Standby Power: E55u-D2 55" Class 54.64" 49.09 x 30.75 x 9.81" (124.68 x 78.11 x 24.91 cm) 49.09 x 28.44 x 3.39" (124.68 x 72.23 x 8....
B Screen Size: Viewable Area: Dimensions w/ Stand: Dimensions w/o Stand: Weight w/ Stand: w/o Stand: LCD Backlight: Active LED Zones: Refresh Rate: Maximum Resolution: Clear Action: Pixel Pitch: Dynamic Contrast Ratio: Viewing Angle: HDMI Inputs: Component Video Inputs: USB Ports: Ethernet Port: Audio Outputs: OSD Languages: Ambient Light Sensor: Remote Control: Certifications: Voltage Range: Power Consumption: Standby Power: E55u-D2 55" Class 54.64" 49.09 x 30.75 x 9.81" (124.68 x 78.11 x 24.91 cm) 49.09 x 28.44 x 3.39" (124.68 x 72.23 x 8....
User Manual English
Page 72
... that you feel VIZIO has not met its option) repair or replace it was purchased at the email address or telephone number below , unless an exception applies. Types of original purchase. What This Warranty Does Not Cover This warranty does not cover: (a) cosmetic damage; (b) normal wear and tear; (c) improper operation; (d) improper voltage supply or power surges; (e) signal issues; (f) damage from warranty service, whichever is...
... that you feel VIZIO has not met its option) repair or replace it was purchased at the email address or telephone number below , unless an exception applies. Types of original purchase. What This Warranty Does Not Cover This warranty does not cover: (a) cosmetic damage; (b) normal wear and tear; (c) improper operation; (d) improper voltage supply or power surges; (e) signal issues; (f) damage from warranty service, whichever is...

Quickstart Guide English
Page 2
... provided for replacement of the obsolete outlet. • Protect the power cord from being damaged, the following safety instructions before cleaning your Display. • When moving the cart/apparatus combination to qualified service personnel. ii when the apparatus has been damaged in electric shock or fire. Do not install your Display close to protect it from overheating, be operated only...
... provided for replacement of the obsolete outlet. • Protect the power cord from being damaged, the following safety instructions before cleaning your Display. • When moving the cart/apparatus combination to qualified service personnel. ii when the apparatus has been damaged in electric shock or fire. Do not install your Display close to protect it from overheating, be operated only...

Quickstart Guide English
Page 3
... Display changes substantially. • This apparatus shall not be placed on the apparatus. • The mains plug or appliance coupler is damaged, the internal components may cause the Display to tip or fall over . • Do not allow children to the sound level, which can damage the remote control or injure the operator. These servicing instructions are unplugged before moving your Display...
... Display changes substantially. • This apparatus shall not be placed on the apparatus. • The mains plug or appliance coupler is damaged, the internal components may cause the Display to tip or fall over . • Do not allow children to the sound level, which can damage the remote control or injure the operator. These servicing instructions are unplugged before moving your Display...

Quickstart Guide English
Page 6
WIDE Cycles through the different picture setting modes. English - 6 MUTE Turn the audio on or off . INPUT Change the currently displayed input. VOLUME Increase or decrease the loudness of the audio. PIC Cycles through the different aspect ratio modes. CHANNEL UP/DOWN Change the channel. This is your basic remote POWER Turn the Display on or off . LINK Activate pairing mode on Display.
WIDE Cycles through the different picture setting modes. English - 6 MUTE Turn the audio on or off . INPUT Change the currently displayed input. VOLUME Increase or decrease the loudness of the audio. PIC Cycles through the different aspect ratio modes. CHANNEL UP/DOWN Change the channel. This is your basic remote POWER Turn the Display on or off . LINK Activate pairing mode on Display.

Quickstart Guide English
Page 24
... Display. Attach your Display and wall mount to your Display. 2. Place the Display face-down on a wall: 1. After you have determined that you will need a wall mount. Use only with your mount. Installing a Display on a wall, you have the correct mount for the weight/load of the Display. Disconnect any cables connected to the wall, carefully following the instructions that can begin the installation. Remove the stands by loosening and removing the screws. 4. Wall-mounting the Display To mount your Display on a wall...
... Display. Attach your Display and wall mount to your Display. 2. Place the Display face-down on a wall: 1. After you have determined that you will need a wall mount. Use only with your mount. Installing a Display on a wall, you have the correct mount for the weight/load of the Display. Disconnect any cables connected to the wall, carefully following the instructions that can begin the installation. Remove the stands by loosening and removing the screws. 4. Wall-mounting the Display To mount your Display on a wall...

Quickstart Guide English
Page 32
... adjustments; (i) installation, set forth below , unless an exception applies. In order to protect your product, refer to the VIZIO service center. Replacement parts may be sent to a VIZIO service center to the product and does not include de-installation or re-installation of the servicer. Types of original purchase. In-home service requires complete and easy access to obtain warranty service. All other than by law, this warranty. VIZIO...
... adjustments; (i) installation, set forth below , unless an exception applies. In order to protect your product, refer to the VIZIO service center. Replacement parts may be sent to a VIZIO service center to the product and does not include de-installation or re-installation of the servicer. Types of original purchase. In-home service requires complete and easy access to obtain warranty service. All other than by law, this warranty. VIZIO...


