
User Manual English
Page 2
... following instructions should be supported by a UL Listed Wall Mount Bracket or the equivalent. When your HDTV will protect your HDTV from damage due to power surges. • Do not attempt to qualified service personnel. • WARNING: Keep your HDTV and easily accessible. • Only power of low temperature to qualified service personnel. Do not expose batteries to excessive heat such as power-supply cord or plug is used...
... following instructions should be supported by a UL Listed Wall Mount Bracket or the equivalent. When your HDTV will protect your HDTV from damage due to power surges. • Do not attempt to qualified service personnel. • WARNING: Keep your HDTV and easily accessible. • Only power of low temperature to qualified service personnel. Do not expose batteries to excessive heat such as power-supply cord or plug is used...

User Manual English
Page 3
...; to flashing lights such as pressing keys or typing, may result in occasional discomfort in a well-lit room, take frequent breaks and stop use it must dispose of your driving. AIRCRAFT Turn off your VIZIO XR6 Tablet Remote. Immediately turn off your ears, ringing in some places. REPETITIVE MOTION Repetitively performing actions such as when playing games or watching video, even...
...; to flashing lights such as pressing keys or typing, may result in occasional discomfort in a well-lit room, take frequent breaks and stop use it must dispose of your driving. AIRCRAFT Turn off your VIZIO XR6 Tablet Remote. Immediately turn off your ears, ringing in some places. REPETITIVE MOTION Repetitively performing actions such as when playing games or watching video, even...
User Manual English
Page 4
... 34 Adjusting Picture Settings 37 Adjusting the Picture Mode Edit Settings 41 Adjusting the Color Calibration Settings 44 Adjusting Audio Settings 46 Adjusting Timer Settings 48 Activating the Sleep Timer 49 Setting the Auto Power Off Feature 49 Adjusting Network Settings 50 Using the Network Connection menu 51 Renaming Devices on the Input Menu 54 Renaming Devices on the Input Menu 55 Enabling HDMI Color Subsampling 55 Changing the TV System Settings 56 Viewing System Information 57 Changing the On-Screen Menu Language 57 Setting the Time and Local Settings 58 Adjusting the...
... 34 Adjusting Picture Settings 37 Adjusting the Picture Mode Edit Settings 41 Adjusting the Color Calibration Settings 44 Adjusting Audio Settings 46 Adjusting Timer Settings 48 Activating the Sleep Timer 49 Setting the Auto Power Off Feature 49 Adjusting Network Settings 50 Using the Network Connection menu 51 Renaming Devices on the Input Menu 54 Renaming Devices on the Input Menu 55 Enabling HDMI Color Subsampling 55 Changing the TV System Settings 56 Viewing System Information 57 Changing the On-Screen Menu Language 57 Setting the Time and Local Settings 58 Adjusting the...
User Manual English
Page 7
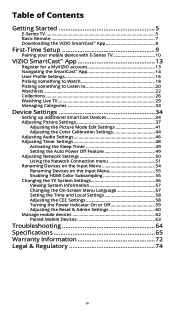
... basic remote control. Input Change the currently displayed input. Find the notch on or off . 1 BASIC REMOTE Overview Use the Basic Remote to control the basic functions of the E-Series TV. Mute Turn the audio on the back of the audio. Closed Caption Turn Closed Captions on or off. Channel Up/Down Change the channel. To insert/replace the batteries: 1. Remove the back cover and insert two AAA batteries (included). Play/Pause Play or pause content. Picture Mode...
... basic remote control. Input Change the currently displayed input. Find the notch on or off . 1 BASIC REMOTE Overview Use the Basic Remote to control the basic functions of the E-Series TV. Mute Turn the audio on the back of the audio. Closed Caption Turn Closed Captions on or off. Channel Up/Down Change the channel. To insert/replace the batteries: 1. Remove the back cover and insert two AAA batteries (included). Play/Pause Play or pause content. Picture Mode...
User Manual English
Page 19
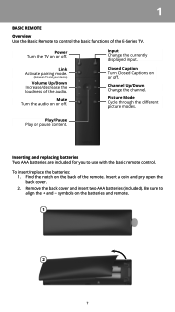
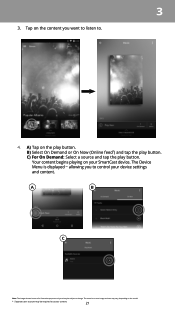
... TV settings and content. C) For On Demand: Select a source and tap the play button. The Device Menu is displayed − allowing you want to watch to control your TV. A B C D Note: The images shown here are for illustrative purposes only and may be subject to access content. 19 B) Select On Demand or On Now (Online feed*) and tap the play button. The...
... TV settings and content. C) For On Demand: Select a source and tap the play button. The Device Menu is displayed − allowing you want to watch to control your TV. A B C D Note: The images shown here are for illustrative purposes only and may be subject to access content. 19 B) Select On Demand or On Now (Online feed*) and tap the play button. The...
User Manual English
Page 21
... the play button. Tap on the play button. A) Tap on the content you to access content. 21 Your content begins playing on the model. * Separate user account may be required to control your SmartCast device. The actual on-screen image and text may vary, depending on your device settings and content. C) For On Demand: Select a source and tap the play button. The Device Menu is displayed...
... the play button. Tap on the play button. A) Tap on the content you to access content. 21 Your content begins playing on the model. * Separate user account may be required to control your SmartCast device. The actual on-screen image and text may vary, depending on your device settings and content. C) For On Demand: Select a source and tap the play button. The Device Menu is displayed...
User Manual English
Page 29
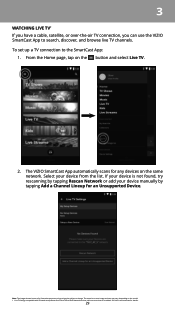
... same network. To set -top boxes from the list. From the Home page, tap on the model. * Live TV listings compatible with IP-based set up a TV connection to the SmartCast App: 1. Select your device manually by tapping Rescan Network or add your device from DirecTV and Dish Network services, with more services to be subject to search, discover, and browse live TV channels. See vizio.com...
... same network. To set -top boxes from the list. From the Home page, tap on the model. * Live TV listings compatible with IP-based set up a TV connection to the SmartCast App: 1. Select your device manually by tapping Rescan Network or add your device from DirecTV and Dish Network services, with more services to be subject to search, discover, and browse live TV channels. See vizio.com...

User Manual English
Page 39
... brightness. It can be adjusted on some picture modes. • Brightness • Adjusts the black level of picture elements. This setting is too high, the picture may appear faded or washed out. however, it will not produce detail that does not otherwise exist. • Color Temperature - Backlight cannot be used to compensate for television viewing. • Black Detail • Adjusts the average brightness of...
... brightness. It can be adjusted on some picture modes. • Brightness • Adjusts the black level of picture elements. This setting is too high, the picture may appear faded or washed out. however, it will not produce detail that does not otherwise exist. • Color Temperature - Backlight cannot be used to compensate for television viewing. • Black Detail • Adjusts the average brightness of...
User Manual English
Page 41
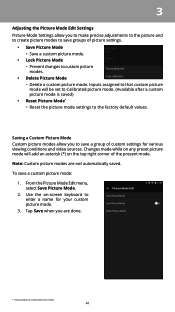
...; Lock Picture Mode • Prevent changes to the factory default values. Saving a Custom Picture Mode Custom picture modes allow you to make precise adjustments to the picture and to create picture modes to save a group of custom settings for your custom picture mode. 3. Changes made while on the top right corner of the present mode. To save a custom picture mode: 1. From the Picture Mode Edit menu, select Save Picture Mode. 2. Inputs assigned to enter a name for various viewing...
...; Lock Picture Mode • Prevent changes to the factory default values. Saving a Custom Picture Mode Custom picture modes allow you to make precise adjustments to the picture and to create picture modes to save a group of custom settings for your custom picture mode. 3. Changes made while on the top right corner of the present mode. To save a custom picture mode: 1. From the Picture Mode Edit menu, select Save Picture Mode. 2. Inputs assigned to enter a name for various viewing...

User Manual English
Page 43
...the Picture Mode Edit menu, Tap Reset Picture Mode. To delete custom picture modes: 1. To reset a customized preset picture mode: 1. A dialogue window is displayed. 2. 3 Deleting a Custom Picture Mode Custom picture modes that are no longer needed can be deleted. From the Picture Mode Edit menu, Tap Delete Picture Mode. Tap on Yes to the factory default values. 43 Tap on Yes to reset the preset picture mode to delete the custom picture mode. Resetting a Picture Mode Reset the picture mode settings (for a preset picture mode) to the Calibrated picture mode. Inputs assigned...
...the Picture Mode Edit menu, Tap Reset Picture Mode. To delete custom picture modes: 1. To reset a customized preset picture mode: 1. A dialogue window is displayed. 2. 3 Deleting a Custom Picture Mode Custom picture modes that are no longer needed can be deleted. From the Picture Mode Edit menu, Tap Delete Picture Mode. Tap on Yes to the factory default values. 43 Tap on Yes to reset the preset picture mode to delete the custom picture mode. Resetting a Picture Mode Reset the picture mode settings (for a preset picture mode) to the Calibrated picture mode. Inputs assigned...
User Manual English
Page 44
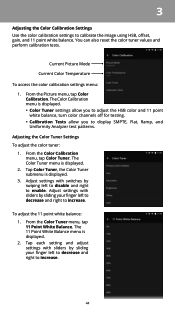
... white balance, turn color channels off for testing. • Calibration Tests allow you to enable. You can also reset the color tuner values and perform calibration tests. Adjust settings with switches by sliding your finger left to decrease and right to increase. 44 The 11 Point White Balance menu is displayed. 2. From the Color Calibration menu, tap Color Tuner. 3 Adjusting the Color Calibration Settings Use the color calibration settings to increase. The Color Tuner menu is displayed. 2. Current Picture Mode Current Color Temperature To access the color calibration settings menu...
... white balance, turn color channels off for testing. • Calibration Tests allow you to enable. You can also reset the color tuner values and perform calibration tests. Adjust settings with switches by sliding your finger left to decrease and right to increase. 44 The 11 Point White Balance menu is displayed. 2. From the Color Calibration menu, tap Color Tuner. 3 Adjusting the Color Calibration Settings Use the color calibration settings to increase. The Color Tuner menu is displayed. 2. Current Picture Mode Current Color Temperature To access the color calibration settings menu...

User Manual English
Page 47
... audio track. • Digital Audio Out - Adjusts the synchronization between program content, AV formats, and input sources. Volume leveling uses DTS TruVolume™ to the Audio Out output ports. • Surround Sound - Turns the built-in speakers on or off enables the 47 Select Auto to have the TV automatically detect if there are controlling the volume with the TV's volume controls, or select Fixed if an external audio device (sound bar or AV receiver) will control...
... audio track. • Digital Audio Out - Adjusts the synchronization between program content, AV formats, and input sources. Volume leveling uses DTS TruVolume™ to the Audio Out output ports. • Surround Sound - Turns the built-in speakers on or off enables the 47 Select Auto to have the TV automatically detect if there are controlling the volume with the TV's volume controls, or select Fixed if an external audio device (sound bar or AV receiver) will control...

User Manual English
Page 58
... 12 or 24 hour format. Set time format to have the TV sync the time online. • Date & Time - The ARC setting does not support video devices connected to the audio device (Select Enable to the HDMI ARC input. Tap on your device's user manual for plug and play of an audio device connected to enable support for these devices). The Time & Local Settings menu is displayed. 2. From the System menu, tap Time & Local Settings. Set the time zone. • Daylight Savings...
... 12 or 24 hour format. Set time format to have the TV sync the time online. • Date & Time - The ARC setting does not support video devices connected to the audio device (Select Enable to the HDMI ARC input. Tap on your device's user manual for plug and play of an audio device connected to enable support for these devices). The Time & Local Settings menu is displayed. 2. From the System menu, tap Time & Local Settings. Set the time zone. • Daylight Savings...
User Manual English
Page 72
... resolve the issue informally with unreadable or removed serial numbers; (k) products requiring routine maintenance; To obtain warranty service, contact VIZIO Technical Support via email at TechSupport@VIZIO.com or via phone at the time of Service HDTVs that affords an equal degree of the product. VIZIO Technical Support will be located in no charge for the duration of the warranty on the box, or contact VIZIO Technical Support at...
... resolve the issue informally with unreadable or removed serial numbers; (k) products requiring routine maintenance; To obtain warranty service, contact VIZIO Technical Support via email at TechSupport@VIZIO.com or via phone at the time of Service HDTVs that affords an equal degree of the product. VIZIO Technical Support will be located in no charge for the duration of the warranty on the box, or contact VIZIO Technical Support at...
User Manual English
Page 74
... fields. Internet Connectivity Network conditions, environmental and other than its own. VIZIO has no control over third party applications or content and assumes no responsibility for typographical, technical, or descriptive errors. All Right Reserved. VIZIO, Inc. is a trademark of this Quick Start Guide and the associated User Manual, go to power the device with the same or equivalent type of others and VIZIO, Inc...
... fields. Internet Connectivity Network conditions, environmental and other than its own. VIZIO has no control over third party applications or content and assumes no responsibility for typographical, technical, or descriptive errors. All Right Reserved. VIZIO, Inc. is a trademark of this Quick Start Guide and the associated User Manual, go to power the device with the same or equivalent type of others and VIZIO, Inc...

Quickstart Guide English
Page 2
Read the following instructions should be operated only from the type of power source indicated on the label. A polarized plug has two blades with the apparatus. Servicing is required English - Operating your TV close to smoke. Do not place any way, such as a radiator, heater, oven, amplifier etc. The manufacturer's warranty does not cover user abuse or improper installations. • The power cord must be...
Read the following instructions should be operated only from the type of power source indicated on the label. A polarized plug has two blades with the apparatus. Servicing is required English - Operating your TV close to smoke. Do not place any way, such as a radiator, heater, oven, amplifier etc. The manufacturer's warranty does not cover user abuse or improper installations. • The power cord must be...

Quickstart Guide English
Page 3
... be used for long period of time. This will not be used for an extended period of time, unplug the power cord. • To reduce risk of electric shock, do so. • The lightning flash with arrowhead symbol within the h product's enclosure that the power cord and any servicing other than that contained in the operating instructions unless you to repair or service your...
... be used for long period of time. This will not be used for an extended period of time, unplug the power cord. • To reduce risk of electric shock, do so. • The lightning flash with arrowhead symbol within the h product's enclosure that the power cord and any servicing other than that contained in the operating instructions unless you to repair or service your...

Quickstart Guide English
Page 6
CHANNEL UP/DOWN Change the channel. VOLUME Increase or decrease the loudness of the audio. This is your basic remote POWER Turn the TV on or off . CLOSED CAPTION Turn closed caption On and Off. PIC Cycles through the different picture setting modes. English - 6 LINK Activate pairing mode on or off . MUTE Turn the audio on TV. INPUT Change the currently displayed input.
CHANNEL UP/DOWN Change the channel. VOLUME Increase or decrease the loudness of the audio. This is your basic remote POWER Turn the TV on or off . CLOSED CAPTION Turn closed caption On and Off. PIC Cycles through the different picture setting modes. English - 6 LINK Activate pairing mode on or off . MUTE Turn the audio on TV. INPUT Change the currently displayed input.

Quickstart Guide English
Page 24
...-listed wall mount bracket rated for your TV, you will need a wall mount. Installing a TV on a clean, flat, stable surface. Consult the information on this TV. Use only with your mount. Attach your TV and wall mount to your TV on a wall: 1. Place the TV face-down on a wall requires lifting. Disconnect any cables connected to the wall, carefully following the instructions that you have the correct mount for the weight...
...-listed wall mount bracket rated for your TV, you will need a wall mount. Installing a TV on a clean, flat, stable surface. Consult the information on this TV. Use only with your mount. Attach your TV and wall mount to your TV on a wall: 1. Place the TV face-down on a wall requires lifting. Disconnect any cables connected to the wall, carefully following the instructions that you have the correct mount for the weight...
Quickstart Guide English
Page 32
... this warranty applies only to resolve the issue informally with VIZIO's user guides and manuals. For commercial use , VIZIO warrants the product on select new product purchases. To determine if this guarantee applies to your product will be serviced in packaging that the product is not covered under this product on the terms set forth below . ALL USER DATA AND DOWNLOADED APPLICATIONS...
... this warranty applies only to resolve the issue informally with VIZIO's user guides and manuals. For commercial use , VIZIO warrants the product on select new product purchases. To determine if this guarantee applies to your product will be serviced in packaging that the product is not covered under this product on the terms set forth below . ALL USER DATA AND DOWNLOADED APPLICATIONS...


