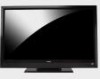
E422VL User Manual
Page 4
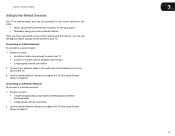
..., or component damage. • A distance of the polarized or grounding-type plug. Do not place any object into the apparatus, the apparatus has been eposed E422VL / E472VL / E552VL to rain or moisture, does not operate normally or has been dropped. • Unplug the power cord before turning on or pinched, particularly...
..., or component damage. • A distance of the polarized or grounding-type plug. Do not place any object into the apparatus, the apparatus has been eposed E422VL / E472VL / E552VL to rain or moisture, does not operate normally or has been dropped. • Unplug the power cord before turning on or pinched, particularly...
E422VL User Manual
Page 5
... or appliance coupler is damaged, the internal components may cause fire or electric shock. • Follow instructions for repair. To reduce the risk of time. E422VL / E472VL / E552VL • Do not overload power strips and extension cords. If your TV during electrical storms. • Unplug your TV is dropped and the...
... or appliance coupler is damaged, the internal components may cause fire or electric shock. • Follow instructions for repair. To reduce the risk of time. E422VL / E472VL / E552VL • Do not overload power strips and extension cords. If your TV during electrical storms. • Unplug your TV is dropped and the...
E422VL User Manual
Page 6
Power Lines Do not locate the antenna near overhead light or power circuits, or where it is needed. E422VL / E472VL / E552VL Television Antenna Connection Protection If an outside antenna/satellite dish or cable system is to be connected to earth in the building installation. ...
Power Lines Do not locate the antenna near overhead light or power circuits, or where it is needed. E422VL / E472VL / E552VL Television Antenna Connection Protection If an outside antenna/satellite dish or cable system is to be connected to earth in the building installation. ...
E422VL User Manual
Page 7
Table of the Inputs 24 Changing the On-Screen Menu Language 25 Setting the Time Zone 25 Adjusting the CEC Settings 26 Turning the VIZIO Logo On or Off 26 Using the Help Menu 26 Back (Models E472VL / E552VL Only 6 VIA Shortcut Buttons 6 Replacing the ...Batteries (Models E472VL / E552VL Only 6 Replacing the Batteries (Model E422VL Only 6 Connecting Your Devices 7 Before You Begin 7 Connecting Your Devices 7 Setting Up Your Network Connection 9 Connecting to A Wired Network 9 Connecting to a...
Table of the Inputs 24 Changing the On-Screen Menu Language 25 Setting the Time Zone 25 Adjusting the CEC Settings 26 Turning the VIZIO Logo On or Off 26 Using the Help Menu 26 Back (Models E472VL / E552VL Only 6 VIA Shortcut Buttons 6 Replacing the ...Batteries (Models E472VL / E552VL Only 6 Replacing the Batteries (Model E422VL Only 6 Connecting Your Devices 7 Before You Begin 7 Connecting Your Devices 7 Setting Up Your Network Connection 9 Connecting to A Wired Network 9 Connecting to a...
E422VL User Manual
Page 8
... Using the USB Media Player 29 Using the USB Media Player 29 Connecting a USB Thumb Drive to the TV 29 Playing USB Media 29 Using VIZIO Internet Apps 32 Using the VIA Shortcut Buttons 32 Using the VIA Dock 32 Moving an App on the VIA Dock 32 Adding a New App... aren't working 36 The image quality is not good 36 The picture is distorted 37 The display image does not cover the entire screen 37 E422VL / E472VL / E552VL The TV has pixels (dots) that are always dark or always lit 37 I see "noise" or static on the screen 37 When I change...
... Using the USB Media Player 29 Using the USB Media Player 29 Connecting a USB Thumb Drive to the TV 29 Playing USB Media 29 Using VIZIO Internet Apps 32 Using the VIA Shortcut Buttons 32 Using the VIA Dock 32 Moving an App on the VIA Dock 32 Adding a New App... aren't working 36 The image quality is not good 36 The picture is distorted 37 The display image does not cover the entire screen 37 E422VL / E472VL / E552VL The TV has pixels (dots) that are always dark or always lit 37 I see "noise" or static on the screen 37 When I change...
E422VL User Manual
Page 10
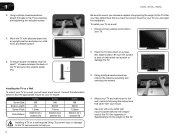
... weight of debris that came with a UL-listed wall mount bracket rated for your TV model: Screw Size: Screw Length: Screw Pitch: Hole Pattern: E422VL M6 20 1.0mm 200mm (V) x 200mm (H) E472VL M6 20mm 1.0mm 200mm (V) x 400mm (H) E552VL M8 25mm 1.25mm 200mm (V) x 400mm (H) Installing a TV ...on a wall, you . 2 4. E422VL / E472VL / E552VL Be sure the mount you can scratch or damage the TV. 3. To ensure proper ventilation, leave at least 1" of space between the back ...
... weight of debris that came with a UL-listed wall mount bracket rated for your TV model: Screw Size: Screw Length: Screw Pitch: Hole Pattern: E422VL M6 20 1.0mm 200mm (V) x 200mm (H) E472VL M6 20mm 1.0mm 200mm (V) x 400mm (H) E552VL M8 25mm 1.25mm 200mm (V) x 400mm (H) Installing a TV ...on a wall, you . 2 4. E422VL / E472VL / E552VL Be sure the mount you can scratch or damage the TV. 3. To ensure proper ventilation, leave at least 1" of space between the back ...
E422VL User Manual
Page 12
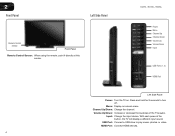
E422VL / E472VL / E552VL Power Menu Channel Up Channel Down Volume Up Volume Down Input USB Ports (1, 2) HDMI Port Left Side Panel Power: Turn the TV on -...
E422VL / E472VL / E552VL Power Menu Channel Up Channel Down Volume Up Volume Down Input USB Ports (1, 2) HDMI Port Left Side Panel Power: Turn the TV on -...

E422VL User Manual
Page 13
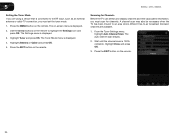
...Mute: Turn the sound off or on or off . Number Pad: Use the number pad to the channel last viewed. Info: Display the Info Window. E422VL / E472VL / E552VL Remote Control (Models E472VL / E552VL Only) Input App Launcher CC Exit OK Back V Button Volume Up/Down Mute Number Pad Wide... VIA: Start VIA Internet Apps. A/V Controls: Control external device (Blu-Ray or DVD player). CC (Closed: Open the CC Menu. VIA Shortcuts: Control VIZIO Internet Apps. Channel Up/Down: Change the channel. With each press of the TV's audio. When mute is activated, the TV's audio is turned off ...
...Mute: Turn the sound off or on or off . Number Pad: Use the number pad to the channel last viewed. Info: Display the Info Window. E422VL / E472VL / E552VL Remote Control (Models E472VL / E552VL Only) Input App Launcher CC Exit OK Back V Button Volume Up/Down Mute Number Pad Wide... VIA: Start VIA Internet Apps. A/V Controls: Control external device (Blu-Ray or DVD player). CC (Closed: Open the CC Menu. VIA Shortcuts: Control VIZIO Internet Apps. Channel Up/Down: Change the channel. With each press of the TV's audio. When mute is activated, the TV's audio is turned off ...

E422VL User Manual
Page 14
... pets. 6 This is open) View Settings for Active VIA App Exit App/Exit VIA Dock VIA Shortcut Buttons Replacing the Batteries (Model E422VL Only) 4. Arrow QWERTY Keypad App Shortcuts E422VL / E472VL / E552VL Replacing the Batteries (Models E472VL / E552VL Only) 1. Remove the battery cover. 2. Replace the battery cover. • Use only good quality...
... pets. 6 This is open) View Settings for Active VIA App Exit App/Exit VIA Dock VIA Shortcut Buttons Replacing the Batteries (Model E422VL Only) 4. Arrow QWERTY Keypad App Shortcuts E422VL / E472VL / E552VL Replacing the Batteries (Models E472VL / E552VL Only) 1. Remove the battery cover. 2. Replace the battery cover. • Use only good quality...

E422VL User Manual
Page 16
3 Select one of the connection types. BEST BETTER HDMI RF/ COAXIAL RGB COMPONENT GOOD COMPOSITE AV 8 E422VL / E472VL / E552VL Select One: OR OR OR OR DIGITAL DIGITAL / ANALOG ANALOG ANALOG ANALOG Device Connection Chart Use the cable(s) shown to connect the TV to your device.
3 Select one of the connection types. BEST BETTER HDMI RF/ COAXIAL RGB COMPONENT GOOD COMPOSITE AV 8 E422VL / E472VL / E552VL Select One: OR OR OR OR DIGITAL DIGITAL / ANALOG ANALOG ANALOG ANALOG Device Connection Chart Use the cable(s) shown to connect the TV to your device.
E422VL User Manual
Page 17
... reach your TV • A router or modem with an available ethernet port • A high-speed internet connection 2. Use the Guided Network Setup to a wired network: 1. E422VL / E472VL / E552VL 3 Setting Up Your Network Connection Your TV is internet-ready, and can be connected to your home network in two ways: • Wired...
... reach your TV • A router or modem with an available ethernet port • A high-speed internet connection 2. Use the Guided Network Setup to a wired network: 1. E422VL / E472VL / E552VL 3 Setting Up Your Network Connection Your TV is internet-ready, and can be connected to your home network in two ways: • Wired...

E422VL User Manual
Page 20
... display image. If you wish to see : • Analog Closed Caption for analog (NTSC) TV channels. • Digital Closed Caption for programs that include them . 5 E422VL / 472VL / E552VL Changing the Screen Aspect Ratio The TV can display closed captions for digital (ATSC) TV channels. 4. Closed captions display a transcription of the display...
... display image. If you wish to see : • Analog Closed Caption for analog (NTSC) TV channels. • Digital Closed Caption for programs that include them . 5 E422VL / 472VL / E552VL Changing the Screen Aspect Ratio The TV can display closed captions for digital (ATSC) TV channels. 4. Closed captions display a transcription of the display...

E422VL User Manual
Page 21
E422VL / 472VL / E552VL Changing the Appearance of the text. • Color - The Digital CC Style menu appears. 3. Choose Auto to keep default settings or Custom to ...
E422VL / 472VL / E552VL Changing the Appearance of the text. • Color - The Digital CC Style menu appears. 3. Choose Auto to keep default settings or Custom to ...

E422VL User Manual
Page 22
.... Use the Up/Down Arrow buttons on the remote to highlight the Picture icon and press OK. This option is not available unless Ambient 14 E422VL / 472VL / E552VL Light Sensor is displayed. 4. Adjusts the edge sharpness of the picture. 5 Adjusting the Picture Settings Your TV display can be adjusted to suit...
.... Use the Up/Down Arrow buttons on the remote to highlight the Picture icon and press OK. This option is not available unless Ambient 14 E422VL / 472VL / E552VL Light Sensor is displayed. 4. Adjusts the edge sharpness of the picture. 5 Adjusting the Picture Settings Your TV display can be adjusted to suit...
E422VL User Manual
Page 23
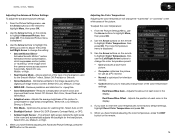
..." of the picture. Select Off, Low, Medium, Strong, or Extend. • Film Mode - When you to compensate for watching film. Diminishes artifacts in the display. E422VL / 472VL / E552VL Adjusting the Advanced Picture Settings To adjust the advanced picture settings: 1. Use the Arrow buttons on the remote. 15 Select Off, Low, Medium...
..." of the picture. Select Off, Low, Medium, Strong, or Extend. • Film Mode - When you to compensate for watching film. Diminishes artifacts in the display. E422VL / 472VL / E552VL Adjusting the Advanced Picture Settings To adjust the advanced picture settings: 1. Use the Arrow buttons on the remote. 15 Select Off, Low, Medium...
E422VL User Manual
Page 24
... - Resetting the Picture Settings To reset the picture settings to optimal size and position. (RGB input only.) • Horiz. The Audio Settings menu is displayed. 4. 5 E422VL / 472VL / E552VL Adjusting the Picture Size and Position When displaying an image from the left /right) position of the display image. • Vertical Position - See...
... - Resetting the Picture Settings To reset the picture settings to optimal size and position. (RGB input only.) • Horiz. The Audio Settings menu is displayed. 4. 5 E422VL / 472VL / E552VL Adjusting the Picture Size and Position When displaying an image from the left /right) position of the display image. • Vertical Position - See...
E422VL User Manual
Page 25
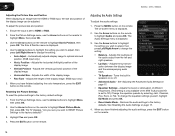
... remote. Highlight Yes and press OK. 5. Press the MENU button on the remote to television commercials or channel changes. The Audio Settings menu is displayed. 2. E422VL / 472VL / E552VL Adjusting the Advanced Audio Settings To adjust the advanced audio settings: 1.
... remote. Highlight Yes and press OK. 5. Press the MENU button on the remote to television commercials or channel changes. The Audio Settings menu is displayed. 2. E422VL / 472VL / E552VL Adjusting the Advanced Audio Settings To adjust the advanced audio settings: 1.

E422VL User Manual
Page 26
... on -screen keyboard, enter your network's password, then highlight Connect and press OK. 6. The on -screen menu is displayed. 2. The on -screen menu is displayed. 2. 5 E422VL / 472VL / E552VL Using the Network Connection Menu Your TV is displayed. 3. Connecting to a Wireless Network To connect to a network with an Ethernet cable, you will...
... on -screen keyboard, enter your network's password, then highlight Connect and press OK. 6. The on -screen menu is displayed. 2. The on -screen menu is displayed. 2. 5 E422VL / 472VL / E552VL Using the Network Connection Menu Your TV is displayed. 3. Connecting to a Wireless Network To connect to a network with an Ethernet cable, you will...

E422VL User Manual
Page 27
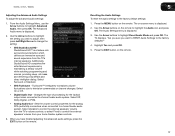
... parental controls • Change the on-screen menu language • Set the time • Adjust the CEC settings • Adjust the VIZIO logo settings Changing the Input Source To quickly access the Input Source menu, press the INPUT button on the remote to the TV. •...EXIT button on the remote. The Settings menu is displayed. 4. Highlight Input Source and press OK. DNS Server - Your alternate domain name server address. 3. E422VL / 472VL / E552VL 5 Changing the Advanced Network Settings Advanced users can : • Change the input source • Set up the TV tuner •...
... parental controls • Change the on-screen menu language • Set the time • Adjust the CEC settings • Adjust the VIZIO logo settings Changing the Input Source To quickly access the Input Source menu, press the INPUT button on the remote to the TV. •...EXIT button on the remote. The Settings menu is displayed. 4. Highlight Input Source and press OK. DNS Server - Your alternate domain name server address. 3. E422VL / 472VL / E552VL 5 Changing the Advanced Network Settings Advanced users can : • Change the input source • Set up the TV tuner •...
E422VL User Manual
Page 28
The Settings menu is 100% complete. Wait until the channel scan is displayed. 3. 5 E422VL / 472VL / E552VL Setting the Tuner Mode If you are using a device that is connected to -air broadcast television channels are available. 1. The on the remote ...
The Settings menu is 100% complete. Wait until the channel scan is displayed. 3. 5 E422VL / 472VL / E552VL Setting the Tuner Mode If you are using a device that is connected to -air broadcast television channels are available. 1. The on the remote ...


