E422VL User Manual
Page 4
... ground your TV close to qualified service personnel. Operating your TV safely. This plug will fit only into the apparatus, the apparatus has been eposed E422VL / E472VL / E552VL to rain or moisture, does not operate normally or has been dropped. • Unplug the power cord before operating your safety. Keep these...
... ground your TV close to qualified service personnel. Operating your TV safely. This plug will fit only into the apparatus, the apparatus has been eposed E422VL / E472VL / E552VL to rain or moisture, does not operate normally or has been dropped. • Unplug the power cord before operating your safety. Keep these...
E422VL User Manual
Page 5
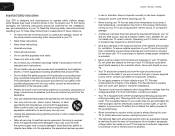
... other than the specified voltage may function abnormally. Your TV is dropped or damaged in fire or electric shock. • Do not use your TV. E422VL / E472VL / E552VL • Do not overload power strips and extension cords. If any other voltage than that may cause the batteries to high voltages...
... other than the specified voltage may function abnormally. Your TV is dropped or damaged in fire or electric shock. • Do not use your TV. E422VL / E472VL / E552VL • Do not overload power strips and extension cords. If any other voltage than that may cause the batteries to high voltages...
E422VL User Manual
Page 6
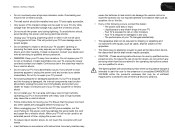
... grounded to provide some protection against voltage surges and static charges. Article 810 of antenna discharge unit, connection to receive over-the-air TV. E422VL / E472VL / E552VL Television Antenna Connection Protection If an outside antenna/satellite dish or cable system is to be connected to earth in the building installation...
... grounded to provide some protection against voltage surges and static charges. Article 810 of antenna discharge unit, connection to receive over-the-air TV. E422VL / E472VL / E552VL Television Antenna Connection Protection If an outside antenna/satellite dish or cable system is to be connected to earth in the building installation...
E422VL User Manual
Page 7
Table of the Inputs 24 Changing the On-Screen Menu Language 25 Setting the Time Zone 25 Adjusting the CEC Settings 26 Turning the VIZIO Logo On or Off 26 Using the Help Menu 26 Back (Models E472VL / E552VL Only 6 VIA Shortcut Buttons 6 Replacing the ...Batteries (Models E472VL / E552VL Only 6 Replacing the Batteries (Model E422VL Only 6 Connecting Your Devices 7 Before You Begin 7 Connecting Your Devices 7 Setting Up Your Network Connection 9 Connecting to A Wired Network 9 Connecting to a...
Table of the Inputs 24 Changing the On-Screen Menu Language 25 Setting the Time Zone 25 Adjusting the CEC Settings 26 Turning the VIZIO Logo On or Off 26 Using the Help Menu 26 Back (Models E472VL / E552VL Only 6 VIA Shortcut Buttons 6 Replacing the ...Batteries (Models E472VL / E552VL Only 6 Replacing the Batteries (Model E422VL Only 6 Connecting Your Devices 7 Before You Begin 7 Connecting Your Devices 7 Setting Up Your Network Connection 9 Connecting to A Wired Network 9 Connecting to a...
E422VL User Manual
Page 8
... Using the USB Media Player 29 Using the USB Media Player 29 Connecting a USB Thumb Drive to the TV 29 Playing USB Media 29 Using VIZIO Internet Apps 32 Using the VIA Shortcut Buttons 32 Using the VIA Dock 32 Moving an App on the VIA Dock 32 Adding a New App... aren't working 36 The image quality is not good 36 The picture is distorted 37 The display image does not cover the entire screen 37 E422VL / E472VL / E552VL The TV has pixels (dots) that are always dark or always lit 37 I see "noise" or static on the screen 37 When I change...
... Using the USB Media Player 29 Using the USB Media Player 29 Connecting a USB Thumb Drive to the TV 29 Playing USB Media 29 Using VIZIO Internet Apps 32 Using the VIA Shortcut Buttons 32 Using the VIA Dock 32 Moving an App on the VIA Dock 32 Adding a New App... aren't working 36 The image quality is not good 36 The picture is distorted 37 The display image does not cover the entire screen 37 E422VL / E472VL / E552VL The TV has pixels (dots) that are always dark or always lit 37 I see "noise" or static on the screen 37 When I change...
E422VL User Manual
Page 10
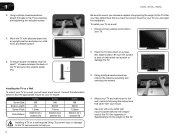
... find the appropriate mount for the weight of the TV. See Appendix A Specifications for your TV model: Screw Size: Screw Length: Screw Pitch: Hole Pattern: E422VL M6 20 1.0mm 200mm (V) x 200mm (H) E472VL M6 20mm 1.0mm 200mm (V) x 400mm (H) E552VL M8 25mm 1.25mm 200mm (V) x 400mm (H) Installing a TV on a wall .... To install your TV on a flat, level, and stable surface. After you have determined that you choose is clear of this TV. E422VL / E472VL / E552VL Be sure the mount you have the correct mount for the weight/ load of debris that came with attached stand into ...
... find the appropriate mount for the weight of the TV. See Appendix A Specifications for your TV model: Screw Size: Screw Length: Screw Pitch: Hole Pattern: E422VL M6 20 1.0mm 200mm (V) x 200mm (H) E472VL M6 20mm 1.0mm 200mm (V) x 400mm (H) E552VL M8 25mm 1.25mm 200mm (V) x 400mm (H) Installing a TV on a wall .... To install your TV on a flat, level, and stable surface. After you have determined that you choose is clear of this TV. E422VL / E472VL / E552VL Be sure the mount you have the correct mount for the weight/ load of debris that came with attached stand into ...
E422VL User Manual
Page 12
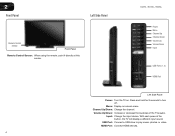
... Up/Down: Increase or decrease the loudness of the button, the TV will display a different input source USB Port: Connect a USB drive to turn off. E422VL / E472VL / E552VL Power Menu Channel Up Channel Down Volume Up Volume Down Input USB Ports (1, 2) HDMI Port Left Side Panel Power: Turn the TV on...
... Up/Down: Increase or decrease the loudness of the button, the TV will display a different input source USB Port: Connect a USB drive to turn off. E422VL / E472VL / E552VL Power Menu Channel Up Channel Down Volume Up Volume Down Input USB Ports (1, 2) HDMI Port Left Side Panel Power: Turn the TV on...

E422VL User Manual
Page 13
CC (Closed: Open the CC Menu. OK: Select highlighted menu option. dow on or off. Last: Return to manually enter a channel. E422VL / E472VL / E552VL Remote Control (Models E472VL / E552VL Only) Input App Launcher CC Exit OK Back V Button Volume Up/Down Mute Number Pad Wide Power/...each press of the TV's audio. Mute: Turn the sound off . Number Pad: Use the number pad to the channel last viewed. VIA Shortcuts: Control VIZIO Internet Apps. A/V Controls: Control external device (Blu-Ray or DVD player). Exit: Close the on . VIA: Start VIA Internet Apps. See Setting Up ...
CC (Closed: Open the CC Menu. OK: Select highlighted menu option. dow on or off. Last: Return to manually enter a channel. E422VL / E472VL / E552VL Remote Control (Models E472VL / E552VL Only) Input App Launcher CC Exit OK Back V Button Volume Up/Down Mute Number Pad Wide Power/...each press of the TV's audio. Mute: Turn the sound off . Number Pad: Use the number pad to the channel last viewed. VIA Shortcuts: Control VIZIO Internet Apps. A/V Controls: Control external device (Blu-Ray or DVD player). Exit: Close the on . VIA: Start VIA Internet Apps. See Setting Up ...

E422VL User Manual
Page 14
Arrow QWERTY Keypad App Shortcuts E422VL / E472VL / E552VL Replacing the Batteries (Models E472VL / E552VL Only) 1. Insert two AAA batteries into the remote control. Insert two AAA batteries into the remote control. ... battery cover. 2 Remote Control - This is open) View Settings for Active VIA App Exit App/Exit VIA Dock VIA Shortcut Buttons Replacing the Batteries (Model E422VL Only) 4. Replace the battery cover. • Use only good quality batteries. • Inserting the batteries incorrectly may result in cracking or leakage that may cause...
Arrow QWERTY Keypad App Shortcuts E422VL / E472VL / E552VL Replacing the Batteries (Models E472VL / E552VL Only) 1. Insert two AAA batteries into the remote control. Insert two AAA batteries into the remote control. ... battery cover. 2 Remote Control - This is open) View Settings for Active VIA App Exit App/Exit VIA Dock VIA Shortcut Buttons Replacing the Batteries (Model E422VL Only) 4. Replace the battery cover. • Use only good quality batteries. • Inserting the batteries incorrectly may result in cracking or leakage that may cause...

E422VL User Manual
Page 16
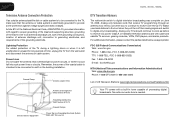
Use the cable(s) shown to connect the TV to your device. 3 Select one of the connection types. BEST BETTER HDMI RF/ COAXIAL RGB COMPONENT GOOD COMPOSITE AV 8 E422VL / E472VL / E552VL Select One: OR OR OR OR DIGITAL DIGITAL / ANALOG ANALOG ANALOG ANALOG Device Connection Chart
Use the cable(s) shown to connect the TV to your device. 3 Select one of the connection types. BEST BETTER HDMI RF/ COAXIAL RGB COMPONENT GOOD COMPOSITE AV 8 E422VL / E472VL / E552VL Select One: OR OR OR OR DIGITAL DIGITAL / ANALOG ANALOG ANALOG ANALOG Device Connection Chart
E422VL User Manual
Page 17
... have : • An ethernet cable long enough to reach your TV • A router or modem with an available ethernet port • A high-speed internet connection 2. E422VL / E472VL / E552VL 3 Setting Up Your Network Connection Your TV is internet-ready, and can use VIA apps to deliver popular online content to your TV...
... have : • An ethernet cable long enough to reach your TV • A router or modem with an available ethernet port • A high-speed internet connection 2. E422VL / E472VL / E552VL 3 Setting Up Your Network Connection Your TV is internet-ready, and can use VIA apps to deliver popular online content to your TV...

E422VL User Manual
Page 20
... appear distorted. If you wish to see : • Analog Closed Caption for analog (NTSC) TV channels. • Digital Closed Caption for digital (ATSC) TV channels. 4. 5 E422VL / 472VL / E552VL Changing the Screen Aspect Ratio The TV can display closed captions for programs that include them . Each mode displays the picture differently. Images...
... appear distorted. If you wish to see : • Analog Closed Caption for analog (NTSC) TV channels. • Digital Closed Caption for digital (ATSC) TV channels. 4. 5 E422VL / 472VL / E552VL Changing the Screen Aspect Ratio The TV can display closed captions for programs that include them . Each mode displays the picture differently. Images...

E422VL User Manual
Page 21
... highlight Digital CC Style. 2. Adjust the size of the background. • Window Color - Change the background color. • BG Opacity - The Timers menu is displayed. 3. E422VL / 472VL / E552VL Changing the Appearance of Digital Closed Captions Digital closed captions can be displayed according to your TV is displayed. 2. From the Closed Caption...
... highlight Digital CC Style. 2. Adjust the size of the background. • Window Color - Change the background color. • BG Opacity - The Timers menu is displayed. 3. E422VL / 472VL / E552VL Changing the Appearance of Digital Closed Captions Digital closed captions can be displayed according to your TV is displayed. 2. From the Closed Caption...

E422VL User Manual
Page 22
... remote to highlight Picture Mode, then use the Left/Right Arrow buttons to distinguish in the picture. This option is not available unless Ambient 14 E422VL / 472VL / E552VL Light Sensor is too high, the picture may be difficult to change each of the picture settings: Backlight - Adjusts the black level of...
... remote to highlight Picture Mode, then use the Left/Right Arrow buttons to distinguish in the picture. This option is not available unless Ambient 14 E422VL / 472VL / E552VL Light Sensor is too high, the picture may be difficult to change each of the picture settings: Backlight - Adjusts the black level of...
E422VL User Manual
Page 23
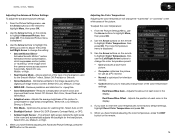
... sensor detects the light levels in the display. When you wish to adjust, then press Left/Right Arrow to highlight Color Temperature, then press OK. E422VL / 472VL / E552VL Adjusting the Advanced Picture Settings To adjust the advanced picture settings: 1. From the Picture Settings Menu, use as a PC monitor. • Normal is...
... sensor detects the light levels in the display. When you wish to adjust, then press Left/Right Arrow to highlight Color Temperature, then press OK. E422VL / 472VL / E552VL Adjusting the Advanced Picture Settings To adjust the advanced picture settings: 1. From the Picture Settings Menu, use as a PC monitor. • Normal is...
E422VL User Manual
Page 24
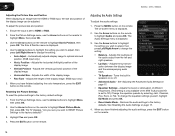
... page 17. 4. To adjust the picture size and position: 1. When you wish to adjust, then press Left/Right Arrow to highlight Audio and press OK. 5 E422VL / 472VL / E552VL Adjusting the Picture Size and Position When displaying an image from the left /right) position of different frequencies. (This setting is only available...
... page 17. 4. To adjust the picture size and position: 1. When you wish to adjust, then press Left/Right Arrow to highlight Audio and press OK. 5 E422VL / 472VL / E552VL Adjusting the Picture Size and Position When displaying an image from the left /right) position of different frequencies. (This setting is only available...
E422VL User Manual
Page 25
... Arrow buttons to a home theater audio system. When you want to RESET Audio Settings to control the external speakers' volume from the TV's internal speakers. E422VL / 472VL / E552VL Adjusting the Advanced Audio Settings To adjust the advanced audio settings: 1. Select On or Off. • Digital Audio Out - Sets the volume control...
... Arrow buttons to a home theater audio system. When you want to RESET Audio Settings to control the external speakers' volume from the TV's internal speakers. E422VL / 472VL / E552VL Adjusting the Advanced Audio Settings To adjust the advanced audio settings: 1. Select On or Off. • Digital Audio Out - Sets the volume control...

E422VL User Manual
Page 26
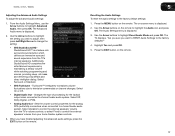
... is displayed. 4. Using the on the remote. The More Access Points menu, which is a list of your network's password, then highlight Connect and press OK. 6. 5 E422VL / 472VL / E552VL Using the Network Connection Menu Your TV is connected to a network with an Ethernet cable, you do not see the wireless network connection...
... is displayed. 4. Using the on the remote. The More Access Points menu, which is a list of your network's password, then highlight Connect and press OK. 6. 5 E422VL / 472VL / E552VL Using the Network Connection Menu Your TV is connected to a network with an Ethernet cable, you do not see the wireless network connection...

E422VL User Manual
Page 27
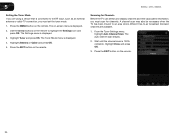
E422VL / 472VL / E552VL 5 Changing the Advanced Network Settings Advanced users can : • Change the input source • Set up the TV tuner • Name the TV ... remote to set up parental controls • Change the on-screen menu language • Set the time • Adjust the CEC settings • Adjust the VIZIO logo settings Changing the Input Source To quickly access the Input Source menu, press the INPUT button on the remote. To change the input source...
E422VL / 472VL / E552VL 5 Changing the Advanced Network Settings Advanced users can : • Change the input source • Set up the TV tuner • Name the TV ... remote to set up parental controls • Change the on-screen menu language • Set the time • Adjust the CEC settings • Adjust the VIZIO logo settings Changing the Input Source To quickly access the Input Source menu, press the INPUT button on the remote. To change the input source...
E422VL User Manual
Page 28
5 E422VL / 472VL / E552VL Setting the Tuner Mode If you are available. 1. Use the Arrow buttons on the remote. Highlight Antenna or Cable and press OK. 5. Press ...
5 E422VL / 472VL / E552VL Setting the Tuner Mode If you are available. 1. Use the Arrow buttons on the remote. Highlight Antenna or Cable and press OK. 5. Press ...


