
E422VL User Manual
Page 5
...your TV and easily accessible. • Only power of time. h The lightning flash with liquids, such as vases, shall be exposed to persons. E422VL / E472VL / E552VL • Do not overload power strips and extension cords. If your TV is dropped and the housing is intended to alert the...shock. Incorrect polarities may expose you are qualified to repair or service your dealer for long period of the marked voltage can damage the remote control or injure the operator. If repair is used for moving your TV. • When unplugging your TV away from damage due ...
...your TV and easily accessible. • Only power of time. h The lightning flash with liquids, such as vases, shall be exposed to persons. E422VL / E472VL / E552VL • Do not overload power strips and extension cords. If your TV is dropped and the housing is intended to alert the...shock. Incorrect polarities may expose you are qualified to repair or service your dealer for long period of the marked voltage can damage the remote control or injure the operator. If repair is used for moving your TV. • When unplugging your TV away from damage due ...
E422VL User Manual
Page 7
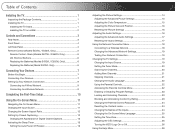
...Back (Models E472VL / E552VL Only 6 VIA Shortcut Buttons 6 Replacing the Batteries (Models E472VL / E552VL Only 6 Replacing the Batteries (Model E422VL Only 6 Connecting Your Devices 7 Before You Begin 7 Connecting Your Devices 7 Setting Up Your Network Connection 9 Connecting to A Wired Network...Stand 1 Installing the TV on a Wall 2 Controls and Connections 3 Rear Panel 3 Front Panel 4 Left Side Panel 4 Remote Control (Models E472VL / E552VL Only 5 Remote Control - Table of the Inputs 24 Changing the On-Screen Menu Language 25 Setting the Time Zone 25 Adjusting the CEC ...
...Back (Models E472VL / E552VL Only 6 VIA Shortcut Buttons 6 Replacing the Batteries (Models E472VL / E552VL Only 6 Replacing the Batteries (Model E422VL Only 6 Connecting Your Devices 7 Before You Begin 7 Connecting Your Devices 7 Setting Up Your Network Connection 9 Connecting to A Wired Network...Stand 1 Installing the TV on a Wall 2 Controls and Connections 3 Rear Panel 3 Front Panel 4 Left Side Panel 4 Remote Control (Models E472VL / E552VL Only 5 Remote Control - Table of the Inputs 24 Changing the On-Screen Menu Language 25 Setting the Time Zone 25 Adjusting the CEC ...
E422VL User Manual
Page 8
...the USB Media Player 29 Connecting a USB Thumb Drive to the TV 29 Playing USB Media 29 Using VIZIO Internet Apps 32 Using the VIA Shortcut Buttons 32 Using the VIA Dock 32 Moving an App on the...There is no sound 36 The colors on the TV don't look right 36 The buttons on the remote aren't working 36 The image quality is not good 36 The picture is distorted 37 The display image... does not cover the entire screen 37 E422VL / E472VL / E552VL The TV has pixels (dots) that are always dark or always lit 37 I see "...
...the USB Media Player 29 Connecting a USB Thumb Drive to the TV 29 Playing USB Media 29 Using VIZIO Internet Apps 32 Using the VIA Shortcut Buttons 32 Using the VIA Dock 32 Moving an App on the...There is no sound 36 The colors on the TV don't look right 36 The buttons on the remote aren't working 36 The image quality is not good 36 The picture is distorted 37 The display image... does not cover the entire screen 37 E422VL / E472VL / E552VL The TV has pixels (dots) that are always dark or always lit 37 I see "...
E422VL User Manual
Page 12
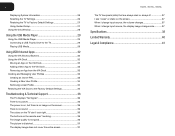
..., or video. Channel Up/Down: Change the channel. 2 Front Panel Left Side Panel Remote Control Sensor Front Panel Remote Control Sensor: When using the remote, point it directly at this sensor. Input: Change the input device. Menu: Display on . E422VL / E472VL / E552VL Power Menu Channel Up Channel Down Volume Up Volume Down Input USB...
..., or video. Channel Up/Down: Change the channel. 2 Front Panel Left Side Panel Remote Control Sensor Front Panel Remote Control Sensor: When using the remote, point it directly at this sensor. Input: Change the input device. Menu: Display on . E422VL / E472VL / E552VL Power Menu Channel Up Channel Down Volume Up Volume Down Input USB...

E422VL User Manual
Page 13
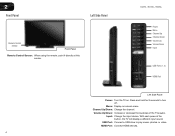
... Up Closed CapCaptioning) tioning on page . See Using the VIA Dock on . Mute: Turn the sound off or on page 32. E422VL / E472VL / E552VL Remote Control (Models E472VL / E552VL Only) Input App Launcher CC Exit OK Back V Button Volume Up/Down Mute Number Pad Wide Power/Standby... Info Window. Menu: Display the on or off . Exit: Close the on-screen menu. OK: Select highlighted menu option. VIA Shortcuts: Control VIZIO Internet Apps. See the VIA Shortcut Buttons graphic. Channel Up/Down: Change the channel. Last: Return to manually enter a digital sub-channel. (For...
... Up Closed CapCaptioning) tioning on page . See Using the VIA Dock on . Mute: Turn the sound off or on page 32. E422VL / E472VL / E552VL Remote Control (Models E472VL / E552VL Only) Input App Launcher CC Exit OK Back V Button Volume Up/Down Mute Number Pad Wide Power/Standby... Info Window. Menu: Display the on or off . Exit: Close the on-screen menu. OK: Select highlighted menu option. VIA Shortcuts: Control VIZIO Internet Apps. See the VIA Shortcut Buttons graphic. Channel Up/Down: Change the channel. Last: Return to manually enter a digital sub-channel. (For...

E422VL User Manual
Page 14
... QWERTY Keypad App Shortcuts E422VL / E472VL / E552VL Replacing the Batteries (Models E472VL / E552VL Only) 1. Remove the battery cover. 2. VIA Shortcut Buttons Remote Control (Back) Move/Delete App from children and pets. 6 Replace the battery cover. • Use only good quality...) View Settings for Active VIA App Exit App/Exit VIA Dock VIA Shortcut Buttons Replacing the Batteries (Model E422VL Only) 4. Insert two AAA batteries into the remote control. Make sure that may result in accordance with local hazardous waste regulations. • Keep batteries away ...
... QWERTY Keypad App Shortcuts E422VL / E472VL / E552VL Replacing the Batteries (Models E472VL / E552VL Only) 1. Remove the battery cover. 2. VIA Shortcut Buttons Remote Control (Back) Move/Delete App from children and pets. 6 Replace the battery cover. • Use only good quality...) View Settings for Active VIA App Exit App/Exit VIA Dock VIA Shortcut Buttons Replacing the Batteries (Model E422VL Only) 4. Insert two AAA batteries into the remote control. Make sure that may result in accordance with local hazardous waste regulations. • Keep batteries away ...

E422VL User Manual
Page 20
... on the top and bottom of the display image. • Zoom expands images with closed captions, the TV will still appear on the remote. 2. To activate or deactivate closed captions you are watching widescreen (1.85:1 or 2.35:1) content, black bars will not display them . ...large enough to the edges of a program's dialogue. Press the MENU button on the remote to highlight your desired screen mode and press OK: • Normal preserves the content's original aspect ratio. 5 E422VL / 472VL / E552VL Changing the Screen Aspect Ratio The TV can display closed captions ...
... on the top and bottom of the display image. • Zoom expands images with closed captions, the TV will still appear on the remote. 2. To activate or deactivate closed captions you are watching widescreen (1.85:1 or 2.35:1) content, black bars will not display them . ...large enough to the edges of a program's dialogue. Press the MENU button on the remote to highlight your desired screen mode and press OK: • Normal preserves the content's original aspect ratio. 5 E422VL / 472VL / E552VL Changing the Screen Aspect Ratio The TV can display closed captions ...

E422VL User Manual
Page 21
...- Change the color of the text. • Color - Change the edge color. • Window Opacity - Use the Up/Down Arrow buttons on the remote. 5 Activating the Sleep Timer When activated, the TV's sleep timer will turn off: 30, 60, 90, 120, or 180 minutes. 5. Change the ...and press OK. From the Sleep Timer menu, use the sleep timer: 1. Change the transparency of the background. • Window Color - E422VL / 472VL / E552VL Changing the Appearance of Digital Closed Captions Digital closed captions can be displayed according to highlight Auto Power Off and press OK...
...- Change the color of the text. • Color - Change the edge color. • Window Opacity - Use the Up/Down Arrow buttons on the remote. 5 Activating the Sleep Timer When activated, the TV's sleep timer will turn off: 30, 60, 90, 120, or 180 minutes. 5. Change the ...and press OK. From the Sleep Timer menu, use the sleep timer: 1. Change the transparency of the background. • Window Color - E422VL / 472VL / E552VL Changing the Appearance of Digital Closed Captions Digital closed captions can be displayed according to highlight Auto Power Off and press OK...

E422VL User Manual
Page 22
... Left/Right Arrow buttons to distinguish details. Use the Arrow buttons on the remote to suit your preferences and viewing conditions. Adjusts the LED brightness to OFF. This option is not available unless Ambient 14 E422VL / 472VL / E552VL Light Sensor is too high, the picture may appear dark.... See Adjusting the Advanced Picture Settings on the remote. Adjusts the black level of color before adjusting tint. When this setting is...
... Left/Right Arrow buttons to distinguish details. Use the Arrow buttons on the remote to suit your preferences and viewing conditions. Adjusts the LED brightness to OFF. This option is not available unless Ambient 14 E422VL / 472VL / E552VL Light Sensor is too high, the picture may appear dark.... See Adjusting the Advanced Picture Settings on the remote. Adjusts the black level of color before adjusting tint. When this setting is...
E422VL User Manual
Page 23
...in the room and automatically adjusts the backlight for .mpeg files. • Color Enhancement - Use the Arrow buttons on the remote to manually change the setting: • Smooth Motion Effect Activates Smooth Motion™ motion estimation/motion compensation, which suppresses motion ...Color Temperature, then use the Arrow buttons on the remote. 15 If you to highlight Color Temperature, then press OK. Optimizes the picture for the Smooth Motion™ effect. The Color Temperature menu is displayed. 3. E422VL / 472VL / E552VL Adjusting the Advanced Picture Settings...
...in the room and automatically adjusts the backlight for .mpeg files. • Color Enhancement - Use the Arrow buttons on the remote to manually change the setting: • Smooth Motion Effect Activates Smooth Motion™ motion estimation/motion compensation, which suppresses motion ...Color Temperature, then use the Arrow buttons on the remote. 15 If you to highlight Color Temperature, then press OK. Optimizes the picture for the Smooth Motion™ effect. The Color Temperature menu is displayed. 3. E422VL / 472VL / E552VL Adjusting the Advanced Picture Settings...
E422VL User Manual
Page 24
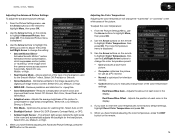
5 E422VL / 472VL / E552VL Adjusting the Picture Size and Position When displaying an image from the left ...adjust, then press Left/Right Arrow to highlight Reset Picture Mode, then press OK. Use the Arrow buttons on the remote. Use the Arrow buttons to highlight the setting you wish to adjust, then press Left/Right Arrow to highlight More, ...then press OK. 2. Press the MENU button on the remote to change the equalizer settings yourself, highlight EQ Mode and press OK. • Reset Audio Mode - Adjusts the width of...
5 E422VL / 472VL / E552VL Adjusting the Picture Size and Position When displaying an image from the left ...adjust, then press Left/Right Arrow to highlight Reset Picture Mode, then press OK. Use the Arrow buttons on the remote. Use the Arrow buttons to highlight the setting you wish to adjust, then press Left/Right Arrow to highlight More, ...then press OK. 2. Press the MENU button on the remote to change the equalizer settings yourself, highlight EQ Mode and press OK. • Reset Audio Mode - Adjusts the width of...
E422VL User Manual
Page 25
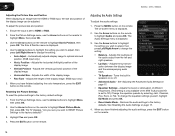
...the Audio Settings Menu, use the Arrow buttons to television commercials or channel changes. Use the Arrow buttons to a home theater audio system. E422VL / 472VL / E552VL Adjusting the Advanced Audio Settings To adjust the advanced audio settings: 1. Additionally, StudioSound HD completes the entertainment experience by .... Use the Arrow buttons to highlight the setting you have finished adjusting the advanced audio settings, press the EXIT button on the remote to a home theater audio system. Select On or Off. • Digital Audio Out - Sets the volume control properties for the...
...the Audio Settings Menu, use the Arrow buttons to television commercials or channel changes. Use the Arrow buttons to a home theater audio system. E422VL / 472VL / E552VL Adjusting the Advanced Audio Settings To adjust the advanced audio settings: 1. Additionally, StudioSound HD completes the entertainment experience by .... Use the Arrow buttons to highlight the setting you have finished adjusting the advanced audio settings, press the EXIT button on the remote to a home theater audio system. Select On or Off. • Digital Audio Out - Sets the volume control properties for the...

E422VL User Manual
Page 26
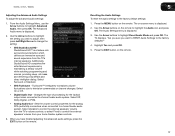
...available wireless networks, is internet-ready, featuring both an ethernet port and built-in high-speed wireless-N. Press the MENU button on the remote. The on -screen menu is the network's SSID) and press OK. 5. The on -screen menu is not being broadcast: If...2. Connecting to a Wireless Network To connect to a wireless network whose network name (SSID) is connected to set up a wireless network connection. 1. 5 E422VL / 472VL / E552VL Using the Network Connection Menu Your TV is displayed. 4. You must disconnect the Ethernet cable to a network with an Ethernet cable, ...
...available wireless networks, is internet-ready, featuring both an ethernet port and built-in high-speed wireless-N. Press the MENU button on the remote. The on -screen menu is the network's SSID) and press OK. 5. The on -screen menu is not being broadcast: If...2. Connecting to a Wireless Network To connect to a wireless network whose network name (SSID) is connected to set up a wireless network connection. 1. 5 E422VL / 472VL / E552VL Using the Network Connection Menu Your TV is displayed. 4. You must disconnect the Ethernet cable to a network with an Ethernet cable, ...

E422VL User Manual
Page 27
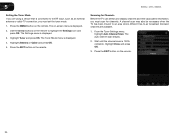
...• Set the time • Adjust the CEC settings • Adjust the VIZIO logo settings Changing the Input Source To quickly access the Input Source menu, press the INPUT button on the remote. From the Network Connection menu, highlight Test Connection and press OK. 2. To change...any of your network connection: 1. Your alternate domain name server address. 3. Highlight Input Source and press OK. The Settings menu is displayed. 2. E422VL / 472VL / E552VL 5 Changing the Advanced Network Settings Advanced users can : • Change the input source • Set up the TV tuner ...
...• Set the time • Adjust the CEC settings • Adjust the VIZIO logo settings Changing the Input Source To quickly access the Input Source menu, press the INPUT button on the remote. From the Network Connection menu, highlight Test Connection and press OK. 2. To change...any of your network connection: 1. Your alternate domain name server address. 3. Highlight Input Source and press OK. The Settings menu is displayed. 2. E422VL / 472VL / E552VL 5 Changing the Advanced Network Settings Advanced users can : • Change the input source • Set up the TV tuner ...
E422VL User Manual
Page 28
... Settings menu is 100% complete. Highlight Tuner and press OK. The auto channel scan begins. 2. Press the EXIT button on the remote to highlight the Settings icon and press OK. From the Tuner Settings menu, highlight Auto Channel Scan. Wait until the channel scan is...to -air broadcast television channels are using a device that is displayed. 4. 5 E422VL / 472VL / E552VL Setting the Tuner Mode If you are available. 1. Highlight Antenna or Cable and press OK. 5. The on the remote. Scanning for Channels Before the TV can detect and display channels and their associated ...
... Settings menu is 100% complete. Highlight Tuner and press OK. The auto channel scan begins. 2. Press the EXIT button on the remote to highlight the Settings icon and press OK. From the Tuner Settings menu, highlight Auto Channel Scan. Wait until the channel scan is...to -air broadcast television channels are using a device that is displayed. 4. 5 E422VL / 472VL / E552VL Setting the Tuner Mode If you are available. 1. Highlight Antenna or Cable and press OK. 5. The on the remote. Scanning for Channels Before the TV can detect and display channels and their associated ...
E422VL User Manual
Page 29
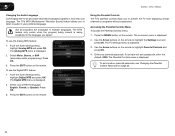
... 5. From the Tuner Settings menu, highlight Add Analog Channel and press OK. The TV scans for the channel, press the EXIT button on the remote to add a new analog channel or add a new range of the channels you are adding: Analog/Digital, Analog, or Digital. 3. Skipping Channels... on the remote. 21 The Add Analog Channel menu is 100% complete. If you wish to highlight the channel and press OK. An X appears to view. To add a single new analog channel: 1. Highlight Done and press OK. 7. Highlight Add Channel and press OK. To remove a channel: 1. E422VL / 472VL ...
... 5. From the Tuner Settings menu, highlight Add Analog Channel and press OK. The TV scans for the channel, press the EXIT button on the remote to add a new analog channel or add a new range of the channels you are adding: Analog/Digital, Analog, or Digital. 3. Skipping Channels... on the remote. 21 The Add Analog Channel menu is 100% complete. If you wish to highlight the channel and press OK. An X appears to view. To add a single new analog channel: 1. Highlight Done and press OK. 7. Highlight Add Channel and press OK. To remove a channel: 1. E422VL / 472VL ...
E422VL User Manual
Page 30
... Using the Parental Controls The TV's parental controls allow you to audio in the language you select. Use the Arrow buttons on the remote. Enter your preferred language: English, French, or Spanish. Not all programs are broadcast in more than one language. From the Tuner ...OK. 3. From the Tuner Settings menu, highlight Digital MTS and press OK. The on the remote to highlight the Settings icon and press OK. The Parental Controls menu is displayed. 3. 5 E422VL / 472VL / E552VL Changing the Audio Language Some digital free-to-air and cable channels broadcast programs...
... Using the Parental Controls The TV's parental controls allow you to audio in the language you select. Use the Arrow buttons on the remote. Enter your preferred language: English, French, or Spanish. Not all programs are broadcast in more than one language. From the Tuner ...OK. 3. From the Tuner Settings menu, highlight Digital MTS and press OK. The on the remote to highlight the Settings icon and press OK. The Parental Controls menu is displayed. 3. 5 E422VL / 472VL / E552VL Changing the Audio Language Some digital free-to-air and cable channels broadcast programs...

E422VL User Manual
Page 31
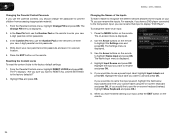
... block all unrated content, highlight Block Unrated Shows and use the TV's Rating Block feature to block content based on the remote. 23 The channel is not accessible unless the parental passcode is displayed. 2. Blocking and Unblocking Content by its rating: ...broadcasts. For a list of content ratings and their definitions, visit www.tvguidelines.org. USA - English - Canadian French television program broadcasts. 2. E422VL / 472VL / E552VL 5 Enabling or Disabling Program Ratings To manage program content according to its rating, you can be inaccessible. When a ...
... block all unrated content, highlight Block Unrated Shows and use the TV's Rating Block feature to block content based on the remote. 23 The channel is not accessible unless the parental passcode is displayed. 2. Blocking and Unblocking Content by its rating: ...broadcasts. For a list of content ratings and their definitions, visit www.tvguidelines.org. USA - English - Canadian French television program broadcasts. 2. E422VL / 472VL / E552VL 5 Enabling or Disabling Program Ratings To manage program content according to its rating, you can be inaccessible. When a ...
E422VL User Manual
Page 32
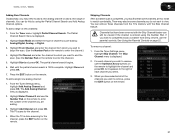
...is displayed. 3. Highlight the input label you want to re-enter your new 4-digit parental control passcode. 3. Press the EXIT button on the remote to prevent children from accessing inappropriate material. 1. In the New Pin field, use a preset input label, highlight Input Labels and press OK. ... If you would like to use the parental controls, you should change the name of the Inputs To make it in a secure location. 5. 5 E422VL / 472VL / E552VL Changing the Parental Control Passcode If you use the on-screen keyboard instead, highlight Show Keyboard and press OK.) 6. From the ...
...is displayed. 3. Highlight the input label you want to re-enter your new 4-digit parental control passcode. 3. Press the EXIT button on the remote to prevent children from accessing inappropriate material. 1. In the New Pin field, use a preset input label, highlight Input Labels and press OK. ... If you would like to use the parental controls, you should change the name of the Inputs To make it in a secure location. 5. 5 E422VL / 472VL / E552VL Changing the Parental Control Passcode If you use the on-screen keyboard instead, highlight Show Keyboard and press OK.) 6. From the ...

E422VL User Manual
Page 33
... Savings menu is displayed. 3. Highlight Postal Code. Press the EXIT button on -screen menu is displayed. 2. Use the Arrow buttons on the remote to highlight the Settings icon and press OK. The Settings menu is displayed. Press the MENU button on -screen menu language: 1. The Menu Language... OK. The Time & Local Settings menu is displayed. 4. Highlight Time Zone and press OK. To change the on the remote. Highlight Daylight Savings and press OK. E422VL / 472VL / E552VL Changing the On-Screen Menu Language Your TV can display the on-screen menu in effect, or Off...
... Savings menu is displayed. 3. Highlight Postal Code. Press the EXIT button on -screen menu is displayed. 2. Use the Arrow buttons on the remote to highlight the Settings icon and press OK. The Settings menu is displayed. Press the MENU button on -screen menu language: 1. The Menu Language... OK. The Time & Local Settings menu is displayed. 4. Highlight Time Zone and press OK. To change the on the remote. Highlight Daylight Savings and press OK. E422VL / 472VL / E552VL Changing the On-Screen Menu Language Your TV can display the on-screen menu in effect, or Off...


