Vivitar i7 Support and Manuals
Get Help and Manuals for this Vivitar item
Popular Vivitar i7 Manual Pages
Warranty - Page 2
... charge for the
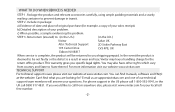
from anywhere else, please visit www.vivitar.com for example, a copy of your questions. WHAT TO DO WHEN SERVICE IS NEEDED
STEP 1.
c) When possible, a sample evidencing the problem.
If you shipping prepaid. For more information visit our website www.vivitar.com TECHNICAL SUPPORT
support team members will be not faulty or the defect...
Camera Manual - Page 1
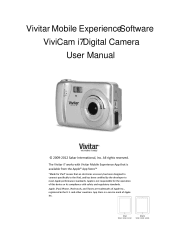
... with Vivitar Mobile Experience App that is a service mark of Apple Inc. and other countries. All rights reserved. App Store is available from the Apple® App Store™
"Made for the operation of Apple Inc., registered in the U.S. Vivitar Mobile Experience Software ViviCam i7Digital Camera User Manual
© 2009-2012 Sakar International, Inc.
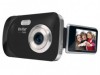
The Vivitar i7 works...
Camera Manual - Page 2
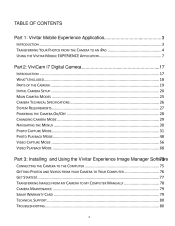
... YOUR PHOTOS FROM THE CAMERA TO AN IPAD ...4 USING THE VIVITAR MOBILE EXPERIENCE APPLICATION...7
Part 2: ViviCam i7 Digital Camera ...17
INTRODUCTION ...17 WHAT'S INCLUDED...18 PARTS OF THE CAMERA ...19 INITIAL CAMERA SETUP ...20 MAIN CAMERA MODES ...25 CAMERA TECHNICAL SPECIFICATIONS ...26 SYSTEM REQUIREMENTS...27 POWERING THE CAMERA ON/OFF ...28 CHANGING CAMERA MODE ...29 NAVIGATING THE...
Camera Manual - Page 3
... to your iPad. Share photos via email, print and social networks
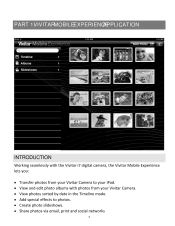
3 Create photo slideshows. View and edit photo albums with the Vivitar i7 digital camera, the Vivitar Mobile Experience lets you Transfer photos from your Vivitar Camera. View photos sorted by date in the Timeline mode. PART 1: VIVITARMOBILEEXPERIENCE APPLICATION
INTRODUCTION
Working seamlessly with photos from your...
Camera Manual - Page 4
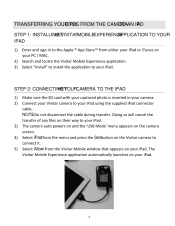
... the menu and press the Set button on your PC / MAC. 2) Search and locate the Vivitar Mobile Experience application. 3) Select "Install" to install the application to your iPad using the supplied iPad connector cable. Connect your Vivitar camera to your iPad. Select iPad from the Vivitar Mobile window that appears on the camera screen. TRANSFERRING YOUR OTOS PH...
Camera Manual - Page 5
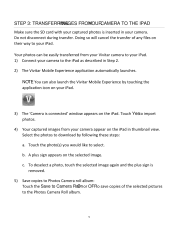
... files on the selected image. c. Do not disconnect during transfer. Touch Yesto import photos. 4) Your captured images from your Vivitar camera to your iPad. 1) Connect your camera to select. STEP 3: TRANSFERRING IMAGES FROM YOUR CAMERA TO THE IPAD
Make sure the SD card with your captured photos is connected' window appears on the iPad...
Camera Manual - Page 6
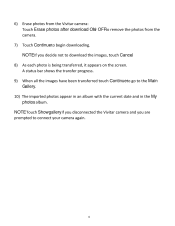
... Erase photos after download ON or OFFto remove the photos from the camera. A status bar shows the transfer progress. NOTE : Touch Showgallery if you disconnected the Vivitar camera and you decide not to download the images, touch Cancel .
7)
8)
As each photo is being transferred, it appears on the screen. When all the images...
Camera Manual - Page 7
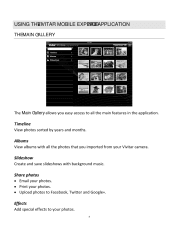
... easy access to all the main features in the application. Share photos
Email your photos. Print your photos. Upload photos to your Vivitar camera.
Effects
Add special effects to Facebook, Twitter and Google+. Timeline
View photos sorted by years and months. USING THE...
Camera Manual - Page 8
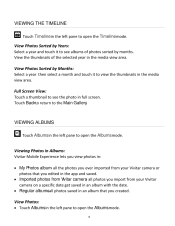
... to see albums of the selected year in an album with the date. Regular albums - all the photos you ever imported from your Vivitar camera on a specific date get saved in the media view area. all photos you view photos in the left pane to see the photo in the media view...
Camera Manual - Page 9
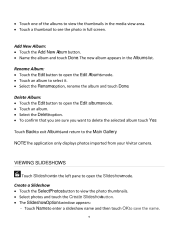
... the Edit button to select it. Select the Renameoption, rename the album and touch Done.
NOTE : The application only displays photos imported from your Vivitar camera. Touch Name to the Main Gallery .
Delete Album:
Touch the Edit button to open the Edit A lbums mode. Touch an album to open the...
Camera Manual - Page 18
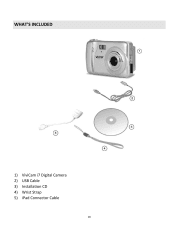
WHAT'S INCLUDED
1) 2) 3) 4) 5)
ViviCam i7 Digital Camera USB Cable Installation CD Wrist Strap iPad Connector Cable
18
Camera Manual - Page 23
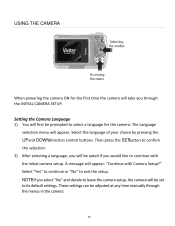
..." to continue or "No" to continue with Camera Setup?" These settings can be prompted to its default settings. Setting the Camera Language
1) You will be set to select a language for the first time the camera will appear. Then press the SET button to leave the camera setup, the camera will appear: "Continue with the initial camera setup. The Language selection menu will take you...
Camera Manual - Page 44
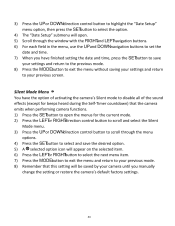
... and LEFT navigation buttons. Press the MODEbutton to exit the menu without saving your settings and return to your settings and return to select and save your previous screen. When you manually change the setting or restore the camera's default factory settings.
44 For each field in the menu, use the UPand DOWNnavigation buttons to select...
Camera Manual - Page 64
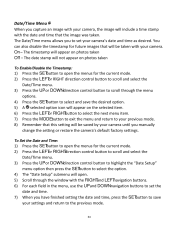
... to open the menus for future images that will open.
When you manually change the setting or restore the camera's default factory settings. Press the UPor DOWNdirection control button to highlight the "Date Setup" menu option then press the SET button to scroll and select the Date/Time menu. A selected option icon will appear on the...
Camera Manual - Page 75

... cable that came with your camera to connect your camera to your computer. 13) On Macintosh: Click the "Quit" button when the installation is complete. Click the "Launch Vivitar Experience Image Manager" to open the application. 14) If you close the application you will have to the computer you can run the Vivitar Experience Image Manager from...
Vivitar i7 Reviews
We have not received any reviews for Vivitar yet.