Camera Manual
Page 3
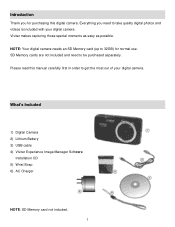
What's Included 1) Digital Camera 2) Lithium Battery 3) USB cable 4) Vivitar Experience Image Manager Software Installation CD 5) Wrist Strap 6) AC Charger NOTE: SD Memory card not included. 2 SD Memory cards are not included and need to take quality digital photos and videos is included with your digital camera. Vivitar makes capturing those special moments as easy...
What's Included 1) Digital Camera 2) Lithium Battery 3) USB cable 4) Vivitar Experience Image Manager Software Installation CD 5) Wrist Strap 6) AC Charger NOTE: SD Memory card not included. 2 SD Memory cards are not included and need to take quality digital photos and videos is included with your digital camera. Vivitar makes capturing those special moments as easy...
Camera Manual
Page 4
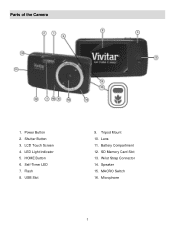
HOME Button 6. Tripod Mount 10. Battery Compartment 12. Parts of the Camera 1. LED Light Indicator 5. Flash 8. SD Memory Card Slot 13. Microphone 3 Shutter Button 3. Power Button 2. LCD Touch Screen 4. Speaker 15. MACRO Switch 16. Lens 11. USB Slot 9. Self-Timer LED 7. Wrist Strap Connector 14.
HOME Button 6. Tripod Mount 10. Battery Compartment 12. Parts of the Camera 1. LED Light Indicator 5. Flash 8. SD Memory Card Slot 13. Microphone 3 Shutter Button 3. Power Button 2. LCD Touch Screen 4. Speaker 15. MACRO Switch 16. Lens 11. USB Slot 9. Self-Timer LED 7. Wrist Strap Connector 14.
Camera Manual
Page 5
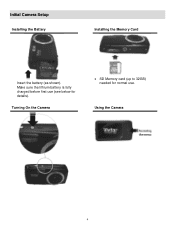
Turning On the Camera SD Memory card (up to 32GB) needed for details). Make sure the lithium battery is fully charged before first use (see below for normal use. Using the Camera 4 Initial Camera Setup Installing the Battery Installing the Memory Card Insert the battery (as shown).
Turning On the Camera SD Memory card (up to 32GB) needed for details). Make sure the lithium battery is fully charged before first use (see below for normal use. Using the Camera 4 Initial Camera Setup Installing the Battery Installing the Memory Card Insert the battery (as shown).
Camera Manual
Page 6
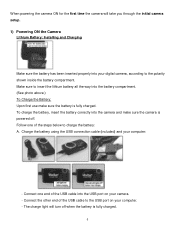
...camera. - Connect one of the steps below to the polarity shown inside the battery compartment. Follow one end of the USB cable to the USB port on your digital camera, according to charge the battery: A. The charge light will take you through the initial camera setup. 1) ...Powering ON the Camera Lithium Battery: Installing and Charging Make sure the battery has been inserted properly into the battery compartment. (See photo above.) To Charge the Battery: Upon first use make sure the camera is fully charged. Connect the other...
...camera. - Connect one of the steps below to the polarity shown inside the battery compartment. Follow one end of the USB cable to the USB port on your digital camera, according to charge the battery: A. The charge light will take you through the initial camera setup. 1) ...Powering ON the Camera Lithium Battery: Installing and Charging Make sure the battery has been inserted properly into the battery compartment. (See photo above.) To Charge the Battery: Upon first use make sure the camera is fully charged. Connect the other...
Camera Manual
Page 7
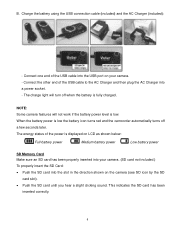
...fully charged. The charge light will not work if the battery power level is low the battery icon turns red and the camcorder automatically turns off when the battery is displayed on LCD as shown below: Full battery power Medium battery power Low battery power SD Memory Card Make sure an SD card has been...on your camera. - B. NOTE: Some camera features will turn off a few seconds later. This indicates the SD card has been inserted correctly. 6 When the battery power is low. Charge the battery using the USB connection cable (included) and the AC Charger (included): -
...fully charged. The charge light will not work if the battery power level is low the battery icon turns red and the camcorder automatically turns off when the battery is displayed on LCD as shown below: Full battery power Medium battery power Low battery power SD Memory Card Make sure an SD card has been...on your camera. - B. NOTE: Some camera features will turn off a few seconds later. This indicates the SD card has been inserted correctly. 6 When the battery power is low. Charge the battery using the USB connection cable (included) and the AC Charger (included): -
Camera Manual
Page 11
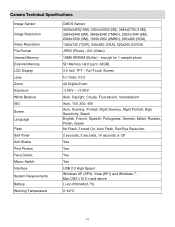
... Memory LCD Display Lens Zoom Exposure White Balance ISO Scene Language Flash Self-Timer Anti-Shake Print Photos Face Detect Macro Switch Interface System Requirements Battery Working Temperature CMOS Sensor 4608x3456(16M), 4000x3000(12M), 3648x2736 (10M), 3264x2448 (8M), 3648x2048 (7MHD), 2592x1944 (5M), 2048x1536 (3M), 1920x1080 (2MHD), 640x480 (VGA) 1280x720 (720P), 640x480...
... Memory LCD Display Lens Zoom Exposure White Balance ISO Scene Language Flash Self-Timer Anti-Shake Print Photos Face Detect Macro Switch Interface System Requirements Battery Working Temperature CMOS Sensor 4608x3456(16M), 4000x3000(12M), 3648x2736 (10M), 3264x2448 (8M), 3648x2048 (7MHD), 2592x1944 (5M), 2048x1536 (3M), 1920x1080 (2MHD), 640x480 (VGA) 1280x720 (720P), 640x480...
Camera Manual
Page 13
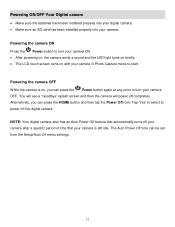
Tap 'Yes' to select to start. Powering ON/OFF Your Digital camera Make sure the batteries have been installed properly into your digital camera. Make sure an SD card has been installed properly into your camera in Photo Capture mode ...
Tap 'Yes' to select to start. Powering ON/OFF Your Digital camera Make sure the batteries have been installed properly into your digital camera. Make sure an SD card has been installed properly into your camera in Photo Capture mode ...
Camera Manual
Page 56
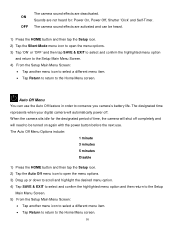
... sound effects are activated and can use . Sounds are not heard for the designated period of time, the camera will need to conserve you camera's battery life. Auto Off Menu You can be turned on again with the power button before the next use the Auto Off feature in order to...
... sound effects are activated and can use . Sounds are not heard for the designated period of time, the camera will need to conserve you camera's battery life. Auto Off Menu You can be turned on again with the power button before the next use the Auto Off feature in order to...


