Camera Manual
Page 1
All other trademarks are registered trademarks of their respective companies. All rights reserved. Windows and the Windows logo are the property of Microsoft Corporation. ViviCam S137 Digital Camera User Manual © 2009-2012 Sakar International, Inc.
All other trademarks are registered trademarks of their respective companies. All rights reserved. Windows and the Windows logo are the property of Microsoft Corporation. ViviCam S137 Digital Camera User Manual © 2009-2012 Sakar International, Inc.
Camera Manual
Page 2
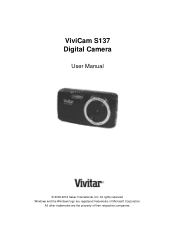
Table of Contents Introduction ...2 What's Included ...2 Parts of the Camera ...3 Initial Camera Setup ...4 Main Camera Modes...9 Camera Technical Specifications ...10 Computer System Requirements ...11 Powering ON/OFF Your Digital camera 12 Changing Camera Mode ...13 Navigating the Menus ...14 Camera Options: Flash, Macro Switch 17 Photo Capture Mode ...19 Photo Playback Mode ...33 Video Capture Mode ...39 Video Playback...
Table of Contents Introduction ...2 What's Included ...2 Parts of the Camera ...3 Initial Camera Setup ...4 Main Camera Modes...9 Camera Technical Specifications ...10 Computer System Requirements ...11 Powering ON/OFF Your Digital camera 12 Changing Camera Mode ...13 Navigating the Menus ...14 Camera Options: Flash, Macro Switch 17 Photo Capture Mode ...19 Photo Playback Mode ...33 Video Capture Mode ...39 Video Playback...
Camera Manual
Page 3
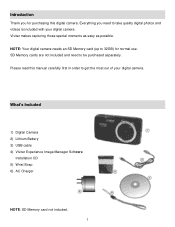
...for normal use. Please read this digital camera. Vivitar makes capturing those special moments as easy as possible. SD Memory cards are not included and need to take quality digital photos and videos is included with your digital camera. NOTE: Your digital camera needs an SD Memory card (...up to 32GB) for purchasing this manual carefully first in order to get the most out of your digital camera. What's Included 1) Digital Camera 2) Lithium Battery 3) USB cable 4) Vivitar Experience Image Manager Software Installation CD 5) Wrist Strap 6) AC Charger NOTE: SD Memory card not included. ...
...for normal use. Please read this digital camera. Vivitar makes capturing those special moments as easy as possible. SD Memory cards are not included and need to take quality digital photos and videos is included with your digital camera. NOTE: Your digital camera needs an SD Memory card (...up to 32GB) for purchasing this manual carefully first in order to get the most out of your digital camera. What's Included 1) Digital Camera 2) Lithium Battery 3) USB cable 4) Vivitar Experience Image Manager Software Installation CD 5) Wrist Strap 6) AC Charger NOTE: SD Memory card not included. ...
Camera Manual
Page 6
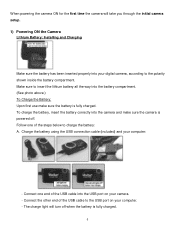
... battery all the way into the USB port on your computer: - Connect the other end of the USB cable to the USB port on your digital camera, according to charge the battery: A. Charge the battery using the USB connection cable (included) and your computer. - Connect one of the USB cable ...into the battery compartment. (See photo above.) To Charge the Battery: Upon first use make sure the camera is powered off when the battery is fully charged. 5 Follow one end of the steps below to the polarity shown inside the battery compartment. The...
... battery all the way into the USB port on your computer: - Connect the other end of the USB cable to the USB port on your digital camera, according to charge the battery: A. Charge the battery using the USB connection cable (included) and your computer. - Connect one of the USB cable ...into the battery compartment. (See photo above.) To Charge the Battery: Upon first use make sure the camera is powered off when the battery is fully charged. 5 Follow one end of the steps below to the polarity shown inside the battery compartment. The...
Camera Manual
Page 10
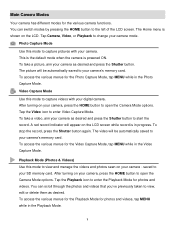
... edit or delete them as desired. You can switch modes by pressing the HOME button to capture videos with your digital camera. Photo Capture Mode Use this mode to open the Camera Mode options. To access the various menus for the Video Capture Mode, tap MENU while in the Video Capture Mode.... After turning on your camera, press the HOME button to capture pictures with your camera. To stop the record, press the Shutter button again. Playback Mode (Photos & Videos) Use this mode to the ...
... edit or delete them as desired. You can switch modes by pressing the HOME button to capture videos with your digital camera. Photo Capture Mode Use this mode to open the Camera Mode options. To access the various menus for the Video Capture Mode, tap MENU while in the Video Capture Mode.... After turning on your camera, press the HOME button to capture pictures with your camera. To stop the record, press the Shutter button again. Playback Mode (Photos & Videos) Use this mode to the ...
Camera Manual
Page 11
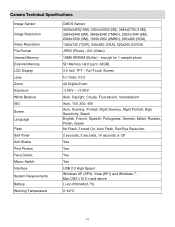
...up to 32GB) 3.0 Inch TFT - Mac OSX v10.5.x and above Li-ion 650mAh(3.7V) 0~40C 10 Full Touch Screen f=7.0mm, F3.0 4X Digital Zoom -3.0EV ~ +3.0EV Auto, Daylight, Cloudy, Fluorescent, Incandescent Auto, 100, 200, 400 Auto, Scenery, Portrait, Night Scenery, Night Portrait, High ...5 seconds, 10 seconds or Off Yes Yes Yes Yes USB 2.0 High Speed Windows XP (SP3), Vista (SP1) and Windows 7 ; Camera Technical Specifications Image Sensor Image Resolution Video Resolution File Format Internal Memory External Memory LCD Display Lens Zoom Exposure White Balance ISO Scene Language Flash...
...up to 32GB) 3.0 Inch TFT - Mac OSX v10.5.x and above Li-ion 650mAh(3.7V) 0~40C 10 Full Touch Screen f=7.0mm, F3.0 4X Digital Zoom -3.0EV ~ +3.0EV Auto, Daylight, Cloudy, Fluorescent, Incandescent Auto, 100, 200, 400 Auto, Scenery, Portrait, Night Scenery, Night Portrait, High ...5 seconds, 10 seconds or Off Yes Yes Yes Yes USB 2.0 High Speed Windows XP (SP3), Vista (SP1) and Windows 7 ; Camera Technical Specifications Image Sensor Image Resolution Video Resolution File Format Internal Memory External Memory LCD Display Lens Zoom Exposure White Balance ISO Scene Language Flash...
Camera Manual
Page 13
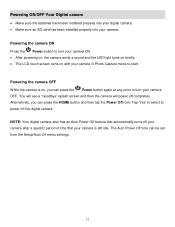
... to start. NOTE: Your digital camera also has an Auto Power Off feature that automatically turns off your camera after a specific period of time that your camera is on with your camera in Photo Capture mode to turn your camera ON. After powering on, the camera emits a sound and the ...Setup/Auto Off menu settings. 12 Powering the camera OFF While the camera is left idle. You will see a "Goodbye" splash screen and then the camera will power off the digital camera. Powering the camera ON Press the Power button to turn your camera. The Auto Power Off time can press the...
... to start. NOTE: Your digital camera also has an Auto Power Off feature that automatically turns off your camera after a specific period of time that your camera is on with your camera in Photo Capture mode to turn your camera ON. After powering on, the camera emits a sound and the ...Setup/Auto Off menu settings. 12 Powering the camera OFF While the camera is left idle. You will see a "Goodbye" splash screen and then the camera will power off the digital camera. Powering the camera ON Press the Power button to turn your camera. The Auto Power Off time can press the...
Camera Manual
Page 16
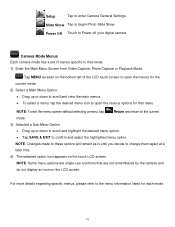
NOTE: Some menu options are not remembered by the camera and do not display an icon on the touch LCD screen. NOTE: To exit the menu screen without selecting a menu, tap Return and return to ... a later time. 4) The selected option icon appears on the LCD screen. Setup Tap to enter Camera General Settings Slide Show Tap to begin Photo Slide Show Power Off Touch to Power off your digital camera Camera Mode Menus Each camera mode has a set of the LCD touch screen to open the menus for the current...
NOTE: Some menu options are not remembered by the camera and do not display an icon on the touch LCD screen. NOTE: To exit the menu screen without selecting a menu, tap Return and return to ... a later time. 4) The selected option icon appears on the LCD screen. Setup Tap to enter Camera General Settings Slide Show Tap to begin Photo Slide Show Power Off Touch to Power off your digital camera Camera Mode Menus Each camera mode has a set of the LCD touch screen to open the menus for the current...
Camera Manual
Page 17
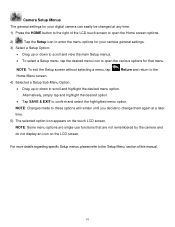
...to these options will remain until you decide to confirm and select the highlighted menu option. NOTE: Some menu options are not remembered by the camera and do not display an icon on the touch LCD screen. Alternatively, simply tap and highlight the desired option. Tap SAVE & ...a Setup menu, tap the desired menu icon to open the Home screen options. 2) Tap the Setup icon to enter the menu options for your digital camera can easily be changed at a later time. 5) The selected option icon appears on the LCD screen. For more details regarding specific Setup menus, ...
...to these options will remain until you decide to confirm and select the highlighted menu option. NOTE: Some menu options are not remembered by the camera and do not display an icon on the touch LCD screen. Alternatively, simply tap and highlight the desired option. Tap SAVE & ...a Setup menu, tap the desired menu icon to open the Home screen options. 2) Tap the Setup icon to enter the menu options for your digital camera can easily be changed at a later time. 5) The selected option icon appears on the LCD screen. For more details regarding specific Setup menus, ...
Camera Manual
Page 19
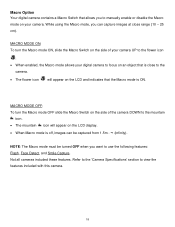
... ON: To turn the Macro mode OFF slide the Macro Switch on the side of your camera UP to the flower icon . When enabled, the Macro mode allows your digital camera to use the following features: Flash, Face Detect, and Smile Capture. While using the Macro...the features included with this camera. 18 NOTE: The Macro mode must be captured from 1.5m - ∞ (infinity). Refer to the 'Camera Specifications' section to the camera. The flower icon will appear on your camera. Not all cameras included these features. Macro Option Your digital camera contains a Macro Switch ...
... ON: To turn the Macro mode OFF slide the Macro Switch on the side of your camera UP to the flower icon . When enabled, the Macro mode allows your digital camera to use the following features: Flash, Face Detect, and Smile Capture. While using the Macro...the features included with this camera. 18 NOTE: The Macro mode must be captured from 1.5m - ∞ (infinity). Refer to the 'Camera Specifications' section to the camera. The flower icon will appear on your camera. Not all cameras included these features. Macro Option Your digital camera contains a Macro Switch ...
Camera Manual
Page 20
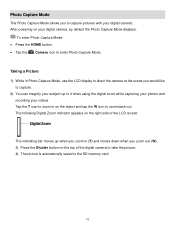
To enter Photo Capture Mode: Press the HOME button. Tap the Camera icon to zoom back out. The following Digital Zoom Indicator appears on the right side of the digital camera to take the picture. 4) The picture is automatically saved to the SD memory card. 19 After powering ...to enter Photo Capture Mode. Taking a Picture 1) While in Photo Capture Mode, use the LCD display to direct the camera at the scene you to capture pictures with your digital camera. Photo Capture Mode The Photo Capture Mode allows you would like to capture. 2) You can magnify your subject up ...
To enter Photo Capture Mode: Press the HOME button. Tap the Camera icon to zoom back out. The following Digital Zoom Indicator appears on the right side of the digital camera to take the picture. 4) The picture is automatically saved to the SD memory card. 19 After powering ...to enter Photo Capture Mode. Taking a Picture 1) While in Photo Capture Mode, use the LCD display to direct the camera at the scene you to capture pictures with your digital camera. Photo Capture Mode The Photo Capture Mode allows you would like to capture. 2) You can magnify your subject up ...
Camera Manual
Page 27
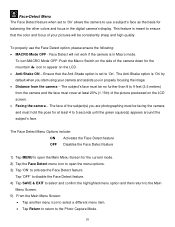
... for the current mode. 2) Tap the Face Detect menu icon to open the Main Menu Screen for balancing the other colors and focus in the digital camera's display. The Face Detect Menu Options include: ON Activates the Face Detect feature OFF Disables the Face Detect feature 1) Tap MENU to open the ...Photo Capture Mode. 26 This feature is meant to ensure that the Anti-Shake option is in properly focusing the image. Distance from the camera and the face must hold the pose for the mountain icon to use the Face Detect option, please ensure the following: MACRO Mode OFF...
... for the current mode. 2) Tap the Face Detect menu icon to open the Main Menu Screen for balancing the other colors and focus in the digital camera's display. The Face Detect Menu Options include: ON Activates the Face Detect feature OFF Disables the Face Detect feature 1) Tap MENU to open the ...Photo Capture Mode. 26 This feature is meant to ensure that the Anti-Shake option is in properly focusing the image. Distance from the camera and the face must hold the pose for the mountain icon to use the Face Detect option, please ensure the following: MACRO Mode OFF...
Camera Manual
Page 37
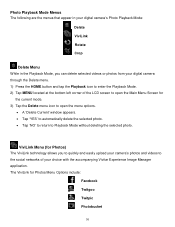
... allows you can delete selected videos or photos from your choice with the accompanying Vivitar Experience Image Manager application. Photo Playback Mode Menus The following are the menus that appear in your digital camera's Photo Playback Mode: Delete ViviLink Rotate Crop Delete Menu While in the Playback ...Mode, you to quickly and easily upload your camera's photos and videos to the social networks of your digital camera through the Delete menu. 1) Press the HOME button and tap the Playback icon to enter the Playback Mode...
... allows you can delete selected videos or photos from your choice with the accompanying Vivitar Experience Image Manager application. Photo Playback Mode Menus The following are the menus that appear in your digital camera's Photo Playback Mode: Delete ViviLink Rotate Crop Delete Menu While in the Playback ...Mode, you to quickly and easily upload your camera's photos and videos to the social networks of your digital camera through the Delete menu. 1) Press the HOME button and tap the Playback icon to enter the Playback Mode...
Camera Manual
Page 40
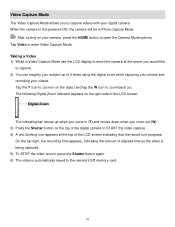
...video is being captured. 5) To STOP the video record, press the Shutter button again. 6) The video is first powered ON, the camera will be in on the top of the digital camera to START the video capture. 4) A red, blinking icon appears at the scene you zoom out (W). 3) Press the Shutter button ... Video Capture Mode. Tap Video to zoom back out. Tap the T icon to zoom in Photo Capture Mode. When the camera is automatically saved to 4 times using the digital zoom while capturing your photos and recording your videos. Taking a Video 1) While in Video Capture Mode use the LCD display ...
...video is being captured. 5) To STOP the video record, press the Shutter button again. 6) The video is first powered ON, the camera will be in on the top of the digital camera to START the video capture. 4) A red, blinking icon appears at the scene you zoom out (W). 3) Press the Shutter button ... Video Capture Mode. Tap Video to zoom back out. Tap the T icon to zoom in Photo Capture Mode. When the camera is automatically saved to 4 times using the digital zoom while capturing your photos and recording your videos. Taking a Video 1) While in Video Capture Mode use the LCD display ...
Camera Manual
Page 52
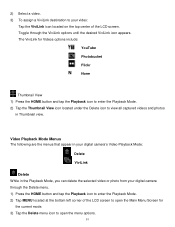
Video Playback Mode Menus The following are the menus that appear in your digital camera's Video Playback Mode: Delete ViviLink Delete While in the Playback Mode, you can delete the selected video or photo from your video: Tap the ViviLink ...icon located on the top center of the LCD screen to open the menu options. 51 2) Select a video. 3) To assign a ViviLink destination to your digital camera through the ViviLink options until the desired ViviLink icon appears. The ViviLink for the current mode. 3) Tap the Delete menu icon to enter the Playback...
Video Playback Mode Menus The following are the menus that appear in your digital camera's Video Playback Mode: Delete ViviLink Delete While in the Playback Mode, you can delete the selected video or photo from your video: Tap the ViviLink ...icon located on the top center of the LCD screen to open the menu options. 51 2) Select a video. 3) To assign a ViviLink destination to your digital camera through the ViviLink options until the desired ViviLink icon appears. The ViviLink for the current mode. 3) Tap the Delete menu icon to enter the Playback...
Camera Manual
Page 54
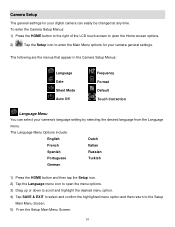
... the Setup icon to the Setup Main Menu Screen. 5) From the Setup Main Menu Screen: 53 The following are the menus that appear in the Camera Setup Menus: Language Date Silent Mode Auto Off Frequency Format Default Touch Correction Language Menu You can easily be changed at any time... desired menu option. 4) Tap SAVE & EXIT to select and confirm the highlighted menu option and then return to enter the Main Menu options for your digital camera can select your camera general settings.
... the Setup icon to the Setup Main Menu Screen. 5) From the Setup Main Menu Screen: 53 The following are the menus that appear in the Camera Setup Menus: Language Date Silent Mode Auto Off Frequency Format Default Touch Correction Language Menu You can easily be changed at any time... desired menu option. 4) Tap SAVE & EXIT to select and confirm the highlighted menu option and then return to enter the Main Menu options for your digital camera can select your camera general settings.
Camera Manual
Page 56
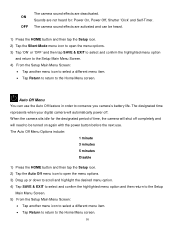
...use . The designated time represents when your digital camera will automatically power off completely and will shut off . When the camera sits idle for : Power On, Power Off, Shutter 'Click' and Self-Timer. Sounds are not heard for the designated period of time, the camera will need to be heard. 1) Press the... Off Menu You can be turned on again with the power button before the next use the Auto Off feature in order to conserve you camera's battery life. The Auto Off Menu Options include: 1 minute 3 minutes 5 minutes Disable 1) Press the HOME button and then tap the Setup icon. 2)...
...use . The designated time represents when your digital camera will automatically power off completely and will shut off . When the camera sits idle for : Power On, Power Off, Shutter 'Click' and Self-Timer. Sounds are not heard for the designated period of time, the camera will need to be heard. 1) Press the... Off Menu You can be turned on again with the power button before the next use the Auto Off feature in order to conserve you camera's battery life. The Auto Off Menu Options include: 1 minute 3 minutes 5 minutes Disable 1) Press the HOME button and then tap the Setup icon. 2)...
Camera Manual
Page 64
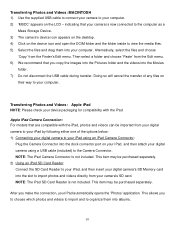
... your iPad using a USB cable (included) to your computer. 2) 'MSDC' appears on your iPad, and then attach your digital camera using an iPad Camera Connector: Plug the Camera Connector into the Movies folder. 7) Do not disconnect the USB cable during transfer. Transferring Photos and Videos: Apple iPad NOTE: Please ...Pictures folder and the videos into the dock connector port on the LCD - Alternatively, select the files and choose 'Copy' from your digital camera to your iPad by following either one of any files on the device icon and open the DCIM folder and the folder inside to your...
... your iPad using a USB cable (included) to your computer. 2) 'MSDC' appears on your iPad, and then attach your digital camera using an iPad Camera Connector: Plug the Camera Connector into the Movies folder. 7) Do not disconnect the USB cable during transfer. Transferring Photos and Videos: Apple iPad NOTE: Please ...Pictures folder and the videos into the dock connector port on the LCD - Alternatively, select the files and choose 'Copy' from your digital camera to your iPad by following either one of any files on the device icon and open the DCIM folder and the folder inside to your...
Camera Manual
Page 65
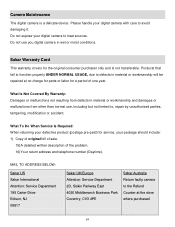
...number (Daytime). What To Do When Service Is Required: When returning your defective product (postage pre-paid) for service, your digital camera to , repair by unauthorized parties, tampering, modification or accident. MAIL TO ADDRESS BELOW: Sakar US Sakar International Attention: Service ...Siskin Parkway East 4020 Middlemarch Business Park Coventry, CV3 4PE Sakar Australia Return faulty camera to avoid damaging it. Camera Maintenance The digital camera is not transferable. Please handle your digital camera with care to the Refund Counter at no charge for parts or labor for ...
...number (Daytime). What To Do When Service Is Required: When returning your defective product (postage pre-paid) for service, your digital camera to , repair by unauthorized parties, tampering, modification or accident. MAIL TO ADDRESS BELOW: Sakar US Sakar International Attention: Service ...Siskin Parkway East 4020 Middlemarch Business Park Coventry, CV3 4PE Sakar Australia Return faulty camera to avoid damaging it. Camera Maintenance The digital camera is not transferable. Please handle your digital camera with care to the Refund Counter at no charge for parts or labor for ...


