
Camera Manual
Page 1
DVR 790HD 3D Digital Camcorder User Manual © 2009-2011 Sakar International, Inc. All rights reserved. Windows and the Windows logo are the property of Microsoft Corporation. All other trademarks are registered trademarks of their respective companies.
DVR 790HD 3D Digital Camcorder User Manual © 2009-2011 Sakar International, Inc. All rights reserved. Windows and the Windows logo are the property of Microsoft Corporation. All other trademarks are registered trademarks of their respective companies.

Camera Manual
Page 3
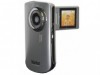
... 2 USB cable 3. AV Cable 6. 3D Glasses 7. What's Included 1. Note: Your camera needs an SD Memory card (up to take quality digital photos and videos is included with your digital camcorder. Please read this camera. Vivitar Experience Image Manager Software Installation CD 4. ...Everything you for normal use. AC Adapter 5. Digital camcorder 2. Built-in order to be purchased separately. Introduction Thank...
... 2 USB cable 3. AV Cable 6. 3D Glasses 7. What's Included 1. Note: Your camera needs an SD Memory card (up to take quality digital photos and videos is included with your digital camcorder. Please read this camera. Vivitar Experience Image Manager Software Installation CD 4. ...Everything you for normal use. AC Adapter 5. Digital camcorder 2. Built-in order to be purchased separately. Introduction Thank...

Camera Manual
Page 15
... on the LCD screen in Video Capture Mode. The following Digital Zoom Indicator appears on the right side of the LCD will automatically be in 3D as you capture your video. 5) To STOP the video record, press the Shutter button again. 6) The video will indicate the elapsed recording... of the camera to START the video capture. 4) You will be saved to the camera‟s SD memory card. 3D Video Capture To capture your digital camcorder. Put on your 3D glasses (included) in 3 dimension, push the joystick control button UP. Video Capture Mode The Video Capture Mode allows you...
... on the LCD screen in Video Capture Mode. The following Digital Zoom Indicator appears on the right side of the LCD will automatically be in 3D as you capture your video. 5) To STOP the video record, press the Shutter button again. 6) The video will indicate the elapsed recording... of the camera to START the video capture. 4) You will be saved to the camera‟s SD memory card. 3D Video Capture To capture your digital camcorder. Put on your 3D glasses (included) in 3 dimension, push the joystick control button UP. Video Capture Mode The Video Capture Mode allows you...

Camera Manual
Page 16
Up Down Right 3D Option - Toggles between the Video Capture Mode, Photo Capture Mode, and Playback Mode Exits ...selected menu option Note: To navigate through the Menus, use the UP/DOWN/LEFT/RIGHT direction control buttons. Toggles between 3D and 2D image capture Delete - Quick Function Button Left Function LED Light - Turns the LED light on the screen. 15 Opens ...allows you to redisplay the icons on or off. Video Capture Mode Quick Function Buttons Your digital camcorder has a four-directional joystick button that functions as previously captured images ViviLink -
Up Down Right 3D Option - Toggles between the Video Capture Mode, Photo Capture Mode, and Playback Mode Exits ...selected menu option Note: To navigate through the Menus, use the UP/DOWN/LEFT/RIGHT direction control buttons. Toggles between 3D and 2D image capture Delete - Quick Function Button Left Function LED Light - Turns the LED light on the screen. 15 Opens ...allows you to redisplay the icons on or off. Video Capture Mode Quick Function Buttons Your digital camcorder has a four-directional joystick button that functions as previously captured images ViviLink -

Camera Manual
Page 34
...the LCD display to direct the camera at the scene you to enter Photo Capture Mode. The 3D Icon will automatically be in 3 dimension, push the joystick control button UP. Press the Mode button...In and W/Zoom Out buttons to the camera‟s Micro SD memory card. 3D Photo Capture To capture your digital camcorder. Put on your subject up to view the scene on the top left ...side of the zoom buttons may vary per camera model. Photo Capture Mode When the digital camcorder is ready. You can magnify your 3D...
...the LCD display to direct the camera at the scene you to enter Photo Capture Mode. The 3D Icon will automatically be in 3 dimension, push the joystick control button UP. Press the Mode button...In and W/Zoom Out buttons to the camera‟s Micro SD memory card. 3D Photo Capture To capture your digital camcorder. Put on your subject up to view the scene on the top left ...side of the zoom buttons may vary per camera model. Photo Capture Mode When the digital camcorder is ready. You can magnify your 3D...

Camera Manual
Page 35
...visible as Quick Function buttons: Button Function Left LED Light - Turns the LED light on or off. Photo Capture Mode Quick Function Buttons Your digital camcorder has a four-directional pad that functions as desired. 1) Hold the MODE button for 2 seconds to hide the display of the icons on the ...screen. 2) Press the MODE button again to view and delete the last photo taken ViviLink - Up Down Right 3D Option - Opens the ViviLink for Photos menu Other Shutter SET MODE T W Captures the photo Opens the menu options for Photo Capture Mode...
...visible as Quick Function buttons: Button Function Left LED Light - Turns the LED light on or off. Photo Capture Mode Quick Function Buttons Your digital camcorder has a four-directional pad that functions as desired. 1) Hold the MODE button for 2 seconds to hide the display of the icons on the ...screen. 2) Press the MODE button again to view and delete the last photo taken ViviLink - Up Down Right 3D Option - Opens the ViviLink for Photos menu Other Shutter SET MODE T W Captures the photo Opens the menu options for Photo Capture Mode...

Camera Manual
Page 49
... without resetting to the default settings. Select "Yes" and press the SET button to proceed with the digital camcorder settings set to the Factory Default Settings. Firmware (Factory Default Settings) Menu (3D and 2D Image Capture) Use this menu to view the Firmware version on , you do not, the next time...
... without resetting to the default settings. Select "Yes" and press the SET button to proceed with the digital camcorder settings set to the Factory Default Settings. Firmware (Factory Default Settings) Menu (3D and 2D Image Capture) Use this menu to view the Firmware version on , you do not, the next time...


