
VC8025 User Manual
Page 1
ViviCam 8025 Digital Camera Owner Manual © 2009 Sakar International, Inc. All rights reserved. All other trademarks are registered trademarks of their respective companies. Windows and the Windows logo are the property of Microsoft Corporation.
ViviCam 8025 Digital Camera Owner Manual © 2009 Sakar International, Inc. All rights reserved. All other trademarks are registered trademarks of their respective companies. Windows and the Windows logo are the property of Microsoft Corporation.

VC8025 User Manual
Page 2
... Requirements for Windows Vista 3 Computer System Requirements for Macintosh 4 A Quick Look at Your Camera ...5 Preparing Your Camera for Use ...6 Install lithium battery...6 Installing SD Memory Card ...7 Starting Your Digital Camera ...9 This is the default mode when you power on your camera 11 Taking Photos...11 Installing PhoTags Express Software ...34 Everything you need to...
... Requirements for Windows Vista 3 Computer System Requirements for Macintosh 4 A Quick Look at Your Camera ...5 Preparing Your Camera for Use ...6 Install lithium battery...6 Installing SD Memory Card ...7 Starting Your Digital Camera ...9 This is the default mode when you power on your camera 11 Taking Photos...11 Installing PhoTags Express Software ...34 Everything you need to...

VC8025 User Manual
Page 3
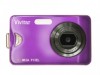
... with memory card up to 8GB. Vivitar makes capturing those special moments so easy. Please read this manual carefully first in Flash y PhoTags Express software for purchasing the ViviCam 8025 8.1 Mega-Pixel Touch Screen Digital Camera. Your digital camera can also be used as a removable... disk. It enriches your digital camera. y 8.1 mega pixels camera with choice of your life. What your photos, printing, sending...
... with memory card up to 8GB. Vivitar makes capturing those special moments so easy. Please read this manual carefully first in Flash y PhoTags Express software for purchasing the ViviCam 8025 8.1 Mega-Pixel Touch Screen Digital Camera. Your digital camera can also be used as a removable... disk. It enriches your digital camera. y 8.1 mega pixels camera with choice of your life. What your photos, printing, sending...

VC8025 User Manual
Page 7
.... 2. Note: 1. Close the battery door. A "Low battery" message will appear on the LCD when the battery power is found separately in order to use your camera will power off. 2. Test photos taken with the correct polarity facing up. 3. The battery is insufficient. Please remove your battery when you don't intend to...
.... 2. Note: 1. Close the battery door. A "Low battery" message will appear on the LCD when the battery power is found separately in order to use your camera will power off. 2. Test photos taken with the correct polarity facing up. 3. The battery is insufficient. Please remove your battery when you don't intend to...

VC8025 User Manual
Page 8
...the Memory card into charger and charge the lithium battery directly from electrical outlet Installing SD Memory Card Your camera has a memory card slot that enables you to computer with supplied charger Your camera is in the correct direction. (see the sketch below 2 methods: A. Charge lithium battery Please charge ...allow you to insert any "SD" compatible memory card up to replace the battery. The red LED of your camera before you have to transfer photos and videos to your camera is supplied a compatible charger for you, you are only required to put the battery into the slot in ...
...the Memory card into charger and charge the lithium battery directly from electrical outlet Installing SD Memory Card Your camera has a memory card slot that enables you to computer with supplied charger Your camera is in the correct direction. (see the sketch below 2 methods: A. Charge lithium battery Please charge ...allow you to insert any "SD" compatible memory card up to replace the battery. The red LED of your camera before you have to transfer photos and videos to your camera is supplied a compatible charger for you, you are only required to put the battery into the slot in ...
VC8025 User Manual
Page 9
...use . 2. Please download the images before power off . Formatting will delete all the images taken with the camera will now be flushed with Yes or No options. 3. The top of the camera. An icon will appear on the SD memory card including protected data. 8 If there is provided for ...normal use . Limited internal memory is a photo in until you insert the card into position. Your camera supports any compatible SD memory card (up to card" message will appear on the LCD screen after you turn on the card. Push the card...
...use . 2. Please download the images before power off . Formatting will delete all the images taken with the camera will now be flushed with Yes or No options. 3. The top of the camera. An icon will appear on the SD memory card including protected data. 8 If there is provided for ...normal use . Limited internal memory is a photo in until you insert the card into position. Your camera supports any compatible SD memory card (up to card" message will appear on the LCD screen after you turn on the card. Push the card...

VC8025 User Manual
Page 10
... turned on the LCD screen. Don't remove the SD card during formatting as this indicates your camera is full, download the media on the top of the camera once to activate the corresponding functions. Power off your camera Starting Your Digital Camera Power on Press the Power button on the SD card to your... in order to turn off Press the Power button once to turn on the LCD screen are displayed below: 9 Finger Touch Screen feature Your digital camera supports a touch screen feature for use your finger to touch the relevant parts of the screen in order to continue using your...
... turned on the LCD screen. Don't remove the SD card during formatting as this indicates your camera is full, download the media on the top of the camera once to activate the corresponding functions. Power off your camera Starting Your Digital Camera Power on Press the Power button on the SD card to your... in order to turn off Press the Power button once to turn on the LCD screen are displayed below: 9 Finger Touch Screen feature Your digital camera supports a touch screen feature for use your finger to touch the relevant parts of the screen in order to continue using your...

VC8025 User Manual
Page 11
... select the mode, please follow the below steps: 1. The following icons will appear on the LCD touch screen 10 Mode selection Your digital touch screen camera has 4 main modes - You can preview photos and videos as well as being able to take still photos. Still Image mode, Video mode, Playback mode...
... select the mode, please follow the below steps: 1. The following icons will appear on the LCD touch screen 10 Mode selection Your digital touch screen camera has 4 main modes - You can preview photos and videos as well as being able to take still photos. Still Image mode, Video mode, Playback mode...

VC8025 User Manual
Page 12
Touch the icon function area to enter Movie (Video) mode. 5. Compose your camera. Touch the icon function area to enter the Setup menu. Note: If you ...these modes and open the Still Image mode. Touch the icon 3. Touch the icon function area to enter Still Image (Camera) mode. 4. function area to enter Playback mode. Still Image mode This is the default mode when you are in ... mode, pressing the Home button will be a short delay while the camera saves the photo to take the photo. 3. Hold the camera steady and press the shutter button to memory. 11 Taking Photos 1.
Touch the icon function area to enter Movie (Video) mode. 5. Compose your camera. Touch the icon function area to enter the Setup menu. Note: If you ...these modes and open the Still Image mode. Touch the icon 3. Touch the icon function area to enter Still Image (Camera) mode. 4. function area to enter Playback mode. Still Image mode This is the default mode when you are in ... mode, pressing the Home button will be a short delay while the camera saves the photo to take the photo. 3. Hold the camera steady and press the shutter button to memory. 11 Taking Photos 1.

VC8025 User Manual
Page 13
... more photos. The following icon will display a message - Touch the icon function area to Transfer and Take More Photos!" Macro/Far shooting The camera has the function that allows you to capture objects either at the selected resolution is displayed on the left to shoot at very near the... continue taking the picture slide the Macro/Far switch on the LCD screen. Digital Zoom function You can magnify your object. 2. When the camera's memory (photo capacity) is full, the LCD screen will appear on your subject using the Photags Express software as described below in on...
... more photos. The following icon will display a message - Touch the icon function area to Transfer and Take More Photos!" Macro/Far shooting The camera has the function that allows you to capture objects either at the selected resolution is displayed on the left to shoot at very near the... continue taking the picture slide the Macro/Far switch on the LCD screen. Digital Zoom function You can magnify your object. 2. When the camera's memory (photo capacity) is full, the LCD screen will appear on your subject using the Photags Express software as described below in on...

VC8025 User Manual
Page 15
... photo is recommended that you desire: 2 seconds , 5 14 By touching the icon function area select the self-time option you use a tripod or place the camera on the screen repeatedly to select the next page until the icon appears. 4.
... photo is recommended that you desire: 2 seconds , 5 14 By touching the icon function area select the self-time option you use a tripod or place the camera on the screen repeatedly to select the next page until the icon appears. 4.

VC8025 User Manual
Page 16
... to confirm. Touch the icon function area repeatedly until you to take the photo. seconds or 10 seconds . 5. Your camera will count down 2, 5 or 10 seconds as per your camera are Auto, Night Portrait, Night Scenery, Portrait, Scenery, Sport, Party, Beach or High Sensitivity. Press the Menu/OK button.... 2. Press the Menu/OK button to enter the Scene menu. 15 Scene Your camera supplies many scenes for you see the "Scene" option appear. 3. Scene included with your selection) will now appear on the screen. 6.
... to confirm. Touch the icon function area repeatedly until you to take the photo. seconds or 10 seconds . 5. Your camera will count down 2, 5 or 10 seconds as per your camera are Auto, Night Portrait, Night Scenery, Portrait, Scenery, Sport, Party, Beach or High Sensitivity. Press the Menu/OK button.... 2. Press the Menu/OK button to enter the Scene menu. 15 Scene Your camera supplies many scenes for you see the "Scene" option appear. 3. Scene included with your selection) will now appear on the screen. 6.

VC8025 User Manual
Page 17
... that can effectively print your image size. 5. To set the Image size: 1. Touch the icon function area to the camera standby mode. Touch the icon function area repeatedly until you want to the camera standby mode. Touch the icon function area to select the scene you see "Image Size" option. 3. Press the...
... that can effectively print your image size. 5. To set the Image size: 1. Touch the icon function area to the camera standby mode. Touch the icon function area repeatedly until you want to the camera standby mode. Touch the icon function area to select the scene you see "Image Size" option. 3. Press the...

VC8025 User Manual
Page 18
... area repeatedly until you see the "Anti-Shake" option. 3. Note: The anti-shake icon will appear on the LCD screen. 17 Anti-Shake Your Digital Camera has a function that prevents photos coming out blurry as a result of trembling or shaking when taking the photo. Press the Menu/OK button. 2. Touch the... icon function area to take good quality photos. 1. Press the Menu/OK button to confirm, save and exit to enter the Anti-Shake menu. 4. Your camera has "7M" and "2M" high definition image size. Touch the icon function area to the...
... area repeatedly until you see the "Anti-Shake" option. 3. Note: The anti-shake icon will appear on the LCD screen. 17 Anti-Shake Your Digital Camera has a function that prevents photos coming out blurry as a result of trembling or shaking when taking the photo. Press the Menu/OK button. 2. Touch the... icon function area to take good quality photos. 1. Press the Menu/OK button to confirm, save and exit to enter the Anti-Shake menu. 4. Your camera has "7M" and "2M" high definition image size. Touch the icon function area to the...

VC8025 User Manual
Page 19
.... 2. Note: The Face Detection icon will appear on the LCD. 18 Touch the icon function area to select next page until you to the camera standby mode. Press the Home button for the main menu to select the Face Detection On/Off. 5. Touch the icon function area to enter the... Off, Language, Frequency, Format and Default Setting. 1. Press the Menu/OK button to confirm and exit to take better portrait photos. 1. Face Detection Your camera supports face detecting that allows you see the "Face Detection" option. 3. Touch the icon function area to appear on the LCD screen.
.... 2. Note: The Face Detection icon will appear on the LCD. 18 Touch the icon function area to select next page until you to the camera standby mode. Press the Home button for the main menu to select the Face Detection On/Off. 5. Touch the icon function area to enter the... Off, Language, Frequency, Format and Default Setting. 1. Press the Menu/OK button to confirm and exit to take better portrait photos. 1. Face Detection Your camera supports face detecting that allows you see the "Face Detection" option. 3. Touch the icon function area to appear on the LCD screen.

VC8025 User Manual
Page 20
Touch the first icon function area to control the brightness of your images. 1. 2. Exposure This setting allows you to enter the "Exposure" option. 2. Touch the icon function area to -3). 3. Touch the icon function area to select an exposure value (from +3 to enter the Setup Menu. Press the Menu/OK button to confirm, save and exit to the camera standby mode. 19
Touch the first icon function area to control the brightness of your images. 1. 2. Exposure This setting allows you to enter the "Exposure" option. 2. Touch the icon function area to -3). 3. Touch the icon function area to select an exposure value (from +3 to enter the Setup Menu. Press the Menu/OK button to confirm, save and exit to the camera standby mode. 19

VC8025 User Manual
Page 21
...do not wish to prevent spots or blotches appearing on your photo. 1. Press the Menu/OK button to confirm, save and exit to the camera standby mode. Touch the icon function area until you see the "Sharpness" option. 20 When using ISO sensitization, please choose the low value ...light source. 1. Touch the icon function area to enter the ISO setting. 3. Press the Menu/OK button to confirm, save and exit to the camera standby mode. Touch the icon function area to enter the White Balance setting. 3. Touch the icon function area repeatedly until you see the "ISO"...
...do not wish to prevent spots or blotches appearing on your photo. 1. Press the Menu/OK button to confirm, save and exit to the camera standby mode. Touch the icon function area until you see the "Sharpness" option. 20 When using ISO sensitization, please choose the low value ...light source. 1. Touch the icon function area to enter the ISO setting. 3. Press the Menu/OK button to confirm, save and exit to the camera standby mode. Touch the icon function area to enter the White Balance setting. 3. Touch the icon function area repeatedly until you see the "ISO"...

VC8025 User Manual
Page 22
... . Press the Menu/OK button to confirm, save and exit to select one of Fine/Super Fine/Normal. 4. Touch the icon function area to the camera standby mode. Press the Menu/OK button to confirm , save and exit to select one of better quality. Touch the icon function area to enter...
... . Press the Menu/OK button to confirm, save and exit to select one of Fine/Super Fine/Normal. 4. Touch the icon function area to the camera standby mode. Press the Menu/OK button to confirm , save and exit to select one of better quality. Touch the icon function area to enter...

VC8025 User Manual
Page 23
... and function area repeatedly to change this setting: 1. Touch the icon function area to confirm. Touch the icon and function area repeatedly to the camera standby mode. Press the Menu button to confirm, save and exit to select and highlight the digit. 2. Use the Auto Off option to set... the system time which will automatically be displayed on the photos. 1. Auto Power off By default, if your camera is idle for 60 seconds it will be powered off. Touch the icon function area until you see "Date" option. 2. Touch the icon function ...
... and function area repeatedly to change this setting: 1. Touch the icon function area to confirm. Touch the icon and function area repeatedly to the camera standby mode. Press the Menu button to confirm, save and exit to select and highlight the digit. 2. Use the Auto Off option to set... the system time which will automatically be displayed on the photos. 1. Auto Power off By default, if your camera is idle for 60 seconds it will be powered off. Touch the icon function area until you see "Date" option. 2. Touch the icon function ...

VC8025 User Manual
Page 25
...Setting You can restore your camera to select OK or Cancel. 4. Touch the icon function area repeatedly until you are in order to confirm. 5. Touch the icon function area to the original factory settings. 1. Touch the icon or function area to the camera standby mode. 8. Press ...the Menu/OK button to confirm, save and exit to the camera standby mode. Touch the icon function area to select modes. Video Mode Please refer to Mode...
...Setting You can restore your camera to select OK or Cancel. 4. Touch the icon function area repeatedly until you are in order to confirm. 5. Touch the icon function area to the original factory settings. 1. Touch the icon or function area to the camera standby mode. 8. Press ...the Menu/OK button to confirm, save and exit to the camera standby mode. Touch the icon function area to select modes. Video Mode Please refer to Mode...


