
Owner Manual
Page 26
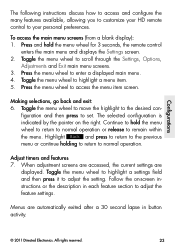
...Making selections, go back and exit: 6. All rights reserved. 23 The selected configuration is indicated by the pointer on -screen instructions or the description in button activity. © 2011 Directed Electronics. Continue to hold the menu wheel for 3 seconds, the remote control ...screen. 2. Press and hold the menu wheel to return to normal operation or release to adjust the setting. Configurations The following instructions discuss how to access and configure the many features available, allowing you to customize your personal preferences. Press the menu...
...Making selections, go back and exit: 6. All rights reserved. 23 The selected configuration is indicated by the pointer on -screen instructions or the description in button activity. © 2011 Directed Electronics. Continue to hold the menu wheel for 3 seconds, the remote control ...screen. 2. Press and hold the menu wheel to return to normal operation or release to adjust the setting. Configurations The following instructions discuss how to access and configure the many features available, allowing you to customize your personal preferences. Press the menu...
Owner Manual
Page 29
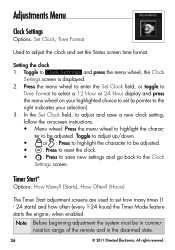
... the Set Clock field, or toggle to Time Format to select a 12 Hour or 24 Hour display and press the menu wheel on -screen instructions. Timer Start* Options: How Many? (Starts), How Often? (Hours) The Timer Start adjustment screens are used to set the Status screen time format. s Menu wheel...
... the Set Clock field, or toggle to Time Format to select a 12 Hour or 24 Hour display and press the menu wheel on -screen instructions. Timer Start* Options: How Many? (Starts), How Often? (Hours) The Timer Start adjustment screens are used to set the Status screen time format. s Menu wheel...
Owner Manual
Page 30
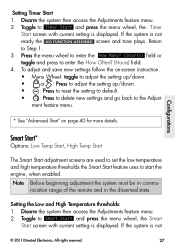
... to enter the How Often? (Hours) field. 4. s : Press to delete new settings and go back to the Adjust- Configurations * See "Advanced Start" on -screen instruction. Note Before beginning adjustment the system must be in the disarmed state. If the system is not ready the NO FUNCTION ASSIGNED screen and tone...
... to enter the How Often? (Hours) field. 4. s : Press to delete new settings and go back to the Adjust- Configurations * See "Advanced Start" on -screen instruction. Note Before beginning adjustment the system must be in the disarmed state. If the system is not ready the NO FUNCTION ASSIGNED screen and tone...
Owner Manual
Page 32
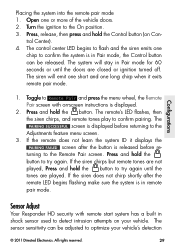
... Adjustments feature menu screen. 3. If the siren does not chirp shortly after the button is displayed. 2. Sensor Adjust Your Responder HD security with on-screen instructions is released before returning to detect intrusion attempts on Con- trol Center). 4. Toggle to Remote Pair and press the menu wheel, the Remote Pair screen...
... Adjustments feature menu screen. 3. If the siren does not chirp shortly after the button is displayed. 2. Sensor Adjust Your Responder HD security with on-screen instructions is released before returning to detect intrusion attempts on Con- trol Center). 4. Toggle to Remote Pair and press the menu wheel, the Remote Pair screen...

Owner Manual
Page 36
... a companion system in another vehicle. Toggle to Set Name Tag1 or Set Name Tag2 and press the menu wheel to the next character on -screen instructions. All rights reserved. 33 Name Tag2 is used when your Responder HD remote control is dis- played. 2. Configurations Setting the Name Tags 1. Press to move...
... a companion system in another vehicle. Toggle to Set Name Tag1 or Set Name Tag2 and press the menu wheel to the next character on -screen instructions. All rights reserved. 33 Name Tag2 is used when your Responder HD remote control is dis- played. 2. Configurations Setting the Name Tags 1. Press to move...
Owner Manual
Page 55
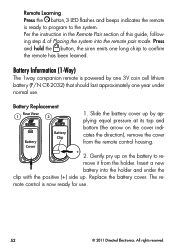
... Rear View 1 2 1. Gently pry up by one 3V coin cell lithium battery (P/N CR-2032) that should last approximately one long chirp to re- Per the instruction in the Remote Pair section of this guide, following step 4 of Placing the system into the holder and under normal use . 52 © 2011 Directed...
... Rear View 1 2 1. Gently pry up by one 3V coin cell lithium battery (P/N CR-2032) that should last approximately one long chirp to re- Per the instruction in the Remote Pair section of this guide, following step 4 of Placing the system into the holder and under normal use . 52 © 2011 Directed...

Owner Manual
Page 63
... radio or television, which can radiate radio frequency energy and, if not installed and used in a residential installation. Government Regulations This device complies with the instruction manual, may cause harmful interference to radio communications. This equipment has been tested and found to comply with the limits for the hand and wrists...
... radio or television, which can radiate radio frequency energy and, if not installed and used in a residential installation. Government Regulations This device complies with the instruction manual, may cause harmful interference to radio communications. This equipment has been tested and found to comply with the limits for the hand and wrists...