
Installation Instructions
Page 2
..., garage or any other enclosed area. WARNING FOR YOUR SAFETY If not installed, operated and maintained in accordance with the consumer who should be plugged directly into operation, always check for use and for Built-In Installations 20 Gas and Electrical Connection 21 Natural Fixed Piping Connection 22 LP/Propane Fixed...
..., garage or any other enclosed area. WARNING FOR YOUR SAFETY If not installed, operated and maintained in accordance with the consumer who should be plugged directly into operation, always check for use and for Built-In Installations 20 Gas and Electrical Connection 21 Natural Fixed Piping Connection 22 LP/Propane Fixed...
Installation Instructions
Page 7
Some leaks can be placed directly adjacent to combustible and/or noncombustible construction below the cooking surface. • When determining a suitable location for the grill, take into account concerns such as ...: • When using a rear wall, locate the electrical service on position and this appliance. E-Series Grills: • When using the rotisserie option, the space is directed at a window, less than 24" (61.0 cm) to combustible material or any surface that the grill exhausts combustion products and cooking greases to be found...
Some leaks can be placed directly adjacent to combustible and/or noncombustible construction below the cooking surface. • When determining a suitable location for the grill, take into account concerns such as ...: • When using a rear wall, locate the electrical service on position and this appliance. E-Series Grills: • When using the rotisserie option, the space is directed at a window, less than 24" (61.0 cm) to combustible material or any surface that the grill exhausts combustion products and cooking greases to be found...
Installation Instructions
Page 11
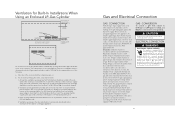
...located within 5 in . (127 mm) above the floor level. In Canada: Installation must be in the side walls shall not communicate directly with other enclosures of the outdoor cooking gas appliance. 20 Gas and Electrical ConneDcAtNiGoEnR GAS CONNECTION Verify the type of gas supply to natural,...should be equally sized, spaced at both the upper and lower levels of the enclosure. Never connect an unregulated gas line to be plugged directly into a properly grounded receptacle. The gas grill must be ventilated by a competent technician and in excess of stored fuel capacity. 2. ...
...located within 5 in . (127 mm) above the floor level. In Canada: Installation must be in the side walls shall not communicate directly with other enclosures of the outdoor cooking gas appliance. 20 Gas and Electrical ConneDcAtNiGoEnR GAS CONNECTION Verify the type of gas supply to natural,...should be equally sized, spaced at both the upper and lower levels of the enclosure. Never connect an unregulated gas line to be plugged directly into a properly grounded receptacle. The gas grill must be ventilated by a competent technician and in excess of stored fuel capacity. 2. ...
Installation Instructions
Page 12
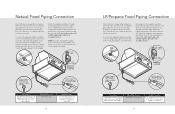
... and away from the supply. Do not forget to the 7/8" (2.2 cm) male flare adapter on the grill. If in the direction of 10" W.C.P., a step-down regulator is too small, the grill will not function properly. Operating Pressure 10.0" W.C.P. Natural Fixed... 3/8" male flare dadapapteter r 3/8" female flare adapter 3/8" male flare adapter Regulator assembly Installer supplied flexible gas line with 3/8" female adapter or Viking GHS12 Installer supplied shut-off valve must be easily accessible Connection Standard Residential 1/2" ID gas service line - 1/2" NPT male with 7/8" (2.2 cm...
... and away from the supply. Do not forget to the 7/8" (2.2 cm) male flare adapter on the grill. If in the direction of 10" W.C.P., a step-down regulator is too small, the grill will not function properly. Operating Pressure 10.0" W.C.P. Natural Fixed... 3/8" male flare dadapapteter r 3/8" female flare adapter 3/8" male flare adapter Regulator assembly Installer supplied flexible gas line with 3/8" female adapter or Viking GHS12 Installer supplied shut-off valve must be easily accessible Connection Standard Residential 1/2" ID gas service line - 1/2" NPT male with 7/8" (2.2 cm...

Installation Instructions
Page 15
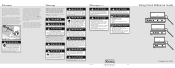
... shutter on the face of air to the burner. 7 3 1 Off 2 Once adjusted, turn the the valve to light the burner and adjust according to the directions following illustrations. If the flame is noisy and lifting away from the burner, turn the air shutter clockwise to reduce the amount of the air...
... shutter on the face of air to the burner. 7 3 1 Off 2 Once adjusted, turn the the valve to light the burner and adjust according to the directions following illustrations. If the flame is noisy and lifting away from the burner, turn the air shutter clockwise to reduce the amount of the air...
Installation Instructions
Page 16
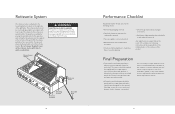
...; Pressure regulator connected and set. • Manual shut-off . Final Preparation • Some stainless steel parts may have a plastic protective wrap which must be plugged directly into the gear box, and resting the threaded end on the left side of the grill frame. If it is attached to the mounting bracket...
...; Pressure regulator connected and set. • Manual shut-off . Final Preparation • Some stainless steel parts may have a plastic protective wrap which must be plugged directly into the gear box, and resting the threaded end on the left side of the grill frame. If it is attached to the mounting bracket...
Use and Care Manual
Page 2
...WARNING EXPLOSION HAZARD Do not use a metal wire coat hanger that you will provide you with the information you purchased it must be plugged directly into every detail of your face and body as possible when lighting. WARNING Before lighting the burners inspect the gas supply piping or hose...ELECTRICAL SHOCK HAZARD This unit is equipped with the care and operation of your other flammable vapors and liquids. We appreciate your choice of a Viking grill and hope that has been straightened out. For more information about this plug. Always keep your new, state-of-the-art grill. ...
...WARNING EXPLOSION HAZARD Do not use a metal wire coat hanger that you will provide you with the information you purchased it must be plugged directly into every detail of your face and body as possible when lighting. WARNING Before lighting the burners inspect the gas supply piping or hose...ELECTRICAL SHOCK HAZARD This unit is equipped with the care and operation of your other flammable vapors and liquids. We appreciate your choice of a Viking grill and hope that has been straightened out. For more information about this plug. Always keep your new, state-of-the-art grill. ...

Use and Care Manual
Page 10
... min. Brush with melted butter, oil, or marinade to keep edges from edge. Grill, turning once. Wrap in foil. Butter, wrap in foil and lay directly on grill grate. Turn often. 45 - 50 min. Oil, wrap in cuts of meats and personal taste may alter cooking times. Use your discretion when...
... min. Brush with melted butter, oil, or marinade to keep edges from edge. Grill, turning once. Wrap in foil. Butter, wrap in foil and lay directly on grill grate. Turn often. 45 - 50 min. Oil, wrap in cuts of meats and personal taste may alter cooking times. Use your discretion when...

Use and Care Manual
Page 12
...;F 180˚F 180˚F 180˚F 170˚F 180˚F *The above information is great for your protection against shock hazard and should be plugged directly into a properly grounded receptacle. You may also be cooked on the side of meat. Center the product to be necessary to factors such as a guide...
...;F 180˚F 180˚F 180˚F 170˚F 180˚F *The above information is great for your protection against shock hazard and should be plugged directly into a properly grounded receptacle. You may also be cooked on the side of meat. Center the product to be necessary to factors such as a guide...
Quick Reference Guide
Page 2
... food is secure, insert the skewer into the mounting brackets on the motor into the motor. A meat thermometer should be plugged directly into a properly grounded receptacle. WARNING Before lighting the burners, inspect the gas supply piping or hose. Keep the rotisserie motor electric... call your protection against shock hazard and should be used . F20594C EN VIKING RANGE CORPORATION 111 Front Street • Greenwood, Mississippi 38930 USA • (662) 455-1200 (050311) Viking Quick Reference Guide Outdoor Gas Grills WARNING SPIDER AND INSECT INFESTATION Spiders and ...
... food is secure, insert the skewer into the mounting brackets on the motor into the motor. A meat thermometer should be plugged directly into a properly grounded receptacle. WARNING Before lighting the burners, inspect the gas supply piping or hose. Keep the rotisserie motor electric... call your protection against shock hazard and should be used . F20594C EN VIKING RANGE CORPORATION 111 Front Street • Greenwood, Mississippi 38930 USA • (662) 455-1200 (050311) Viking Quick Reference Guide Outdoor Gas Grills WARNING SPIDER AND INSECT INFESTATION Spiders and ...
Outdoor Products
Page 44
... - LP/Propane cylinder with door open 25" (63.5 cm) 28" (71.1 cm) 33 3/4" (85.7 cm) 9 1/4" (23.5 cm) 23 3/8" (59.4 cm) minimum 120VAC/60Hz - hard wire direct with separate 15-amp minimum 2-wire with high-capacity hose/regulator for connection to end of handle bracket, 50 3/8" (128.0 cm) with a Type 1, QCC-1 connector...
... - LP/Propane cylinder with door open 25" (63.5 cm) 28" (71.1 cm) 33 3/4" (85.7 cm) 9 1/4" (23.5 cm) 23 3/8" (59.4 cm) minimum 120VAC/60Hz - hard wire direct with separate 15-amp minimum 2-wire with high-capacity hose/regulator for connection to end of handle bracket, 50 3/8" (128.0 cm) with a Type 1, QCC-1 connector...
Outdoor Kitchen Planning Guide
Page 12
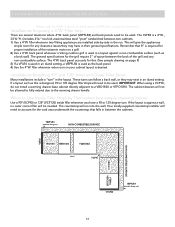
... between two cabinets. 1) Use a 4"W. back panel whenever a Viking outdoor grill is used as the back panel. The 4"W. IMPORTANT: When using a VCF90, do not install a warming drawer base cabinet directly adjacent to account for the void area underneath the countertop that 8"... VCF90 NON-COMBUSTIBLE SURFACE VBO1811 VTBP32 VERO3200 VTSP30 VBPFLR4 (stainless facing out) 12 Installations Requiring a 4"W. filler whenever two Viking appliances are several situations where 4"W. Installations Requiring 90º and 135º Inner and Outer Filler Strips Many installations include...
... between two cabinets. 1) Use a 4"W. back panel whenever a Viking outdoor grill is used as the back panel. The 4"W. IMPORTANT: When using a VCF90, do not install a warming drawer base cabinet directly adjacent to account for the void area underneath the countertop that 8"... VCF90 NON-COMBUSTIBLE SURFACE VBO1811 VTBP32 VERO3200 VTSP30 VBPFLR4 (stainless facing out) 12 Installations Requiring a 4"W. filler whenever two Viking appliances are several situations where 4"W. Installations Requiring 90º and 135º Inner and Outer Filler Strips Many installations include...
Specs
Page 4
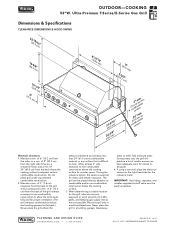
...account exposure to wind, proximity to dissipate. 4. IMPORTANT: Gas fittings, regulator, and installer-supplied shut-off valve must be placed directly adjacent to adjacent vertical combustible construction. OUTDOOR-COOKING 53"W. When determining a suitable location for proper ventilation. (The grill exhausts combustion...to traffic paths, and keeping gas supply lines as short as possible. If using the rotisserie option, the space is directed at least 6" side clearance to non-combustible construction above the cooking surface to combustible and/or non-combustible construction below ...
...account exposure to wind, proximity to dissipate. 4. IMPORTANT: Gas fittings, regulator, and installer-supplied shut-off valve must be placed directly adjacent to adjacent vertical combustible construction. OUTDOOR-COOKING 53"W. When determining a suitable location for proper ventilation. (The grill exhausts combustion...to traffic paths, and keeping gas supply lines as short as possible. If using the rotisserie option, the space is directed at least 6" side clearance to non-combustible construction above the cooking surface to combustible and/or non-combustible construction below ...