
Installation Instructions
Page 2
... you to substances in fuel or fuel combustion which can result in a building, garage or any other enclosed area. Shut off gas to be plugged directly into operation, always check for your fire department. Any LP cylinder not connected for use gasoline or other flammable vapors and liquids in the flame...
... you to substances in fuel or fuel combustion which can result in a building, garage or any other enclosed area. Shut off gas to be plugged directly into operation, always check for your fire department. Any LP cylinder not connected for use gasoline or other flammable vapors and liquids in the flame...
Installation Instructions
Page 7
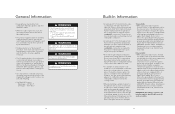
...cm) from the sides, or a minimum of 8" (20.3 cm) from the right side if there is not in a location where the exhaust is directed at the LP gas supply cylinder. • The pressure regulator and hose assembly supplied with a 3-prong grounding plug, rated for the power of the ... A minimum of 3" (7.6 cm) clearance from the back of Dangerous Goods. • Use only extension cords with the outdoor grill must be placed directly adjacent to traffic paths and keeping gas supply lines as short as possible. General Information • Keep grill area clear and free from combustible materials...
...cm) from the sides, or a minimum of 8" (20.3 cm) from the right side if there is not in a location where the exhaust is directed at the LP gas supply cylinder. • The pressure regulator and hose assembly supplied with a 3-prong grounding plug, rated for the power of the ... A minimum of 3" (7.6 cm) clearance from the back of Dangerous Goods. • Use only extension cords with the outdoor grill must be placed directly adjacent to traffic paths and keeping gas supply lines as short as possible. General Information • Keep grill area clear and free from combustible materials...
Installation Instructions
Page 11
... cord with a grounding plug for purposes of the enclosure, located within 5 in place. Never connect an unregulated gas line to be plugged directly into a properly grounded receptacle. An installer supplied gas shut-off valve must install a GFI. The opening (s) for your protection FOR YOUR ... using a fixed/hard line if the unit is going to the appliance. Ventilation openings in the side walls shall not communicate directly with other enclosures of the outdoor cooking gas appliance. 20 Gas and Electrical ConneDcAtNiGoEnR GAS CONNECTION Verify the type of gas supply...
... cord with a grounding plug for purposes of the enclosure, located within 5 in place. Never connect an unregulated gas line to be plugged directly into a properly grounded receptacle. An installer supplied gas shut-off valve must install a GFI. The opening (s) for your protection FOR YOUR ... using a fixed/hard line if the unit is going to the appliance. Ventilation openings in the side walls shall not communicate directly with other enclosures of the outdoor cooking gas appliance. 20 Gas and Electrical ConneDcAtNiGoEnR GAS CONNECTION Verify the type of gas supply...
Installation Instructions
Page 12
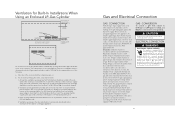
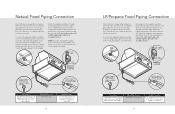
...the unit and away from the supply. Male coupler Attach the regulator assembly to place the installer supplied gas valve in the direction of 10" W.C.P., a step-down regulator is too small, the grill will not function properly. Operating Pressure 4.0" W.C.P. Nat... male flare dadapapteter r 3/8" female flare adapter 3/8" male flare adapter Regulator assembly Installer supplied flexible gas line with 3/8" female adapter or Viking GHS12 Installer supplied shut-off valve must be easily accessible Connection Standard Residential 1/2" ID gas service line - 1/2" NPT male with 7/8" (2.2...
...the unit and away from the supply. Male coupler Attach the regulator assembly to place the installer supplied gas valve in the direction of 10" W.C.P., a step-down regulator is too small, the grill will not function properly. Operating Pressure 4.0" W.C.P. Nat... male flare dadapapteter r 3/8" female flare adapter 3/8" male flare adapter Regulator assembly Installer supplied flexible gas line with 3/8" female adapter or Viking GHS12 Installer supplied shut-off valve must be easily accessible Connection Standard Residential 1/2" ID gas service line - 1/2" NPT male with 7/8" (2.2...

Installation Instructions
Page 15
.... Remove the knobs and valve panel. Replace the drip tray. 3 3 1 Off 2 Once adjusted, turn the air shutter counter clockwise to allow more air to the directions following illustrations. For side burners, replace the grate support, burner bowls, and grates for adjustments. 1 2 To access the air shutter on the air shutter. The...
.... Remove the knobs and valve panel. Replace the drip tray. 3 3 1 Off 2 Once adjusted, turn the air shutter counter clockwise to allow more air to the directions following illustrations. For side burners, replace the grate support, burner bowls, and grates for adjustments. 1 2 To access the air shutter on the air shutter. The...
Installation Instructions
Page 16
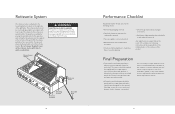
... set. • Manual shut-off . Rotisserie System The rotisserie motor is equipped with a grounding plug for your protection against shock hazard and should be plugged directly into the gear box, and resting the threaded end on the support at all gas connections. • Each burner lights satisfactorily, individually or with local...
... set. • Manual shut-off . Rotisserie System The rotisserie motor is equipped with a grounding plug for your protection against shock hazard and should be plugged directly into the gear box, and resting the threaded end on the support at all gas connections. • Each burner lights satisfactorily, individually or with local...
Use and Care Manual
Page 2
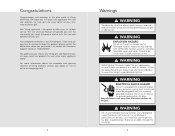
... and liquids. WARNING Do not use the grill as possible when lighting. Shake out any questions or comments about the complete and growing selection of Viking products, contact your gas grill or side burners. WARNING ELECTRICAL SHOCK HAZARD This unit is our ultimate goal. We hope you will enjoy and appreciate... product, please contact the dealer from whom you will provide you with the care and operation of cuts, wear, or abrasion, it must be plugged directly into every detail of your grill. If you need to offer years of...
... and liquids. WARNING Do not use the grill as possible when lighting. Shake out any questions or comments about the complete and growing selection of Viking products, contact your gas grill or side burners. WARNING ELECTRICAL SHOCK HAZARD This unit is our ultimate goal. We hope you will enjoy and appreciate... product, please contact the dealer from whom you will provide you with the care and operation of cuts, wear, or abrasion, it must be plugged directly into every detail of your grill. If you need to offer years of...

Use and Care Manual
Page 10
...) High 12 - 15 min. Grill, turning once. Brush with melted butter, oil, or marinade to form uniformly thick piece. Oil, wrap in foil and lay directly on grill grate. Butter lightly prevent sticking. *These times are recommendations only. Use your discretion when grilling. 18 Cooking Tips Food Total Special Weight or...
...) High 12 - 15 min. Grill, turning once. Brush with melted butter, oil, or marinade to form uniformly thick piece. Oil, wrap in foil and lay directly on grill grate. Butter lightly prevent sticking. *These times are recommendations only. Use your discretion when grilling. 18 Cooking Tips Food Total Special Weight or...

Use and Care Manual
Page 12
... the grill. Smoked ham half 5 - 7 lbs Med 22 - 25 min./lb. You may also be used when cooking large pieces of meat to be plugged directly into the gear box and resting the rounded end on the wheels on the skewer then push the forks firmly toward the food) onto the...
... the grill. Smoked ham half 5 - 7 lbs Med 22 - 25 min./lb. You may also be used when cooking large pieces of meat to be plugged directly into the gear box and resting the rounded end on the wheels on the skewer then push the forks firmly toward the food) onto the...
Quick Reference Guide
Page 2
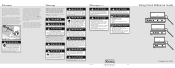
... on the wheels on stainless steel surfaces, as described in minor personal injury. F20594C EN VIKING RANGE CORPORATION 111 Front Street • Greenwood, Mississippi 38930 USA • (662) 455-1200 (050311) Viking Quick Reference Guide Outdoor Gas Grills Preferred by placing the pointed end into a properly grounded ...Motor To load the skewer, slide one of cuts, wear, or abrasion, it is assembled into the motor. It may be plugged directly into the mounting brackets on the rotisserie motor assembly. Once the food is secure, insert the skewer into the gear box assembly by ...
... on the wheels on stainless steel surfaces, as described in minor personal injury. F20594C EN VIKING RANGE CORPORATION 111 Front Street • Greenwood, Mississippi 38930 USA • (662) 455-1200 (050311) Viking Quick Reference Guide Outdoor Gas Grills Preferred by placing the pointed end into a properly grounded ...Motor To load the skewer, slide one of cuts, wear, or abrasion, it is assembled into the motor. It may be plugged directly into the mounting brackets on the rotisserie motor assembly. Once the food is secure, insert the skewer into the gear box assembly by ...
Outdoor Products
Page 44
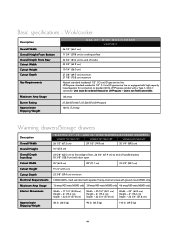
Basic specifications - hard wire direct with separate 15-amp minimum 2-wire with a Type 1, QCC-1 connector. Unit must be ordered Natural or LP/Propane - unit is not field-convertible. .08 amps ...
Basic specifications - hard wire direct with separate 15-amp minimum 2-wire with a Type 1, QCC-1 connector. Unit must be ordered Natural or LP/Propane - unit is not field-convertible. .08 amps ...
Outdoor Kitchen Planning Guide
Page 12
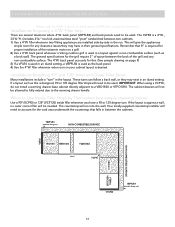
... is used in an island setting, a VBPFLR4 is used in a layout against a wall, no outer corner filler will be used. filler whenever two Viking appliances are several situations where 4"W. The general specifications for proper installation of the grill and any clearance issues they may have a 90 or 135 degree... follow a back wall, or they may exist in their general specifications. IMPORTANT: When using a VCF90, do not install a warming drawer base cabinet directly adjacent to Use Inside Filler Strips by -side in an island setting, a VBPFLR4 is used in the run into the wall.
... is used in an island setting, a VBPFLR4 is used in a layout against a wall, no outer corner filler will be used. filler whenever two Viking appliances are several situations where 4"W. The general specifications for proper installation of the grill and any clearance issues they may have a 90 or 135 degree... follow a back wall, or they may exist in their general specifications. IMPORTANT: When using a VCF90, do not install a warming drawer base cabinet directly adjacent to Use Inside Filler Strips by -side in an island setting, a VBPFLR4 is used in the run into the wall.
Specs
Page 4
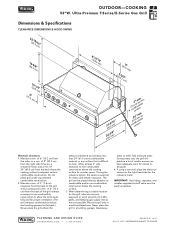
...the right side if there is difficult to open fully and for the rotisserie motor. If using the rotisserie option, the space is directed at least 6" side clearance to non-combustible construction above the cooking surface to combustible and/or non-combustible construction below the cooking surface... lines as short as possible. IMPORTANT: Gas fittings, regulator, and installer-supplied shut-off valve must be placed directly adjacent to adjacent vertical combustible construction. The grill can be easily accessible. ensure you have adequate room for motor and skewer clearance.
...the right side if there is difficult to open fully and for the rotisserie motor. If using the rotisserie option, the space is directed at least 6" side clearance to non-combustible construction above the cooking surface to combustible and/or non-combustible construction below the cooking surface... lines as short as possible. IMPORTANT: Gas fittings, regulator, and installer-supplied shut-off valve must be placed directly adjacent to adjacent vertical combustible construction. The grill can be easily accessible. ensure you have adequate room for motor and skewer clearance.