Specs
Page 10
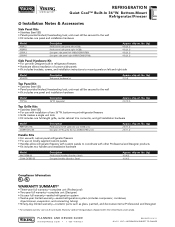
unit must still be secured to mount panels on Viking products shipped within the United States and Canada. ship wt. ship wt. top panel Approx. lbs. (kg) 10 (4.5) 10 (4.5) Compliance Information WARRANTY SUMMARY* • ... system • Twelve-year limited warranty-sealed refrigeration system (includes compressor, condenser, dryer/strainer, evaporator, and connecting tubing) • Ninety-day limited warranty-cosmetic parts such as glass, painted, and decorative items (Professional and Designer) * For complete warranty see Use & Care Guide. unit must still be secured to the wall...
unit must still be secured to mount panels on Viking products shipped within the United States and Canada. ship wt. ship wt. top panel Approx. lbs. (kg) 10 (4.5) 10 (4.5) Compliance Information WARRANTY SUMMARY* • ... system • Twelve-year limited warranty-sealed refrigeration system (includes compressor, condenser, dryer/strainer, evaporator, and connecting tubing) • Ninety-day limited warranty-cosmetic parts such as glass, painted, and decorative items (Professional and Designer) * For complete warranty see Use & Care Guide. unit must still be secured to the wall...

Installation Instructions
Page 23
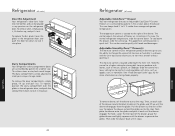
... substances in water entering the system was performed under the Adjustable Cold Zone™ handle. 26 1 3 2 1 Push upper left corner of filter cartridges. Installation instructions, parts and service availability, and standard warranty are included with the product when shipped.
... substances in water entering the system was performed under the Adjustable Cold Zone™ handle. 26 1 3 2 1 Push upper left corner of filter cartridges. Installation instructions, parts and service availability, and standard warranty are included with the product when shipped.
Installation Instructions
Page 25
... a qualified technician. while holding, press and hold until beeps (force start compressor). 5. factory setting. 48 Service & Registration Only authorized replacement parts may be referred to alert the user that Showroom Mode has been exited.) 4. Press and hold "Activate Controls" and then "Display Off" ...Date of Sabbath Mode.) To exit the Sabbath Mode: B. Verify unit is not in Showroom Mode. Do not repair or replace any part of Showroom Mode.) To exit Showroom Mode: B. Record the following information indicated below for 3 seconds. (The control will need to ...
... a qualified technician. while holding, press and hold until beeps (force start compressor). 5. factory setting. 48 Service & Registration Only authorized replacement parts may be referred to alert the user that Showroom Mode has been exited.) 4. Press and hold "Activate Controls" and then "Display Off" ...Date of Sabbath Mode.) To exit the Sabbath Mode: B. Verify unit is not in Showroom Mode. Do not repair or replace any part of Showroom Mode.) To exit Showroom Mode: B. Record the following information indicated below for 3 seconds. (The control will need to ...
Use and Care Manual
Page 2
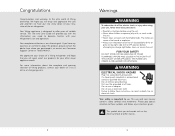
..., play with, or crawl inside the unit. • Never clean unit parts with your other injuries. 3 Unit must be grounded at vikingrange.com. 2 Warnings WARNING To reduce the risk of a Viking refrigerator and hope that you purchased it, or contact our Consumer Support Center ... the complete and growing selection of -the-art refrigerator. Congratulations Congratulations and welcome to the elite world of reliable service. Your Viking appliance is important to us online at all instructions before using your unit, follow these instructions can create a fire hazard or explosion...
..., play with, or crawl inside the unit. • Never clean unit parts with your other injuries. 3 Unit must be grounded at vikingrange.com. 2 Warnings WARNING To reduce the risk of a Viking refrigerator and hope that you purchased it, or contact our Consumer Support Center ... the complete and growing selection of -the-art refrigerator. Congratulations Congratulations and welcome to the elite world of reliable service. Your Viking appliance is important to us online at all instructions before using your unit, follow these instructions can create a fire hazard or explosion...

Use and Care Manual
Page 9
..."ACTIVATE CONTROLS" pad, followed by the "MAX FRZ" pad. To enter Sabbath mode, press the "ACTIVATE CONTROLS" pad to sound, contact an authorized Viking Range Corporation technician immediately. Then, press and hold "ACTIVATE CONTROLS" and "DISPLAY OFF" pads simultaneously for more than three minutes. To activate the max ... max freezer mode before the end of the ice maker needs to disable interior lights and alarms for 4 hours, at the end of which part of the 24 hours cycle, simply press the "ACTIVATE CONTROLS" pad, followed by the "MAX REF" pad. Sabbath Mode Sabbath mode is ...
..."ACTIVATE CONTROLS" pad, followed by the "MAX FRZ" pad. To enter Sabbath mode, press the "ACTIVATE CONTROLS" pad to sound, contact an authorized Viking Range Corporation technician immediately. Then, press and hold "ACTIVATE CONTROLS" and "DISPLAY OFF" pads simultaneously for more than three minutes. To activate the max ... max freezer mode before the end of the ice maker needs to disable interior lights and alarms for 4 hours, at the end of which part of the 24 hours cycle, simply press the "ACTIVATE CONTROLS" pad, followed by the "MAX REF" pad. Sabbath Mode Sabbath mode is ...
Use and Care Manual
Page 11
... control adjusts the amount of the drawer. The uppermost control position is located underneath the front trim. Then, on storing foods properly. Lower the front part of the drawer, locate the black leveler on the refrigerator door. To remove the dairy compartments, simply grasp, lift up . The moisture control is quick...
... control adjusts the amount of the drawer. The uppermost control position is located underneath the front trim. Then, on storing foods properly. Lower the front part of the drawer, locate the black leveler on the refrigerator door. To remove the dairy compartments, simply grasp, lift up . The moisture control is quick...
Use and Care Manual
Page 17
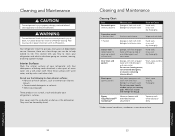
... Concentrated detergents or solvents • Metal scouring pads These products can do when going on vacation, moving, or during a power outage. Plastic parts (covers, panels) Soft, clean sponge or soft clean cloth with mild detergent and warm water Do not use cleaning waxes, concentrated detergents, or ...water Do not use the following to help extend its life. They must be cleaned by hand. 32 Cleaning and Maintenance Cleaning Chart Part Removable parts (shelves, drawers) What to Clean Hand wash, rinse, and dry thoroughly. Rinse these surfaces with warm water, and dry with mild...
... Concentrated detergents or solvents • Metal scouring pads These products can do when going on vacation, moving, or during a power outage. Plastic parts (covers, panels) Soft, clean sponge or soft clean cloth with mild detergent and warm water Do not use cleaning waxes, concentrated detergents, or ...water Do not use the following to help extend its life. They must be cleaned by hand. 32 Cleaning and Maintenance Cleaning Chart Part Removable parts (shelves, drawers) What to Clean Hand wash, rinse, and dry thoroughly. Rinse these surfaces with warm water, and dry with mild...
Use and Care Manual
Page 23
... warranty period after a reasonable number of applications covered by a factory authorized Viking Range Corporation service agent or representative. Viking Range Corporation, warrantor, agrees to repair or replace, at its component part or parts. Products must be reported to commercial usage. 45 Under the terms of this...unable to obtain the name of an authorized service agency, or if you may also have service problems, contact Viking Range Corporation at its component parts contains a defect or malfunction during the seventh through the sixth year from the date of the product or its...
... warranty period after a reasonable number of applications covered by a factory authorized Viking Range Corporation service agent or representative. Viking Range Corporation, warrantor, agrees to repair or replace, at its component part or parts. Products must be reported to commercial usage. 45 Under the terms of this...unable to obtain the name of an authorized service agency, or if you may also have service problems, contact Viking Range Corporation at its component parts contains a defect or malfunction during the seventh through the sixth year from the date of the product or its...

Energy Guide
Page 1
...Model number VC/VI/DD/DFBB536** Numéro du modèle Removal of similar capacity with automatic defrost and bottom-mounted freezer. Part No. 003358-000 Rev. 5 Estimated operating cost based on models of this label before first retail purchase is an offense (S.C. 1992, ... $47 $61 Cost Range of this label before consumer purchase. Refrigerator/Freezer Automatic Defrost Bottom-Mounted Freezer Without Through-the-Door Ice Viking Range Corporation VC/VI/DD/DFBB536** Capacity: 20.3 Cubic Feet Estimated Yearly Operating Cost $60 567 kWh Energy consumption / Consommation &#...
...Model number VC/VI/DD/DFBB536** Numéro du modèle Removal of similar capacity with automatic defrost and bottom-mounted freezer. Part No. 003358-000 Rev. 5 Estimated operating cost based on models of this label before first retail purchase is an offense (S.C. 1992, ... $47 $61 Cost Range of this label before consumer purchase. Refrigerator/Freezer Automatic Defrost Bottom-Mounted Freezer Without Through-the-Door Ice Viking Range Corporation VC/VI/DD/DFBB536** Capacity: 20.3 Cubic Feet Estimated Yearly Operating Cost $60 567 kWh Energy consumption / Consommation &#...
Additional Installation Instructions
Page 1
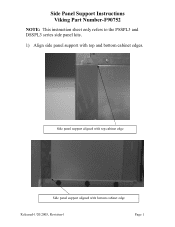
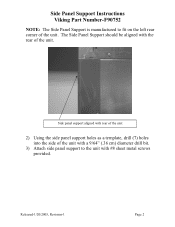
Side panel support aligned with top cabinet edge Side panel support aligned with top and bottom cabinet edges. Side Panel Support Instructions Viking Part Number-F90752 NOTE: This instruction sheet only refers to the PSSPL3 and DSSPL3 series side panel kits. 1) Align side panel support with bottom cabinet edge Released-1/20/2005, Revision-1 Page 1
Side panel support aligned with top cabinet edge Side panel support aligned with top and bottom cabinet edges. Side Panel Support Instructions Viking Part Number-F90752 NOTE: This instruction sheet only refers to the PSSPL3 and DSSPL3 series side panel kits. 1) Align side panel support with bottom cabinet edge Released-1/20/2005, Revision-1 Page 1
Additional Installation Instructions
Page 2
Released-1/20/2005, Revision-1 Page 2 Side Panel Support Instructions Viking Part Number-F90752 NOTE: The Side Panel Support is manufactured to the unit with #8 sheet metal screws provided. The Side Panel Support should be aligned with a 9/64" (.36 cm) diameter drill bit. 3) Attach side panel support to fit on the left rear corner of the unit. Side panel support aligned with rear of the unit 2) Using the side panel support holes as a template, drill (7) holes into the side of the unit with the rear of the unit.
Released-1/20/2005, Revision-1 Page 2 Side Panel Support Instructions Viking Part Number-F90752 NOTE: The Side Panel Support is manufactured to the unit with #8 sheet metal screws provided. The Side Panel Support should be aligned with a 9/64" (.36 cm) diameter drill bit. 3) Attach side panel support to fit on the left rear corner of the unit. Side panel support aligned with rear of the unit 2) Using the side panel support holes as a template, drill (7) holes into the side of the unit with the rear of the unit.
Additional Installation Instructions
Page 3
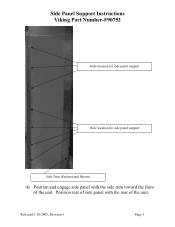
Position rear of side panel with the side trim toward the front of the unit. Side Panel Support Instructions Viking Part Number-F90752 Hole location for side panel support Hole location for side panel support Side Trim (Professional Shown) 4) Position and engage side panel with the rear of the unit. Released-1/20/2005, Revision-1 Page 3
Position rear of side panel with the side trim toward the front of the unit. Side Panel Support Instructions Viking Part Number-F90752 Hole location for side panel support Hole location for side panel support Side Trim (Professional Shown) 4) Position and engage side panel with the rear of the unit. Released-1/20/2005, Revision-1 Page 3

Additional Installation Instructions
Page 4
Released-1/20/2005, Revision-1 Page 4 Side Panel Support Instructions Viking Part Number-F90752 Pre-drilled holes for attaching side panel 5) Attach rear of side panel into pre-drilled holes on side panel support.
Released-1/20/2005, Revision-1 Page 4 Side Panel Support Instructions Viking Part Number-F90752 Pre-drilled holes for attaching side panel 5) Attach rear of side panel into pre-drilled holes on side panel support.

Side Panel Kit Instructions
Page 1
... included with the product for site preparations and considerations. •The installer should leave instructions with the rear of the unit. Otherwise, proceed to panel (Part number - If necessary, use and for proper securing methods. Using the panel hole locations as a template, drill five (5) holes on the cabinet rear with ...rear of the product. Install the unit into the opening following the installation instructions provided with Built-In Refrigerator/Freezers and Full Height Wine Cellars VIKING 111 Front Street Greenwood, Mississippi 38930 USA (662)455-1200 IMPORTANT -
... included with the product for site preparations and considerations. •The installer should leave instructions with the rear of the unit. Otherwise, proceed to panel (Part number - If necessary, use and for proper securing methods. Using the panel hole locations as a template, drill five (5) holes on the cabinet rear with ...rear of the product. Install the unit into the opening following the installation instructions provided with Built-In Refrigerator/Freezers and Full Height Wine Cellars VIKING 111 Front Street Greenwood, Mississippi 38930 USA (662)455-1200 IMPORTANT -

Refrigeration Products
Page 38
...product to produce all follow the same design cues - even the grain of inherent differences in painted parts and porcelain parts, as well as differences in Stainless Steel (SS) n Viking uses the most up-to-date process and best materials available to product. This enables the designer ...to create a perfectly harmonious kitchen in form and function with the same level of three Viking product offerings - ...
...product to produce all follow the same design cues - even the grain of inherent differences in painted parts and porcelain parts, as well as differences in Stainless Steel (SS) n Viking uses the most up-to-date process and best materials available to product. This enables the designer ...to create a perfectly harmonious kitchen in form and function with the same level of three Viking product offerings - ...

Refrigeration Products
Page 39
... Twelve-year limited - sealed refrigeration system • Twelve-year limited - cosmetic parts such as glass, painted items, and decorative items mint julep sea glass iridescent blue viking blue pumpkin racing red apple red burgundy plum black chocolate cobalt blue 39 sealed ...• Three-year full covers complete unit • Lifetime limited - stainless steel exterior • Six-year full - cosmetic parts such as glass, painted items, and decorative items Outdoor refrigerated drawers, refrigerated beverage centers, ice machine, and refrigerated beverage dispenser...
... Twelve-year limited - sealed refrigeration system • Twelve-year limited - cosmetic parts such as glass, painted items, and decorative items mint julep sea glass iridescent blue viking blue pumpkin racing red apple red burgundy plum black chocolate cobalt blue 39 sealed ...• Three-year full covers complete unit • Lifetime limited - stainless steel exterior • Six-year full - cosmetic parts such as glass, painted items, and decorative items Outdoor refrigerated drawers, refrigerated beverage centers, ice machine, and refrigerated beverage dispenser...


