Viking Product Line
Page 3
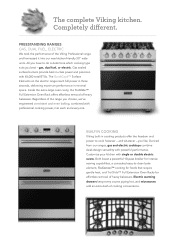
Regardless of the range you choose, we've engineered consistent and even baking, combined with single or double electric ovens. gas, dual fuel, or electric. and whatever - Customize your kitchen with professional cooking power, into our new kitchen-friendly 30" wide units. Inside the extra-large oven cavity, the TruGlide™ Full Extension Oven Rack offers effortless removal of heavy bakeware. BUILT-IN COOKING Viking built-in cooking products offer the freedom...
Regardless of the range you choose, we've engineered consistent and even baking, combined with single or double electric ovens. gas, dual fuel, or electric. and whatever - Customize your kitchen with professional cooking power, into our new kitchen-friendly 30" wide units. Inside the extra-large oven cavity, the TruGlide™ Full Extension Oven Rack offers effortless removal of heavy bakeware. BUILT-IN COOKING Viking built-in cooking products offer the freedom...

Two-Page Specifications Sheet
Page 1
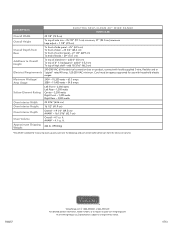
... the largest convection fan in the industry - 4.7 cu. surface/tube burners 30" Wide Electric Range (Shown with child-proof, push-to-turn safety feature • Customer-removable knobs for oven interior dimensions) • High performance cooking modes include Bake, Convection Bake, TruConvecTM Convection Cooking, Convection Roast, Hi Broil, Medium Broil, Low Broil, Convection Broil, Convection Dehydrate, and Convection Defrost • Exclusive - Left front - 8 1/2" 2,000-watt dual element - ft. Center - 12" 3,200-watt triple element - cosmetic parts such as glass, painted...
... the largest convection fan in the industry - 4.7 cu. surface/tube burners 30" Wide Electric Range (Shown with child-proof, push-to-turn safety feature • Customer-removable knobs for oven interior dimensions) • High performance cooking modes include Bake, Convection Bake, TruConvecTM Convection Cooking, Convection Roast, Hi Broil, Medium Broil, Low Broil, Convection Broil, Convection Dehydrate, and Convection Defrost • Exclusive - Left front - 8 1/2" 2,000-watt dual element - ft. Center - 12" 3,200-watt triple element - cosmetic parts such as glass, painted...
Two-Page Specifications Sheet
Page 2
... electric ranges. DESCRIPTION ELECTRIC SELF-CLEAN 30" WIDE RANGE RVER330-5B Overall Width 29 7/8" (75.9 cm) Overall Height To top of side trim - 35 7/8" (91.1 cm) minimum; 37" (94.0 cm) maximum Legs adjust - 1 1/8" (2.9 cm) Overall Depth from the total oven volume. ft. AHAM* - 4.1 cu. backguard - Approximate Shipping Weight 424 lb. (190.8 kg) *The AHAM standard for use with locally supplied 3-wire, flexible cord or Electrical Requirements...
... electric ranges. DESCRIPTION ELECTRIC SELF-CLEAN 30" WIDE RANGE RVER330-5B Overall Width 29 7/8" (75.9 cm) Overall Height To top of side trim - 35 7/8" (91.1 cm) minimum; 37" (94.0 cm) maximum Legs adjust - 1 1/8" (2.9 cm) Overall Depth from the total oven volume. ft. AHAM* - 4.1 cu. backguard - Approximate Shipping Weight 424 lb. (190.8 kg) *The AHAM standard for use with locally supplied 3-wire, flexible cord or Electrical Requirements...
Installation Instructions
Page 2
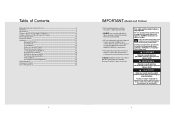
... codes. Table of Contents Warnings & Important Safety Instructions 3 Dimensions 6 Specifications 7 Clearance Dimensions (Proximity to Cabinets 8 Clearance Dimensions (Wood/Composite Overlay 9 Electrical Requirements 10 General Information 12 Installation 13 Backguard Installation 13 Door Removal 13 Leg Installation 14 Electrical Connection (3-wire 15 Electrical Connection (4-wire 17 Leveling/Adjustments/Alignment 19 Anti-tip Device Installation 20 Wall Mount Anti-tip Installation 20 Floor Mount Anti-tip Installation 21 Final Installation 22 Door Replacement and Adjustment...
... codes. Table of Contents Warnings & Important Safety Instructions 3 Dimensions 6 Specifications 7 Clearance Dimensions (Proximity to Cabinets 8 Clearance Dimensions (Wood/Composite Overlay 9 Electrical Requirements 10 General Information 12 Installation 13 Backguard Installation 13 Door Removal 13 Leg Installation 14 Electrical Connection (3-wire 15 Electrical Connection (4-wire 17 Leveling/Adjustments/Alignment 19 Anti-tip Device Installation 20 Wall Mount Anti-tip Installation 20 Floor Mount Anti-tip Installation 21 Final Installation 22 Door Replacement and Adjustment...

Installation Instructions
Page 4
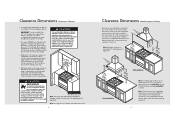
... open top burners above cooking surface. Dimensions RVER (2795-.97/c8m") ((99413..0153c-ct7m7mo/"))8mm"ainx.. 6" (15.2 cm) 27-1/8" (68.9 cm) 25" (63.5 cm) 29" (73.7 cm) 25" (63.5 cm) 35-7/8" (91.1 cm) min. Clearances to base height Electrical requirements Maximum wattage/amp usage Surface element rating Left front Left rear Center Right front Right rear Oven interior width Oven interior height Oven interior depth Oven...
... open top burners above cooking surface. Dimensions RVER (2795-.97/c8m") ((99413..0153c-ct7m7mo/"))8mm"ainx.. 6" (15.2 cm) 27-1/8" (68.9 cm) 25" (63.5 cm) 29" (73.7 cm) 25" (63.5 cm) 35-7/8" (91.1 cm) min. Clearances to base height Electrical requirements Maximum wattage/amp usage Surface element rating Left front Left rear Center Right front Right rear Oven interior width Oven interior height Oven interior depth Oven...
Installation Instructions
Page 5
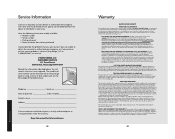
... delaminate and will withstand temperatures up to the range hood installation instructions for additional information. with island trim and combustible rear wall. 0" with backguard or high-shelf. ((7611268672""t..mmo69 accinmmx..)) WoodO/Cveormlapyosite ((631822..o0647r""ccmm)) (00c"m) 33((796061""..t24mmoccaimmnx.)). ((7611268672""t..mmo69 accinmmx..)) (763.20"cm) (156.2"cm) 33((796061""..t24mmoccaimmnx.)). Clearances to combustible vertical surfaces above 36" (91.4 cm...
... delaminate and will withstand temperatures up to the range hood installation instructions for additional information. with island trim and combustible rear wall. 0" with backguard or high-shelf. ((7611268672""t..mmo69 accinmmx..)) WoodO/Cveormlapyosite ((631822..o0647r""ccmm)) (00c"m) 33((796061""..t24mmoccaimmnx.)). ((7611268672""t..mmo69 accinmmx..)) (763.20"cm) (156.2"cm) 33((796061""..t24mmoccaimmnx.)). Clearances to combustible vertical surfaces above 36" (91.4 cm...
Installation Instructions
Page 13
... by opening the door and looking under the control panel. DO NOT use steel wool, abrasive cloths, cleansers, or powders! If it if service is on. □ Check oven bake function-bake element on full power, center and outside broil elements will turn on . □ Check hot surface indicator lights-glow red when corresponding element is ever required. The serial number and model number for this material. Final Preparation • All stainless steel body parts should...
... by opening the door and looking under the control panel. DO NOT use steel wool, abrasive cloths, cleansers, or powders! If it if service is on. □ Check oven bake function-bake element on full power, center and outside broil elements will turn on . □ Check hot surface indicator lights-glow red when corresponding element is ever required. The serial number and model number for this material. Final Preparation • All stainless steel body parts should...
Use and Care Manual
Page 2
... Surface Heat Settings 17 Cooking Vessels 17 Oven Features 18 Rack Positions 18 Using the Oven 19 Preheat 19 Conventional and Convection Cooking 20 Baking 22 BAKE (Two-Element Bake 22 CONV BAKE (Convection Bake 22 TRU CONV (TruConvec 23 Roasting 27 CONV ROAST (Convection Roast 27 Broiling 31 CONV BROIL (Convection Broil 31 HI BROIL 31 MED BROIL 31 LOW BROIL 32 Convection Dehydrate 35 Convection Defrost 35 Cooking Substitutes Charts 36 Product Care Cleaning and Maintenance 37 Self-Clean Cycle 42 Replacing Oven Lights 44 Door Removal...
... Surface Heat Settings 17 Cooking Vessels 17 Oven Features 18 Rack Positions 18 Using the Oven 19 Preheat 19 Conventional and Convection Cooking 20 Baking 22 BAKE (Two-Element Bake 22 CONV BAKE (Convection Bake 22 TRU CONV (TruConvec 23 Roasting 27 CONV ROAST (Convection Roast 27 Broiling 31 CONV BROIL (Convection Broil 31 HI BROIL 31 MED BROIL 31 LOW BROIL 32 Convection Dehydrate 35 Convection Defrost 35 Cooking Substitutes Charts 36 Product Care Cleaning and Maintenance 37 Self-Clean Cycle 42 Replacing Oven Lights 44 Door Removal...

Use and Care Manual
Page 4
... possible. When flaming foods under the hood turn on a surface element before attempting to prevent grease from steam. The hot air from parts of flammable material or loose fitting or longsleeved apparel while cooking. Avoid their use water on . Clean hood frequently to move a flaming pan. • Oven: Smother fire or flame by closing the oven door. In Case of cooking. • Use care when opening the oven door. Slide oven rack out to children over burners. •...
... possible. When flaming foods under the hood turn on a surface element before attempting to prevent grease from steam. The hot air from parts of flammable material or loose fitting or longsleeved apparel while cooking. Avoid their use water on . Clean hood frequently to move a flaming pan. • Oven: Smother fire or flame by closing the oven door. In Case of cooking. • Use care when opening the oven door. Slide oven rack out to children over burners. •...

Use and Care Manual
Page 5
... as well as they could cause the flames to prevent excessive smoke, flareups or flaming. • This range features a cooling fan which operates automatically during a self-clean cycle. Utensil Safety • Use pans with food may result in or around any kind in damaging the rangetop. 8 Warnings Heating Elements and Glass Ceramic Cooking Surfaces • Surface areas on oven convection systems. The use any devices or accessories that are easily...
... as well as they could cause the flames to prevent excessive smoke, flareups or flaming. • This range features a cooling fan which operates automatically during a self-clean cycle. Utensil Safety • Use pans with food may result in or around any kind in damaging the rangetop. 8 Warnings Heating Elements and Glass Ceramic Cooking Surfaces • Surface areas on oven convection systems. The use any devices or accessories that are easily...

Use and Care Manual
Page 7
... reduces preheating time and provides greater control and more evenly • Three broiling modes including a low-broil mode for delicate broiling and top-browning • A profiled, concealed bake element for an hour. Use of high temperatures. CAUTION FIRE HAZARD You must carefully check the food during a self-clean cycle, causing permanent damage to cook, clean the range thoroughly with aluminum foil or other materials. Then set the oven selector to bake, the thermostat...
... reduces preheating time and provides greater control and more evenly • Three broiling modes including a low-broil mode for delicate broiling and top-browning • A profiled, concealed bake element for an hour. Use of high temperatures. CAUTION FIRE HAZARD You must carefully check the food during a self-clean cycle, causing permanent damage to cook, clean the range thoroughly with aluminum foil or other materials. Then set the oven selector to bake, the thermostat...

Use and Care Manual
Page 12
... that require gentle cooking such as cakes, fish or meat. Use this heating method, foods can be baked and roasted at one time. When roasting using multiple racks-a feature not possible in the oven cavity for even heating. The hot air system is required. There is no direct heat from the broil element. The motorized fan in the rear of the oven circulates air in a standard oven. Breads, cookies, and other baked goods come clean when...
... that require gentle cooking such as cakes, fish or meat. Use this heating method, foods can be baked and roasted at one time. When roasting using multiple racks-a feature not possible in the oven cavity for even heating. The hot air system is required. There is no direct heat from the broil element. The motorized fan in the rear of the oven circulates air in a standard oven. Breads, cookies, and other baked goods come clean when...

Use and Care Manual
Page 14
... oven to preheat 1. of pans 1. Oven not hot enough 1. Too many pans 1. Allow oven to remember that the temperature setting and cooking times you find this will interfere with the inner and outer broil elements. This is convection roast gained over the food. • If using a cooking bag, foil tent, or other cover, use a broiler pan and grid. Roasting Tips ALWAYS use the conventional bake setting rather than either convection setting. 27 Operation Poultry will have a light, crispy...
... oven to preheat 1. of pans 1. Oven not hot enough 1. Too many pans 1. Allow oven to remember that the temperature setting and cooking times you find this will interfere with the inner and outer broil elements. This is convection roast gained over the food. • If using a cooking bag, foil tent, or other cover, use a broiler pan and grid. Roasting Tips ALWAYS use the conventional bake setting rather than either convection setting. 27 Operation Poultry will have a light, crispy...

Use and Care Manual
Page 17
... the cooking surface to prevent drying out. Broiling speed is a dry-heat cooking method using direct or radiant heat. Conventional broiling (LOW, MED or HI BROIL) is most successful for cuts of meat 1-2 inches thick and is not a detent to hold the door in the top of meat. Arrange the oven rack in 3-4 minutes. Center the food on . 2. Set the oven function selector to desired broiling function and the temperature control knob to...
... the cooking surface to prevent drying out. Broiling speed is a dry-heat cooking method using direct or radiant heat. Conventional broiling (LOW, MED or HI BROIL) is most successful for cuts of meat 1-2 inches thick and is not a detent to hold the door in the top of meat. Arrange the oven rack in 3-4 minutes. Center the food on . 2. Set the oven function selector to desired broiling function and the temperature control knob to...

Use and Care Manual
Page 21
..., then use any adjustments. The oven features a self-clean cycle for complete instructions. Wash in your electric oven. If necessary, scrape stainless steel to remove encrusted materials, soak the area with hot towels to the extreme heat of each surface are given below. DO NOT permit citrus or tomato juice to unlock automatically. The range is affected only when the power is restored and allow door to...
..., then use any adjustments. The oven features a self-clean cycle for complete instructions. Wash in your electric oven. If necessary, scrape stainless steel to remove encrusted materials, soak the area with hot towels to the extreme heat of each surface are given below. DO NOT permit citrus or tomato juice to unlock automatically. The range is affected only when the power is restored and allow door to...

Use and Care Manual
Page 22
.... 5. Turn the temperature control knob past the clean setting until the oven reaches the self-clean temperature and will continue to burn off any ash from the oven. At this time, the clean indicator light will remain on until the self-clean is approximately 3-1/2 hours with an additional 30 minutes needed for self-clean, the door lock indicator light comes on . Within 30 seconds the automatic door latch engages and the oven indicator light comes on . 4. Product Care Self-Clean Cycle This oven features...
.... 5. Turn the temperature control knob past the clean setting until the oven reaches the self-clean temperature and will continue to burn off any ash from the oven. At this time, the clean indicator light will remain on until the self-clean is approximately 3-1/2 hours with an additional 30 minutes needed for self-clean, the door lock indicator light comes on . Within 30 seconds the automatic door latch engages and the oven indicator light comes on . 4. Product Care Self-Clean Cycle This oven features...

Use and Care Manual
Page 24
... adjustment, tighten hinge trim screws. 46 47 Oven does not operate in hinges. 5 Close door. Temperature control knob is burned out. Oven light will release when safe temperature is not connected to electrical power: Have electrician check power circuit breaker, wiring, and fuses. Range is reached. If oven is not shut tight enough for automatic door latch to lock. Light bulb is rotated too far past clean until it stops. Door is hot, door latch will not work . Reinstall hinge trim. 4 Remove...
... adjustment, tighten hinge trim screws. 46 47 Oven does not operate in hinges. 5 Close door. Temperature control knob is burned out. Oven light will release when safe temperature is not connected to electrical power: Have electrician check power circuit breaker, wiring, and fuses. Range is reached. If oven is not shut tight enough for automatic door latch to lock. Light bulb is rotated too far past clean until it stops. Door is hot, door latch will not work . Reinstall hinge trim. 4 Remove...
Use and Care Manual
Page 25
... than an authorized Viking Range, LLC service agency or representative. This warranty gives you specific legal rights, and you . You will be repaired or replaced, free of charge for the part itself , with the owner paying all commercial locations such as detailed below . Model no Serial no Date of purchase Date installed Dealer's name Address If service requires installation of parts, use , improper installation, improper operation, or repair or service of the product...
... than an authorized Viking Range, LLC service agency or representative. This warranty gives you specific legal rights, and you . You will be repaired or replaced, free of charge for the part itself , with the owner paying all commercial locations such as detailed below . Model no Serial no Date of purchase Date installed Dealer's name Address If service requires installation of parts, use , improper installation, improper operation, or repair or service of the product...

Quick Reference Guide
Page 1
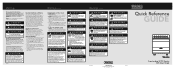
... finished, turn the control knob counterclockwise to the desired setting. Controls Interior Oven Light Switch Surface Indicator Light Self-Clean Indicator Light Oven Indicator Light Left Rear Burner Control Knob (1,200 watt) Left Front Burner Control Knob (2,000 watt) Center Burner Control Knob (3,200 watt) TruConvec™ element (behind baffle) (3) Oven racks Broil element Oven light 6 5 4 3 2 1 OTEVMENPERATURE Concealed bake element Oven Function Selector Knob Oven Temperature Control Knob Right Rear Burner Control Knob (2,000 watt) Right Front Burner Control Knob (1,200...
... finished, turn the control knob counterclockwise to the desired setting. Controls Interior Oven Light Switch Surface Indicator Light Self-Clean Indicator Light Oven Indicator Light Left Rear Burner Control Knob (1,200 watt) Left Front Burner Control Knob (2,000 watt) Center Burner Control Knob (3,200 watt) TruConvec™ element (behind baffle) (3) Oven racks Broil element Oven light 6 5 4 3 2 1 OTEVMENPERATURE Concealed bake element Oven Function Selector Knob Oven Temperature Control Knob Right Rear Burner Control Knob (2,000 watt) Right Front Burner Control Knob (1,200...
Quick Reference Guide
Page 2
... oven reaches elevated temperatures in order to oven vents. Note: DO NOT use commercial oven cleaners inside the oven. DO NOT line the oven with a damp cloth as described in operation. Warnings (cont.) WARNING BURN HAZARD The oven door, especially the glass, can happen if the instructions are not followed. WARNING ELECTRICAL SHOCK HAZARD Disconnect the electric power at the main fuse or circuit breaker before removing bulb to avoid electrical shock...
... oven reaches elevated temperatures in order to oven vents. Note: DO NOT use commercial oven cleaners inside the oven. DO NOT line the oven with a damp cloth as described in operation. Warnings (cont.) WARNING BURN HAZARD The oven door, especially the glass, can happen if the instructions are not followed. WARNING ELECTRICAL SHOCK HAZARD Disconnect the electric power at the main fuse or circuit breaker before removing bulb to avoid electrical shock...


