Specs
Page 1
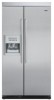
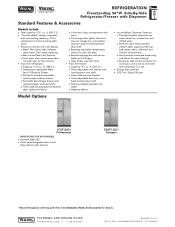
... Electronic controls with top grille kits. ft. (653.3 L) • "Counter depth" design integrates with surrounding cabinetry-fit for five minutes • Frost-free refrigerator o Capacity-14.0 cu. ft. (396.0 L) o Temperature adjustable Meat Savor™/Produce Drawer o Full-width humidity-adjustable, see-through produce drawer o Full-...and one fixed position wire shelf o Three slide-out wire baskets o Three adjustable door bins; Gray cabinet sides and top. REFRIGERATION Freestanding 36"W. Side-By-Side Refrigerator/Freezer with cover • Frost-free freezer o Capacity-9.1 cu.
... Electronic controls with top grille kits. ft. (653.3 L) • "Counter depth" design integrates with surrounding cabinetry-fit for five minutes • Frost-free refrigerator o Capacity-14.0 cu. ft. (396.0 L) o Temperature adjustable Meat Savor™/Produce Drawer o Full-width humidity-adjustable, see-through produce drawer o Full-...and one fixed position wire shelf o Three slide-out wire baskets o Three adjustable door bins; Gray cabinet sides and top. REFRIGERATION Freestanding 36"W. Side-By-Side Refrigerator/Freezer with cover • Frost-free freezer o Capacity-9.1 cu.
Specs
Page 2
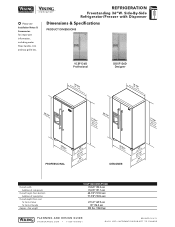
Side-By-Side Refrigerator/Freezer with Dispenser Dimensions & Specifications PRODUCT DIMENSIONS VCSF136D Professional DDSF136D Designer w/side (3p95a1n-.17el/c8amc")cessory w/side (3p95a1n-.17el/c8amc")cessory (16784-.10/c2m") (ag17wc8r1cii2tle-...) 30" (76.2 cm) 304 lbs. (136.8 kg) PLANNING AND DESIGN GUIDE VIKINGRANGE.COM • 1-888-VIKING1 REVISED 5/2/11 ©2011 VRC-INFORMATION SUBJECT TO CHANGE REFRIGERATION Freestanding 36"W.
Side-By-Side Refrigerator/Freezer with Dispenser Dimensions & Specifications PRODUCT DIMENSIONS VCSF136D Professional DDSF136D Designer w/side (3p95a1n-.17el/c8amc")cessory w/side (3p95a1n-.17el/c8amc")cessory (16784-.10/c2m") (ag17wc8r1cii2tle-...) 30" (76.2 cm) 304 lbs. (136.8 kg) PLANNING AND DESIGN GUIDE VIKINGRANGE.COM • 1-888-VIKING1 REVISED 5/2/11 ©2011 VRC-INFORMATION SUBJECT TO CHANGE REFRIGERATION Freestanding 36"W.

Specs
Page 3
Side-By-Side Refrigerator/Freezer with Dispenser VCSF136D Professional 35-5/8" (90.5 cm) DDSF136D Designer 41-3/4" (106.0 cm) 2-1/2" (6.4 cm) 90.0° 90.0° PROFESSIONAL 35-5/8" (90.5 cm) 45-1/2" (115.6 cm) 2-1/2" (6.4 cm) 41-3/4" (106.0 cm) 2-1/2" (6.4 cm) 90.0° 90.0° 45-1/2" (115.6 cm) 2-1/2" (6.4 cm) DESIGNER PLANNING AND DESIGN GUIDE VIKINGRANGE.COM • 1-888-VIKING1 REVISED 5/2/11 ©2011 VRC-INFORMATION SUBJECT TO CHANGE Dimensions & Specifications DOOR SWING REFRIGERATION Freestanding 36"W.
Side-By-Side Refrigerator/Freezer with Dispenser VCSF136D Professional 35-5/8" (90.5 cm) DDSF136D Designer 41-3/4" (106.0 cm) 2-1/2" (6.4 cm) 90.0° 90.0° PROFESSIONAL 35-5/8" (90.5 cm) 45-1/2" (115.6 cm) 2-1/2" (6.4 cm) 41-3/4" (106.0 cm) 2-1/2" (6.4 cm) 90.0° 90.0° 45-1/2" (115.6 cm) 2-1/2" (6.4 cm) DESIGNER PLANNING AND DESIGN GUIDE VIKINGRANGE.COM • 1-888-VIKING1 REVISED 5/2/11 ©2011 VRC-INFORMATION SUBJECT TO CHANGE Dimensions & Specifications DOOR SWING REFRIGERATION Freestanding 36"W.

Specs
Page 4
UTILITY REQUIREMENTS REFRIGERATION Freestanding 36"W. Do not use an extension cord or adapter plug for proper air circulation. carpet, tile, wood floors, rugs) may make your opening smaller ... location PLUMBING • Inlet waterline requirements- 1/4" copper tubing • 30 psi min.; 120 psi max. 26-1/2" (67.3 cm) 24-1/2" (62.2 cm) min. Side-By-Side Refrigerator/Freezer with Dispenser Installation Requirements ACCESS REQUIREMENTS GAS Not applicable ELECTRICAL • Three-wire cord with addition of the door must be 2-7/8" (7.3 cm) from the...
UTILITY REQUIREMENTS REFRIGERATION Freestanding 36"W. Do not use an extension cord or adapter plug for proper air circulation. carpet, tile, wood floors, rugs) may make your opening smaller ... location PLUMBING • Inlet waterline requirements- 1/4" copper tubing • 30 psi min.; 120 psi max. 26-1/2" (67.3 cm) 24-1/2" (62.2 cm) min. Side-By-Side Refrigerator/Freezer with Dispenser Installation Requirements ACCESS REQUIREMENTS GAS Not applicable ELECTRICAL • Three-wire cord with addition of the door must be 2-7/8" (7.3 cm) from the...
Specs
Page 5
...kits Model PFRGKS2 DFRGKS2 Description Professional side-by-side grille kit Designer side-by -side top kit Approx. Warranty valid on Viking products shipped within the United States and Canada. PLANNING AND DESIGN GUIDE VIKINGRANGE.COM • 1-888-VIKING1 REVISED 5/2/11 ...SUBJECT TO CHANGE lbs. (kg) 60 (27.0) Top Kit • Stainless steel finish • Provides "wrapped" look when used with freestanding refrigerator/freezers • Reduces sediment, bad taste and odor • Reduces cysts, particulates, turbidity, lead, chlorine, atrazine and lindane • NSF ...
...kits Model PFRGKS2 DFRGKS2 Description Professional side-by-side grille kit Designer side-by -side top kit Approx. Warranty valid on Viking products shipped within the United States and Canada. PLANNING AND DESIGN GUIDE VIKINGRANGE.COM • 1-888-VIKING1 REVISED 5/2/11 ...SUBJECT TO CHANGE lbs. (kg) 60 (27.0) Top Kit • Stainless steel finish • Provides "wrapped" look when used with freestanding refrigerator/freezers • Reduces sediment, bad taste and odor • Reduces cysts, particulates, turbidity, lead, chlorine, atrazine and lindane • NSF ...
Installation Instructions
Page 4
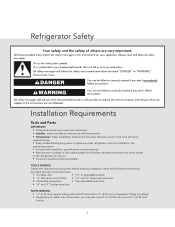
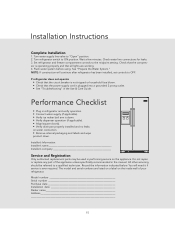
...or decorative panels from kitchen cabinets that would not allow access to the refrigerator for the local electrical inspector's use. • Keep cardboard shipping piece or plywood under refrigerator until it is installed in the operating position. • Comply with shutoff...; Depending on water line connections, you may also need a 1⁄4" (6.35 mm) nut and 1⁄4" (6.35 mm) ferrule. 2 Refrigerator Safety Installation Requirements Tools and Parts IMPORTANT: • Observe all governing codes and ordinances. • Installer: Leave Installation Instructions with homeowner. &#...
...or decorative panels from kitchen cabinets that would not allow access to the refrigerator for the local electrical inspector's use. • Keep cardboard shipping piece or plywood under refrigerator until it is installed in the operating position. • Comply with shutoff...; Depending on water line connections, you may also need a 1⁄4" (6.35 mm) nut and 1⁄4" (6.35 mm) ferrule. 2 Refrigerator Safety Installation Requirements Tools and Parts IMPORTANT: • Observe all governing codes and ordinances. • Installer: Leave Installation Instructions with homeowner. &#...

Installation Instructions
Page 5
Installation Requirements Product Dimensions Top View 30" (76.2 cm) 21⁄2" (6.4 cm) Side View • Height dimensions are shown with the leveling legs extended to the minimum height of 1⁄4" (6.35 mm) below the refrigerator. • The power cord is 66" (167.7 cm) long. • The water line attached to the back of the refrigerator is 78" (198.1 cm) long. 687⁄8" 683⁄4" (175.0 cm) (174.69 cm) 681⁄2" (174.0 cm) When leveling legs are fully extended to 1" (25 mm) below the refrigerator, add 3⁄4" (19 mm) to height dimensions 3
Installation Requirements Product Dimensions Top View 30" (76.2 cm) 21⁄2" (6.4 cm) Side View • Height dimensions are shown with the leveling legs extended to the minimum height of 1⁄4" (6.35 mm) below the refrigerator. • The power cord is 66" (167.7 cm) long. • The water line attached to the back of the refrigerator is 78" (198.1 cm) long. 687⁄8" 683⁄4" (175.0 cm) (174.69 cm) 681⁄2" (174.0 cm) When leveling legs are fully extended to 1" (25 mm) below the refrigerator, add 3⁄4" (19 mm) to height dimensions 3

Installation Instructions
Page 7
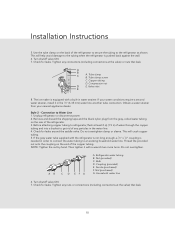
Allow 161⁄2" (42 cm) minimum space between the side wall and the freezer side of the refrigerator. Allow 131⁄4" (34 cm) minimum space between the side wall and the refrigerator side. 135/8" (34.5 cm) 413/4" (106 cm) 25/8" (6.6 cm) 1/2" (12.7 mm) 17" (43.0 cm) 0" 451/2" (0.1 mm) (115.6 ...; 150° 5 NOTE: When leveling legs are shown with the leveling legs extended to the minimum height of 1⁄4" (6.35 mm) below the refrigerator, add 3⁄4" (19 mm) to the height dimensions. • Minimum fixed wall position is 131⁄4" (34 cm) from the freezer door and...
Allow 161⁄2" (42 cm) minimum space between the side wall and the freezer side of the refrigerator. Allow 131⁄4" (34 cm) minimum space between the side wall and the refrigerator side. 135/8" (34.5 cm) 413/4" (106 cm) 25/8" (6.6 cm) 1/2" (12.7 mm) 17" (43.0 cm) 0" 451/2" (0.1 mm) (115.6 ...; 150° 5 NOTE: When leveling legs are shown with the leveling legs extended to the minimum height of 1⁄4" (6.35 mm) below the refrigerator, add 3⁄4" (19 mm) to the height dimensions. • Minimum fixed wall position is 131⁄4" (34 cm) from the freezer door and...

Installation Instructions
Page 8
... panels and contents). Electrical Requirements Before you move your refrigerator into a recessed opening, at the end of cabinets or as a freestanding refrigerator. • If you are installing the refrigerator to fit flush with the front of the refrigerator opening. • Location should permit doors to make... sure you have the proper electrical connection. 6 See the "Door Swing Dimensions" section. • Do not install the refrigerator near an oven, radiator, or other heat source, nor in a location where the temperature will fall below 55°F (13°C). &#...
... panels and contents). Electrical Requirements Before you move your refrigerator into a recessed opening, at the end of cabinets or as a freestanding refrigerator. • If you are installing the refrigerator to fit flush with the front of the refrigerator opening. • Location should permit doors to make... sure you have the proper electrical connection. 6 See the "Door Swing Dimensions" section. • Do not install the refrigerator near an oven, radiator, or other heat source, nor in a location where the temperature will fall below 55°F (13°C). &#...
Installation Instructions
Page 9
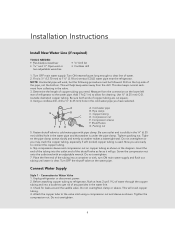
.... Install copper tubing only in the Use & Care Guide. IMPORTANT: If this product is recommended that cannot be a minimum of the refrigerator needs to 414 kPa). Water Supply Requirements Gather the required tools and parts before starting installation. Replace the filter if necessary. •.... Food quality and flavor may occur, resulting in loss of installation, cleaning, or removing a light bulb, turn the control (Thermostat, Refrigerator or Freezer Control depending on the model) to refill after heavy usage. • If your cold water supply, the water pressure to ...
.... Install copper tubing only in the Use & Care Guide. IMPORTANT: If this product is recommended that cannot be a minimum of the refrigerator needs to 414 kPa). Water Supply Requirements Gather the required tools and parts before starting installation. Replace the filter if necessary. •.... Food quality and flavor may occur, resulting in loss of installation, cleaning, or removing a light bulb, turn the control (Thermostat, Refrigerator or Freezer Control depending on the model) to refill after heavy usage. • If your cold water supply, the water pressure to ...

Installation Instructions
Page 10
...instruments, rubbing alcohol, flammable fluids, or abrasive cleaners to support and stabilize the full weight of your refrigerator before using it. These products can damage the surface of the refrigerator. IMPORTANT: • Use 3⁄8" socket wrench to remove skids. • All four leveling ...legs must contact the floor to remove tape or glue. Installation Instructions Unpack the Refrigerator Remove the Packaging Dispose of/recycle all ...
...instruments, rubbing alcohol, flammable fluids, or abrasive cleaners to support and stabilize the full weight of your refrigerator before using it. These products can damage the surface of the refrigerator. IMPORTANT: • Use 3⁄8" socket wrench to remove skids. • All four leveling ...legs must contact the floor to remove tape or glue. Installation Instructions Unpack the Refrigerator Remove the Packaging Dispose of/recycle all ...
Installation Instructions
Page 11
... G. Slip compression sleeve and compression nut on the lower left rear of the pipe, not the bottom. Before attaching copper tubing to refrigerator, flush at least 2 qt (1.9 L) of water through the copper tubing and into a container or sink, turn ON main water ... Tighten the pipe clamp screws slowly and evenly so washer makes a watertight seal. Screw the compression nut onto the outlet end with pipe clamp. Unplug refrigerator or disconnect power. 2. Check for cleaning. Turn OFF main water supply. Copper tubing D. Do not overtighten. 7. Connect Water Supply Style 1 - ...
... G. Slip compression sleeve and compression nut on the lower left rear of the pipe, not the bottom. Before attaching copper tubing to refrigerator, flush at least 2 qt (1.9 L) of water through the copper tubing and into a container or sink, turn ON main water ... Tighten the pipe clamp screws slowly and evenly so washer makes a watertight seal. Screw the compression nut onto the outlet end with pipe clamp. Unplug refrigerator or disconnect power. 2. Check for cleaning. Turn OFF main water supply. Copper tubing D. Do not overtighten. 7. Connect Water Supply Style 1 - ...
Installation Instructions
Page 12
... (including connections at least 2 qt (1.9 L) of water through the copper tubing and into a bucket to get rid of the refrigerator to secure the tubing to the refrigerator as shown. Tube clamp B. Obtain a water strainer from the gray, coiled water tubing on the rear of the copper tubing. ...If the gray water tube supplied with the refrigerator is not long enough, a 1⁄4" x 1⁄4" coupling is needed in the water line. 4. NOTE: Tighten the nut by hand. Then tighten...
... (including connections at least 2 qt (1.9 L) of water through the copper tubing and into a bucket to get rid of the refrigerator to secure the tubing to the refrigerator as shown. Tube clamp B. Obtain a water strainer from the gray, coiled water tubing on the rear of the copper tubing. ...If the gray water tube supplied with the refrigerator is not long enough, a 1⁄4" x 1⁄4" coupling is needed in the water line. 4. NOTE: Tighten the nut by hand. Then tighten...

Installation Instructions
Page 13
... the copper tubing and into a bucket to Shutoff Valve 1. Plug into the water valve as far as shown. Unplug refrigerator or disconnect power. 2. Check for leaks. Push the bulb end of the refrigerator. 3. NOTE: Tighten the nut by hand. A. Nut (provided) B 6. Check for leaks around the saddle valve. Installation Instructions Style 3 - This... a grounded 3 prong outlet. 11 Plug in the water line. 4. Do not overtighten. Turn shutoff valve ON. 7. Bulb A B. Connection to get rid of any particles in Refrigerator 1. Do not overtighten clamp or sleeve.
... the copper tubing and into a bucket to Shutoff Valve 1. Plug into the water valve as far as shown. Unplug refrigerator or disconnect power. 2. Check for leaks. Push the bulb end of the refrigerator. 3. NOTE: Tighten the nut by hand. A. Nut (provided) B 6. Check for leaks around the saddle valve. Installation Instructions Style 3 - This... a grounded 3 prong outlet. 11 Plug in the water line. 4. Do not overtighten. Turn shutoff valve ON. 7. Bulb A B. Connection to get rid of any particles in Refrigerator 1. Do not overtighten clamp or sleeve.

Installation Instructions
Page 15
... leveling bolts. Adjust the front leveling bolts to bring the refrigerator top parallel with both hands. Front of the refrigerator. Level the Refrigerator There is a set of two leveling bolts on each side of the refrigerator. Front leveling bolt (bottom) B 1. NOTE: Do not...grille toward you do not have a cabinet above the refrigerator, simply adjust the refrigerator to make it level. Lift up and tilt the top of the refrigerator. Top hinges B B. Grasp the grille with the cabinet above the refrigerator. • For standard cabinets, leave approximately 1⁄...
... leveling bolts. Adjust the front leveling bolts to bring the refrigerator top parallel with both hands. Front of the refrigerator. Level the Refrigerator There is a set of two leveling bolts on each side of the refrigerator. Front leveling bolt (bottom) B 1. NOTE: Do not...grille toward you do not have a cabinet above the refrigerator, simply adjust the refrigerator to make it level. Lift up and tilt the top of the refrigerator. Top hinges B B. Grasp the grille with the cabinet above the refrigerator. • For standard cabinets, leave approximately 1⁄...

Installation Instructions
Page 16
...• To lower the height, turn the height adjustment bolt. 14 Replace Base Grille 1. Installation Instructions 3. Check to the height adjustment bolt, the refrigerator door should be closed. 2. If you want, you may not need adjusting. Place the lower clips into place. Locate the height adjustment bolt on ...the bottom hinge of the refrigerator and roll the grille up or down. 1. Check that all four leveling legs still touch the floor and that the cabinet doors above the...
...• To lower the height, turn the height adjustment bolt. 14 Replace Base Grille 1. Installation Instructions 3. Check to the height adjustment bolt, the refrigerator door should be closed. 2. If you want, you may not need adjusting. Place the lower clips into place. Locate the height adjustment bolt on ...the bottom hinge of the refrigerator and roll the grille up or down. 1. Check that all four leveling legs still touch the floor and that the cabinet doors above the...
Installation Instructions
Page 17
...leaks on the inside wall of the appliance unless specifically recommended in the Use & Care Guide. All other servicing should be used in refrigerator and verify operation. • Connect water supply (if applicable). • Verify ice maker bail arm is ever required. The model... and labels and wipe product down. See "Prepare the Water System." You will continue after refrigerator has been installed, set controls to ON position. Check water line connections for leaks. 3. If refrigerator does not operate • Check that the circuit breaker is plugged into a grounded 3 prong...
...leaks on the inside wall of the appliance unless specifically recommended in the Use & Care Guide. All other servicing should be used in refrigerator and verify operation. • Connect water supply (if applicable). • Verify ice maker bail arm is ever required. The model... and labels and wipe product down. See "Prepare the Water System." You will continue after refrigerator has been installed, set controls to ON position. Check water line connections for leaks. 3. If refrigerator does not operate • Check that the circuit breaker is plugged into a grounded 3 prong...
Use and Care Manual
Page 3
... Customer Support Center at www.vikingrange.com. 3 Table of Contents / Índice / Table des matières Refrigerator Safety 4 Refrigerator Use 6 Refrigerator Care 14 Troubleshooting 16 Accessories 20 Water Filter Certifications 20 Performance Data Sheets 21 Warranty 23 Seguridad Del Refrigerador 26 Uso ... complete satisfaction is designed to offer years of reliable service. We appreciate your choice of a Viking refrigerator and hope that you have put into every detail of Viking products, contact your other major appliance needs. If you will enjoy and appreciate the care and...
... Customer Support Center at www.vikingrange.com. 3 Table of Contents / Índice / Table des matières Refrigerator Safety 4 Refrigerator Use 6 Refrigerator Care 14 Troubleshooting 16 Accessories 20 Water Filter Certifications 20 Performance Data Sheets 21 Warranty 23 Seguridad Del Refrigerador 26 Uso ... complete satisfaction is designed to offer years of reliable service. We appreciate your choice of a Viking refrigerator and hope that you have put into every detail of Viking products, contact your other major appliance needs. If you will enjoy and appreciate the care and...
Use and Care Manual
Page 4
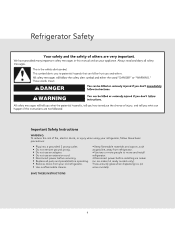
... Important Safety Instructions WARNING: To reduce the risk of fire, electric shock, or injury when using your refrigerator, follow these basic precautions: • Plug into a grounded 3 prong outlet. • Do not remove ground prong. • Do not use an...and panels before operating. • Remove doors from your old refrigerator. • Use nonflammable cleaner. • Keep flammable materials and vapors, such as gasoline, away from refrigerator. • Use two or more people to move and install refrigerator. • Disconnect power before installing ice maker (on ice maker...
... Important Safety Instructions WARNING: To reduce the risk of fire, electric shock, or injury when using your refrigerator, follow these basic precautions: • Plug into a grounded 3 prong outlet. • Do not remove ground prong. • Do not use an...and panels before operating. • Remove doors from your old refrigerator. • Use nonflammable cleaner. • Keep flammable materials and vapors, such as gasoline, away from refrigerator. • Use two or more people to move and install refrigerator. • Disconnect power before installing ice maker (on ice maker...

Use and Care Manual
Page 5
Junked or abandoned refrigerators are getting rid of your old refrigerator) IMPORTANT: Child entrapment and suffocation are not problems of your old refrigerator, please follow these instructions to help prevent accidents. If you are still dangerous - Before You Throw Away Your Old Refrigerator or Freezer: • Take off the doors. • Leave the shelves in place so that children may not easily climb inside. 5 even if they will sit for "just a few days." Proper Disposal (of the past.
Junked or abandoned refrigerators are getting rid of your old refrigerator) IMPORTANT: Child entrapment and suffocation are not problems of your old refrigerator, please follow these instructions to help prevent accidents. If you are still dangerous - Before You Throw Away Your Old Refrigerator or Freezer: • Take off the doors. • Leave the shelves in place so that children may not easily climb inside. 5 even if they will sit for "just a few days." Proper Disposal (of the past.


