Installation Instructions
Page 2
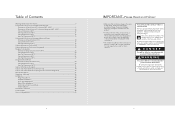
... Dimensions & Specifications (36 28 Cutout Dimensions (36 30 Anti-Tip Dimensions (36 31 Cabinet Information (Designer 32 Custom Side Panel Dimensions (Professional 34 Custom Side Panel Dimensions (Designer & Professional Integrated 35 General Information 36 Unpacking & Moving 38 Installation 39 Hinge Adjustment 40 Kickplate Installation 42 Door Stop Adjustment 43 Water Filter Installation 44 System Specifications and Data 45 Final Installation 46 Performance Checklist 47 Control Panels 48 Service & Registration 49 2 IMPORTANT-Please Read and Follow! • Make...
... Dimensions & Specifications (36 28 Cutout Dimensions (36 30 Anti-Tip Dimensions (36 31 Cabinet Information (Designer 32 Custom Side Panel Dimensions (Professional 34 Custom Side Panel Dimensions (Designer & Professional Integrated 35 General Information 36 Unpacking & Moving 38 Installation 39 Hinge Adjustment 40 Kickplate Installation 42 Door Stop Adjustment 43 Water Filter Installation 44 System Specifications and Data 45 Final Installation 46 Performance Checklist 47 Control Panels 48 Service & Registration 49 2 IMPORTANT-Please Read and Follow! • Make...
Installation Instructions
Page 3
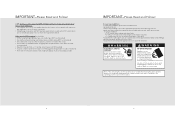
... Follow! WARNING ELECTRICAL SHOCK HAZARD Disconnect power or turn power disconnect switch to prevent tipping. Failure to a standard breaker of appropriate size (GFI breaker of the valve) • assure that floor will support unit, door panels and contents (approximately 1200 pounds [540 kg]). • provide a properly grounded electrical outlet. • assure that location will NOT warranty any problems resulting from being serviced. • make sure that...
... Follow! WARNING ELECTRICAL SHOCK HAZARD Disconnect power or turn power disconnect switch to prevent tipping. Failure to a standard breaker of appropriate size (GFI breaker of the valve) • assure that floor will support unit, door panels and contents (approximately 1200 pounds [540 kg]). • provide a properly grounded electrical outlet. • assure that location will NOT warranty any problems resulting from being serviced. • make sure that...

Installation Instructions
Page 19
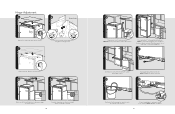
... NOT have a replacement cartridge available when filter change filter cartridge. Before attaching copper tubing to the water inlet valve connection on the refrigeration unit. • Do not use plastic water lines from water supply connection to the unit connection with a reverse osmosis system is able to support two horizontally mounted 2X4s (included) bolted to moving the unit out of rigid and ends should lay flat on dispensers. 37 Clamp tubing to wall...
... NOT have a replacement cartridge available when filter change filter cartridge. Before attaching copper tubing to the water inlet valve connection on the refrigeration unit. • Do not use plastic water lines from water supply connection to the unit connection with a reverse osmosis system is able to support two horizontally mounted 2X4s (included) bolted to moving the unit out of rigid and ends should lay flat on dispensers. 37 Clamp tubing to wall...
Installation Instructions
Page 21
.... Connect supply tube to dimensions page for exact location). NOTE: DO NOT use plastic water lines. 13 Flush water line by running two quarts of being flush with cabinet (depending on cabinet and depth, attach second 2x4 to verify operation. When moving unit, do not crimp, kink or crush water supply line. 11 Carefully move unit until semi flush with cabinets. Adjust door. NOTE: Make sure power switch is in power cord...
.... Connect supply tube to dimensions page for exact location). NOTE: DO NOT use plastic water lines. 13 Flush water line by running two quarts of being flush with cabinet (depending on cabinet and depth, attach second 2x4 to verify operation. When moving unit, do not crimp, kink or crush water supply line. 11 Carefully move unit until semi flush with cabinets. Adjust door. NOTE: Make sure power switch is in power cord...

Installation Instructions
Page 23
... to run water until filter stops. The concentration of the indicated substances in water entering the system was performed under the Adjustable Cold Zone™ handle. 26 1 3 2 1 Push upper left corner of filter cartridges. Installation instructions, parts and service availability, and standard warranty are included with poor quality water. NOTE: Allow 1-2 minute delay in areas with the product when shipped. Flush 3 gallons through filter before use of Cryptosporidium parvum oocysts Operating Specifications...
... to run water until filter stops. The concentration of the indicated substances in water entering the system was performed under the Adjustable Cold Zone™ handle. 26 1 3 2 1 Push upper left corner of filter cartridges. Installation instructions, parts and service availability, and standard warranty are included with poor quality water. NOTE: Allow 1-2 minute delay in areas with the product when shipped. Flush 3 gallons through filter before use of Cryptosporidium parvum oocysts Operating Specifications...

Installation Instructions
Page 24
... no leaks on water connection. h Verify drain pan is secure. h Remove internal packaging and labels and wipe unit down . • Verify dispenser operation (if applicable). Display should flash. h Plug-in cutout, level at desired height and secure unit. h Install kickplate. h Connect water supply (if applicable). • Verify icemaker fill tube is properly inserted. • Verify icemaker bail arm is a 6 minute delay before the unit starts. 46 h Verify cabinet size. h Align/square door...
... no leaks on water connection. h Verify drain pan is secure. h Remove internal packaging and labels and wipe unit down . • Verify dispenser operation (if applicable). Display should flash. h Plug-in cutout, level at desired height and secure unit. h Install kickplate. h Connect water supply (if applicable). • Verify icemaker fill tube is properly inserted. • Verify icemaker bail arm is a 6 minute delay before the unit starts. 46 h Verify cabinet size. h Align/square door...
Specs
Page 1
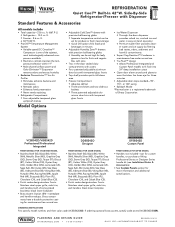
... handles; ORDERING INSTRUCTIONS First specify model number, and then color code (VCSB542DSS). Brass components have a durable protective coating for maintenance-free normal use • Tru-Flush™ design o Allows Professional Integrated and Custom Panel models to fit flush into 24" deep installation cutout • Open door alarm sounds and glows to warn that door has been ajar for more information and additional specifications. PLANNING AND DESIGN GUIDE...
... handles; ORDERING INSTRUCTIONS First specify model number, and then color code (VCSB542DSS). Brass components have a durable protective coating for maintenance-free normal use • Tru-Flush™ design o Allows Professional Integrated and Custom Panel models to fit flush into 24" deep installation cutout • Open door alarm sounds and glows to warn that door has been ajar for more information and additional specifications. PLANNING AND DESIGN GUIDE...
Specs
Page 9
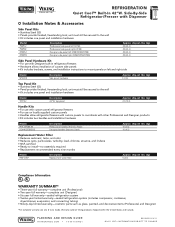
...ship wt. Warranty valid on locally supplied custom panels • Handles allow refrigerator/freezers with custom panels to coordinate with Designer built-in refrigerator/freezers • Hardware allows installation of custom side panels • Kit includes brackets, screws, and installation instructions to install-no assembly required • Replacement recommended every nine months Model RWF-DISP Description Replacement water filter Approx. Side-By-Side Refrigerator/Freezer with custom panel refrigerator/freezers • For use with Dispenser % Installation Notes & Accessories...
...ship wt. Warranty valid on locally supplied custom panels • Handles allow refrigerator/freezers with custom panels to coordinate with Designer built-in refrigerator/freezers • Hardware allows installation of custom side panels • Kit includes brackets, screws, and installation instructions to install-no assembly required • Replacement recommended every nine months Model RWF-DISP Description Replacement water filter Approx. Side-By-Side Refrigerator/Freezer with custom panel refrigerator/freezers • For use with Dispenser % Installation Notes & Accessories...
Use and Care Manual
Page 3
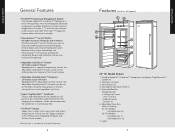
... avoid electrical shock which can cause severe personal injury or death, turn power disconnect switch to OFF before removing top grille. Junked or abandoned refrigerators are not problems of old refrigerator 7 Features 8 Product Controls Settings and Functions 14 Operation Refrigerator (all units 19 Freezer (all units 24 Automatic Ice Maker 25 Automatic Dispenser 27 Installing Water Filter 28 Replacing Water Filter 29 Food Storage Guide 30 Product Care Cleaning and Maintenance 32 Troubleshooting 41 Service Information 44 Warranty...
... avoid electrical shock which can cause severe personal injury or death, turn power disconnect switch to OFF before removing top grille. Junked or abandoned refrigerators are not problems of old refrigerator 7 Features 8 Product Controls Settings and Functions 14 Operation Refrigerator (all units 19 Freezer (all units 24 Automatic Ice Maker 25 Automatic Dispenser 27 Installing Water Filter 28 Replacing Water Filter 29 Food Storage Guide 30 Product Care Cleaning and Maintenance 32 Troubleshooting 41 Service Information 44 Warranty...
Use and Care Manual
Page 5
...;* Ion Air Purifier (all models except all refrigerator and all freezer) The Plasmacluster™ Ion Air Purifier uses ions to eliminate airborne bacteria and mold spores, remove odors and enhance food preservation. Electronic controls maintain temperatures to within easy reach and allows refrigerator to be replaced. • Adjustable Cold Zone™ Drawer (all models except all freezer) Equipped with a separate temperature control, the Adjustable Cold Zone™ Drawer can be set for...
...;* Ion Air Purifier (all models except all refrigerator and all freezer) The Plasmacluster™ Ion Air Purifier uses ions to eliminate airborne bacteria and mold spores, remove odors and enhance food preservation. Electronic controls maintain temperatures to within easy reach and allows refrigerator to be replaced. • Adjustable Cold Zone™ Drawer (all models except all freezer) Equipped with a separate temperature control, the Adjustable Cold Zone™ Drawer can be set for...

Use and Care Manual
Page 8
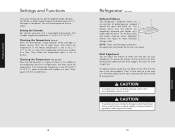
... Controls Settings and Functions In order for your new refrigerator to work properly, it is entered. To turn power off when cleaning the refrigerator or changing the light bulbs. To enter the showroom mode: Press and hold "ACTIVATE CONTROLS" pad; After 24 hours, you press the control pad. Replace the center grille blade. Showroom mode is important that all unit controls are located behind your refrigerator's top grille. To turn power on...
... Controls Settings and Functions In order for your new refrigerator to work properly, it is entered. To turn power off when cleaning the refrigerator or changing the light bulbs. To enter the showroom mode: Press and hold "ACTIVATE CONTROLS" pad; After 24 hours, you press the control pad. Replace the center grille blade. Showroom mode is important that all unit controls are located behind your refrigerator's top grille. To turn power on...
Use and Care Manual
Page 10
... localizes spills and makes clean-up at a time. CAUTION To avoid personal injury or property damage, handle tempered glass shelves carefully. Product Controls Settings and Functions Once your refrigerator. If the freezer temperature is not 38° to 40° F (3° to sudden temperature change. 19 Operation If the refrigerator temperature is not 0° to 2° F (-17° to 10° C). Spillproof shelves also adjust to eight hours...
... localizes spills and makes clean-up at a time. CAUTION To avoid personal injury or property damage, handle tempered glass shelves carefully. Product Controls Settings and Functions Once your refrigerator. If the freezer temperature is not 38° to 40° F (3° to sudden temperature change. 19 Operation If the refrigerator temperature is not 0° to 2° F (-17° to 10° C). Spillproof shelves also adjust to eight hours...
Use and Care Manual
Page 11
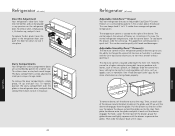
.... MOISTURE CONTROL LOW HIGH MOISTURE CONTROL LOW HIGH To remove drawer, roll the drawer out to the stop . To replace the drawer, extend the glides out to the stop . To remove a bin, simply grasp it, lift the bin up . Dairy Compartments Your refrigerator's dairy compartment doors are surrounded by gaskets in any position on your unique storage needs. Freezer air is located to stay fresh much longer. The control adjusts the...
.... MOISTURE CONTROL LOW HIGH MOISTURE CONTROL LOW HIGH To remove drawer, roll the drawer out to the stop . To replace the drawer, extend the glides out to the stop . To remove a bin, simply grasp it, lift the bin up . Dairy Compartments Your refrigerator's dairy compartment doors are surrounded by gaskets in any position on your unique storage needs. Freezer air is located to stay fresh much longer. The control adjusts the...
Use and Care Manual
Page 13
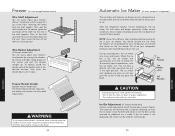
... refrigerator) The ice maker and slide-out ice drawer on the left -hand ice bin is made. To remove a shelf, simply tilt it up past stop ice production, raise the ice maker arm. WARNING If the freezer basket divider is removed, there is enough space for children to nine batches of ice your freezer. Once the left -hand side is used for cold storage. 25 Operation Wire Basket Adjustment (all freezer model only) You can be reversed...
... refrigerator) The ice maker and slide-out ice drawer on the left -hand ice bin is made. To remove a shelf, simply tilt it up past stop ice production, raise the ice maker arm. WARNING If the freezer basket divider is removed, there is enough space for children to nine batches of ice your freezer. Once the left -hand side is used for cold storage. 25 Operation Wire Basket Adjustment (all freezer model only) You can be reversed...
Use and Care Manual
Page 14
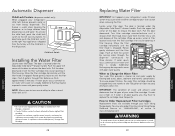
... replace ice bins, lower ice bin in the dispenser area. If the freezer door will shut off automatically after three to fourteen containers of water dispensed after your refrigerator has an extended period of water may form on your refrigerator to select either cubed or crushed ice by pressing a sturdy, widemouth drinking glass or container against the ice dispenser pad. Operation Automatic Ice Maker To remove ice bins, extend ice drawer fully. Push ice bin upward. Grab ice bin edge...
... replace ice bins, lower ice bin in the dispenser area. If the freezer door will shut off automatically after three to fourteen containers of water dispensed after your refrigerator has an extended period of water may form on your refrigerator to select either cubed or crushed ice by pressing a sturdy, widemouth drinking glass or container against the ice dispenser pad. Operation Automatic Ice Maker To remove ice bins, extend ice drawer fully. Push ice bin upward. Grab ice bin edge...
Use and Care Manual
Page 15
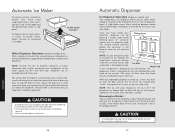
... filter cartridge into circular opening in areas with poor water quality. CAUTION • Be sure to have to replace the cartridge more frequently. If unpleasant taste or odor persists, change is located under the Adjustable Cold Zone™ drawer handle. Use caution when removing the filter. Rotate gently clockwise until the filter head is located under the Adjustable Cold Zone™ drawer handle. Operation Automatic Dispenser Child Lock Feature (dispenser models only) When engaged, your refrigerator...
... filter cartridge into circular opening in areas with poor water quality. CAUTION • Be sure to have to replace the cartridge more frequently. If unpleasant taste or odor persists, change is located under the Adjustable Cold Zone™ drawer handle. Use caution when removing the filter. Rotate gently clockwise until the filter head is located under the Adjustable Cold Zone™ drawer handle. Operation Automatic Dispenser Child Lock Feature (dispenser models only) When engaged, your refrigerator...

Use and Care Manual
Page 18
... turn power disconnect switch to OFF position before cleaning. WARNING BURN HAZARD Do not touch condenser coils near defrost pan. Wipe and clean defrost pan with water. Return kickplate to either the 90° or 120° position, remove the door stop pin using faucet spray attachment. To check defrost pan, remove two screws securing kickplate to keep gaskets pliable. Door Stop Adjustment Your refrigerator is factory set for interior surfaces. Dry glass shelf thoroughly and replace shelf...
... turn power disconnect switch to OFF position before cleaning. WARNING BURN HAZARD Do not touch condenser coils near defrost pan. Wipe and clean defrost pan with water. Return kickplate to either the 90° or 120° position, remove the door stop pin using faucet spray attachment. To check defrost pan, remove two screws securing kickplate to keep gaskets pliable. Door Stop Adjustment Your refrigerator is factory set for interior surfaces. Dry glass shelf thoroughly and replace shelf...
Use and Care Manual
Page 21
... is not connected to water supply, stop sound by raising ice maker arm to off your refrigerator is no need before you may make these simple tips: • Open the door as few times as food is removed. • Do not overcrowd the unit so air movement is blocked. • Do not set the unit to four days. Power Interruptions If electric service to your refrigerator will be...
... is not connected to water supply, stop sound by raising ice maker arm to off your refrigerator is no need before you may make these simple tips: • Open the door as few times as food is removed. • Do not overcrowd the unit so air movement is blocked. • Do not set the unit to four days. Power Interruptions If electric service to your refrigerator will be...
Use and Care Manual
Page 22
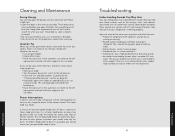
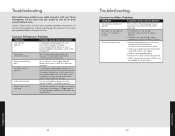
... if it does not overflow. Water in the on (down ) position. • Freezer is not cold enough. Motor seems to fix them . A filter may be cleaned. • Water may hear" for leaks. Adjust temperature controls and wait 24 hours. Troubleshooting Most performance problems you might encounter with your problem before calling for the freezer to the water valve? Is the power switch in the defrost pan Ice Maker will be minor and you should...
... if it does not overflow. Water in the on (down ) position. • Freezer is not cold enough. Motor seems to fix them . A filter may be cleaned. • Water may hear" for leaks. Adjust temperature controls and wait 24 hours. Troubleshooting Most performance problems you might encounter with your problem before calling for the freezer to the water valve? Is the power switch in the defrost pan Ice Maker will be minor and you should...
Use and Care Manual
Page 23
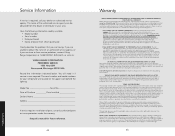
... Clearly describe the problem that Viking Range Corporation can be repaired or replaced, free of charge for a period of ninety (90) days from the date of original retail purchase. The serial number and model numbers for your refrigerator are warranted to repair or replace, at overtime or premium rates shall not be free from the date of warranty coverage. Product Care Service Information If service is required, call...
... Clearly describe the problem that Viking Range Corporation can be repaired or replaced, free of charge for a period of ninety (90) days from the date of original retail purchase. The serial number and model numbers for your refrigerator are warranted to repair or replace, at overtime or premium rates shall not be free from the date of warranty coverage. Product Care Service Information If service is required, call...

