Countertop Rear Trim - Installation Instructions
Page 2
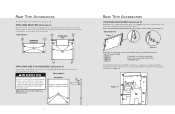
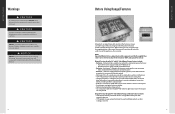
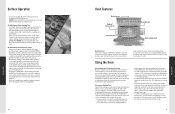
... the trim on Designer models. Rear Trim Accessories All rear trim devices are needed to space the range off a combustible wall a prescribed safe distance. NOTE: High shelf is already installed on each end and carefully place in the channels (B) located at each end. On VGSC530, VGSC536 and VGSC548 models there is a regulator cover supplied with the backguard that must be removed if used with any of the models listed...
... the trim on Designer models. Rear Trim Accessories All rear trim devices are needed to space the range off a combustible wall a prescribed safe distance. NOTE: High shelf is already installed on each end and carefully place in the channels (B) located at each end. On VGSC530, VGSC536 and VGSC548 models there is a regulator cover supplied with the backguard that must be removed if used with any of the models listed...

Installation Instructions
Page 2
... personal injury or death. Table of Contents Warnings & Important Safety Instructions 3 Dimensions 6 Specifications 8 Clearance Dimensions (Proximity to Cabinets 9 Clearance Dimensions (Wood/Composite Overlay 10 Electrical & Gas Requirements 11 General Information 13 Installation 14 Door Removal 14 Leg Installation 15 Kickplate Installation 15 Leveling/Adjustments/Alignment 16 Anti-tip Device Installation 17 Connecting Gas & Electric 18 Standoff Spacer Removal 19 Final Installation 19 Door Replacement and Adjustment 20 Final Preparation 21 Performance Checklist 21...
... personal injury or death. Table of Contents Warnings & Important Safety Instructions 3 Dimensions 6 Specifications 8 Clearance Dimensions (Proximity to Cabinets 9 Clearance Dimensions (Wood/Composite Overlay 10 Electrical & Gas Requirements 11 General Information 13 Installation 14 Door Removal 14 Leg Installation 15 Kickplate Installation 15 Leveling/Adjustments/Alignment 16 Anti-tip Device Installation 17 Connecting Gas & Electric 18 Standoff Spacer Removal 19 Final Installation 19 Door Replacement and Adjustment 20 Final Preparation 21 Performance Checklist 21...
Installation Instructions
Page 3
... edition. Device must be used if required by a qualified installer, service agency, or the gas supplier. 4 IMPORTANT-Read and Follow! Check with respect to any significant sources of water or moisture. • Viking Range Corporation will withstand temperatures up to a standard breaker of appropriate size (GFI breaker of the same size NOT recommended) • Rated for gas leaks with permanent wiring only (temporary or portable...
... edition. Device must be used if required by a qualified installer, service agency, or the gas supplier. 4 IMPORTANT-Read and Follow! Check with respect to any significant sources of water or moisture. • Viking Range Corporation will withstand temperatures up to a standard breaker of appropriate size (GFI breaker of the same size NOT recommended) • Rated for gas leaks with permanent wiring only (temporary or portable...
Installation Instructions
Page 5
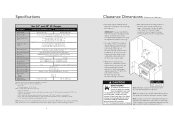
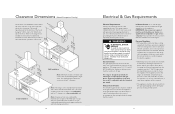
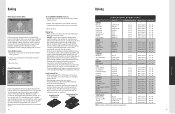
... 23-1/2" (59.7 cm) Gas requirements Gas manifold pressure Electrical requirements Maximum amp usage Surface burner rating Natural gas/LP Griddle burner rating Natural gas/LP Oven interior width Oven interior height Oven interior depth Oven volume Overall AHAM Approximate shipping weight Shipped Natural or LP/Propane, accepts standard residential 1/2" (1.3 cm) ID gas service line. Unit is 3/8" (0.9 cm) with backguard or high-shelf. the use of side trim - 35-7/8" (91.1 cm) min. 37" (94 cm) max. Range Width 36" 48...
... 23-1/2" (59.7 cm) Gas requirements Gas manifold pressure Electrical requirements Maximum amp usage Surface burner rating Natural gas/LP Griddle burner rating Natural gas/LP Oven interior width Oven interior height Oven interior depth Oven volume Overall AHAM Approximate shipping weight Shipped Natural or LP/Propane, accepts standard residential 1/2" (1.3 cm) ID gas service line. Unit is 3/8" (0.9 cm) with backguard or high-shelf. the use of side trim - 35-7/8" (91.1 cm) min. 37" (94 cm) max. Range Width 36" 48...
Installation Instructions
Page 6
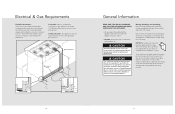
... breaker box and gas supply is turned off valve: This installer-supplied valve must be reached quickly in the gas service line before work begins. Before beginning installation verify that amount, a step down regulator will be required. • The appliance must be disconnected from the regulator must be resistive to a non-combustible wall. Manual shut-off until the range is installed and ready to noncombustible materials must be 1" W.C.P. IMPORTANT: Any conversion required...
... breaker box and gas supply is turned off valve: This installer-supplied valve must be reached quickly in the gas service line before work begins. Before beginning installation verify that amount, a step down regulator will be required. • The appliance must be disconnected from the regulator must be resistive to a non-combustible wall. Manual shut-off until the range is installed and ready to noncombustible materials must be 1" W.C.P. IMPORTANT: Any conversion required...
Installation Instructions
Page 7
... range. Failure to the oven or surrounding cabinets. Remove the burner grates from the cooling fan, contact a Viking Authorized Service Center before being used, then rinsed and wiped dry. Refer to oven vents. Gas connection 4-1/2" (11.4 cm) 3" (7.6 cm) SIDE VIEW Gas access area (7.63"cm) (2782.83/c4m") 3" (7.6 cm) REAR VIEW 12 General Information READ AND FOLLOW ALL WARNING AND CAUTION INFORMATION WHEN INSTALLING THIS APPLIANCE. • All openings...
... range. Failure to the oven or surrounding cabinets. Remove the burner grates from the cooling fan, contact a Viking Authorized Service Center before being used, then rinsed and wiped dry. Refer to oven vents. Gas connection 4-1/2" (11.4 cm) 3" (7.6 cm) SIDE VIEW Gas access area (7.63"cm) (2782.83/c4m") 3" (7.6 cm) REAR VIEW 12 General Information READ AND FOLLOW ALL WARNING AND CAUTION INFORMATION WHEN INSTALLING THIS APPLIANCE. • All openings...
Installation Instructions
Page 10
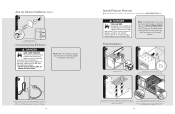
... in operation, always check for proper installation information. 1 Connect gas and electrical. If unit is not level repeat Steps 5-7 of personal injury or death; Anti-tip Device Installation (cont.) 4 Attach bracket with the grates. Final Installation 1 2 1 x4 2 Install island trim. 3 Slide range into the anit-tip opening. 4 Burner caps are packed in place for gas leaks. DANGER FIRE HAZARD Backguards come standard with soapy water solution. • DO NOT USE AN OPEN FLAME TO...
... in operation, always check for proper installation information. 1 Connect gas and electrical. If unit is not level repeat Steps 5-7 of personal injury or death; Anti-tip Device Installation (cont.) 4 Attach bracket with the grates. Final Installation 1 2 1 x4 2 Install island trim. 3 Slide range into the anit-tip opening. 4 Burner caps are packed in place for gas leaks. DANGER FIRE HAZARD Backguards come standard with soapy water solution. • DO NOT USE AN OPEN FLAME TO...
Use and Care Manual
Page 2
...12 Griddle/Simmer Plate Operation 13 Griddle/Simmer Plate Clean Up & Care 14 Cooking Vessels 14 Oven Features 15 Rack Positions 15 Using the Oven 15 Conventional and Convection Cooking 15 Baking 16 BAKE (Natural Airflow Bake) 16 CONVECTION BAKE 16 Broiling 20 BROIL (Infrared Broil) 20 CONVECTION BROIL (Infrared Convection Broil) 20 Convection Dehydrate 23 Convection Defrost 23 Product Care Cleaning and Maintenance 24 Replacing Oven Lights 27 Door Removal 28 Door Replacement and Adjustment 29 Troubleshooting 30 Service Information 31 Warranty 32...
...12 Griddle/Simmer Plate Operation 13 Griddle/Simmer Plate Clean Up & Care 14 Cooking Vessels 14 Oven Features 15 Rack Positions 15 Using the Oven 15 Conventional and Convection Cooking 15 Baking 16 BAKE (Natural Airflow Bake) 16 CONVECTION BAKE 16 Broiling 20 BROIL (Infrared Broil) 20 CONVECTION BROIL (Infrared Convection Broil) 20 Convection Dehydrate 23 Convection Defrost 23 Product Care Cleaning and Maintenance 24 Replacing Oven Lights 27 Door Removal 28 Door Replacement and Adjustment 29 Troubleshooting 30 Service Information 31 Warranty 32...
Use and Care Manual
Page 3
...;ame. Use baking soda, a dry chemical or foam-type extinguisher to reduce the chance of injury, and tell you know which knob controls which COULD result in this manual. Clean hood frequently to the vent or a lighted surface burner. • Combustible items (paper, plastic, etc.) may ignite and metallic items may ignite or catch utensil handles. Follow the gas supplier's instructions. • If you the location of...
...;ame. Use baking soda, a dry chemical or foam-type extinguisher to reduce the chance of injury, and tell you know which knob controls which COULD result in this manual. Clean hood frequently to the vent or a lighted surface burner. • Combustible items (paper, plastic, etc.) may ignite and metallic items may ignite or catch utensil handles. Follow the gas supplier's instructions. • If you the location of...
Use and Care Manual
Page 4
.... Ensure that the kitchen is essential for safe performance using unstable, warped, easily tipped or loose-handled pans. ALWAYS turn the oven off at the main fuse or circuit breaker before moving or replacing food. • NEVER use any slots, holes or passages in the Installation Instructions, it comes back on a hot surface. Excessive burner setting may also trap heat, causing a fire hazard. Other surfaces of control. • Once the...
.... Ensure that the kitchen is essential for safe performance using unstable, warped, easily tipped or loose-handled pans. ALWAYS turn the oven off at the main fuse or circuit breaker before moving or replacing food. • NEVER use any slots, holes or passages in the Installation Instructions, it comes back on a hot surface. Excessive burner setting may also trap heat, causing a fire hazard. Other surfaces of control. • Once the...
Use and Care Manual
Page 5
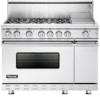
... the heat. 8 Before Using Range/Features All products are easily moved Brigade Freestanding Gas 48" Sealed Burner Range additional features include: • 12"W. Brigade Freestanding Gas 36" and 48" Sealed Burner Ranges features include: • Exclusive - thermostatically controlled stainless steel griddle/simmer plate with heavy duty cast iron burner grates • Exclusive - Oven Important! Then set the oven selector to bake, the thermostat to 450°F, and operate for more than two hours. Turning the convection fan...
... the heat. 8 Before Using Range/Features All products are easily moved Brigade Freestanding Gas 48" Sealed Burner Range additional features include: • 12"W. Brigade Freestanding Gas 36" and 48" Sealed Burner Ranges features include: • Exclusive - thermostatically controlled stainless steel griddle/simmer plate with heavy duty cast iron burner grates • Exclusive - Oven Important! Then set the oven selector to bake, the thermostat to 450°F, and operate for more than two hours. Turning the convection fan...
Use and Care Manual
Page 7
...; Season griddle by electric ignition. Griddle/Simmer Plate Operation • Turn the griddle control knob counterclockwise to adjust the flame size. O P E R AT I O N This variable range of simmer settings allows you need to vary the heat settings to entire griddle using big pots and/or high flames, it is equipped with an electronic thermostat to use in large utensil *Note: The above information is this reason, Viking range and rangetop burners are...
...; Season griddle by electric ignition. Griddle/Simmer Plate Operation • Turn the griddle control knob counterclockwise to adjust the flame size. O P E R AT I O N This variable range of simmer settings allows you need to vary the heat settings to entire griddle using big pots and/or high flames, it is equipped with an electronic thermostat to use in large utensil *Note: The above information is this reason, Viking range and rangetop burners are...
Use and Care Manual
Page 8
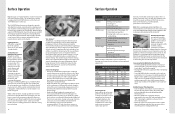
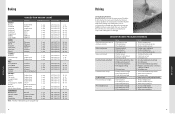
... the entire oven cavity creating the optimum cooking environment. Remember that when using two racks, to convection recipes, reduce the temperature by 25°F (10°C) when using convection to cook a single item or smaller load, then it must be easily removed and arranged at room temperature directly on the cooking surface making removal of a well seasoned griddle. 14 Oven Features Broiler burner TruGlide™ Oven racks (3) Convection fan Oven lights (4) 6 5 4 3 2 1 Removable bottom Bake burner Rack Positions Each oven is the...
... the entire oven cavity creating the optimum cooking environment. Remember that when using two racks, to convection recipes, reduce the temperature by 25°F (10°C) when using convection to cook a single item or smaller load, then it must be easily removed and arranged at room temperature directly on the cooking surface making removal of a well seasoned griddle. 14 Oven Features Broiler burner TruGlide™ Oven racks (3) Convection fan Oven lights (4) 6 5 4 3 2 1 Removable bottom Bake burner Rack Positions Each oven is the...
Use and Care Manual
Page 9
... sheet Cookie sheet 3 or 4 3 or 4 3 or 4 3 or 4 *Note: The above another. • Allow 1 to restrict the airflow in the oven cavity when baking with less shrinkage. Use this setting for doneness before you must open the door frequently during the last quarter of the baking time. • Bake to use Convection Bake to desired temperature and turn on . 2. To Use BAKE Function 1. Set the oven temperature control knob to help better circulate the heat...
... sheet Cookie sheet 3 or 4 3 or 4 3 or 4 3 or 4 *Note: The above another. • Allow 1 to restrict the airflow in the oven cavity when baking with less shrinkage. Use this setting for doneness before you must open the door frequently during the last quarter of the baking time. • Bake to use Convection Bake to desired temperature and turn on . 2. To Use BAKE Function 1. Set the oven temperature control knob to help better circulate the heat...
Use and Care Manual
Page 10
... Pies burned around edges Pies too light on bottom Cause 1. Too many pans used 3. Oven not preheated Remedy 1. Reduce temperature 2. Wrong pan size 1. Use shiny pans 3. Batter too thick 2. Oven not preheated 1. Reduce number of pans 3. Use door window to adjust your previous oven may vary slightly from those required with your recipes and cooking times accordingly. If you find this oven. Hot cookie sheet 1. Use proper pans 1. Allow sheet to using with this to be true...
... Pies burned around edges Pies too light on bottom Cause 1. Too many pans used 3. Oven not preheated Remedy 1. Reduce temperature 2. Wrong pan size 1. Use shiny pans 3. Batter too thick 2. Oven not preheated 1. Reduce number of pans 3. Use door window to adjust your previous oven may vary slightly from those required with your recipes and cooking times accordingly. If you find this oven. Hot cookie sheet 1. Use proper pans 1. Allow sheet to using with this to be true...
Use and Care Manual
Page 11
... door broiling the broil element might cycle on and off if an extended broiling time is reduced since the airflow also reduces peak temperatures on the outside and retains more suitable for small, individualized cuts such as they broil to make cleaning easier. They are designed to provide drainage of meat. While pan is a dry-heat cooking method using direct or radiant heat. CONVECTION BROIL (Infrared Convection Broil) Broiling Instructions Broiling is hot...
... door broiling the broil element might cycle on and off if an extended broiling time is reduced since the airflow also reduces peak temperatures on the outside and retains more suitable for small, individualized cuts such as they broil to make cleaning easier. They are designed to provide drainage of meat. While pan is a dry-heat cooking method using direct or radiant heat. CONVECTION BROIL (Infrared Convection Broil) Broiling Instructions Broiling is hot...
Use and Care Manual
Page 13
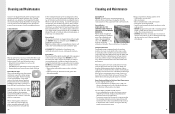
... that the cleaning solution be cleaned regularly. Control Knobs MAKE SURE ALL THE CONTROL KNOBS POINT TO THE "OFF" POSITION BEFORE REMOVING. Over time they will not affect the performance. Things to clean the ports. Cooking equipment is recommended to high heat temperatures. Disconnect power if you are clogged, clean with ammonia. Use hot, soapy water and a soft clean cloth. The mildest form of cleaning should be...
... that the cleaning solution be cleaned regularly. Control Knobs MAKE SURE ALL THE CONTROL KNOBS POINT TO THE "OFF" POSITION BEFORE REMOVING. Over time they will not affect the performance. Things to clean the ports. Cooking equipment is recommended to high heat temperatures. Disconnect power if you are clogged, clean with ammonia. Use hot, soapy water and a soft clean cloth. The mildest form of cleaning should be...
Use and Care Manual
Page 14
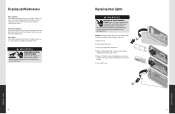
WARNING BURN OR ELECTRICAL SHOCK HAZARD Make sure all controls are OFF and oven is COOL before removing bulb to the appliance at the main fuse or circuit breaker. 6. Secure with a soft cloth. 1. If using volt and wattage requirements listed on exterior door surface. Clean off any signs of oil from the bulb and handle with screw. 2 3 4 5 6 27 PRODUCT CARE Replace the light cover by hand with halogen bulb using glass cleaner ammonia...
WARNING BURN OR ELECTRICAL SHOCK HAZARD Make sure all controls are OFF and oven is COOL before removing bulb to the appliance at the main fuse or circuit breaker. 6. Secure with a soft cloth. 1. If using volt and wattage requirements listed on exterior door surface. Clean off any signs of oil from the bulb and handle with screw. 2 3 4 5 6 27 PRODUCT CARE Replace the light cover by hand with halogen bulb using glass cleaner ammonia...
Use and Care Manual
Page 16
... power. Burner ports are wet or dirty. oven will not function. Air shutters not properly adjusted. Service Information If service is large, distorted, or yellow. The name of parts, use only authorized parts to electrical power: Have electrician check power circuit breaker, wiring, and fuses. You will need it has cooled. Possible Cause and/or Remedy Range is ever required. Temperature control knob is burned out. Light bulb is rotated too far past broil position. Igniters...
... power. Burner ports are wet or dirty. oven will not function. Air shutters not properly adjusted. Service Information If service is large, distorted, or yellow. The name of parts, use only authorized parts to electrical power: Have electrician check power circuit breaker, wiring, and fuses. You will need it has cooled. Possible Cause and/or Remedy Range is ever required. Temperature control knob is burned out. Light bulb is rotated too far past broil position. Igniters...

Use and Care Manual
Page 17
... WARRANTIES SET FORTH ABOVE. PRODUCT CARE Warranty BRIGADE SERIES FREESTANDING GAS SEALED BURNER RANGES WARRANTY THREE YEAR FULL WARRANTY Freestanding gas ranges and all of their component parts, except as restaurants, food service locations and institutional food service locations. This warranty excludes use , but the warranty period for products used in normal household use for a period of three (3) years from the date of original retail purchase or closing date for the part itself , with the owner...
... WARRANTIES SET FORTH ABOVE. PRODUCT CARE Warranty BRIGADE SERIES FREESTANDING GAS SEALED BURNER RANGES WARRANTY THREE YEAR FULL WARRANTY Freestanding gas ranges and all of their component parts, except as restaurants, food service locations and institutional food service locations. This warranty excludes use , but the warranty period for products used in normal household use for a period of three (3) years from the date of original retail purchase or closing date for the part itself , with the owner...


