PJ260D User Guide
Page 6
... ...3 Using the Product 5 Control Panel ...5 Connection Ports ...6 Remote Control ...7 Replacing the Battery 8 Remote Control Operation 9 Installation 10 Connecting the Projector 10 Powering On/Off the Projector 11 Adjusting the Projector 12 Menu Operation 14 Maintenance 18 Cleaning the Lens ...18 Cleaning the Projector Housing 18 Replacing the Lamp 19 Specifications 21 Appendix 22 LED Indicator Messages...
... ...3 Using the Product 5 Control Panel ...5 Connection Ports ...6 Remote Control ...7 Replacing the Battery 8 Remote Control Operation 9 Installation 10 Connecting the Projector 10 Powering On/Off the Projector 11 Adjusting the Projector 12 Menu Operation 14 Maintenance 18 Cleaning the Lens ...18 Cleaning the Projector Housing 18 Replacing the Lamp 19 Specifications 21 Appendix 22 LED Indicator Messages...

PJ260D User Guide
Page 8
Package Contents When you unpack the projector, make sure you ever to D-SUB) Remote Control (IR) AAA size batteries for remote control CD-Wizard Quick Start Guide Projector Carrying Case „ Save the original shipping carton and packing material; ViewSonic 2 PJ260D For maximum protection, repack your unit. they will comein handy if you have all these components: Projector with Lens Cap AC Power Cord VGA Cable (D-SUB to ship your unit as it was originally packed at the factory. „ Accessories and components may vary by retailer and region.
Package Contents When you unpack the projector, make sure you ever to D-SUB) Remote Control (IR) AAA size batteries for remote control CD-Wizard Quick Start Guide Projector Carrying Case „ Save the original shipping carton and packing material; ViewSonic 2 PJ260D For maximum protection, repack your unit. they will comein handy if you have all these components: Projector with Lens Cap AC Power Cord VGA Cable (D-SUB to ship your unit as it was originally packed at the factory. „ Accessories and components may vary by retailer and region.

PJ260D User Guide
Page 9
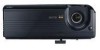
Projector Overview Front View 1 Lens cap 2 Projection lens 3 Lens cap strap 4 Front IR remote control sensor 5 Ventilation holes 6 Control panel 7 Zoom ring 8 Focus ring 9 Speaker ViewSonic 3 PJ260D
Projector Overview Front View 1 Lens cap 2 Projection lens 3 Lens cap strap 4 Front IR remote control sensor 5 Ventilation holes 6 Control panel 7 Zoom ring 8 Focus ring 9 Speaker ViewSonic 3 PJ260D

PJ260D User Guide
Page 13
ViewSonic 7 PJ260D Press again to cancel the Mute function. 7 Resync Resynchronize the projector to pause the screen image. Press again to cancel the Blank Screen function. 9 ViewMatch Switch the white peaking. 10 Source Manually select an input ...source. 11 Volume + / Adjust the volume level. 12 Freeze Press "Freeze" to the input signal from a computer. Remote Control 1 Power Turn the projector on or off. 2 Four directional buttons Use four directional buttons to select items or make adjustments to your selection. 3 MENU Display or exit...
ViewSonic 7 PJ260D Press again to cancel the Mute function. 7 Resync Resynchronize the projector to pause the screen image. Press again to cancel the Blank Screen function. 9 ViewMatch Switch the white peaking. 10 Source Manually select an input ...source. 11 Volume + / Adjust the volume level. 12 Freeze Press "Freeze" to the input signal from a computer. Remote Control 1 Power Turn the projector on or off. 2 Four directional buttons Use four directional buttons to select items or make adjustments to your selection. 3 MENU Display or exit...

PJ260D User Guide
Page 14
ViewSonic 8 PJ260D There is a danger of used batteries along with new ones. Installing the Batteries 1. Dispose of death by the diagram inside the compartment. 3. Replce all ... of the reach of explosion may happen if batteries are incorrectly replaced. Install batteries as indicated by accidentally swallowing the batteries. „ Remove batteries from remote control when not using for extended periods. „ Do not dispose of the used batteries according to local regulations. „ Danger of children. Open the...
ViewSonic 8 PJ260D There is a danger of used batteries along with new ones. Installing the Batteries 1. Dispose of death by the diagram inside the compartment. 3. Replce all ... of the reach of explosion may happen if batteries are incorrectly replaced. Install batteries as indicated by accidentally swallowing the batteries. „ Remove batteries from remote control when not using for extended periods. „ Do not dispose of the used batteries according to local regulations. „ Danger of children. Open the...
PJ260D User Guide
Page 15
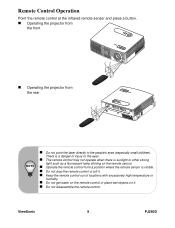
... Point the remote control at the infrared remote sensor and press a button. „ Operating the projector from the front „ Operating the projector from a position where the remote sensor is visible. „ Do not drop the remote control or jolt it. „ Keep the remote control out of locations with ...the rear „ Do not point the laser directly to the people's eyes (especially small children). ViewSonic 9 PJ260D There is a danger of injury to the eyes. „ The remote control may not operate when there is sunlight or other strong light such as a fluorescent lamp shining ...
... Point the remote control at the infrared remote sensor and press a button. „ Operating the projector from the front „ Operating the projector from a position where the remote sensor is visible. „ Do not drop the remote control or jolt it. „ Keep the remote control out of locations with ...the rear „ Do not point the laser directly to the people's eyes (especially small children). ViewSonic 9 PJ260D There is a danger of injury to the eyes. „ The remote control may not operate when there is sunlight or other strong light such as a fluorescent lamp shining ...

PJ260D User Guide
Page 17
...lens when the lamp is especially important that children are connecting multiple sources to the projector simultaneously, press the SOURCE button on the control panel or the Source button on the remote control. This can damage your source (computer, notebook, DVD, etc.). Press ...the AC power cord and peripheral signal cable(s) connections. 3. Powering Off the Projector: 1. ViewSonic 11 PJ260D The projector automatically detects your source. „ If you are not allowed to turn on . Turn on the projector. Press button again to confirm. „ The cooling fans continue to turn...
...lens when the lamp is especially important that children are connecting multiple sources to the projector simultaneously, press the SOURCE button on the control panel or the Source button on the remote control. This can damage your source (computer, notebook, DVD, etc.). Press ...the AC power cord and peripheral signal cable(s) connections. 3. Powering Off the Projector: 1. ViewSonic 11 PJ260D The projector automatically detects your source. „ If you are not allowed to turn on . Turn on the projector. Press button again to confirm. „ The cooling fans continue to turn...
PJ260D User Guide
Page 30
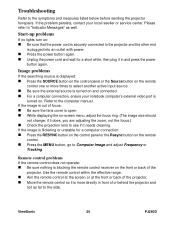
...on the front or back of focus: „ Be sure the lens cover is turned on the remote control. „ Press the MENU button, go to the symptoms and measures listed below before sending the projector forrepairs. Refer to "Indicator Messages" as far to select another active input source. „ Be ... reseller or service center. Start-up problems If no lights turn on: „ Be sure that the power cord is securely connected to the projector and the other end is more times to the side. ViewSonic 24 PJ260D Troubleshooting Refer to Computer Image and adjust Frequency or Tracking.
...on the front or back of focus: „ Be sure the lens cover is turned on the remote control. „ Press the MENU button, go to the symptoms and measures listed below before sending the projector forrepairs. Refer to "Indicator Messages" as far to select another active input source. „ Be ... reseller or service center. Start-up problems If no lights turn on: „ Be sure that the power cord is securely connected to the projector and the other end is more times to the side. ViewSonic 24 PJ260D Troubleshooting Refer to Computer Image and adjust Frequency or Tracking.


