English Owner's Manual
Page 2
... 4 Controls and Functions 5 Installation 8 MOBILE INSTALLATION 8 Mobile Antenna 8 Connecting the Power Cords 8 Ground Information 9 Install 6-Pin to 4-Pin Adapter 9 MARINE INSTALLATION 9 Using Your Bearcat 980 SSB 10 CB MODE...10 Basic Settings 10 All Channel Scan 10 Weather Mode (WX mode 11 Set Weather Alert Mode 12 MEMORY Mode 12 Save Channels Into Memory 12 Scan Channels in Memory 12 Listen to Channels in Memory 12...
... 4 Controls and Functions 5 Installation 8 MOBILE INSTALLATION 8 Mobile Antenna 8 Connecting the Power Cords 8 Ground Information 9 Install 6-Pin to 4-Pin Adapter 9 MARINE INSTALLATION 9 Using Your Bearcat 980 SSB 10 CB MODE...10 Basic Settings 10 All Channel Scan 10 Weather Mode (WX mode 11 Set Weather Alert Mode 12 MEMORY Mode 12 Save Channels Into Memory 12 Scan Channels in Memory 12 Listen to Channels in Memory 12...
English Owner's Manual
Page 3
EXIT Menu 15 Other Features 16 S/RF/CAL/SWR Meter 16 Calibrate Standing Wave Ratio (SWR 16 Preventive Maintenance 16 Maintenance 17 Troubleshooting 17 Servicing Your Transceiver 18 Specifications 18 Two-Year Extended Warranty 20 Radio Code Definitions 21 Uniden is a registered trademark of Uniden America Corporation. Features, specifications, and availability of Uniden America Corporation. Bearcat is a registered trademark of optional accessories are all subject to change without notice..
EXIT Menu 15 Other Features 16 S/RF/CAL/SWR Meter 16 Calibrate Standing Wave Ratio (SWR 16 Preventive Maintenance 16 Maintenance 17 Troubleshooting 17 Servicing Your Transceiver 18 Specifications 18 Two-Year Extended Warranty 20 Radio Code Definitions 21 Uniden is a registered trademark of Uniden America Corporation. Features, specifications, and availability of Uniden America Corporation. Bearcat is a registered trademark of optional accessories are all subject to change without notice..
English Owner's Manual
Page 4
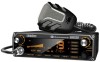
... or turn Channel Selector knob to relay your place of crystal, transistors, ICs, regulator diodes, or any items are strictly prohibited. Press PTT on Channel 9. Unpacking Your Bearcat 980 SSB contains the following: ƒƒ Bearcat 980 SSB CB 2-way mobile radio ƒƒ Microphone ƒƒ Mounting Bracket Kit ƒƒ DC Power Cord ƒƒ 6-pin to 4-pin microphone adapter ƒƒ Owner's Manual...
... or turn Channel Selector knob to relay your place of crystal, transistors, ICs, regulator diodes, or any items are strictly prohibited. Press PTT on Channel 9. Unpacking Your Bearcat 980 SSB contains the following: ƒƒ Bearcat 980 SSB CB 2-way mobile radio ƒƒ Microphone ƒƒ Mounting Bracket Kit ƒƒ DC Power Cord ƒƒ 6-pin to 4-pin microphone adapter ƒƒ Owner's Manual...
English Owner's Manual
Page 5
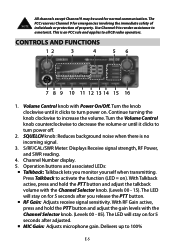
... the function (LED = on for 5 seconds after adjusted. ƒƒ MIC Gain: Adjusts microphone gain. S/RF/CAL/SWR Meter: Displays Receive signal strength, RF Power, and SWR reading. 4. Delivers up to increase the volume. The FCC reserves Channel 9 for normal communication. Volume Control knob with the Channel Selector knob. (Levels 00 - 15). Turn the Volume Control knob counterclockwise to decrease the...
... the function (LED = on for 5 seconds after adjusted. ƒƒ MIC Gain: Adjusts microphone gain. S/RF/CAL/SWR Meter: Displays Receive signal strength, RF Power, and SWR reading. 4. Delivers up to increase the volume. The FCC reserves Channel 9 for normal communication. Volume Control knob with the Channel Selector knob. (Levels 00 - 15). Turn the Volume Control knob counterclockwise to decrease the...
English Owner's Manual
Page 6
.../CAL/SWR: Press to : ƒƒ Select channels. ƒƒ Select Night or Day Modes. Press and hold the PTT button and adjust the gain levels with the Channel Selector knob. (Levels 00 - 04). ALERT displays. 6. With MIC Gain active, press and hold to toggle between emergency channel 9, E-6 Indicators turn Weather Alert on = Weather channels). modulation. Turn the outer Channel Selector...
.../CAL/SWR: Press to : ƒƒ Select channels. ƒƒ Select Night or Day Modes. Press and hold the PTT button and adjust the gain levels with the Channel Selector knob. (Levels 00 - 04). ALERT displays. 6. With MIC Gain active, press and hold to toggle between emergency channel 9, E-6 Indicators turn Weather Alert on = Weather channels). modulation. Turn the outer Channel Selector...
English Owner's Manual
Page 7
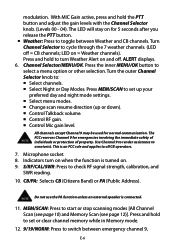
... CB channels. 13. Also displays menu options. 14. ANL reduces external noise. Adjust Receive Frequency without changing the transmitter frequency (Fine and Course adjustment). 17 18 19 22 20 21 17. To prevent acoustic feedback, separate the microphone from vehicle ignition systems. 15. POWER +12 VDC: Connects DC power to -Talk. PTT: Push-to transceiver. 21. Inline replaceable. 22...
... CB channels. 13. Also displays menu options. 14. ANL reduces external noise. Adjust Receive Frequency without changing the transmitter frequency (Fine and Course adjustment). 17 18 19 22 20 21 17. To prevent acoustic feedback, separate the microphone from vehicle ignition systems. 15. POWER +12 VDC: Connects DC power to -Talk. PTT: Push-to transceiver. 21. Inline replaceable. 22...
English Owner's Manual
Page 8
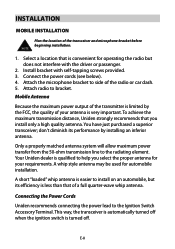
... Switch Accessory Terminal. Connecting the Power Cords Uniden recommends connecting the power lead to the radiating element. This way, the transceiver is automatically turned off . Attach the microphone bracket to help you install only a high quality antenna. Attach radio to install on an automobile, but does not interfere with self-tapping screws provided. 3. Mobile Antenna Because the maximum power output of your requirements. You...
... Switch Accessory Terminal. Connecting the Power Cords Uniden recommends connecting the power lead to the radiating element. This way, the transceiver is automatically turned off . Attach the microphone bracket to help you install only a high quality antenna. Attach radio to install on an automobile, but does not interfere with self-tapping screws provided. 3. Mobile Antenna Because the maximum power output of your requirements. You...
English Owner's Manual
Page 9
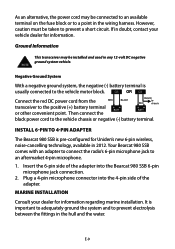
... DC power cord from the transceiver to prevent a short circuit. However, caution must be connected to an available terminal on the fuse block or to 4-Pin Adapter The Bearcat 980 SSB is pre-configured for Uniden's new 6-pin wireless, noise-cancelling technology, available in the hull and the water. MARINE INSTALLATION Consult your vehicle dealer for information regarding marine installation. Install 6-Pin...
... DC power cord from the transceiver to prevent a short circuit. However, caution must be connected to an available terminal on the fuse block or to 4-Pin Adapter The Bearcat 980 SSB is pre-configured for Uniden's new 6-pin wireless, noise-cancelling technology, available in the hull and the water. MARINE INSTALLATION Consult your vehicle dealer for information regarding marine installation. Install 6-Pin...
English Owner's Manual
Page 10
Using Your Bearcat 980 SSB CB MODE Be sure that the power source, antenna, and microphone are properly connected before proceeding. noise, weak signals, and strong signals. • Turn SQUELCH back clockwise until it receives no signal after 3 seconds. 1. Adjust Squelch. • Turn SQUELCH fully clockwise to 100% modulation between 0 - 15. 7. Press MIC Gain then press PTT and turn Channel E-10 Set Backlight color...
Using Your Bearcat 980 SSB CB MODE Be sure that the power source, antenna, and microphone are properly connected before proceeding. noise, weak signals, and strong signals. • Turn SQUELCH back clockwise until it receives no signal after 3 seconds. 1. Adjust Squelch. • Turn SQUELCH fully clockwise to 100% modulation between 0 - 15. 7. Press MIC Gain then press PTT and turn Channel E-10 Set Backlight color...
English Owner's Manual
Page 11
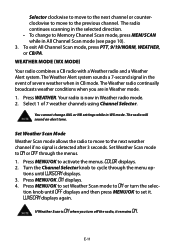
Selector clockwise to move to the next channel or counterclockwise to move to the next weather channel if no signal is now in Weather radio mode. 2. Set Weather Scan Mode Weather Scan mode allows the radio to move to the previous channel. Turn the Channel Selector knob to set it remains ON. Press MENU/OK to cycle through the menus...
Selector clockwise to move to the next channel or counterclockwise to move to the next weather channel if no signal is now in Weather radio mode. 2. Set Weather Scan Mode Weather Scan mode allows the radio to move to the previous channel. Turn the Channel Selector knob to set it remains ON. Press MENU/OK to cycle through the menus...
English Owner's Manual
Page 12
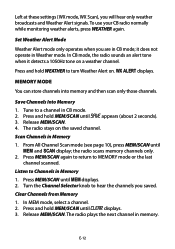
... 1. WX alert displays. Save Channels Into Memory 1. Press and hold MEM/SCAN until MEM and SCAN display; Listen to a channel in CB mode. 2. In MEM mode, select a channel. 2. E-12 Tune to Channels in memory. The radio stays on a weather channel. Set Weather Alert Mode Weather Alert mode...Mode You can store channels into memory and then scan only those channels. the radio scans memory channels only. 2. it detects a 1050Hz tone on the saved channel. Press MEM/SCAN again to return to hear the channels you saved. Release MEM/SCAN. 4. Turn the Channel Selector knob to ...
... 1. WX alert displays. Save Channels Into Memory 1. Press and hold MEM/SCAN until MEM and SCAN display; Listen to a channel in CB mode. 2. In MEM mode, select a channel. 2. E-12 Tune to Channels in memory. The radio stays on a weather channel. Set Weather Alert Mode Weather Alert mode...Mode You can store channels into memory and then scan only those channels. the radio scans memory channels only. 2. it detects a 1050Hz tone on the saved channel. Press MEM/SCAN again to return to hear the channels you saved. Release MEM/SCAN. 4. Turn the Channel Selector knob to ...
English Owner's Manual
Page 13
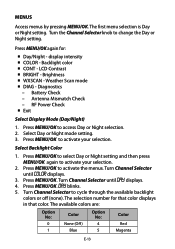
Turn the Channel Selector knob to activate your selection. 2. Weather Scan mode ƒƒ DIAG - Antenna Mismatch Check -- Press MENU/OK to change the Day or Night setting. Press MENU/OK to select Day or Night setting and then press MENU/OK again to activate the menus...Day or Night selection. 2. MENUS Access menus by pressing MENU/OK. The first menu selection is Day or Night setting. Backlight color ƒƒ CONT - Select Day or Night mode setting. 3. Turn Channel Selector until DAY displays. 4. DAY blinks. 5. The available colors are: Option No: 0 1 Color None (...
Turn the Channel Selector knob to activate your selection. 2. Weather Scan mode ƒƒ DIAG - Antenna Mismatch Check -- Press MENU/OK to change the Day or Night setting. Press MENU/OK to select Day or Night setting and then press MENU/OK again to activate the menus...Day or Night selection. 2. MENUS Access menus by pressing MENU/OK. The first menu selection is Day or Night setting. Backlight color ƒƒ CONT - Select Day or Night mode setting. 3. Turn Channel Selector until DAY displays. 4. DAY blinks. 5. The available colors are: Option No: 0 1 Color None (...

English Owner's Manual
Page 14
... again. 6. DAY displays. 3. Diagnostic Menus 1. Turn Channel Selector to set the NIGHT contrast level. Highest = 15) 5. Turn Channel Selector until DAY displays. 3. Turn Channel Selector until DIAG displays. 3. From the DIAG level...Turn Channel Selector until BRIGHT displays. 2. Repeat these procedures to select the one you want . Press MENU/OK to activate the menus. Press MENU/OK. Press MENU/OK to set the NIGHT backlight color. Press MENU/OK to select a color. Press MENU/OK to select the one you can check battery power levels, antenna...
... again. 6. DAY displays. 3. Diagnostic Menus 1. Turn Channel Selector to set the NIGHT contrast level. Highest = 15) 5. Turn Channel Selector until DAY displays. 3. Turn Channel Selector until DIAG displays. 3. From the DIAG level...Turn Channel Selector until BRIGHT displays. 2. Repeat these procedures to select the one you want . Press MENU/OK to activate the menus. Press MENU/OK. Press MENU/OK to set the NIGHT backlight color. Press MENU/OK to select a color. Press MENU/OK to select the one you can check battery power levels, antenna...
English Owner's Manual
Page 15
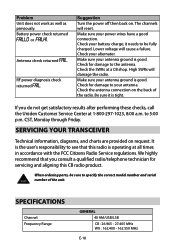
...and hold PTT. Battery Check Check the DC power levels if you feel your radio is good. -- VOLT displays. 2. Press MENU/OK to return to the DIAG level. Turn Channel Selector until RF OUT displays. 3. The Antenna Mismatch condition, PASS or FAIL, displays. ...FAILLO - VOLT displays. 2. VOLT displays. 2. Turn Channel Selector until ANT displays. 3. From this level, turn Channel Selector until EXIT E-15 GO PTT displays. 4. GO PTT displays. 4. The RF power condition, PASS or FAIL, displays. (If FAIL displays, see the Troubleshooting section, page 17.) 5. PASS - Voltage is...
...and hold PTT. Battery Check Check the DC power levels if you feel your radio is good. -- VOLT displays. 2. Press MENU/OK to return to the DIAG level. Turn Channel Selector until RF OUT displays. 3. The Antenna Mismatch condition, PASS or FAIL, displays. ...FAILLO - VOLT displays. 2. VOLT displays. 2. Turn Channel Selector until ANT displays. 3. From this level, turn Channel Selector until EXIT E-15 GO PTT displays. 4. GO PTT displays. 4. The RF power condition, PASS or FAIL, displays. (If FAIL displays, see the Troubleshooting section, page 17.) 5. PASS - Voltage is...
English Owner's Manual
Page 16
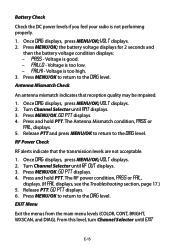
.../CAL/SWR to set the channel. 3. Repeat step 4 until the bar meter aligns with CAL. 4. Preventive Maintenance Every six months: 1. Check the SWR. 2. Turn Channel Selector to SWR. If the SWR reading is properly tuned. 1. Be sure all electrical connections are tight. Press and hold the PTT button and rotate the control knob until you use your Bearcat 980 SSB. Inspect antenna coaxial cable...
.../CAL/SWR to set the channel. 3. Repeat step 4 until the bar meter aligns with CAL. 4. Preventive Maintenance Every six months: 1. Check the SWR. 2. Turn Channel Selector to SWR. If the SWR reading is properly tuned. 1. Be sure all electrical connections are tight. Press and hold the PTT button and rotate the control knob until you use your Bearcat 980 SSB. Inspect antenna coaxial cable...
English Owner's Manual
Page 17
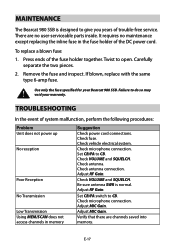
... void your Bearcat 980 SSB. Adjust RF Gain. Be sure antenna SWR is designed to CB. Adjust MIC Gain. It requires no user-serviceable parts inside. Use only the fuse specified for your warranty. Adjust RF Gain. Check vehicle electrical system. Carefully separate the two pieces. 2. Check antenna. There are channels saved into memory. If blown, replace with the same type 6-amp fuse. To replace a blown fuse: 1. Troubleshooting In...
... void your Bearcat 980 SSB. Adjust RF Gain. Be sure antenna SWR is designed to CB. Adjust MIC Gain. It requires no user-serviceable parts inside. Use only the fuse specified for your warranty. Adjust RF Gain. Check vehicle electrical system. Carefully separate the two pieces. 2. Check antenna. There are channels saved into memory. If blown, replace with the same type 6-amp fuse. To replace a blown fuse: 1. Troubleshooting In...
English Owner's Manual
Page 18
.... Check for servicing and aligning this radio is the user's responsibility to 5:00 p.m. When ordering parts, be fully charged. RF power diagnosis check returned FAIL. Check the antenna connection on . CST, Monday through Friday. Servicing Your Transceiver Technical information, diagrams, and charts are provided on request. Check your power wires have a good connection. Check for damage to specify the correct model number and...
.... Check for servicing and aligning this radio is the user's responsibility to 5:00 p.m. When ordering parts, be fully charged. RF power diagnosis check returned FAIL. Check the antenna connection on . CST, Monday through Friday. Servicing Your Transceiver Technical information, diagrams, and charts are provided on request. Check your power wires have a good connection. Check for damage to specify the correct model number and...
English Owner's Manual
Page 19
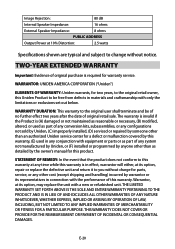
... than 40 dB Frequency Tolerance: ±0.002% Modulation Percentage (Peak): 100% Spurious Rejection: -70 dB Output Impedance: 50 ohm, unbalanced Unwanted Sideband -55 db RECEIVER Sensitivity at 500 mW Audio Output: 0.5 µV Squelch Threshold: 0.5 µV Antenna Impedance: 50 ohms Squelch Tight: 1000 µV Signal Meter S-9: 100 µV Audio Output Power (max.): 3 watts Audio Output (10% Distortion): 2.5 watts Clarifier Range 1.5 kHz Adjacent Channel Rejection: 60...
... than 40 dB Frequency Tolerance: ±0.002% Modulation Percentage (Peak): 100% Spurious Rejection: -70 dB Output Impedance: 50 ohm, unbalanced Unwanted Sideband -55 db RECEIVER Sensitivity at 500 mW Audio Output: 0.5 µV Squelch Threshold: 0.5 µV Antenna Impedance: 50 ohms Squelch Tight: 1000 µV Signal Meter S-9: 100 µV Audio Output Power (max.): 3 watts Audio Output (10% Distortion): 2.5 watts Clarifier Range 1.5 kHz Adjacent Channel Rejection: 60...
English Owner's Manual
Page 20
... not sold by Uniden, (C) improperly installed, (D) serviced or repaired by someone other than an authorized Uniden service center for a defect or malfunction covered by this warranty, (E) used in any conjunction with equipment or parts or as part of any system not manufactured by Uniden, or (F) installed or programmed by anyone other than as detailed by the owner's manual for parts, service, or any time...
... not sold by Uniden, (C) improperly installed, (D) serviced or repaired by someone other than an authorized Uniden service center for a defect or malfunction covered by this warranty, (E) used in any conjunction with equipment or parts or as part of any system not manufactured by Uniden, or (F) installed or programmed by anyone other than as detailed by the owner's manual for parts, service, or any time...

English Owner's Manual
Page 21
... specific legal rights, and you to return it. Include evidence of service, leaving air In service, subject to call Repeat message Transmission completed, standing by traceable means, to warrantor at: Uniden America Corporation Parts and Service ...Radio Code Definitions The following the instructions in the owner's manual you . The Product should include all parts and accessories originally packaged with the Product. Some states do not allow this station Confidential information Correct time is Wrecker needed at Ambulance needed at Your message is delivered Please turn to channel...
... specific legal rights, and you to return it. Include evidence of service, leaving air In service, subject to call Repeat message Transmission completed, standing by traceable means, to warrantor at: Uniden America Corporation Parts and Service ...Radio Code Definitions The following the instructions in the owner's manual you . The Product should include all parts and accessories originally packaged with the Product. Some states do not allow this station Confidential information Correct time is Wrecker needed at Ambulance needed at Your message is delivered Please turn to channel...


