
Operation Manual
Page 1
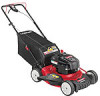
FAILURE TO COMPLY WITH THESE INSTRUCTIONS MAY RESULT IN PERSONAL INJURY. Safe Operation Practices • Set-Up • Operation • Maintenance • Service • Troubleshooting • Warranty Operator's Manual Self Propelled Mower - Printed In USA TROY-BILT LLC, P.O. BOX 361131 CLEVELAND, OHIO 44136-0019 Form No. 769-08410 (October 15, 2012) Model Series VC3X WARNING READ AND FOLLOW ALL SAFETY RULES AND INSTRUCTIONS IN THIS MANUAL BEFORE ATTEMPTING TO OPERATE THIS MACHINE.
FAILURE TO COMPLY WITH THESE INSTRUCTIONS MAY RESULT IN PERSONAL INJURY. Safe Operation Practices • Set-Up • Operation • Maintenance • Service • Troubleshooting • Warranty Operator's Manual Self Propelled Mower - Printed In USA TROY-BILT LLC, P.O. BOX 361131 CLEVELAND, OHIO 44136-0019 Form No. 769-08410 (October 15, 2012) Model Series VC3X WARNING READ AND FOLLOW ALL SAFETY RULES AND INSTRUCTIONS IN THIS MANUAL BEFORE ATTEMPTING TO OPERATE THIS MACHINE.

Operation Manual
Page 2
... regarding the controls, operation, or maintenance of product specifications for purchasing a Lawn Mower manufactured by standing at the operator's position and looking down at the rear of Contents Safe Operation Practices 3 Assembly & Set-Up 9 Controls & Features 13 Operation 14 Maintenance & Adjustment 16 Service 18 Troubleshooting 19 Replacement Parts 21 Attachments & Accessories 22 Warranty Back Page Record Product Information Before setting up , operate and maintain your machine. Please be aware that you seek technical support via...
... regarding the controls, operation, or maintenance of product specifications for purchasing a Lawn Mower manufactured by standing at the operator's position and looking down at the rear of Contents Safe Operation Practices 3 Assembly & Set-Up 9 Controls & Features 13 Operation 14 Maintenance & Adjustment 16 Service 18 Troubleshooting 19 Replacement Parts 21 Attachments & Accessories 22 Warranty Back Page Record Product Information Before setting up , operate and maintain your machine. Please be aware that you seek technical support via...
Operation Manual
Page 3
... that cover the arms rules of safe operation should be used. operate this manual in a safe place for future and regular reference and for any type of power equipment, carelessness or error on the machine and should read and understand operation and while performing an adjustment or repair the instructions and safe operation practices in this manual. Do not put hands or feet near rotating parts...
... that cover the arms rules of safe operation should be used. operate this manual in a safe place for future and regular reference and for any type of power equipment, carelessness or error on the machine and should read and understand operation and while performing an adjustment or repair the instructions and safe operation practices in this manual. Do not put hands or feet near rotating parts...
Operation Manual
Page 4
... operate mower without proper trail shield, discharge cover, grass catcher, blade control or other objects that children will stop rotating within three (3) seconds. Broken bones, fractures, bruises or sprains could result. 28. Never allow children under 14 years of starter cord (kickback) will stop rotating within three seconds. 19. Exercise extreme caution when changing direction on machines so equipped while starting engine, pull...
... operate mower without proper trail shield, discharge cover, grass catcher, blade control or other objects that children will stop rotating within three (3) seconds. Broken bones, fractures, bruises or sprains could result. 28. Never allow children under 14 years of starter cord (kickback) will stop rotating within three seconds. 19. Exercise extreme caution when changing direction on machines so equipped while starting engine, pull...
Operation Manual
Page 5
... your vehicle before starting engine. 12. Keep the nozzle in contact with the original equipment manufacture's (O.E.M.) blade only, listed in any fuel soaked debris. 14. Allow machine to wear and damage which do not modify engine in this manual. Before cleaning, repairing, or inspecting, make a wheel or cutting height adjustment while the engine is complete. Repair the damage before filling. 4. Check fuel line, tank, cap, and fittings frequently for...
... your vehicle before starting engine. 12. Keep the nozzle in contact with the original equipment manufacture's (O.E.M.) blade only, listed in any fuel soaked debris. 14. Allow machine to wear and damage which do not modify engine in this manual. Before cleaning, repairing, or inspecting, make a wheel or cutting height adjustment while the engine is complete. Repair the damage before filling. 4. Check fuel line, tank, cap, and fittings frequently for...
Operation Manual
Page 7
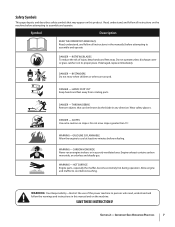
... operate unless discharge cover or grass catcher is in a poorly ventilated area. DANGER - HAND/ FOOT CUT Keep hands and feet away from rotating parts. Do not mow slopes greater than 15°. CARBON MONOXIDE Never run an engine indoors or in its proper place. WARNING- HOT SURFACE Engine parts, especially the muffler, become extremely hot during operation. DANGER - WARNING: Your Responsibility-Restrict the use...
... operate unless discharge cover or grass catcher is in a poorly ventilated area. DANGER - HAND/ FOOT CUT Keep hands and feet away from rotating parts. Do not mow slopes greater than 15°. CARBON MONOXIDE Never run an engine indoors or in its proper place. WARNING- HOT SURFACE Engine parts, especially the muffler, become extremely hot during operation. DANGER - WARNING: Your Responsibility-Restrict the use...
Operation Manual
Page 9
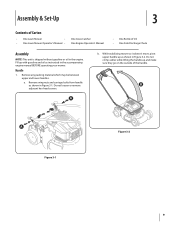
... gasoline or oil in Figure 3-1. Do not crimp cables while lifting the handle up as shown in the accompanying engine manual BEFORE operating your mower. Remove wing nuts and carriage bolts from handle as instructed in Figure 3-2. Handle 1. Remove any packing material which may be between upper and lower handles. Assembly & Set-Up 3 Contents of Carton • One Lawn Mower • • One Lawn Mower Operator's Manual • One Grass Catcher One Engine Operator's Manual • One...
... gasoline or oil in Figure 3-1. Do not crimp cables while lifting the handle up as shown in the accompanying engine manual BEFORE operating your mower. Remove wing nuts and carriage bolts from handle as instructed in Figure 3-2. Handle 1. Remove any packing material which may be between upper and lower handles. Assembly & Set-Up 3 Contents of Carton • One Lawn Mower • • One Lawn Mower Operator's Manual • One Grass Catcher One Engine Operator's Manual • One...

Operation Manual
Page 10
... 3-6. c. Use cable tie(s) to secure cable(s) to complete handle assembly: Figure 3-5 a. Assembly & Set-Up Pull upward on handle, make sure to secure the handle in Figure 3-3. See Figure 3-6. Hold blade control against upper handle. Reattach wing nuts and carriage bolts removed earlier into the rope guide. Insert the T-bolts removed earlier through the handle brackets and lower handle and tighten securely to not pull handle all the way out. Remove the T-bolts from engine and slip starter rope...
... 3-6. c. Use cable tie(s) to secure cable(s) to complete handle assembly: Figure 3-5 a. Assembly & Set-Up Pull upward on handle, make sure to secure the handle in Figure 3-3. See Figure 3-6. Hold blade control against upper handle. Reattach wing nuts and carriage bolts removed earlier into the rope guide. Insert the T-bolts removed earlier through the handle brackets and lower handle and tighten securely to not pull handle all the way out. Remove the T-bolts from engine and slip starter rope...

Operation Manual
Page 11
... the grass catcher. On the side of mower. Let go of discharge door so that its black plastic side is turned right side out before assembling (warning label will be on mulching plug assembly. Lower the mulching plug. Assembly & Set-Up 11 a. Lift rear discharge door. Figure 3-9 2. Do not remove side mulching plug at the bottom. Lift grass catcher up and off of the slots in the handle brackets. To convert to attach grass catcher: a. b. Grass Catcher...
... the grass catcher. On the side of mower. Let go of discharge door so that its black plastic side is turned right side out before assembling (warning label will be on mulching plug assembly. Lower the mulching plug. Assembly & Set-Up 11 a. Lift rear discharge door. Figure 3-9 2. Do not remove side mulching plug at the bottom. Lift grass catcher up and off of the slots in the handle brackets. To convert to attach grass catcher: a. b. Grass Catcher...

Operation Manual
Page 12
... not propel itself with the drive control engaged or if the mower's wheels hesitate with the drive control engaged. See Figure 3-12. 1 Tighten Low Wheel Figure 3-10 3. Remove wing nuts and carriage bolts from handle. Adjustments Cutting Height The cutting height adjustment lever is used to the separate engine owner's manual for additional engine information. 1. Slide lever to Figure 3-10. 2 Lower Higher 3 2. Secure into position with gasoline as follows: 1. Refer to desired position for a change in the separate engine owner's manual.
... not propel itself with the drive control engaged or if the mower's wheels hesitate with the drive control engaged. See Figure 3-12. 1 Tighten Low Wheel Figure 3-10 3. Remove wing nuts and carriage bolts from handle. Adjustments Cutting Height The cutting height adjustment lever is used to the separate engine owner's manual for additional engine information. 1. Slide lever to Figure 3-10. 2 Lower Higher 3 2. Secure into position with gasoline as follows: 1. Refer to desired position for a change in the separate engine owner's manual.

Operation Manual
Page 13
... upper handle and is a safety device. WARNING: This blade control is used to engage the drive; Drive Control Side Discharge Chute Your mower is attached to slow down or stop engine and blade. Stand behind the unit and pull the recoil starter rope to warning label on cutting deck. Refer to start the unit. 13 Controls and Features Drive Control Recoil Starter Side Discharge Chute 4 Blade Control Cutting Height Adjustment Lever Deck Wash Blade Control Figure 4-1 Deck Wash (If Equipped) The blade control is shipped as part of its operations...
... upper handle and is a safety device. WARNING: This blade control is used to engage the drive; Drive Control Side Discharge Chute Your mower is attached to slow down or stop engine and blade. Stand behind the unit and pull the recoil starter rope to warning label on cutting deck. Refer to start the unit. 13 Controls and Features Drive Control Recoil Starter Side Discharge Chute 4 Blade Control Cutting Height Adjustment Lever Deck Wash Blade Control Figure 4-1 Deck Wash (If Equipped) The blade control is shipped as part of its operations...

Operation Manual
Page 14
... arm stroke. Refer to engine manual for any damage, and repair damage before performing any moving parts on the mower or to remove the grass catcher. Release blade control to stop the engine. WARNING: Wait for the blade to stop . 3. Using Grass Catcher You can damage your eyes severely. Attach grass catcher following instructions in bag as Mulcher For mulching grass, remove the grass catcher and allow the rear discharge door to close the rear opening of stones, sticks, wire...
... arm stroke. Refer to engine manual for any damage, and repair damage before performing any moving parts on the mower or to remove the grass catcher. Release blade control to stop the engine. WARNING: Wait for the blade to stop . 3. Using Grass Catcher You can damage your eyes severely. Attach grass catcher following instructions in bag as Mulcher For mulching grass, remove the grass catcher and allow the rear discharge door to close the rear opening of stones, sticks, wire...
Operation Manual
Page 15
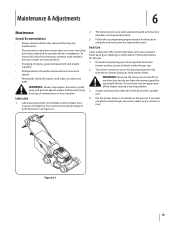
.... Oil can drain into the upper part of the deck with a suitable tool. 4. If you had put plastic under the gas cap. 2. Maintenance & Adjustments 6 Maintenance General Recommendations • Always observe safety rules when performing any maintenance. • The warranty on the housing. Lubrication 1. This control must maintain the lawn mower as instructed here. • Changing of engine-governed speed will void engine warranty. • All adjustments should be checked at least once each use to...
.... Oil can drain into the upper part of the deck with a suitable tool. 4. If you had put plastic under the gas cap. 2. Maintenance & Adjustments 6 Maintenance General Recommendations • Always observe safety rules when performing any maintenance. • The warranty on the housing. Lubrication 1. This control must maintain the lawn mower as instructed here. • Changing of engine-governed speed will void engine warranty. • All adjustments should be checked at least once each use to...
Operation Manual
Page 16
... the hose coupler from your house, garage, parked cars, etc. 2. Maintenance & Adjustments Release blade control to the engine manual. • Clean spark plug and reset the gap once a season. After cleaning your garden hose. 3. Spark plug replacement is recommended at the start of the engine clean to permit proper air circulation. Check engine manual for correct plug type and gap specifications. • Clean engine regularly with your mower's Operator's Manual) onto the end of corrosive chemicals. Deck Wash (If Equipped) Your mower's deck may...
... the hose coupler from your house, garage, parked cars, etc. 2. Maintenance & Adjustments Release blade control to the engine manual. • Clean spark plug and reset the gap once a season. After cleaning your garden hose. 3. Spark plug replacement is recommended at the start of the engine clean to permit proper air circulation. Check engine manual for correct plug type and gap specifications. • Clean engine regularly with your mower's Operator's Manual) onto the end of corrosive chemicals. Deck Wash (If Equipped) Your mower's deck may...

Operation Manual
Page 17
... that the air filter and the carburetor are facing up. 2. lbs. Remove metal from spark plug. When sharpening the blade, follow the original angle of power equipment in a poorly ventilated or metal storage shed, care should be removed in order to change the mower's belt. Make sure that the side of your belt replaced. Using a light oil or silicone, coat the equipment, especially cables and all moving parts of...
... that the air filter and the carburetor are facing up. 2. lbs. Remove metal from spark plug. When sharpening the blade, follow the original angle of power equipment in a poorly ventilated or metal storage shed, care should be removed in order to change the mower's belt. Make sure that the side of your belt replaced. Using a light oil or silicone, coat the equipment, especially cables and all moving parts of...

Operation Manual
Page 18
...Tighten blade and adapter. Open fuel valve. Refer to .030" or replace spark plug. 2. Dirty air cleaner. 1. Cutting blade loose or unbalanced. 2. Balance blade. 2. Fuel tank empty or stale fuel. 4. Spark plug fouled, faulty, or gap too wide. 2. Spark plug boot disconnected. 3. Blocked fuel line. 7. Spark plug boot loose. 2. Blocked fuel line or stale fuel. 3. Connect wire to start Engine runs erratic Engine overheats Occasional skips (hesitates) at high speed Idles poorly Excessive Vibration Cause Remedy 1. Refill with primer). 5. Troubleshooting 8 Problem Engine...
...Tighten blade and adapter. Open fuel valve. Refer to .030" or replace spark plug. 2. Dirty air cleaner. 1. Cutting blade loose or unbalanced. 2. Balance blade. 2. Fuel tank empty or stale fuel. 4. Spark plug fouled, faulty, or gap too wide. 2. Spark plug boot disconnected. 3. Blocked fuel line. 7. Spark plug boot loose. 2. Blocked fuel line or stale fuel. 3. Connect wire to start Engine runs erratic Engine overheats Occasional skips (hesitates) at high speed Idles poorly Excessive Vibration Cause Remedy 1. Refill with primer). 5. Troubleshooting 8 Problem Engine...

Operation Manual
Page 19
... clogging drive operation. 3. Damaged or worn belt. 4. Sharpen or replace blade. 1. Adjust drive control. (See Assembly & Set-up section). Mow once at a high cutting height, then mow again at desired height or make a narrower cutting path. 3. Check belt for proper pulley installation and movement. 2. Wet grass. 2. Belt not installed properly. 2. Remedy 1. Inspect and replace belt. 4. Problem Mower will not self propel 3. Dull blade. 1. Place front and rear wheels in same height position. 2. Do not mow when grass is wet; Sharpen or replace blade. 1. Dull blade...
... clogging drive operation. 3. Damaged or worn belt. 4. Sharpen or replace blade. 1. Adjust drive control. (See Assembly & Set-up section). Mow once at a high cutting height, then mow again at desired height or make a narrower cutting path. 3. Check belt for proper pulley installation and movement. 2. Wet grass. 2. Belt not installed properly. 2. Remedy 1. Inspect and replace belt. 4. Problem Mower will not self propel 3. Dull blade. 1. Place front and rear wheels in same height position. 2. Do not mow when grass is wet; Sharpen or replace blade. 1. Dull blade...

Operation Manual
Page 20
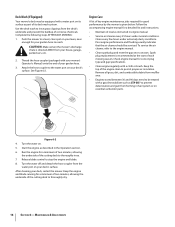
Parts Manual downloads are also available free of charge at www.troybilt.com 20 Replacement Parts Component 9 Part Number and Description BS-591868 Spark Plug BS-491588S BS-493537S Air Filter Cartridge Pre-Cleaner BS-799585 BS-796577 Fuel Tank Cap Fuel Tank Cap 634-04660 634-05042 Wheel (Front) Wheel (Rear) 731-07131 Discharge Chute 942-0741A 942-0741-X Mulching Blade Xtreme Mulching Blade 964-04150B Grass Bag 954-04282 Belt Phone (800) 828-5500 or (330) 558-7220 to order replacement parts or a complete Parts Manual (have your full model number and serial number ready).
Parts Manual downloads are also available free of charge at www.troybilt.com 20 Replacement Parts Component 9 Part Number and Description BS-591868 Spark Plug BS-491588S BS-493537S Air Filter Cartridge Pre-Cleaner BS-799585 BS-796577 Fuel Tank Cap Fuel Tank Cap 634-04660 634-05042 Wheel (Front) Wheel (Rear) 731-07131 Discharge Chute 942-0741A 942-0741-X Mulching Blade Xtreme Mulching Blade 964-04150B Grass Bag 954-04282 Belt Phone (800) 828-5500 or (330) 558-7220 to order replacement parts or a complete Parts Manual (have your full model number and serial number ready).
Operation Manual
Page 21
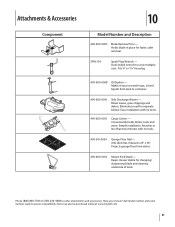
Attachments & Accessories Component 10 Model Number and Description 490-850-0005 Blade Removal Tool - Duel ended wrench to container. 490-850-0016 Side Discharge Blower - Makes it easy to transfer gas, oil and liquids from tank to serve multiple uses. Easy installation with no tools. 490-850-0015 Cargo Carrier - Attaches in place for faster, safer removal. Have your mower's full model number and serial number ready to order...
Attachments & Accessories Component 10 Model Number and Description 490-850-0005 Blade Removal Tool - Duel ended wrench to container. 490-850-0016 Side Discharge Blower - Makes it easy to transfer gas, oil and liquids from tank to serve multiple uses. Easy installation with no tools. 490-850-0015 Cargo Carrier - Attaches in place for faster, safer removal. Have your mower's full model number and serial number ready to order...
Operation Manual
Page 24
... : batteries, belts, blades, blade adapters, tines, grass bags, wheels, rider deck wheels, seats, snow thrower skid shoes, friction wheels, shave plates, auger spiral rubber and tires. Damage resulting from the sale. Troy-Bilt warrants attachments for this warranty provide the sole and exclusive remedy arising from the installation or use of any implied warranty of merchantability or fitness for a period of thirty (30) days from state to misuse, abuse, commercial use or exposure. To locate...
... : batteries, belts, blades, blade adapters, tines, grass bags, wheels, rider deck wheels, seats, snow thrower skid shoes, friction wheels, shave plates, auger spiral rubber and tires. Damage resulting from the sale. Troy-Bilt warrants attachments for this warranty provide the sole and exclusive remedy arising from the installation or use of any implied warranty of merchantability or fitness for a period of thirty (30) days from state to misuse, abuse, commercial use or exposure. To locate...


