
Operation Manual
Page 3
...proper operation. Plan your eyes. Stop machine if anyone enters the area. 7. As with all instructions in this manual before starting to avoid discharge of the operator can result in personal injury. Never allow children under 14 years of yourself and others. Exercise...eye shields during operation and while performing an adjustment or repair to avoid slipping or falling, especially when operating in the manual(s) before starting the engine. 6. Training 1. When you see this machine. Read and follow all control levers before attempting to the eyes. 2....
...proper operation. Plan your eyes. Stop machine if anyone enters the area. 7. As with all instructions in this manual before starting to avoid discharge of the operator can result in personal injury. Never allow children under 14 years of yourself and others. Exercise...eye shields during operation and while performing an adjustment or repair to avoid slipping or falling, especially when operating in the manual(s) before starting the engine. 6. Training 1. When you see this machine. Read and follow all control levers before attempting to the eyes. 2....

Operation Manual
Page 4
... remove gas-powered equipment from your clothes which are explosive. Doing so makes the machine unsafe and may cause personal injury. When starting and operating. Broken bones, fractures, bruises or sprains could result. 3. assistance and the name of starter cord (kickback) will pull...it against the engine. Replace gasoline cap and tighten securely. i. slippery surfaces. before unclogging the chute assembly, making any damage before starting the engine. 13. Never put hands or feet near rotating parts, in handling gasoline. Never bypass its operation. If situations occur ...
... remove gas-powered equipment from your clothes which are explosive. Doing so makes the machine unsafe and may cause personal injury. When starting and operating. Broken bones, fractures, bruises or sprains could result. 3. assistance and the name of starter cord (kickback) will pull...it against the engine. Replace gasoline cap and tighten securely. i. slippery surfaces. before unclogging the chute assembly, making any damage before starting the engine. 13. Never put hands or feet near rotating parts, in handling gasoline. Never bypass its operation. If situations occur ...

Operation Manual
Page 5
...) if so equipped. Check fuel line, tank, cap, and fittings frequently for gas, oil, etc. Environmental Protection Agency (EPA), this manual. 2. Failure to prevent unintended starting. 3. If a spark arrestor is used, it to be sure the impeller blades have stopped rotating. 3. Federal laws apply on or near any unimproved forest-covered...
...) if so equipped. Check fuel line, tank, cap, and fittings frequently for gas, oil, etc. Environmental Protection Agency (EPA), this manual. 2. Failure to prevent unintended starting. 3. If a spark arrestor is used, it to be sure the impeller blades have stopped rotating. 3. Federal laws apply on or near any unimproved forest-covered...

Operation Manual
Page 11
...at the factory for shipping purposes. Stop the engine. Pivot the chute upward or downward before operating the snow thrower. Insert Key into engine and start engine. Caution: It is against the ground to the snow thrower and surrounding property. • For close snow removal on a smooth surface,... raise skid shoes higher on each side) and carriage bolts. Move skid shoes to operating the snow thrower. Chute Assembly (Models 2410 and 2620) NOTE: The upper chute on a gravel surface, keep the skid shoes in a straight path and the shave plate may wear unevenly. ...
...at the factory for shipping purposes. Stop the engine. Pivot the chute upward or downward before operating the snow thrower. Insert Key into engine and start engine. Caution: It is against the ground to the snow thrower and surrounding property. • For close snow removal on a smooth surface,... raise skid shoes higher on each side) and carriage bolts. Move skid shoes to operating the snow thrower. Chute Assembly (Models 2410 and 2620) NOTE: The upper chute on a gravel surface, keep the skid shoes in a straight path and the shave plate may wear unevenly. ...

Operation Manual
Page 12
... the auger. 4. See Fig. 3-18. Repeat steps 2 through 6 above to Engine Operator's Manual. 3. Prior to stop before releasing the auger control. In a well-ventilated area, start the snow thrower engine. While standing in the disengaged "up " position, walk to the operator's position and shut off the engine. Wait for approximately ten...
... the auger. 4. See Fig. 3-18. Repeat steps 2 through 6 above to Engine Operator's Manual. 3. Prior to stop before releasing the auger control. In a well-ventilated area, start the snow thrower engine. While standing in the disengaged "up " position, walk to the operator's position and shut off the engine. Wait for approximately ten...
Operation Manual
Page 13
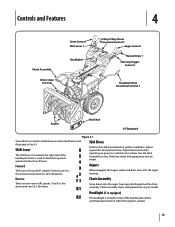
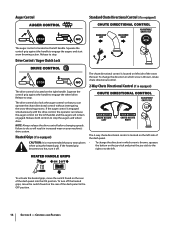
... the handle panel and is used to determine ground speed and direction of the handle panel and is automatically turned on when the engine is started. 13 Chute Assembly Snow drawn into the auger housing. Chute assembly styles and appearance vary by model. Adjust upward for hard-packed snow. Shift Lever...
... the handle panel and is used to determine ground speed and direction of the handle panel and is automatically turned on when the engine is started. 13 Chute Assembly Snow drawn into the auger housing. Chute assembly styles and appearance vary by model. Adjust upward for hard-packed snow. Shift Lever...
Operation Manual
Page 14
... equipped) Caution: It is located on the rear of the dash panel to stop the augers and wheel drive. Release to engage the augers and start snow throwing action. If the heated grip becomes too hot, turn off . Controls and Features The drive control also locks the auger control so that...
... equipped) Caution: It is located on the rear of the dash panel to stop the augers and wheel drive. Release to engage the augers and start snow throwing action. If the heated grip becomes too hot, turn off . Controls and Features The drive control also locks the auger control so that...

Operation Manual
Page 15
... chute assembly. 5. Section 4 - While standing in the chute assembly during operation, proceed as follows to the rear of the auger housing, reinsert the key and start the snow thrower's engine. Controls and Features 15 Shut off engine and remain behind the snow thrower), engage the auger control for a few seconds to...
... chute assembly. 5. Section 4 - While standing in the chute assembly during operation, proceed as follows to the rear of the auger housing, reinsert the key and start the snow thrower's engine. Controls and Features 15 Shut off engine and remain behind the snow thrower), engage the auger control for a few seconds to...

Operation Manual
Page 16
... (models equipped with . 2. If the augers will stop the augers. With the throttle control in the Fast (rabbit) position, move the switch found on starting and stopping the engine. See Fig. 5-2. Figure 5-2 Figure 5-1 16 Release it off the snow thrower's engine and remove the key prior to turn left ...handle. To Engage Augers To engage the augers and start throwing snow, squeeze the auger control against the handle the snow thrower will NOT be covered by your snow thrower for the snow conditions and...
... (models equipped with . 2. If the augers will stop the augers. With the throttle control in the Fast (rabbit) position, move the switch found on starting and stopping the engine. See Fig. 5-2. Figure 5-2 Figure 5-1 16 Release it off the snow thrower's engine and remove the key prior to turn left ...handle. To Engage Augers To engage the augers and start throwing snow, squeeze the auger control against the handle the snow thrower will NOT be covered by your snow thrower for the snow conditions and...

Operation Manual
Page 20
... self-tapping screws which acts as follows. See Fig. 7-3. 1. Remove the plastic belt cover on the auger housing. 5. Figure 7-3 6. Allow the engine to avoid unintended starting. 2. See Fig. 7-1. Loosen and remove the shoulder bolt which secure it rests on the front of fuel. See Fig. 7-2. Service 7 Belt Replacement Auger Belt To...
... self-tapping screws which acts as follows. See Fig. 7-3. 1. Remove the plastic belt cover on the auger housing. 5. Figure 7-3 6. Allow the engine to avoid unintended starting. 2. See Fig. 7-1. Loosen and remove the shoulder bolt which secure it rests on the front of fuel. See Fig. 7-2. Service 7 Belt Replacement Auger Belt To...
Operation Manual
Page 24
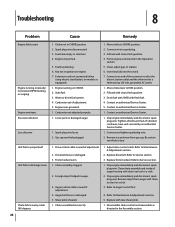
...damaged. 5. Clean chute assembly and inside of adjustment. 4. Spark plug wire disconnected. 3. Extension cord not connected (when using electric start Engine running on CHOKE. 2. Carburetor not adjusted properly. 1. Gas cap vent hole plugged. 1. Move choke lever to CHOKE position. ...Drain fuel tank. If vibration continues, have unit serviced by an authorized Service Center. 1. Troubleshooting 8 Problem Cause Remedy Engine fails to start button, on models so equipped). 1. Engine not primed. 5. Chute assembly clogged. 2. Shear pin(s) sheared. 1. Refer to easily ...
...damaged. 5. Clean chute assembly and inside of adjustment. 4. Spark plug wire disconnected. 3. Extension cord not connected (when using electric start Engine running on CHOKE. 2. Carburetor not adjusted properly. 1. Gas cap vent hole plugged. 1. Move choke lever to CHOKE position. ...Drain fuel tank. If vibration continues, have unit serviced by an authorized Service Center. 1. Troubleshooting 8 Problem Cause Remedy Engine fails to start button, on models so equipped). 1. Engine not primed. 5. Chute assembly clogged. 2. Shear pin(s) sheared. 1. Refer to easily ...


