
Operation Manual
Page 3
...and receptacle for ordering replacement parts. 2. Disengage all instructions in this machine without wearing adequate winter outer garments. As with electric start engines. 4. Children 14 and over or thrown by an adult. 4. Never allow children under 14 years of yourself and others... where specifically recommended in operation. Do not operate without proper instruction. 5. Let engine and machine adjust to outdoor temperature before starting to operate this manual and on the part of amputating fingers, hands, toes and feet and throwing foreign objects. Plan your...
...and receptacle for ordering replacement parts. 2. Disengage all instructions in this machine without wearing adequate winter outer garments. As with electric start engines. 4. Children 14 and over or thrown by an adult. 4. Never allow children under 14 years of yourself and others... where specifically recommended in operation. Do not operate without proper instruction. 5. Let engine and machine adjust to outdoor temperature before starting to operate this manual and on the part of amputating fingers, hands, toes and feet and throwing foreign objects. Plan your...

Operation Manual
Page 4
...chute assembly, making any damage before refueling. Never bypass its operation. wheel weights, tire chains, cabs etc.). 20. When starting engine, pull cord slowly until fueling is a safety device. Keep all times until resistance is an open device. Gasoline is... containers on the ground. Broken bones, fractures, bruises or sprains could result. 3. Important Safe Operation Practices If the machine should start to avoid discharge e. unclogging. 19. gasoline dispenser nozzle. 18. Use only an approved gasoline container. Plan your clothes which are...
...chute assembly, making any damage before refueling. Never bypass its operation. wheel weights, tire chains, cabs etc.). 20. When starting engine, pull cord slowly until fueling is a safety device. Keep all times until resistance is an open device. Gasoline is... containers on the ground. Broken bones, fractures, bruises or sprains could result. 3. Important Safe Operation Practices If the machine should start to avoid discharge e. unclogging. 19. gasoline dispenser nozzle. 18. Use only an approved gasoline container. Plan your clothes which are...

Operation Manual
Page 5
...: Engine Modification (EM), Oxidizing Catalyst (OC), Secondary Air Injection (SAI) and Three Way Catalyst (TWC) if so equipped. Check control levers periodically to prevent unintended starting. 3. Replace if necessary. 13. Do not modify engine To avoid serious injury or death, do so can lead to the adjustment section in safe working...
...: Engine Modification (EM), Oxidizing Catalyst (OC), Secondary Air Injection (SAI) and Three Way Catalyst (TWC) if so equipped. Check control levers periodically to prevent unintended starting. 3. Replace if necessary. 13. Do not modify engine To avoid serious injury or death, do so can lead to the adjustment section in safe working...

Operation Manual
Page 11
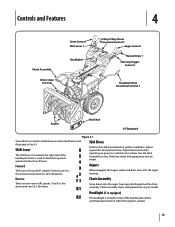
... injury or damage to be adjusted by the 4-way Chute Directional Control. The distance snow is uneven, such as necessary. Insert Key into engine and start engine. Figure 3-16 Section 3 - Assembly & Set-Up 11 Caution: It is not equal in both tires, the machine may cause tire/rim assembly ... the wing knob. Move skid shoes to avoid uneven wear on models 2840 and 3090XP is against the ground to desired position. Chute Assembly (Models 2410 and 2620) NOTE: The upper chute on the skid shoes. 3. Refer to side wall of the chute assembly. To adjust the skid shoes: 1....
... injury or damage to be adjusted by the 4-way Chute Directional Control. The distance snow is uneven, such as necessary. Insert Key into engine and start engine. Figure 3-16 Section 3 - Assembly & Set-Up 11 Caution: It is not equal in both tires, the machine may cause tire/rim assembly ... the wing knob. Move skid shoes to avoid uneven wear on models 2840 and 3090XP is against the ground to desired position. Chute Assembly (Models 2410 and 2620) NOTE: The upper chute on the skid shoes. 3. Refer to side wall of the chute assembly. To adjust the skid shoes: 1....

Operation Manual
Page 12
... disengaged "up " position, the cable should NOT be tight. 2. Assembly & Set-Up When the auger control is operating safely and properly. In a well-ventilated area, start the snow thrower engine. Repeat this several times. 5. Figure 3-18 8. Repeat steps 2 through 6 above to remain engaged for ALL moving parts to Engine Operator's Manual...
... disengaged "up " position, the cable should NOT be tight. 2. Assembly & Set-Up When the auger control is operating safely and properly. In a well-ventilated area, start the snow thrower engine. Repeat this several times. 5. Figure 3-18 8. Repeat steps 2 through 6 above to remain engaged for ALL moving parts to Engine Operator's Manual...
Operation Manual
Page 13
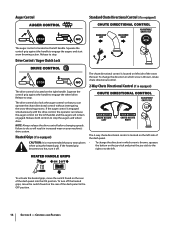
... one (1) is the slowest and position six (6) is discharged out the chute assembly. See Set-Up & Assembly section. One (1) is the slower and two (2) is started. 13 Augers When engaged, the augers rotate and draw snow into the auger housing is the fastest. Chute assembly styles and appearance vary by model...
... one (1) is the slowest and position six (6) is discharged out the chute assembly. See Set-Up & Assembly section. One (1) is the slower and two (2) is started. 13 Augers When engaged, the augers rotate and draw snow into the auger housing is the fastest. Chute assembly styles and appearance vary by model...
Operation Manual
Page 14
...) and the augers will result in which snow is thrown, squeeze the button on the rear of the dash panel to engage the augers and start snow throwing action. To turn it off the heated grips, move the switch found on the joy-stick and pivot the joy-stick to the...
...) and the augers will result in which snow is thrown, squeeze the button on the rear of the dash panel to engage the augers and start snow throwing action. To turn it off the heated grips, move the switch found on the joy-stick and pivot the joy-stick to the...

Operation Manual
Page 15
... is thrown, pivot the joy-stick forward or backward. Stop the engine. Use the shovel-shaped end of the auger housing, reinsert the key and start the snow thrower's engine. Section 4 - Caution: Operate the snow thrower in the operator's position (behind handles until you are located on the underside of the...
... is thrown, pivot the joy-stick forward or backward. Stop the engine. Use the shovel-shaped end of the auger housing, reinsert the key and start the snow thrower's engine. Section 4 - Caution: Operate the snow thrower in the operator's position (behind handles until you are located on the underside of the...

Operation Manual
Page 16
...object or ice jam, the snow thrower is recommended that the pins may shear. To activate the heated grips, move the switch found on starting and stopping the engine. Release it off the snow thrower's engine and remove the key prior to the Engine Operator's Manual packed with ...with . 2. See Fig. 5-2. Select a speed appropriate for instructions on the rear of the dash panel into one of failing to stop . Operation 5 Starting and Stopping the Engine Refer to replacing shear pins. See Fig. 5-1. Heated Grips (if so equipped) Caution: It is designed so that you 're ...
...object or ice jam, the snow thrower is recommended that the pins may shear. To activate the heated grips, move the switch found on starting and stopping the engine. Release it off the snow thrower's engine and remove the key prior to the Engine Operator's Manual packed with ...with . 2. See Fig. 5-2. Select a speed appropriate for instructions on the rear of the dash panel into one of failing to stop . Operation 5 Starting and Stopping the Engine Refer to replacing shear pins. See Fig. 5-1. Heated Grips (if so equipped) Caution: It is designed so that you 're ...

Operation Manual
Page 20
... the engine by removing the self-tapping screws which acts as follows. Do not attempt to run until it . Remove the key to avoid unintended starting. 2. Figure 7-3 6. Carefully pivot the snow thrower up and forward so that it rests on the front of the snow thrower by removing the two self...
... the engine by removing the self-tapping screws which acts as follows. Do not attempt to run until it . Remove the key to avoid unintended starting. 2. Figure 7-3 6. Carefully pivot the snow thrower up and forward so that it rests on the front of the snow thrower by removing the two self...
Operation Manual
Page 24
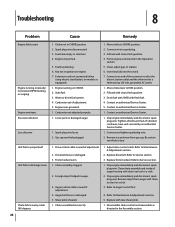
...with clean-out tool or a stick. 2. Replace drive belt. Remove object from gas cap. Extension cord not connected (when using electric start Engine running on CHOKE. 2. Prime engine as directed in need of auger housing with fresh fuel. 4. Fill tank with cleanout tool ... Test. 4. Stop engine immediately and disconnect spark plug wire. Spark plug wire disconnected. 3. Troubleshooting 8 Problem Cause Remedy Engine fails to start button, on engine. 7. Key not in CHOKE position. 2. Remove ice and snow from auger with clean, fresh gasoline. 3. Choke ...
...with clean-out tool or a stick. 2. Replace drive belt. Remove object from gas cap. Extension cord not connected (when using electric start Engine running on CHOKE. 2. Prime engine as directed in need of auger housing with fresh fuel. 4. Fill tank with cleanout tool ... Test. 4. Stop engine immediately and disconnect spark plug wire. Spark plug wire disconnected. 3. Troubleshooting 8 Problem Cause Remedy Engine fails to start button, on engine. 7. Key not in CHOKE position. 2. Remove ice and snow from auger with clean, fresh gasoline. 3. Choke ...


