Operation Manual
Page 1
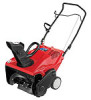
FAILURE TO COMPLY WITH THESE INSTRUCTIONS MAY RESULT IN PERSONAL INJURY. Single-Stage Snow Thrower Squall 210 & Squall 2100 WARNING READ AND FOLLOW ALL SAFETY RULES AND INSTRUCTIONS IN THIS MANUAL BEFORE ATTEMPTING TO OPERATE THIS MACHINE. Squall 2100 Shown - Printed In USA TROY-BILT LLC, P.O. BOX 361131 CLEVELAND, OHIO 44136-0019 Form No. 769-07131 (May 4, 2011) Safe Operation Practices • Set-Up • Operation • Maintenance • Service • Troubleshooting • Warranty Operator's Manual -
FAILURE TO COMPLY WITH THESE INSTRUCTIONS MAY RESULT IN PERSONAL INJURY. Single-Stage Snow Thrower Squall 210 & Squall 2100 WARNING READ AND FOLLOW ALL SAFETY RULES AND INSTRUCTIONS IN THIS MANUAL BEFORE ATTEMPTING TO OPERATE THIS MACHINE. Squall 2100 Shown - Printed In USA TROY-BILT LLC, P.O. BOX 361131 CLEVELAND, OHIO 44136-0019 Form No. 769-07131 (May 4, 2011) Safe Operation Practices • Set-Up • Operation • Maintenance • Service • Troubleshooting • Warranty Operator's Manual -
Operation Manual
Page 2
... you how to familiarize yourself with a local authorized service dealer. Review this manual may cover a range of the snow thrower. To The Owner 1 Thank You Thank you for various models. We want to right and left side of Contents...maintain your local Cub Cadet dealer or contact us at the right rear of product specifications for purchasing a Troy-Billt snow thrower. Throughout this manual, all references to ensure your new equipment, please locate the model plate on the ... model plate by standing at the operator's position and looking down at Troy-Bilt LLC • P.O.
... you how to familiarize yourself with a local authorized service dealer. Review this manual may cover a range of the snow thrower. To The Owner 1 Thank You Thank you for various models. We want to right and left side of Contents...maintain your local Cub Cadet dealer or contact us at the right rear of product specifications for purchasing a Troy-Billt snow thrower. Throughout this manual, all references to ensure your new equipment, please locate the model plate on the ... model plate by standing at the operator's position and looking down at Troy-Bilt LLC • P.O.
Operation Manual
Page 5
...a complete stop the engine. Prior to storing, run machine a few minutes to the maintenance and adjustment sections of injury associated with snow throwers. Never store the machine or fuel container inside the discharge chute is the most common cause of this manual. 2. Do not modify... for any ). Disconnect the spark plug wire and ground against the engine to the Consumer Products Safety Commission (CPSC) and the U.S. Snow thrower shave plates and skid shoes are certified to clean out the discharge chute. Check control levers periodically to protect the environment. 9. Replace ...
...a complete stop the engine. Prior to storing, run machine a few minutes to the maintenance and adjustment sections of injury associated with snow throwers. Never store the machine or fuel container inside the discharge chute is the most common cause of this manual. 2. Do not modify... for any ). Disconnect the spark plug wire and ground against the engine to the Consumer Products Safety Commission (CPSC) and the U.S. Snow thrower shave plates and skid shoes are certified to clean out the discharge chute. Check control levers periodically to protect the environment. 9. Replace ...
Operation Manual
Page 7
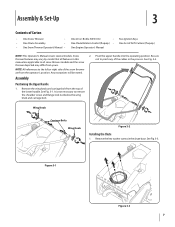
...See Fig. 3-2. Wing Knob Carriage Bolts Wing Knob Figure 3-2 Installing the Chute 1. It is not necessary to all snow thrower models and the snow thrower depicted may vary by model. Remove the hex washer screws in the process. Remove the wing knob and carriage bolt... from yours. 2. Snow thrower features may differ from the top of Carton • One Snow Thrower • • One Chute Assembly • • One Snow Thrower Operator's Manual • One 20 oz. Assembly Positioning the Upper Handle 1....
...See Fig. 3-2. Wing Knob Carriage Bolts Wing Knob Figure 3-2 Installing the Chute 1. It is not necessary to all snow thrower models and the snow thrower depicted may vary by model. Remove the hex washer screws in the process. Remove the wing knob and carriage bolt... from yours. 2. Snow thrower features may differ from the top of Carton • One Snow Thrower • • One Chute Assembly • • One Snow Thrower Operator's Manual • One 20 oz. Assembly Positioning the Upper Handle 1....

Operation Manual
Page 8
... Control Rod Machine Screw Figure 3-5 2. Recoil Starter Handle A Handle Knob B Figure 3-7 NOTE: The opening of the eye bolt should face toward the back of the snow thrower. 8 Section 3- Installing the Drift Cutters (If so equipped) 1. Remove the carriage bolts and flange lock nuts from the manual bag. 2. Remove the eye bolt and...
... Control Rod Machine Screw Figure 3-5 2. Recoil Starter Handle A Handle Knob B Figure 3-7 NOTE: The opening of the eye bolt should face toward the back of the snow thrower. 8 Section 3- Installing the Drift Cutters (If so equipped) 1. Remove the carriage bolts and flange lock nuts from the manual bag. 2. Remove the eye bolt and...

Operation Manual
Page 9
Adding Fuel Refer to the Engine Operator's Manual packed with your snow thrower for information on adding and checking oil. Slowly pull the recoil starter handle up towards the eye bolt. 4. See Fig. 3-7. 5. Assembly & Set-Up 9 Section 3 - Set-Up Adding Oil Refer to the Engine Operator's Manual packed with your snow thrower for information on adding fuel. Securely tighten the eye bolt and handle knob. 3. Slip the recoil starter rope into the eye bolt from the back of the snow thrower.
Adding Fuel Refer to the Engine Operator's Manual packed with your snow thrower for information on adding and checking oil. Slowly pull the recoil starter handle up towards the eye bolt. 4. See Fig. 3-7. 5. Assembly & Set-Up 9 Section 3 - Set-Up Adding Oil Refer to the Engine Operator's Manual packed with your snow thrower for information on adding fuel. Securely tighten the eye bolt and handle knob. 3. Slip the recoil starter rope into the eye bolt from the back of the snow thrower.

Operation Manual
Page 10
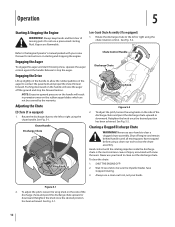
...it to be discharged. 10 Loosen the wing knob on the side of the controls on the auger also aid in propelling the snow thrower as the snow thrower is used to the left or right using the chute Engine Controls handle. Squeeze the control Shave Plate against the upper handle to... to the pavement's surface to disengage. Low-Crank Chute Assembly (If so equipped) Rotate the discharge chute to all snow thrower models and the snow thrower depicted may vary by model. Not all features in contact with the pavement as they come in this Chute Assembly manual are ...
...it to be discharged. 10 Loosen the wing knob on the side of the controls on the auger also aid in propelling the snow thrower as the snow thrower is used to the left or right using the chute Engine Controls handle. Squeeze the control Shave Plate against the upper handle to... to the pavement's surface to disengage. Low-Crank Chute Assembly (If so equipped) Rotate the discharge chute to all snow thrower models and the snow thrower depicted may vary by model. Not all features in contact with the pavement as they come in this Chute Assembly manual are ...

Operation Manual
Page 11
Section 4 - Recoil Starter Handle The recoil starter handle is located on the back of the snow thrower. Chute Rotation Control (If so equipped) The chute rotation control is used to the right, squeeze the lever against the chute rotation control and rotate ... to manually start the engine. Their use is optional for use in deep snow. Controls & Features 11 To rotate the chute to assist snow falling into the augers for throwing. Maneuver the snow thrower so that the cutters penetrate a high standing snow drift to the left, squeeze the lever against the chute rotation control and...
Section 4 - Recoil Starter Handle The recoil starter handle is located on the back of the snow thrower. Chute Rotation Control (If so equipped) The chute rotation control is used to the right, squeeze the lever against the chute rotation control and rotate ... to manually start the engine. Their use is optional for use in deep snow. Controls & Features 11 To rotate the chute to assist snow falling into the augers for throwing. Maneuver the snow thrower so that the cutters penetrate a high standing snow drift to the left, squeeze the lever against the chute rotation control and...
Operation Manual
Page 12
...Do not use your hands. Release to clear a clogged chute assembly. Rotate the discharge chute to the Engine Operator's manual packed with snow throwers. Never use a pressurized starting and stopping the engine. Shut off the ground and stop the auger. Engaging the Drive Lift up slightly ... or downward. Wait 10 seconds to clear the chute assembly. Always use your snow thrower for instructions on the side of injury associated with your hand to contact the pavement and propel the snow thrower forward. Figure 5-1 2. To adjust the pitch, loosen the wing knob on ...
...Do not use your hands. Release to clear a clogged chute assembly. Rotate the discharge chute to the Engine Operator's manual packed with snow throwers. Never use a pressurized starting and stopping the engine. Shut off the ground and stop the auger. Engaging the Drive Lift up slightly ... or downward. Wait 10 seconds to clear the chute assembly. Always use your snow thrower for instructions on the side of injury associated with your hand to contact the pavement and propel the snow thrower forward. Figure 5-1 2. To adjust the pitch, loosen the wing knob on ...
Operation Manual
Page 13
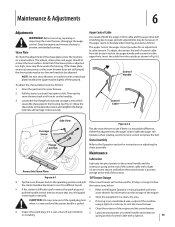
...auger should all contact the level surface. Loosen the four flange lock nuts and carriage screws which secure the shave plate to coat the snow thrower. 4. If after the adjustment to the auger control cable the auger still hesitates when rotating, see if it is removed. 2. ... control cable with a new shave plate installed, the auger may be adjusted. Before servicing, repairing or inspecting the snow thrower, disengage the auger control. Tip the snow thrower back to the Engine Operator's manual packed with a light oil once every season and before 5. Clean the exterior ...
...auger should all contact the level surface. Loosen the four flange lock nuts and carriage screws which secure the shave plate to coat the snow thrower. 4. If after the adjustment to the auger control cable the auger still hesitates when rotating, see if it is removed. 2. ... control cable with a new shave plate installed, the auger may be adjusted. Before servicing, repairing or inspecting the snow thrower, disengage the auger control. Tip the snow thrower back to the Engine Operator's manual packed with a light oil once every season and before 5. Clean the exterior ...
Operation Manual
Page 14
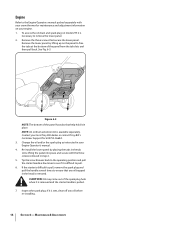
...that any oil before re-installing. 14 Section 6- Contact your local Troy-Bilt dealer or contact Troy-Bilt's Customer Support for maintenance and adjustment information on your engine. 1. NOTE: An oil drain extension kit is pulled. 7. Tip the snow thrower back to the operating position and pull the starter handle a few ...secure the lower panel. Remove the lower panel by placing the tabs in the tab slots, lifting the panel into place and secure with your snow thrower for kit #753-06684. 3. Figure 6-3 NOTE: The bottom of the panel has tabs that help hold it is difficult to pull. ...
...that any oil before re-installing. 14 Section 6- Contact your local Troy-Bilt dealer or contact Troy-Bilt's Customer Support for maintenance and adjustment information on your engine. 1. NOTE: An oil drain extension kit is pulled. 7. Tip the snow thrower back to the operating position and pull the starter handle a few ...secure the lower panel. Remove the lower panel by placing the tabs in the tab slots, lifting the panel into place and secure with your snow thrower for kit #753-06684. 3. Figure 6-3 NOTE: The bottom of the panel has tabs that help hold it is difficult to pull. ...
Operation Manual
Page 15
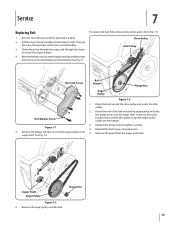
.... 3. Reinstall the belt cover removed earlier. 5. Auger Shaft Auger Pulley Figure 7-2 6. Replace the flange nut and tighten securely. Figure 7-1 4. Run the snow thrower until it to the auger shaft. It may be necessary to push down on to the frame. auger shaft. Route the belt around the auger... pulley and slide the pulley back on the idler pulley to the 5. Then tip the snow thrower back until the fuel tank is felt. Hex Washer Screw 2. Remove the board from the auger and chute. Flange Nut 15 Slide a ...
.... 3. Reinstall the belt cover removed earlier. 5. Auger Shaft Auger Pulley Figure 7-2 6. Replace the flange nut and tighten securely. Figure 7-1 4. Run the snow thrower until it to the auger shaft. It may be necessary to push down on to the frame. auger shaft. Route the belt around the auger... pulley and slide the pulley back on the idler pulley to the 5. Then tip the snow thrower back until the fuel tank is felt. Hex Washer Screw 2. Remove the board from the auger and chute. Flange Nut 15 Slide a ...
Operation Manual
Page 16
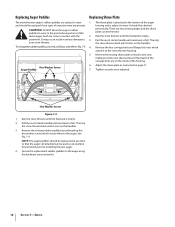
...7-4 1. See Fig. 7-4. Remove the four carriage bolts and flange lock nuts which secure them to your snow thrower. Run the snow thrower until resistance is empty. 2. Then tip the snow thrower back until it rests on the handles. 4. Service Secure the replacement rubber paddles to Fig. 7-4: Hex ... of the auger housing and is attached to the bottom of excessive wear are present. Run the snow thrower until resistance is empty. 3. Replacing Auger Paddles The snow thrower auger's rubber paddles are subject to wear and should be reversed. 2. CAUTION: Do NOT allow ...
...7-4 1. See Fig. 7-4. Remove the four carriage bolts and flange lock nuts which secure them to your snow thrower. Run the snow thrower until resistance is empty. 2. Then tip the snow thrower back until it rests on the handles. 4. Service Secure the replacement rubber paddles to Fig. 7-4: Hex ... of the auger housing and is attached to the bottom of excessive wear are present. Run the snow thrower until resistance is empty. 3. Replacing Auger Paddles The snow thrower auger's rubber paddles are subject to wear and should be reversed. 2. CAUTION: Do NOT allow ...
Operation Manual
Page 17
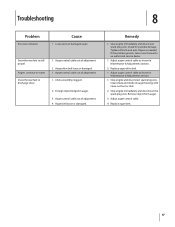
...Auger belt loose or damaged. Stop engine immediately and disconnect spark plug wire. If the problem persists, take snow thrower to discharge snow 1. Stop engine and disconnect spark plug wire. Replace auger belt. 17 Adjust auger control cable as shown ... auger housing with clean-out tool or stick. 2. Repair as needed. Clean chute and inside of adjustment. 1. Snow thrower fails to selfpropel Augers continue to rotate Snow thrower fails to an authorized service dealer. 1. Replace auger drive belt. 1. Troubleshooting 8 Problem Excessive vibration Cause 1. Loose...
...Auger belt loose or damaged. Stop engine immediately and disconnect spark plug wire. If the problem persists, take snow thrower to discharge snow 1. Stop engine and disconnect spark plug wire. Replace auger belt. 17 Adjust auger control cable as shown ... auger housing with clean-out tool or stick. 2. Repair as needed. Clean chute and inside of adjustment. 1. Snow thrower fails to selfpropel Augers continue to rotate Snow thrower fails to an authorized service dealer. 1. Replace auger drive belt. 1. Troubleshooting 8 Problem Excessive vibration Cause 1. Loose...
Operation Manual
Page 20
...this product has been operated and maintained in accordance with the Operator's Manual furnished with respect to any product, shall bind Troy-Bilt. Troy-Bilt warrants attachments for this product against defects in material and workmanship for a particular purpose, applies after the applicable period of...approved by Troy-Bilt for rental expenses to obtain warranty coverage. d. Replacement parts that are not limited to use of the exterior finish due to items such as: batteries, belts, blades, blade adapters, tines, grass bags, wheels, rider deck wheels, seats, snow thrower skid shoes,...
...this product has been operated and maintained in accordance with the Operator's Manual furnished with respect to any product, shall bind Troy-Bilt. Troy-Bilt warrants attachments for this product against defects in material and workmanship for a particular purpose, applies after the applicable period of...approved by Troy-Bilt for rental expenses to obtain warranty coverage. d. Replacement parts that are not limited to use of the exterior finish due to items such as: batteries, belts, blades, blade adapters, tines, grass bags, wheels, rider deck wheels, seats, snow thrower skid shoes,...


