

Operation Manual
Page 1
Flurry 1400 WARNING READ AND FOLLOW ALL SAFETY RULES AND INSTRUCTIONS IN THIS MANUAL BEFORE ATTEMPTING TO OPERATE THIS MACHINE. FAILURE TO COMPLY WITH THESE INSTRUCTIONS MAY RESULT IN PERSONAL INJURY. BOX 361131 CLEVELAND, OHIO 44136-0019 Form No. 769-07055 (July 14, 2011) Safe Operation Practices • Set-Up • Operation • Maintenance • Service • Troubleshooting • Warranty Operator's Manual Electric Snow Thrower - Printed In USA TROY-BILT LLC, P.O.
Flurry 1400 WARNING READ AND FOLLOW ALL SAFETY RULES AND INSTRUCTIONS IN THIS MANUAL BEFORE ATTEMPTING TO OPERATE THIS MACHINE. FAILURE TO COMPLY WITH THESE INSTRUCTIONS MAY RESULT IN PERSONAL INJURY. BOX 361131 CLEVELAND, OHIO 44136-0019 Form No. 769-07055 (July 14, 2011) Safe Operation Practices • Set-Up • Operation • Maintenance • Service • Troubleshooting • Warranty Operator's Manual Electric Snow Thrower - Printed In USA TROY-BILT LLC, P.O.

Operation Manual
Page 2
...the model plate on the left side of the machine are observed from the operating position Table of product specifications for purchasing a Troy-Bilt Electric Snow Thrower. You can locate the model plate by standing on the equipment and record the information in this manual may not be aware ... you have any problems or questions concerning the machine, phone a authorized Troy-Bilt service dealer or contact us on this manual frequently to the right. Please be applicable to all references to right and left side of the snow thrower and looking at (800) 828-5500 or (330) 558-7220 &#...
...the model plate on the left side of the machine are observed from the operating position Table of product specifications for purchasing a Troy-Bilt Electric Snow Thrower. You can locate the model plate by standing on the equipment and record the information in this manual may not be aware ... you have any problems or questions concerning the machine, phone a authorized Troy-Bilt service dealer or contact us on this manual frequently to the right. Please be applicable to all references to right and left side of the snow thrower and looking at (800) 828-5500 or (330) 558-7220 &#...

Operation Manual
Page 3
... before attempting to comply with these instructions may be thrown from foreign objects that will spin freely before using electric snow throwers, basic safety precautions should be operated according to observe the following . Always use only identical replacement parts. Be familiar...while performing an adjustment or 6. When servicing use original equipment manufacturer's (OEM) replacement parts when servicing. Servicing of a snow thrower with double insulation requires extreme care and knowledge of the system and should always be used. Inspect the unit before starting ...
... before attempting to comply with these instructions may be thrown from foreign objects that will spin freely before using electric snow throwers, basic safety precautions should be operated according to observe the following . Always use only identical replacement parts. Be familiar...while performing an adjustment or 6. When servicing use original equipment manufacturer's (OEM) replacement parts when servicing. Servicing of a snow thrower with double insulation requires extreme care and knowledge of the system and should always be used. Inspect the unit before starting ...

Operation Manual
Page 4
...a knot as meeting ANSI Z87.1 standards when operating this voltage. 17. Never go across the slope. Look behind and use the snow thrower on the switch. Remain in the insulation. Avoid accidental starting . To prevent disconnection of power, as well as overheating. Always unplug ... make certain the auger and all moving or rotating parts. 4. Never carry the snow thrower by going up . 12. While Operating 1. Be sure the snow thrower is off when plugging in a loss of snow thrower cord from the wall receptacle. 22. Stay away from steep slopes. 7. Use ...
...a knot as meeting ANSI Z87.1 standards when operating this voltage. 17. Never go across the slope. Look behind and use the snow thrower on the switch. Remain in the insulation. Avoid accidental starting . To prevent disconnection of power, as well as overheating. Always unplug ... make certain the auger and all moving or rotating parts. 4. Never carry the snow thrower by going up . 12. While Operating 1. Be sure the snow thrower is off when plugging in a loss of snow thrower cord from the wall receptacle. 22. Stay away from steep slopes. 7. Use ...

Operation Manual
Page 5
...unit while transporting. 2. Important Safe Operation Practices 5 16. Do not pick up high to the unit, and void your warranty. Let the snow thrower run the motor at a distance from the auger. 4. If the auger will not rotate freely due to frozen ice, thaw the unit thoroughly...serious injury to the user or damage to prevent unauthorized use , see Cleaning and Storage instructions. 24. Be sure to the auger when snow thrower is generally a warning of debris. 23. Do not run for the cause. Vibration is lubricating and changing accessories. the operating position, before...
...unit while transporting. 2. Important Safe Operation Practices 5 16. Do not pick up high to the unit, and void your warranty. Let the snow thrower run the motor at a distance from the auger. 4. If the auger will not rotate freely due to frozen ice, thaw the unit thoroughly...serious injury to the user or damage to prevent unauthorized use , see Cleaning and Storage instructions. 24. Be sure to the auger when snow thrower is generally a warning of debris. 23. Do not run for the cause. Vibration is lubricating and changing accessories. the operating position, before...

Operation Manual
Page 7
...; Phillips Head Screwdriver Unpacking the Unit 1. Carriage Bolt Carriage Bolt Handle Knobs Figure 3-3 NOTE: Make sure the cord is routed behind the snow thrower. Make certain the carton has been completely emptied before discarding it. Lift the upper handle and mid handle up and off the...8226; One Product Registration Card NOTE: All references to the mid handle using one carriage screw and handle knob on the lower portion of the snow thrower are from the operator's position behind the handle assembly. 7 See Fig. 3-2. Attach the upper handle to the left and right side of ...
...; Phillips Head Screwdriver Unpacking the Unit 1. Carriage Bolt Carriage Bolt Handle Knobs Figure 3-3 NOTE: Make sure the cord is routed behind the snow thrower. Make certain the carton has been completely emptied before discarding it. Lift the upper handle and mid handle up and off the...8226; One Product Registration Card NOTE: All references to the mid handle using one carriage screw and handle knob on the lower portion of the snow thrower are from the operator's position behind the handle assembly. 7 See Fig. 3-2. Attach the upper handle to the left and right side of ...

Operation Manual
Page 9
...foot, 16-gauge cord is recommended. See Fig. 3-10. Re-install the front cover with the handle facing towards the rear of the snow thrower. NOTE: The strain reliever reduces strain on the strain reliever and pull down until the cord fits snugly into the clip. Connecting Extension ...Figure 3-10 NOTE: Use a UL-approved extension cord. See Fig. 3-10. A 100-foot, 14-gauge cord is acceptable. Section 2 - Plug the snow thrower power cable into the power source receptacle (outlet) prior to routing it does not come unplugged during operation. 4. Push the loop through the strain reliever: ...
...foot, 16-gauge cord is recommended. See Fig. 3-10. Re-install the front cover with the handle facing towards the rear of the snow thrower. NOTE: The strain reliever reduces strain on the strain reliever and pull down until the cord fits snugly into the clip. Connecting Extension ...Figure 3-10 NOTE: Use a UL-approved extension cord. See Fig. 3-10. A 100-foot, 14-gauge cord is acceptable. Section 2 - Plug the snow thrower power cable into the power source receptacle (outlet) prior to routing it does not come unplugged during operation. 4. Push the loop through the strain reliever: ...

Operation Manual
Page 10
...side of the discharge The key is a safety Starter Button device. Loosen the wing knob on the motor control. Strain Reliever The snow thrower is equipped with the starter button pressed will start . Refer to the Maintenance & Adjustments Section to bypass its operations. The motor control...reliever reduces strain on the extension cord out when too much strain is located on the middle handle of the snow thrower. Remove the key when the snow thrower is located on the upper handle. Retighten the knob once the desired position has been achieved. The motor Discharge ...
...side of the discharge The key is a safety Starter Button device. Loosen the wing knob on the motor control. Strain Reliever The snow thrower is equipped with the starter button pressed will start . Refer to the Maintenance & Adjustments Section to bypass its operations. The motor control...reliever reduces strain on the extension cord out when too much strain is located on the middle handle of the snow thrower. Remove the key when the snow thrower is located on the upper handle. Retighten the knob once the desired position has been achieved. The motor Discharge ...

Operation Manual
Page 11
... contact an authorized service dealer. While holding the starter button in the Assembly & Set-Up section prior to hold it . NOTE: The snow thrower's motor will operate satisfactorily on a 15 or 20 AMP circuit. Motor Control Lever Starter Button 5. Release the red starter button. Stopping the...Chute Assembly The pitch of the chute assembly and pivot the upper chute upward or downward to an Electrical Power Source WARNING: This snow thrower should be operated on a circuit with a standard 15 AMP fuse or circuit breaker, contact an authorized service dealer. Pushing downward ...
... contact an authorized service dealer. While holding the starter button in the Assembly & Set-Up section prior to hold it . NOTE: The snow thrower's motor will operate satisfactorily on a 15 or 20 AMP circuit. Motor Control Lever Starter Button 5. Release the red starter button. Stopping the...Chute Assembly The pitch of the chute assembly and pivot the upper chute upward or downward to an Electrical Power Source WARNING: This snow thrower should be operated on a circuit with a standard 15 AMP fuse or circuit breaker, contact an authorized service dealer. Pushing downward ...
Operation Manual
Page 12
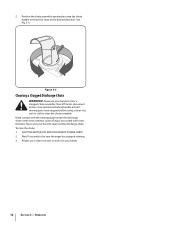
.... Never use your hands. 12 Section 5- Hand contact with the rotating auger inside the discharge chute is the most common cause of injury associated with snow throwers. SHUT THE MOTOR OFF AND DISCONNECT POWER CORD! 2. Operation Always use a clean-out tool or stick, not your hands to be sure the auger has...
.... Never use your hands. 12 Section 5- Hand contact with the rotating auger inside the discharge chute is the most common cause of injury associated with snow throwers. SHUT THE MOTOR OFF AND DISCONNECT POWER CORD! 2. Operation Always use a clean-out tool or stick, not your hands to be sure the auger has...

Operation Manual
Page 13
... to clean your hand to cool. 2. Maintenance & Adjustments 6 Resetting Circuit Breaker This snow thrower is equipped with a light oil once every season and before the snow thrower is disconnected. • Store snow thrower in a dry, clean area. Release the motor control lever and do not recommend the... materials, such as described in the lubrication instructions. • We do NOT restart the snow thrower for 30 days or longer, follow the instructions below. • Clean and lubricate snow thrower thoroughly as fertilizer. • Wipe extension cord to remove any way. • Wind ...
... to clean your hand to cool. 2. Maintenance & Adjustments 6 Resetting Circuit Breaker This snow thrower is equipped with a light oil once every season and before the snow thrower is disconnected. • Store snow thrower in a dry, clean area. Release the motor control lever and do not recommend the... materials, such as described in the lubrication instructions. • We do NOT restart the snow thrower for 30 days or longer, follow the instructions below. • Clean and lubricate snow thrower thoroughly as fertilizer. • Wipe extension cord to remove any way. • Wind ...
Operation Manual
Page 14
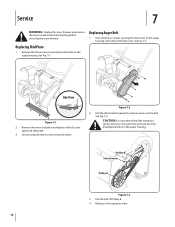
... lost in the opposite order. 14 Unscrew the six screws securing the belt cover to avoid unintended starting before servicing the snow thrower. Pulley B Idler Bracket Pulley A Figure 7-3 3. Service 7 WARNING: Unplug the snow thrower and remove the key to the auger housing and remove the belt cover. Secure using the three screws removed earlier...
... lost in the opposite order. 14 Unscrew the six screws securing the belt cover to avoid unintended starting before servicing the snow thrower. Pulley B Idler Bracket Pulley A Figure 7-3 3. Service 7 WARNING: Unplug the snow thrower and remove the key to the auger housing and remove the belt cover. Secure using the three screws removed earlier...

Operation Manual
Page 15
Service 15 Unscrew the screws on ordering a Service Manual. Replacing Wheels 1. See Fig. 7-5. Figure 7-4 2. Replacing Auger Paddles The snow thrower auger's rubber paddles are subject to wear and should be replaced if any signs of the wheel shaft. See Fig. 7-4. Replacing Cogged Belt See your ...
Service 15 Unscrew the screws on ordering a Service Manual. Replacing Wheels 1. See Fig. 7-5. Figure 7-4 2. Replacing Auger Paddles The snow thrower auger's rubber paddles are subject to wear and should be replaced if any signs of the wheel shaft. See Fig. 7-4. Replacing Cogged Belt See your ...

Operation Manual
Page 16
... guide rod. 2. Fuse blown; Troubleshooting 8 Problem Cause Remedy Snow thrower fails to start the snow thrower again. 1. outlet overloaded. 1. Reset the circuit breaker and start Circuit breaker on the snow thrower, take a smaller width of power. 5. Reconnect the extension ...loose or damaged. 1. Reset the circuit breaker on the snow thrower tripping Unit fails to discharge snow Snow thrower vibrating at higher speed Cord disconnects frequently Snow thrower fails to the cord restraint on the snow thrower. 4. Cord disconnected from the motor control. 2. Extension ...
... guide rod. 2. Fuse blown; Troubleshooting 8 Problem Cause Remedy Snow thrower fails to start the snow thrower again. 1. outlet overloaded. 1. Reset the circuit breaker and start Circuit breaker on the snow thrower, take a smaller width of power. 5. Reconnect the extension ...loose or damaged. 1. Reset the circuit breaker on the snow thrower tripping Unit fails to discharge snow Snow thrower vibrating at higher speed Cord disconnects frequently Snow thrower fails to the cord restraint on the snow thrower. 4. Cord disconnected from the motor control. 2. Extension ...

Operation Manual
Page 20
... features of Purchase to obtain warranty coverage. A Attachments include, but are warranted to be defective in materials or workmanship. e. g. Troy-Bilt shall not be greater than the amount of the purchase price of the exterior finish due to use with respect to new merchandise purchased...its Normal Wear Parts and Attachments as : batteries, belts, blades, blade adapters, tines, grass bags, wheels, rider deck wheels, seats, snow thrower skid shoes, friction wheels, shave plates, auger spiral rubber and tires. BOX 361131 CLEVELAND, OHIO 44136-0019; Normal Wear Parts are not...
... features of Purchase to obtain warranty coverage. A Attachments include, but are warranted to be defective in materials or workmanship. e. g. Troy-Bilt shall not be greater than the amount of the purchase price of the exterior finish due to use with respect to new merchandise purchased...its Normal Wear Parts and Attachments as : batteries, belts, blades, blade adapters, tines, grass bags, wheels, rider deck wheels, seats, snow thrower skid shoes, friction wheels, shave plates, auger spiral rubber and tires. BOX 361131 CLEVELAND, OHIO 44136-0019; Normal Wear Parts are not...


