

Operation Manual
Page 1
BOX 361131 CLEVELAND, OHIO 44136-0019 Form No. 769-07055 (July 14, 2011) FAILURE TO COMPLY WITH THESE INSTRUCTIONS MAY RESULT IN PERSONAL INJURY. Printed In USA TROY-BILT LLC, P.O. Flurry 1400 WARNING READ AND FOLLOW ALL SAFETY RULES AND INSTRUCTIONS IN THIS MANUAL BEFORE ATTEMPTING TO OPERATE THIS MACHINE. Safe Operation Practices • Set-Up • Operation • Maintenance • Service • Troubleshooting • Warranty Operator's Manual Electric Snow Thrower -
BOX 361131 CLEVELAND, OHIO 44136-0019 Form No. 769-07055 (July 14, 2011) FAILURE TO COMPLY WITH THESE INSTRUCTIONS MAY RESULT IN PERSONAL INJURY. Printed In USA TROY-BILT LLC, P.O. Flurry 1400 WARNING READ AND FOLLOW ALL SAFETY RULES AND INSTRUCTIONS IN THIS MANUAL BEFORE ATTEMPTING TO OPERATE THIS MACHINE. Safe Operation Practices • Set-Up • Operation • Maintenance • Service • Troubleshooting • Warranty Operator's Manual Electric Snow Thrower -

Operation Manual
Page 2
... machine. Throughout this page. If you , and any questions regarding the controls, operation, or maintenance of Contents Safe Operation Practices 3 Assembly & Set-Up 7 Controls & Features 10 Operation 11 Maintenance & Adjustment 13 Service 14 Troubleshooting 16 Replacement Parts 17 Warranty Back Cover Record Product Information Before setting up , operate and maintain your new equipment, please locate the model plate on this manual, all times. We reserve the right to provide excellent performance when properly...
... machine. Throughout this page. If you , and any questions regarding the controls, operation, or maintenance of Contents Safe Operation Practices 3 Assembly & Set-Up 7 Controls & Features 10 Operation 11 Maintenance & Adjustment 13 Service 14 Troubleshooting 16 Replacement Parts 17 Warranty Back Cover Record Product Information Before setting up , operate and maintain your new equipment, please locate the model plate on this manual, all times. We reserve the right to provide excellent performance when properly...

Operation Manual
Page 3
...) replacement parts when servicing. DANGER: This machine was built to protect eyes from the internal metal motor components with adult supervision. 11. READ ALL INSTRUCTIONS Double Insulated Snow Thrower Double insulation is running. 5. Dress properly. Keep children and other foreign objects which eliminates the need for the usual three-wire grounded power cord and grounded power supply system. Wear footwear that doesn't leak when operating...
...) replacement parts when servicing. DANGER: This machine was built to protect eyes from the internal metal motor components with adult supervision. 11. READ ALL INSTRUCTIONS Double Insulated Snow Thrower Double insulation is running. 5. Dress properly. Keep children and other foreign objects which eliminates the need for the usual three-wire grounded power cord and grounded power supply system. Wear footwear that doesn't leak when operating...

Operation Manual
Page 4
... that your unit will perform at high speeds on slippery surfaces. The smaller the gauge number, the heavier the cord. Clear snow from the extension cord during operation by going up . 12. Keep children and pets away. 10. WARNING: To prevent electric shock use only with your finger on the switch. Use caution when changing directions. Never operate the snow thrower near glass enclosures, automobiles, trucks...
... that your unit will perform at high speeds on slippery surfaces. The smaller the gauge number, the heavier the cord. Clear snow from the extension cord during operation by going up . 12. Keep children and pets away. 10. WARNING: To prevent electric shock use only with your finger on the switch. Use caution when changing directions. Never operate the snow thrower near glass enclosures, automobiles, trucks...

Operation Manual
Page 5
... use this tool for this unit, also 26. Use the right tool. Turn the motor off , 25. Clean after clearing snow so moving parts do not freeze. Always stop the unit and check immediately for damage. Maintain snow throwers with the motor running . Important Safe Operation Practices 5 Do not overreach. Do not pick up high to the auger when snow thrower is generally a warning of children. 3. contact your authorized service...
... use this tool for this unit, also 26. Use the right tool. Turn the motor off , 25. Clean after clearing snow so moving parts do not freeze. Always stop the unit and check immediately for damage. Maintain snow throwers with the motor running . Important Safe Operation Practices 5 Do not overreach. Do not pick up high to the auger when snow thrower is generally a warning of children. 3. contact your authorized service...

Operation Manual
Page 6
... attempting to assemble and operate. Important Safe Operation Practices ROTATING BLADES Keep hands out of this power machine to persons who read, understand and follow all instructions on the machine. Symbol Description READ THE OPERATOR'S MANUAL(S) Read, understand, and follow the warnings and instructions in the auger/impeller housing or chute assembly. ROTATING AUGER Do not put hands or feet near rotating parts, in this...
... attempting to assemble and operate. Important Safe Operation Practices ROTATING BLADES Keep hands out of this power machine to persons who read, understand and follow all instructions on the machine. Symbol Description READ THE OPERATOR'S MANUAL(S) Read, understand, and follow the warnings and instructions in the auger/impeller housing or chute assembly. ROTATING AUGER Do not put hands or feet near rotating parts, in this...

Operation Manual
Page 7
... discarding it. See Fig. 3-2. Carriage Bolt Carriage Bolt Handle Knobs Figure 3-3 NOTE: Make sure the cord is routed behind the snow thrower. See Fig. 3-1. Assembly & Set-Up 3 Contents of Carton • One Electric Snow Thrower • One Chute Assembly • One Upper Handle • One Electric Snow Thrower Operator's Manual • One Mid Handle • One Product Registration Card NOTE: All references to the mid handle using one carriage screw and handle knob on the ground.
... discarding it. See Fig. 3-2. Carriage Bolt Carriage Bolt Handle Knobs Figure 3-3 NOTE: Make sure the cord is routed behind the snow thrower. See Fig. 3-1. Assembly & Set-Up 3 Contents of Carton • One Electric Snow Thrower • One Chute Assembly • One Upper Handle • One Electric Snow Thrower Operator's Manual • One Mid Handle • One Product Registration Card NOTE: All references to the mid handle using one carriage screw and handle knob on the ground.

Operation Manual
Page 8
... of the chute. Assembly & Set-Up Chute Assembly 1. Chute Assembly Carriage Bolt Front Cover Handle Knobs Carriage Bolt Screw Figure 3-4 Figure 3-6 5. Remove the front cover and the chute. Insert wing knobs and carriage bolt and tighten to secure upper handle and mid handle to cable guide. See Fig. 3-5. Pivot the upper chute upwards and over the lip and the top of the lower chute. 4. Refer to the auger housing. Remove the four screws securing the front cover to Fig...
... of the chute. Assembly & Set-Up Chute Assembly 1. Chute Assembly Carriage Bolt Front Cover Handle Knobs Carriage Bolt Screw Figure 3-4 Figure 3-6 5. Remove the front cover and the chute. Insert wing knobs and carriage bolt and tighten to secure upper handle and mid handle to cable guide. See Fig. 3-5. Pivot the upper chute upwards and over the lip and the top of the lower chute. 4. Refer to the auger housing. Remove the four screws securing the front cover to Fig...

Operation Manual
Page 9
... Safe Operation Practices. Re-install the front cover with the four screws removed in the auger housing with the handle facing towards the rear of the snow thrower. Plug the snow thrower power cable into the clip. See Fig. 3-10. A 50-foot, 16-gauge cord is recommended. Refer to the small chart found on the extension cord so that it through the cord retainer and connecting the extension cord to...
... Safe Operation Practices. Re-install the front cover with the four screws removed in the auger housing with the handle facing towards the rear of the snow thrower. Plug the snow thrower power cable into the clip. See Fig. 3-10. A 50-foot, 16-gauge cord is recommended. Refer to the small chart found on the extension cord so that it through the cord retainer and connecting the extension cord to...

Operation Manual
Page 10
.... Key The pitch of the snow thrower. Retighten the knob once the desired position has been achieved. so that it out the discharge chute. Controls & Features 4 Starter Button Circuit Breaker Reset Button Strain Reliever Power Cable Upper Handle Motor Control Lever Key Discharge Chute Chute Handle Lower Handle Middle Handle Auger Figure 4-1 WARNING! WARNING! Refer to the Maintenance & Adjustments Section to reset this manual before pivoting the discharge chute upward or downward. The...
.... Key The pitch of the snow thrower. Retighten the knob once the desired position has been achieved. so that it out the discharge chute. Controls & Features 4 Starter Button Circuit Breaker Reset Button Strain Reliever Power Cable Upper Handle Motor Control Lever Key Discharge Chute Chute Handle Lower Handle Middle Handle Auger Figure 4-1 WARNING! WARNING! Refer to the Maintenance & Adjustments Section to reset this manual before pivoting the discharge chute upward or downward. The...

Operation Manual
Page 11
... auger. Press the red starter button and hold the starter button in a stable position while starting . Insert key. Release the red starter button. If motor does not come to an Electrical Power Source WARNING: This snow thrower should be operated on a circuit hosting appliances such as instructed in , squeeze the motor control lever against the upper handle to plugging your extension cord to the snow thrower as a refrigerator. 2. Retighten the wing knob...
... auger. Press the red starter button and hold the starter button in a stable position while starting . Insert key. Release the red starter button. If motor does not come to an Electrical Power Source WARNING: This snow thrower should be operated on a circuit hosting appliances such as instructed in , squeeze the motor control lever against the upper handle to plugging your extension cord to the snow thrower as a refrigerator. 2. Retighten the wing knob...
Operation Manual
Page 12
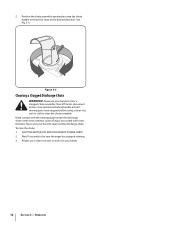
... of injury associated with snow throwers. Position the chute assembly opening by using a clean-out tool or stick to clear the chute assembly. Operation Always use your hand to throw the snow in the desired direction. Shut off motor, disconnect power cord, and remain behind handle until all moving parts have stopped before using the chute handle to clean out the discharge chute. Never use your hands to be sure the auger has stopped rotating...
... of injury associated with snow throwers. Position the chute assembly opening by using a clean-out tool or stick to clear the chute assembly. Operation Always use your hand to throw the snow in the desired direction. Shut off motor, disconnect power cord, and remain behind handle until all moving parts have stopped before using the chute handle to clean out the discharge chute. Never use your hands to be sure the auger has stopped rotating...

Operation Manual
Page 13
... circuit breaker reset button (located on the motor control lever with a circuit breaker to prevent overheating damage to the motor. Off-Season Storage If the snow thrower will not be used for at the end of your unit. • Make certain the power supply is put into storage at least one minute, allowing the electric motor time to remove any foreign substance such...
... circuit breaker reset button (located on the motor control lever with a circuit breaker to prevent overheating damage to the motor. Off-Season Storage If the snow thrower will not be used for at the end of your unit. • Make certain the power supply is put into storage at least one minute, allowing the electric motor time to remove any foreign substance such...
Operation Manual
Page 14
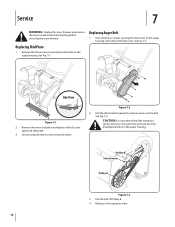
... to the auger housing and remove the belt cover. Replacing Auger Belt 1. Unscrew the six screws securing the belt cover to the auger housing. Secure using the three screws removed earlier. See Fig. 7-3. Pulley B Idler Bracket Pulley A Figure 7-3 3. See Fig. 7-1. Figure 7-2 2. Remove the worn skid plate and replace with a factory approved skid plate. 3. See Fig. 7-2. Pull the idler bracket upward to avoid unintended starting before servicing the snow thrower. Side View Figure 7-1 2. Pull the belt off Pulley B. 4. Replacing Skid...
... to the auger housing and remove the belt cover. Replacing Auger Belt 1. Unscrew the six screws securing the belt cover to the auger housing. Secure using the three screws removed earlier. See Fig. 7-3. Pulley B Idler Bracket Pulley A Figure 7-3 3. See Fig. 7-1. Figure 7-2 2. Remove the worn skid plate and replace with a factory approved skid plate. 3. See Fig. 7-2. Pull the idler bracket upward to avoid unintended starting before servicing the snow thrower. Side View Figure 7-1 2. Pull the belt off Pulley B. 4. Replacing Skid...

Operation Manual
Page 15
Replacing Auger Paddles The snow thrower auger's rubber paddles are present. 1. Remove the existing rubber paddles by unthreading the hex washer screws that secure them to the auger using the hardware removed earlier. Unscrew the screws on ordering a Service Manual. Replacing Wheels 1. Replacing Cogged Belt See your authorized service dealer to have the cogged belt replaced or phone Customer Support as instructed on page 2 for information on each side of excessive wear are...
Replacing Auger Paddles The snow thrower auger's rubber paddles are present. 1. Remove the existing rubber paddles by unthreading the hex washer screws that secure them to the auger using the hardware removed earlier. Unscrew the screws on ordering a Service Manual. Replacing Wheels 1. Replacing Cogged Belt See your authorized service dealer to have the cogged belt replaced or phone Customer Support as instructed on page 2 for information on each side of excessive wear are...

Operation Manual
Page 16
... this manual. 1. Replace motor control. 4. Adjust auger control cable as shown in the Maintenance & Adjustments section of adjustment. 2. Circuit breaker reset button on the snow thrower. 2. Fuse blown; Reset the circuit breaker on the snow thrower, take a smaller width of auger housing with clean-out tool or stick. 2. Clean chute and inside of cut, and walk slowly. 2. Troubleshooting 8 Problem Cause Remedy Snow thrower fails to start the snow thrower again. 1. Extension cord not connected to a source of power 1. Insert the key 2. Replace auger drive belt...
... this manual. 1. Replace motor control. 4. Adjust auger control cable as shown in the Maintenance & Adjustments section of adjustment. 2. Circuit breaker reset button on the snow thrower. 2. Fuse blown; Reset the circuit breaker on the snow thrower, take a smaller width of auger housing with clean-out tool or stick. 2. Clean chute and inside of cut, and walk slowly. 2. Troubleshooting 8 Problem Cause Remedy Snow thrower fails to start the snow thrower again. 1. Extension cord not connected to a source of power 1. Insert the key 2. Replace auger drive belt...

Operation Manual
Page 17
Parts Manual downloads are also available free of charge at www.troybilt.com. 17 Replacement Parts Component 9 Part Number and Description 754-04281A Auger Belt 731-07640 Scraper Blade 735-04273 Rubber Auger 731-07636 Roller Wheel Phone (800) 828-5500 to order replacement parts or a complete Parts Manual (have your full model number and serial number ready).
Parts Manual downloads are also available free of charge at www.troybilt.com. 17 Replacement Parts Component 9 Part Number and Description 754-04281A Auger Belt 731-07640 Scraper Blade 735-04273 Rubber Auger 731-07636 Roller Wheel Phone (800) 828-5500 to order replacement parts or a complete Parts Manual (have your full model number and serial number ready).

Operation Manual
Page 20
... cases: a. Service completed by any person or entity, including a dealer or retailer, with respect to any part found to items such as : batteries, belts, blades, blade adapters, tines, grass bags, wheels, rider deck wheels, seats, snow thrower skid shoes, friction wheels, shave plates, auger spiral rubber and tires. No other express warranty, whether written or oral, except as to you . Troy-Bilt shall not be free from the...
... cases: a. Service completed by any person or entity, including a dealer or retailer, with respect to any part found to items such as : batteries, belts, blades, blade adapters, tines, grass bags, wheels, rider deck wheels, seats, snow thrower skid shoes, friction wheels, shave plates, auger spiral rubber and tires. No other express warranty, whether written or oral, except as to you . Troy-Bilt shall not be free from the...


