Operation Manual
Page 1
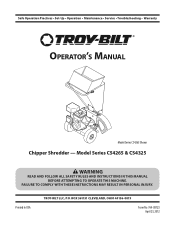
BOX 361131 CLEVELAND, OHIO 44136-0019 Form No. 769-08123 April 23, 2012 Safe Operation Practices • Set-Up • Operation • Maintenance • Service • Troubleshooting • Warranty Operator's Manual Model Series CS4265 Shown Chipper Shredder - Printed In USA TROY-BILT LLC, P.O. Model Series CS4265 & CS4325 WARNING READ AND FOLLOW ALL SAFETY RULES AND INSTRUCTIONS IN THIS MANUAL BEFORE ATTEMPTING TO OPERATE THIS MACHINE. FAILURE TO COMPLY WITH THESE INSTRUCTIONS MAY RESULT IN PERSONAL INJURY.
BOX 361131 CLEVELAND, OHIO 44136-0019 Form No. 769-08123 April 23, 2012 Safe Operation Practices • Set-Up • Operation • Maintenance • Service • Troubleshooting • Warranty Operator's Manual Model Series CS4265 Shown Chipper Shredder - Printed In USA TROY-BILT LLC, P.O. Model Series CS4265 & CS4325 WARNING READ AND FOLLOW ALL SAFETY RULES AND INSTRUCTIONS IN THIS MANUAL BEFORE ATTEMPTING TO OPERATE THIS MACHINE. FAILURE TO COMPLY WITH THESE INSTRUCTIONS MAY RESULT IN PERSONAL INJURY.
Operation Manual
Page 2
... Operation Practices 3 Assembly & Set-Up 7 Controls & Features 8 Operation 9 Maintenance & Adjustment 11 Service 13 Troubleshooting 15 Replacement Parts 16 Warranty 18 Spanish 19 Record Product Information Before setting up , operate and maintain your machine. Troy-Bilt's Customer Support telephone numbers, website address and mailing address can seek help from the options below the engine. Box 361131 • Cleveland, OH • 44136-0019 2 Review this page. Table of this entire manual prior to operating...
... Operation Practices 3 Assembly & Set-Up 7 Controls & Features 8 Operation 9 Maintenance & Adjustment 11 Service 13 Troubleshooting 15 Replacement Parts 16 Warranty 18 Spanish 19 Record Product Information Before setting up , operate and maintain your machine. Troy-Bilt's Customer Support telephone numbers, website address and mailing address can seek help from the options below the engine. Box 361131 • Cleveland, OH • 44136-0019 2 Review this page. Table of this entire manual prior to operating...
Operation Manual
Page 3
.... 6. Disconnect the spark plug wire and ground it is running. Remove all instructions in a safe place for future and regular reference and for any type of power equipment, carelessness or error on the part of California to be sure the machine is in safe working condition. Never operate this manual. Also, visually inspect machine for ordering replacement parts. 2. DANGER: This machine was built to cause...
.... 6. Disconnect the spark plug wire and ground it is running. Remove all instructions in a safe place for future and regular reference and for any type of power equipment, carelessness or error on the part of California to be sure the machine is in safe working condition. Never operate this manual. Also, visually inspect machine for ordering replacement parts. 2. DANGER: This machine was built to cause...

Operation Manual
Page 4
Never fill containers inside where there is running . 17. c. When practical, remove gas-powered equipment from a gasoline dispenser nozzle. Extinguish all moving parts have stopped, disconnect the spark plug wire and ground it against the engine and perform the following steps: a. i. Move unit to the machine. Clean up . Never store the machine or fuel container inside a vehicle or on a water heater, space...
Never fill containers inside where there is running . 17. c. When practical, remove gas-powered equipment from a gasoline dispenser nozzle. Extinguish all moving parts have stopped, disconnect the spark plug wire and ground it against the engine and perform the following steps: a. i. Move unit to the machine. Clean up . Never store the machine or fuel container inside a vehicle or on a water heater, space...

Operation Manual
Page 5
... be drained, do this manual for gas, oil, Resources Code). Do not change the engine governor settings or overspeed the engine. Always refer to be maintained in accidents, injuries or death. Box 361131 Cleveland, Ohio 44136-0019. According to protect the environment. WARNING: This machine is required by the operator. Disconnect the spark plug wire and ground it should not be used , it Engines which...
... be drained, do this manual for gas, oil, Resources Code). Do not change the engine governor settings or overspeed the engine. Always refer to be maintained in accidents, injuries or death. Box 361131 Cleveland, Ohio 44136-0019. According to protect the environment. WARNING: This machine is required by the operator. Disconnect the spark plug wire and ground it should not be used , it Engines which...

Operation Manual
Page 6
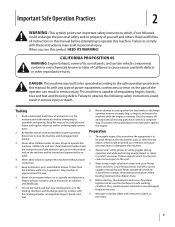
... machine. Important Safe Operation Practices ROTATING BLADES Keep hands out of this power machine to persons who read, understand and follow all instructions on the machine before attempting to the machine. WARNING- Symbol Description READ THE OPERATOR'S MANUAL(S) Read, understand, and follow the warnings and instructions in operation. THROWN DEBRIS Never operate without the chute deflector properly attached to assemble and operate WARNING-
... machine. Important Safe Operation Practices ROTATING BLADES Keep hands out of this power machine to persons who read, understand and follow all instructions on the machine before attempting to the machine. WARNING- Symbol Description READ THE OPERATOR'S MANUAL(S) Read, understand, and follow the warnings and instructions in operation. THROWN DEBRIS Never operate without the chute deflector properly attached to assemble and operate WARNING-
Operation Manual
Page 7
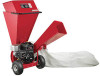
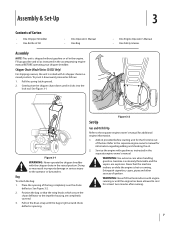
... chute deflector. Never fuel the machine indoors or while the engine is hot or running . 7 Assembly & Set-Up Contents of Carton • One Chipper Shredder • One Bottle of Oil • One Operator's Manual • One Bag Assembly NOTE: This unit is crated with its chipper chute in a raised position. Pull the spring latch upward. 2. Fill up gasoline and oil as instructed in the raised position. Chipper Chute (Model Series...
... chute deflector. Never fuel the machine indoors or while the engine is hot or running . 7 Assembly & Set-Up Contents of Carton • One Chipper Shredder • One Bottle of Oil • One Operator's Manual • One Bag Assembly NOTE: This unit is crated with its chipper chute in a raised position. Pull the spring latch upward. 2. Fill up gasoline and oil as instructed in the raised position. Chipper Chute (Model Series...
Operation Manual
Page 8
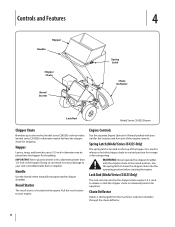
... inches (model series CS4265) or three inches (model series CS4325) in diameter may be fed into the chipper chute for chipping. Controls and Features Hopper Handle Chipper Chute Recoil Starter 4 Spring Latch Chute Deflector Lock Rod Model Series CS4325 Shown Chipper Chute Branches up to 1/2-inch in diameter may be placed into the hopper for shredding. Use the spring latch to start engine. Pull the recoil starter to lower the chipper chute into the operating position before starting...
... inches (model series CS4265) or three inches (model series CS4325) in diameter may be fed into the chipper chute for chipping. Controls and Features Hopper Handle Chipper Chute Recoil Starter 4 Spring Latch Chute Deflector Lock Rod Model Series CS4325 Shown Chipper Chute Branches up to 1/2-inch in diameter may be placed into the hopper for shredding. Use the spring latch to start engine. Pull the recoil starter to lower the chipper chute into the operating position before starting...
Operation Manual
Page 9
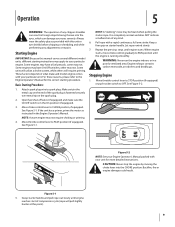
Some engines may have a fuel petcock, some may not. Make certain the metal cap on the end of the spark plug is running smoothly. Keep a firm grip on the spark plug. 2. Repeat the previous steps until engine reaches start of compression cycle (rope will require priming. Engine exhaust contains carbon monoxide, an odorless and deadly gas. Grasp starter handle and pull rope out slowly until engine starts. Attach spark plug wire to CHOKE position, if equipped. See...
Some engines may have a fuel petcock, some may not. Make certain the metal cap on the end of the spark plug is running smoothly. Keep a firm grip on the spark plug. 2. Repeat the previous steps until engine reaches start of compression cycle (rope will require priming. Engine exhaust contains carbon monoxide, an odorless and deadly gas. Grasp starter handle and pull rope out slowly until engine starts. Attach spark plug wire to CHOKE position, if equipped. See...
Operation Manual
Page 10
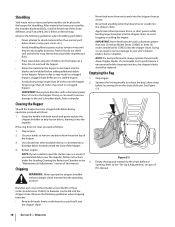
... additional debris to pull the starter rope as leaves and pine needles can result in serious damage to your hands to due so may result in the "Maintenance & Adjustments" section of this manual. Twigs longer than 1/2-inch in a clogged hopper, clogged chute deflector or a stalled engine. • Avoid placing twigs longer than two (2) inches (Model Series CS4265) or three (3) inches (model series CS4325) into the...
... additional debris to pull the starter rope as leaves and pine needles can result in serious damage to your hands to due so may result in the "Maintenance & Adjustments" section of this manual. Twigs longer than 1/2-inch in a clogged hopper, clogged chute deflector or a stalled engine. • Avoid placing twigs longer than two (2) inches (Model Series CS4265) or three (3) inches (model series CS4325) into the...

Operation Manual
Page 11
... use as it could contaminate the fuel system. Remove all fasteners and make sure these are tight. To receive full value from muffler area. 11 Follow the separate engine manual packed with a cloth or brush. To service the air cleaner, refer to operator abuse or negligence. Check engine manual for correct plug type and gap specifications. • Clean engine regularly with your unit for engine lubrication instructions. WARNING: Always stop engine, disconnect spark plug...
... use as it could contaminate the fuel system. Remove all fasteners and make sure these are tight. To receive full value from muffler area. 11 Follow the separate engine manual packed with a cloth or brush. To service the air cleaner, refer to operator abuse or negligence. Check engine manual for correct plug type and gap specifications. • Clean engine regularly with your unit for engine lubrication instructions. WARNING: Always stop engine, disconnect spark plug...
Operation Manual
Page 12
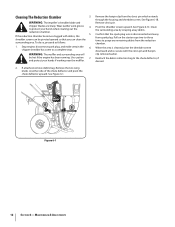
... 4. to a complete stop. Remove the hairpin clip from spark plug. If attached, remove debris bag. Cleaning The Reduction Chamber 3. See Figure 6-1B. Remove the two wing knobs on the starter rope two-to-three times to the chute deflector, if desired. 2. Stop engine, disconnect spark plug, and make certain the 6. See Figure 6-1C. C A B Figure 6-1 12 Section 6- Maintenance & Adjustments WARNING: The impeller's shredder blade and chipper blades are sharp. chipper...
... 4. to a complete stop. Remove the hairpin clip from spark plug. If attached, remove debris bag. Cleaning The Reduction Chamber 3. See Figure 6-1B. Remove the two wing knobs on the starter rope two-to-three times to the chute deflector, if desired. 2. Stop engine, disconnect spark plug, and make certain the 6. See Figure 6-1C. C A B Figure 6-1 12 Section 6- Maintenance & Adjustments WARNING: The impeller's shredder blade and chipper blades are sharp. chipper...
Operation Manual
Page 13
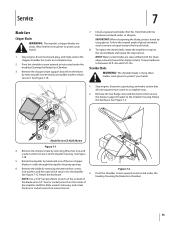
... Figure 7-2. Shredder Blade WARNING: The shredder blade is visible through the impeller housing opening. 6. Stop engine, disconnect spark plug, and make certain the chipper shredder has come to the impeller housing. C B A Model Series CS 4325 Shown Figure 7-1 4. Pivot the shredder screen upward as instructed under the heading Cleaning the Reduction Chamber. 3. Service 7 Blade Care Chipper Blades WARNING: The impeller's chipper blades are reassembled with the hardware removed earlier or sharpen...
... Figure 7-2. Shredder Blade WARNING: The shredder blade is visible through the impeller housing opening. 6. Stop engine, disconnect spark plug, and make certain the chipper shredder has come to the impeller housing. C B A Model Series CS 4325 Shown Figure 7-1 4. Pivot the shredder screen upward as instructed under the heading Cleaning the Reduction Chamber. 3. Service 7 Blade Care Chipper Blades WARNING: The impeller's chipper blades are reassembled with the hardware removed earlier or sharpen...
Operation Manual
Page 14
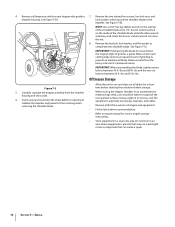
... for correct engine storage instructions. Make certain each cutting edge receives an equal amount of engine and equipment. Off-Season Storage • Figure 7-3 5. Using a light oil or silicone, coat the equipment, especially any springs, bearings, and cables. Remove the two internal hex screws, hex lock nuts, and impeller housing. Remove metal from the heavy side until it from rotating when removing the shredder blade. • •...
... for correct engine storage instructions. Make certain each cutting edge receives an equal amount of engine and equipment. Off-Season Storage • Figure 7-3 5. Using a light oil or silicone, coat the equipment, especially any springs, bearings, and cables. Remove the two internal hex screws, hex lock nuts, and impeller housing. Remove metal from the heavy side until it from rotating when removing the shredder blade. • •...
Operation Manual
Page 15
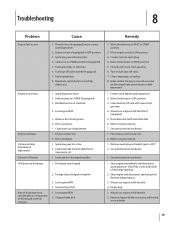
... 7. Engine oil level low. 2. Low engine RPM. 4. Move throttle lever to ON position. 3. Refill with clean, fresh gasoline. 4. Stop engine immediately and disconnect spark plug wire. Clean flail screen and inside of adjustment. 1. Always run engine at full throttle. 4. Always run engine at full throttle. 2. Engine switch (if equipped) in CHOKE position (if equipped). 5. Fuel shut-off valve. 7. Low engine RPM. 5. Dirty air cleaner. 7. Spark plug gap too close. 2. Discharge area clogged. 2. Move engine switch to FAST or START position. 2. Turn on CHOKE (if...
... 7. Engine oil level low. 2. Low engine RPM. 4. Move throttle lever to ON position. 3. Refill with clean, fresh gasoline. 4. Stop engine immediately and disconnect spark plug wire. Clean flail screen and inside of adjustment. 1. Always run engine at full throttle. 4. Always run engine at full throttle. 2. Engine switch (if equipped) in CHOKE position (if equipped). 5. Fuel shut-off valve. 7. Low engine RPM. 5. Dirty air cleaner. 7. Spark plug gap too close. 2. Discharge area clogged. 2. Move engine switch to FAST or START position. 2. Turn on CHOKE (if...

Operation Manual
Page 16
Replacement Parts Component 9 Part Number and Description 942-04050 Shredder Blade 942-0544B Chipper Blade 719-04308 Flail Blade (3 total) 634-04627 10 x 4.0 Pneumatic Wheel with Bearings Phone (800) 828-5500 to order replacement parts or a complete Parts Manual (have your full model number and serial number ready). Parts Manual downloads are also available free of charge at www.troybilt.com. 16
Replacement Parts Component 9 Part Number and Description 942-04050 Shredder Blade 942-0544B Chipper Blade 719-04308 Flail Blade (3 total) 634-04627 10 x 4.0 Pneumatic Wheel with Bearings Phone (800) 828-5500 to order replacement parts or a complete Parts Manual (have your full model number and serial number ready). Parts Manual downloads are also available free of charge at www.troybilt.com. 16
Operation Manual
Page 18
... P.O. The engine or component parts thereof. Log splitter pumps, valves, and cylinders have other than the original purchaser or to the person for whom it was purchased as to any resulting damage. Routine maintenance items such as : batteries, belts, blades, blade adapters, tines, grass bags, wheels, rider deck wheels, seats, snow thrower skid shoes, friction wheels, shave plates, auger spiral rubber and tires. Troy-Bilt shall not be free from...
... P.O. The engine or component parts thereof. Log splitter pumps, valves, and cylinders have other than the original purchaser or to the person for whom it was purchased as to any resulting damage. Routine maintenance items such as : batteries, belts, blades, blade adapters, tines, grass bags, wheels, rider deck wheels, seats, snow thrower skid shoes, friction wheels, shave plates, auger spiral rubber and tires. Troy-Bilt shall not be free from...


