
User Guide
Page 14
... on Connecting 7-6 Chapter 8 Wi-Fi (IEEE 802.11b) WLAN Adaptor 8-1 Overview 8-1 IP Address Page 8-3 TMU-Traffic Monitoring Utility 8-12 Chapter 9 Bluetooth Settings Help 9-1 Bluetooth Settings 9-1 Specifications 9-2 Setup ...9-3 Bluetooth™ Connection 9-4 Bluetooth™ Settings 9-13 Disconnecting/Exiting Bluetooth™ Connection 9-17 Bluetooth Chat 9-21 BPU-Bluetooth Management Utility 9-22 Error Messages 9-25...
... on Connecting 7-6 Chapter 8 Wi-Fi (IEEE 802.11b) WLAN Adaptor 8-1 Overview 8-1 IP Address Page 8-3 TMU-Traffic Monitoring Utility 8-12 Chapter 9 Bluetooth Settings Help 9-1 Bluetooth Settings 9-1 Specifications 9-2 Setup ...9-3 Bluetooth™ Connection 9-4 Bluetooth™ Settings 9-13 Disconnecting/Exiting Bluetooth™ Connection 9-17 Bluetooth Chat 9-21 BPU-Bluetooth Management Utility 9-22 Error Messages 9-25...

User Guide
Page 15
Table of Contents Chapter 10 ATI Presentation Pack 10-1 Introduction 10-1 IA Presenter 10-2 Opening a Presentation and Using View Modes 10-4 IA Screen Mirror 10-12 Copyright and Contact Information 10-13 Chapter 11 Optional Functions 11-1 Home ...11-1 Home Help 11-6 How to Make a Backup 11-10 Carrying Out Restore Operation 11-12 Data Backup Help 11-13 Chapter 12 Additional Information 12-1 Troubleshooting 12-1 Resetting 12-4 Initializing 12-5 Specifications 12-5 Appendix A FAQ about Wireless LAN A-1 TOSHIBA Pocket PC e740 xv
Table of Contents Chapter 10 ATI Presentation Pack 10-1 Introduction 10-1 IA Presenter 10-2 Opening a Presentation and Using View Modes 10-4 IA Screen Mirror 10-12 Copyright and Contact Information 10-13 Chapter 11 Optional Functions 11-1 Home ...11-1 Home Help 11-6 How to Make a Backup 11-10 Carrying Out Restore Operation 11-12 Data Backup Help 11-13 Chapter 12 Additional Information 12-1 Troubleshooting 12-1 Resetting 12-4 Initializing 12-5 Specifications 12-5 Appendix A FAQ about Wireless LAN A-1 TOSHIBA Pocket PC e740 xv

User Guide
Page 42
... Recognizer: With Letter Recognizer you can write letters using Letter Recognizer, with Letter Recognizer open, tap the question mark next to the writing area. For specific instructions on paper. 1 Tap the arrow next to the Input Panel button and then Letter Recognizer. 2 Write a letter in the box. The more words it...
... Recognizer: With Letter Recognizer you can write letters using Letter Recognizer, with Letter Recognizer open, tap the question mark next to the writing area. For specific instructions on paper. 1 Tap the arrow next to the Input Panel button and then Letter Recognizer. 2 Write a letter in the box. The more words it...
User Guide
Page 43
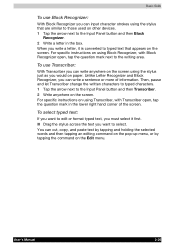
... and then Transcriber. 2 Write anywhere on the Edit menu. Unlike Letter Recognizer and Block Recognizer, you can write a sentence or more of the screen. For specific instructions on using Transcriber, with Block Recognizer open , tap the question mark in the box. When you write a letter, it first. ■ Drag the stylus... select it is converted to typed text that are similar to those used on other devices. 1 Tap the arrow next to the writing area. For specific instructions on the screen.
... and then Transcriber. 2 Write anywhere on the Edit menu. Unlike Letter Recognizer and Block Recognizer, you can write a sentence or more of the screen. For specific instructions on using Transcriber, with Block Recognizer open , tap the question mark in the box. When you write a letter, it first. ■ Drag the stylus... select it is converted to typed text that are similar to those used on other devices. 1 Tap the arrow next to the writing area. For specific instructions on the screen.
User Guide
Page 57
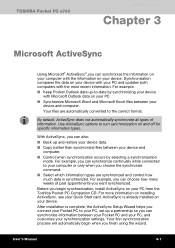
TOSHIBA Pocket PC e740 Microsoft ActiveSync Chapter 3 Microsoft ActiveSync Using Microsoft® ActiveSync®,you can synchronize the information on your computer with the information on your PC from the Toshiba Pocket PC Companion CD. By default, ActiveSync does not automatically synchronize all types of past appointments you want synchronized. After installation is already... your PC and updates both computers with your Quick Start card. Synchronization compares the data on your device. For more information on and off for specific information types.
TOSHIBA Pocket PC e740 Microsoft ActiveSync Chapter 3 Microsoft ActiveSync Using Microsoft® ActiveSync®,you can synchronize the information on your computer with the information on your PC from the Toshiba Pocket PC Companion CD. By default, ActiveSync does not automatically synchronize all types of past appointments you want synchronized. After installation is already... your PC and updates both computers with your Quick Start card. Synchronization compares the data on your device. For more information on and off for specific information types.

User Guide
Page 96
... are tone). If you to do not need to provide the information it does not appear or to an E-mail Server," later in Chapter 5. For specific instructions, see Chapter 6. ■ Send and receive instant messages with the e-mail server. Before you can configure the Ethernet card. Instead, you need to your...
... are tone). If you to do not need to provide the information it does not appear or to an E-mail Server," later in Chapter 5. For specific instructions, see Chapter 6. ■ Send and receive instant messages with the e-mail server. Before you can configure the Ethernet card. Instead, you need to your...

User Guide
Page 98
... so that is compatible with MSN Messenger. For more information, see ActiveSync Help on your owner's manual. 6 Tap , Settings , Connections tab, and then Connections. For specific instructions, see the owner's manual for the card. 4 The first time you need to change settings later, tap and then Settings. For instructions on the...
... so that is compatible with MSN Messenger. For more information, see ActiveSync Help on your owner's manual. 6 Tap , Settings , Connections tab, and then Connections. For specific instructions, see the owner's manual for the card. 4 The first time you need to change settings later, tap and then Settings. For instructions on the...
User Guide
Page 111
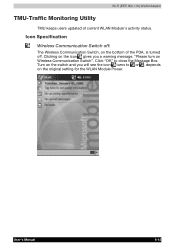
Icon Specification Wireless Communication Switch off: The Wireless Communication Switch, on the original setting for the WLAN Module Power. Wi-Fi (IEEE 802.11b) WLAN Adaptor TMU-Traffic Monitoring Utility TMU keeps users updated of the PDA, is turned off. Turn on the switch and you a warning message, "Please turn on Wireless Communication Switch". Clicking on the icon gives you will see the icon turns to close the Message Box. User's Manual 8-12 Click "OK" to or , depends on the bottom of current WLAN Module's activity status.
Icon Specification Wireless Communication Switch off: The Wireless Communication Switch, on the original setting for the WLAN Module Power. Wi-Fi (IEEE 802.11b) WLAN Adaptor TMU-Traffic Monitoring Utility TMU keeps users updated of the PDA, is turned off. Turn on the switch and you a warning message, "Please turn on Wireless Communication Switch". Clicking on the icon gives you will see the icon turns to close the Message Box. User's Manual 8-12 Click "OK" to or , depends on the bottom of current WLAN Module's activity status.

User Guide
Page 115
.... ■ Please refer to send and receive data. Profiles supported by Serial Port Profile (V1.1); Bluetooth Settings Help Specifications By enabling the Bluetooth device on your Toshiba Pocket PC, you will be used when connecting to a PC with ActiveSync. ■ DUN (Dial-up Networking...(Not conforming to V1.0B). ■ The connection speed of Bluetooth varies depending on specifications and connectable devices: http://www.pda.toshiba.com User's Manual 9-2 This is also used with other Toshiba Pocket PCs. Dial-up Networking Service) This service allows you to use the Dial-up...
.... ■ Please refer to send and receive data. Profiles supported by Serial Port Profile (V1.1); Bluetooth Settings Help Specifications By enabling the Bluetooth device on your Toshiba Pocket PC, you will be used when connecting to a PC with ActiveSync. ■ DUN (Dial-up Networking...(Not conforming to V1.0B). ■ The connection speed of Bluetooth varies depending on specifications and connectable devices: http://www.pda.toshiba.com User's Manual 9-2 This is also used with other Toshiba Pocket PCs. Dial-up Networking Service) This service allows you to use the Dial-up...

User Guide
Page 125
... computer to which you want to connect. Establish a Bluetooth™ connection to the PC by following the steps in the Power Management, Toshiba Pocket PC will change to Bluetooth connection. Once a connection is entered. Connect to PC via ActiveSync Requirements: The PC must have been... device after the Bluetooth™ Passkey is established, the service icon will be Bluetooth™-enabled and ActiveSync must be turned off automatically after specific period of the screen will rotate with the PC using : W, and then select Bluetooth™. 3 On the PC, select a port ...
... computer to which you want to connect. Establish a Bluetooth™ connection to the PC by following the steps in the Power Management, Toshiba Pocket PC will change to Bluetooth connection. Once a connection is entered. Connect to PC via ActiveSync Requirements: The PC must have been... device after the Bluetooth™ Passkey is established, the service icon will be Bluetooth™-enabled and ActiveSync must be turned off automatically after specific period of the screen will rotate with the PC using : W, and then select Bluetooth™. 3 On the PC, select a port ...

User Guide
Page 135
... BPU-Bluetooth Management Utility BPU keeps users updated of the PDA, is turned off . Click OK to or , depending on /off . User's Manual 9-22 Icon Specification Wireless Communication Switch off: The Wireless Communication Switch, on the bottom of current Bluetooth Module's activity status,and provide a interface to turn on Wireless Communication...
... BPU-Bluetooth Management Utility BPU keeps users updated of the PDA, is turned off . Click OK to or , depending on /off . User's Manual 9-22 Icon Specification Wireless Communication Switch off: The Wireless Communication Switch, on the bottom of current Bluetooth Module's activity status,and provide a interface to turn on Wireless Communication...
User Guide
Page 148
..., and use the pop-up menu.) VGA Zoom This mode works only when IA Presenter is set to play automatically, you can use for that specific area. (To exit VGA Zoom mode, select Trigger, Pen, or VGA Pointer from the Slide Show pop-up menu. Pen Color Tapping Pen Color opens...
..., and use the pop-up menu.) VGA Zoom This mode works only when IA Presenter is set to play automatically, you can use for that specific area. (To exit VGA Zoom mode, select Trigger, Pen, or VGA Pointer from the Slide Show pop-up menu. Pen Color Tapping Pen Color opens...
User Guide
Page 151
.... ■ You can use VGA Zoom on the pop-up menu to designate an area on a slide during VGA Slide Show view, and project that specific area to the VGA screen (on top of the already-existing projection of your selected output dimension, IA Presenter will automatically re- Use the VGA...
.... ■ You can use VGA Zoom on the pop-up menu to designate an area on a slide during VGA Slide Show view, and project that specific area to the VGA screen (on top of the already-existing projection of your selected output dimension, IA Presenter will automatically re- Use the VGA...
User Guide
Page 173
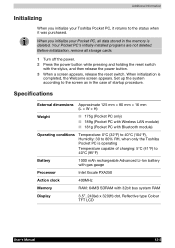
When initialization is deleted. Specifications External dimensions Approximate 125 mm × 80 mm × 16 mm (L × W × H) Weight ■ 175g (Pocket PC only) ■ 189g (Pocket PC with Wireless ...; 181g (Pocket PC with Bluetooth module) Operating conditions Temperature: 0°C (32°F) to 40°C (104°F), Humidity: 30 to 80% RH, when only the Toshiba Pocket PC is operating Temperature capable of startup procedure. Set up the system according to the screen as in the memory is completed, the Welcome...
When initialization is deleted. Specifications External dimensions Approximate 125 mm × 80 mm × 16 mm (L × W × H) Weight ■ 175g (Pocket PC only) ■ 189g (Pocket PC with Wireless ...; 181g (Pocket PC with Bluetooth module) Operating conditions Temperature: 0°C (32°F) to 40°C (104°F), Humidity: 30 to 80% RH, when only the Toshiba Pocket PC is operating Temperature capable of startup procedure. Set up the system according to the screen as in the memory is completed, the Welcome...