User Manual
Page 9
consult Safety Code 6, obtainable from windows to the following two conditions: (1) this device may not cause interference, and (2) this device must ensure that the antenna is intended to be used indoors ...
consult Safety Code 6, obtainable from windows to the following two conditions: (1) this device may not cause interference, and (2) this device must ensure that the antenna is intended to be used indoors ...
User Manual
Page 27
... Bluetooth word mark and logos are those of their respective companies. Other trademarks and trade names are owned by Toshiba is a registered trademark of Toshiba America Information Systems, Inc. and any use of this product may be regulated due to environmental considerations. For ....org. Microsoft, Windows and Windows Vista are trademarks or registered trademarks of Intel Corporation or its subsidiaries in the United States and/or other countries. Computer Disposal Information This product contains mercury. Wi-Fi is under license. 27 Trademarks Tecra and Accupoint are ...
... Bluetooth word mark and logos are those of their respective companies. Other trademarks and trade names are owned by Toshiba is a registered trademark of Toshiba America Information Systems, Inc. and any use of this product may be regulated due to environmental considerations. For ....org. Microsoft, Windows and Windows Vista are trademarks or registered trademarks of Intel Corporation or its subsidiaries in the United States and/or other countries. Computer Disposal Information This product contains mercury. Wi-Fi is under license. 27 Trademarks Tecra and Accupoint are ...

User Manual
Page 30
... Using the overlay to type numeric data 89 Starting a program 89 Starting a program from the Start menu...........89 Starting a program from Windows® Explorer....90 Starting a program using the Start Search field 91 Saving your work 91 Printing your work 93 Backing up your work... a disc with the computer on...........100 Removing a disc with the computer off ..........100 Caring for CD or DVD Discs 101 Toshiba's online resources 101 Chapter 3: Mobile Computing 102 Toshiba's energy-saver design 102 Running the computer on battery power 103 Battery Notice 103 Power management 104
... Using the overlay to type numeric data 89 Starting a program 89 Starting a program from the Start menu...........89 Starting a program from Windows® Explorer....90 Starting a program using the Start Search field 91 Saving your work 91 Printing your work 93 Backing up your work... a disc with the computer on...........100 Removing a disc with the computer off ..........100 Caring for CD or DVD Discs 101 Toshiba's online resources 101 Chapter 3: Mobile Computing 102 Toshiba's energy-saver design 102 Running the computer on battery power 103 Battery Notice 103 Power management 104
User Manual
Page 33
... Controls 156 CD/DVD Drive Acoustic Silencer 157 TOSHIBA Accessibility 158 Trusted Platform Module (TPM 159 Fingerprint Authentication Utility 160 Fingerprint utility limitations 160 Fingerprint Enrollment 160 Fingerprint Logon 162 Power-on Security 162 ... Problems that are easy to fix 174 Problems when you turn on the computer............176 The Windows® operating system is not working 178 Using Startup options to fix problems 179 Internet problems 180 The Windows® operating system can help you 180 Resolving a hardware conflict 181 A plan of action 181 Resolving...
... Controls 156 CD/DVD Drive Acoustic Silencer 157 TOSHIBA Accessibility 158 Trusted Platform Module (TPM 159 Fingerprint Authentication Utility 160 Fingerprint utility limitations 160 Fingerprint Enrollment 160 Fingerprint Logon 162 Power-on Security 162 ... Problems that are easy to fix 174 Problems when you turn on the computer............176 The Windows® operating system is not working 178 Using Startup options to fix problems 179 Internet problems 180 The Windows® operating system can help you 180 Resolving a hardware conflict 181 A plan of action 181 Resolving...
User Manual
Page 34
... problems 197 Develop good computing habits 198 Data and system configuration backup in Windows 199 If you need further assistance 203 Before you contact Toshiba 203 Contacting Toshiba 204 Other Toshiba Internet Web sites 205 Toshiba's worldwide offices 205 Appendix A: Hot Keys/TOSHIBA Cards 207 Hot Key Cards 207 Using the Hot Key Cards 208 Application...
... problems 197 Develop good computing habits 198 Data and system configuration backup in Windows 199 If you need further assistance 203 Before you contact Toshiba 203 Contacting Toshiba 204 Other Toshiba Internet Web sites 205 Toshiba's worldwide offices 205 Appendix A: Hot Keys/TOSHIBA Cards 207 Hot Key Cards 207 Using the Hot Key Cards 208 Application...
User Manual
Page 43
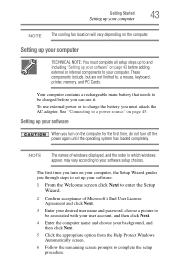
...guides you through steps to set up your software. 1 From the Welcome screen click Next to enter the Setup Wizard. 2 Confirm acceptance of windows displayed, and the order in which windows appear, may vary according to your background, and then click Next. 5 Click the appropriate option from the Help Protect... Windows Automatically screen. 6 Follow the remaining screen prompts to complete the setup procedure. Setting up your computer. These components include, but are not limited ...
...guides you through steps to set up your software. 1 From the Welcome screen click Next to enter the Setup Wizard. 2 Confirm acceptance of windows displayed, and the order in which windows appear, may vary according to your background, and then click Next. 5 Click the appropriate option from the Help Protect... Windows Automatically screen. 6 Follow the remaining screen prompts to complete the setup procedure. Setting up your computer. These components include, but are not limited ...
User Manual
Page 44
... diskette drive" on page 72) ❖ Install PC Cards (see "Using PC Cards" on page 43. Registering your computer with Toshiba 7 Click Start when the Thank You message appears. The Windows® operating system checks the system's performance, and then may want to the Internet. If you decide not to register at...
... diskette drive" on page 72) ❖ Install PC Cards (see "Using PC Cards" on page 43. Registering your computer with Toshiba 7 Click Start when the Thank You message appears. The Windows® operating system checks the system's performance, and then may want to the Internet. If you decide not to register at...

User Manual
Page 57
... before removing/ installing the bottom module. 3 Gently lift the memory module to scan your system has the memory modules stacked on the power: If "Start Windows® Normally" is highlighted, then press Enter. NOTE If your hard drive for errors or defragment the drive. If so, consult... Windows® Help and Support. 2 Pull the latches away from the memory module. The memory module pops up normally. Getting Started 57 Adding memory (optional) NOTE ...
... before removing/ installing the bottom module. 3 Gently lift the memory module to scan your system has the memory modules stacked on the power: If "Start Windows® Normally" is highlighted, then press Enter. NOTE If your hard drive for errors or defragment the drive. If so, consult... Windows® Help and Support. 2 Pull the latches away from the memory module. The memory module pops up normally. Getting Started 57 Adding memory (optional) NOTE ...
User Manual
Page 58
NOTE From time to time, Windows® will display a pop-up . 7 Reconnect the cables. 8 Restart the computer. If unsure, cancel and try again. For more information on inserting the battery, see "... inserted completely into the socket and lined up squarely with a hard disk partition (available on page 113. 6 Turn the computer right side up that says, "Windows® needs your permission. If the computer does not recognize the memory configuration, turn off the computer and remove the memory module slot cover (complete...
NOTE From time to time, Windows® will display a pop-up . 7 Reconnect the cables. 8 Restart the computer. If unsure, cancel and try again. For more information on inserting the battery, see "... inserted completely into the socket and lined up squarely with a hard disk partition (available on page 113. 6 Turn the computer right side up that says, "Windows® needs your permission. If the computer does not recognize the memory configuration, turn off the computer and remove the memory module slot cover (complete...

User Manual
Page 59
... and applications which were bundled with your computer Creating Recovery CDs/DVDs Depending on your optical disc drive is not writable, contact Toshiba Customer Support to copy the Hard Drive Recovery Utilities. If your computer. For more information on creating Recovery media see "Creating Recovery... CDs/DVDs" on the Windows® desktop. You can : ❖ Create Hard Drive Recovery CDs or DVDs using your system. Using the HDD Recovery, you ...
... and applications which were bundled with your computer Creating Recovery CDs/DVDs Depending on your optical disc drive is not writable, contact Toshiba Customer Support to copy the Hard Drive Recovery Utilities. If your computer. For more information on creating Recovery media see "Creating Recovery... CDs/DVDs" on the Windows® desktop. You can : ❖ Create Hard Drive Recovery CDs or DVDs using your system. Using the HDD Recovery, you ...
User Manual
Page 66
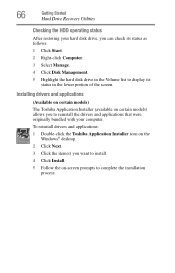
Installing drivers and applications (Available on certain models) The Toshiba Application Installer (available on -screen prompts to complete the installation process. 66 Getting Started Hard Drive Recovery Utilities Checking the HDD operating status ... Volume list to reinstall the drivers and applications that were originally bundled with your computer. To reinstall drivers and applications: 1 Double-click the Toshiba Application Installer icon on the Windows® desktop. 2 Click Next. 3 Click the item(s) you want to install. 4 Click Install. 5 Follow the on certain models) allows you ...
Installing drivers and applications (Available on certain models) The Toshiba Application Installer (available on -screen prompts to complete the installation process. 66 Getting Started Hard Drive Recovery Utilities Checking the HDD operating status ... Volume list to reinstall the drivers and applications that were originally bundled with your computer. To reinstall drivers and applications: 1 Double-click the Toshiba Application Installer icon on the Windows® desktop. 2 Click Next. 3 Click the item(s) you want to install. 4 Click Install. 5 Follow the on certain models) allows you ...
User Manual
Page 70
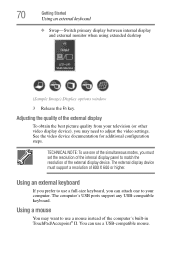
... Getting Started Using an external keyboard ❖ Swap-Switch primary display between internal display and external monitor when using extended desktop (Sample Image) Display options window 3 Release the Fn key. The computer's USB ports support any USB-compatible keyboard. See the video device documentation for additional configuration steps. Adjusting the quality...
... Getting Started Using an external keyboard ❖ Swap-Switch primary display between internal display and external monitor when using extended desktop (Sample Image) Display options window 3 Release the Fn key. The computer's USB ports support any USB-compatible keyboard. See the video device documentation for additional configuration steps. Adjusting the quality...
User Manual
Page 73
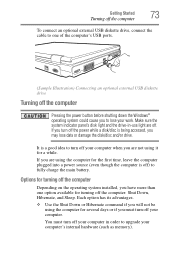
It is a good idea to turn off the power while a disk/disc is off the computer Pressing the power button before shutting down the Windows® operating system could cause you to lose your computer's internal hardware (such as memory). Each option has its advantages. ❖ Use the Shut Down ...
It is a good idea to turn off the power while a disk/disc is off the computer Pressing the power button before shutting down the Windows® operating system could cause you to lose your computer's internal hardware (such as memory). Each option has its advantages. ❖ Use the Shut Down ...
User Manual
Page 75
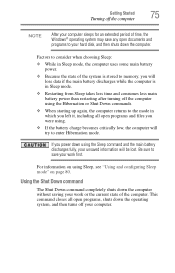
... low, the computer will be lost. Getting Started 75 Turning off the computer NOTE After your computer sleeps for an extended period of time, the Windows® operating system may save your hard disk, and then shuts down the operating system, and then turns off your work first. For information on...
... low, the computer will be lost. Getting Started 75 Turning off the computer NOTE After your computer sleeps for an extended period of time, the Windows® operating system may save your hard disk, and then shuts down the operating system, and then turns off your work first. For information on...

User Manual
Page 76
... computer's power button puts the computer into Sleep mode. 1 Click Start, Control Panel, System and Maintenance, and then Power Options. The Power Options window appears. 2 Click Change plan settings under the power plan to be customized. Start (Sample Image) Shut Down menu Arrow Shut Down menu 2 Click ...Start, and then click the arrow next to the Lock button in the lower-right part of the Start menu. The Edit Plan Settings window appears. 76 Getting Started Turning off the computer Use the following steps to turn off the computer by pressing the power button. Turning off ...
... computer's power button puts the computer into Sleep mode. 1 Click Start, Control Panel, System and Maintenance, and then Power Options. The Power Options window appears. 2 Click Change plan settings under the power plan to be customized. Start (Sample Image) Shut Down menu Arrow Shut Down menu 2 Click ...Start, and then click the arrow next to the Lock button in the lower-right part of the Start menu. The Edit Plan Settings window appears. 76 Getting Started Turning off the computer Use the following steps to turn off the computer by pressing the power button. Turning off ...
User Manual
Page 77
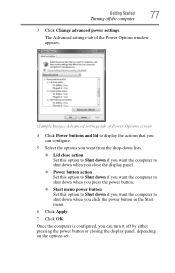
... off by either pressing the power button or closing the display panel, depending on the options set. The Advanced settings tab of the Power Options window appears. (Sample Image) Advanced settings tab of Power Options screen 4 Click Power buttons and lid to display the actions that you can configure. 5 Select the...
... off by either pressing the power button or closing the display panel, depending on the options set. The Advanced settings tab of the Power Options window appears. (Sample Image) Advanced settings tab of Power Options screen 4 Click Power buttons and lid to display the actions that you can configure. 5 Select the...
User Manual
Page 78
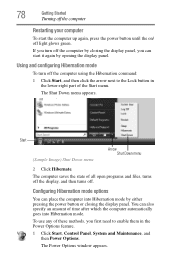
... first need to the Lock button in the Power Options feature. 1 Click Start, Control Panel, System and Maintenance, and then Power Options. The Power Options window appears. The Shut Down menu appears. To use any of time after which the computer automatically goes into Hibernation mode by opening the display panel...
... first need to the Lock button in the Power Options feature. 1 Click Start, Control Panel, System and Maintenance, and then Power Options. The Power Options window appears. The Shut Down menu appears. To use any of time after which the computer automatically goes into Hibernation mode by opening the display panel...

User Manual
Page 79
The Advanced settings tab of the Power Options window appears. (Sample Image) Advanced settings tab of Power Options screen 4 Click Power buttons and lid to display the actions that you can configure. 5 Select Hibernate ... the computer to go into Hibernation mode when you click the power button in the Start menu. 6 Click Apply. 7 Click OK. The Edit Plan Settings window appears. 3 Click Change advanced power settings. Getting Started 79 Turning off the computer 2 Click Change plan settings under the power plan to go into Hibernation...
The Advanced settings tab of the Power Options window appears. (Sample Image) Advanced settings tab of Power Options screen 4 Click Power buttons and lid to display the actions that you can configure. 5 Select Hibernate ... the computer to go into Hibernation mode when you click the power button in the Start menu. 6 Click Apply. 7 Click OK. The Edit Plan Settings window appears. 3 Click Change advanced power settings. Getting Started 79 Turning off the computer 2 Click Change plan settings under the power plan to go into Hibernation...

User Manual
Page 81
The Edit Plan Settings window appears. (Sample Image) Edit Plan Settings screen 3 To change the amount of time in both the On battery and Plugged in the Power Options feature. 1 ...: ❖ Under Put the computer to enable them in categories. ❖ To disable the computer from automatically entering Sleep mode, select Never. The Power Options window appears. 2 Click Change plan settings under the power plan to be customized.
The Edit Plan Settings window appears. (Sample Image) Edit Plan Settings screen 3 To change the amount of time in both the On battery and Plugged in the Power Options feature. 1 ...: ❖ Under Put the computer to enable them in categories. ❖ To disable the computer from automatically entering Sleep mode, select Never. The Power Options window appears. 2 Click Change plan settings under the power plan to be customized.

User Manual
Page 82
... option to Sleep if you click the power button in the Start menu. 7 Click Apply. 8 Click OK. The Advanced settings tab of the Power Options window appears. (Sample Image) Advanced settings tab of Power Options screen 5 Click Power buttons and lid to display the actions that you can place it into...
... option to Sleep if you click the power button in the Start menu. 7 Click Apply. 8 Click OK. The Advanced settings tab of the Power Options window appears. (Sample Image) Advanced settings tab of Power Options screen 5 Click Power buttons and lid to display the actions that you can place it into...


