User Manual
Page 11
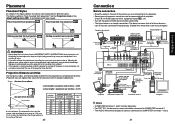
...is a sample connection. This does not mean that fact. Audio amplifier, etc. Floor-mounted front projection Floor-mounted rear projection Ceiling-mounted front projection Ceiling-mounted rear projection WARNING • Always obey the instructions listed in IMPORTANT SAFETY INSTRUCTIONS when placing the... • Read the owner's manual of the device you wish to mount the projector on a ceiling requires special ceiling brackets (sold separately) and specialized knowledge. Let everyone involved with TDP-T91) RGB cable (supplied) To RGB output Computer DVD video recorder,...
...is a sample connection. This does not mean that fact. Audio amplifier, etc. Floor-mounted front projection Floor-mounted rear projection Ceiling-mounted front projection Ceiling-mounted rear projection WARNING • Always obey the instructions listed in IMPORTANT SAFETY INSTRUCTIONS when placing the... • Read the owner's manual of the device you wish to mount the projector on a ceiling requires special ceiling brackets (sold separately) and specialized knowledge. Let everyone involved with TDP-T91) RGB cable (supplied) To RGB output Computer DVD video recorder,...
User Manual
Page 17
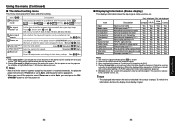
... on Sets whether to wait for customer service, etc. To refresh the information, dismiss the display, then display it again. p.20 (Standard) (Rear) (Mounted from ceiling) (Rear mounted from ceiling) No signal power off Set the timer to turn on is plugged in the event of the projector's internal control program. Yes No Notes...
... on Sets whether to wait for customer service, etc. To refresh the information, dismiss the display, then display it again. p.20 (Standard) (Rear) (Mounted from ceiling) (Rear mounted from ceiling) No signal power off Set the timer to turn on is plugged in the event of the projector's internal control program. Yes No Notes...

User Manual
Page 20
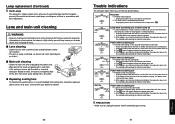
...being replaced. • Frequently check the used hours and prepare spares when the replacement time approaches. (Refer to happen if the lamp is mounted on resetting the lamp timer. Use care to avoid any difficulty in place using the projector, the lamp will appear. Lamp replacement A ...to light at least 1 hour. 3 Remove the lamp cover. p.33 • It is consumable supplies. See the lamp's manual for instructions on a ceiling, request a lamp replacement from the openings for repair service. 38 1 Unplug power cord. 2 Wait until the lamp cover is made out of the ...
...being replaced. • Frequently check the used hours and prepare spares when the replacement time approaches. (Refer to happen if the lamp is mounted on resetting the lamp timer. Use care to avoid any difficulty in place using the projector, the lamp will appear. Lamp replacement A ...to light at least 1 hour. 3 Remove the lamp cover. p.33 • It is consumable supplies. See the lamp's manual for instructions on a ceiling, request a lamp replacement from the openings for repair service. 38 1 Unplug power cord. 2 Wait until the lamp cover is made out of the ...
User Manual
Page 21
... in a neutral detergent diluted in accordance with the camera. ❈ The icon will appear before the power goes out. ❈ After approx. TDP-T91 (Red lit) (Green lit) Power went out during use ⇒ Problem inside the projector. (Green flashing) • Unplug the power ...easily scratched, so do not rub it with projector • Unplug the power cord, and contact your projector dealership. one minute of a ceiling-mounted unit from your dealer. ⇒ The lamp cover is not correctly connected. • Disconnect the power plug and check the connection with local...
... in a neutral detergent diluted in accordance with the camera. ❈ The icon will appear before the power goes out. ❈ After approx. TDP-T91 (Red lit) (Green lit) Power went out during use ⇒ Problem inside the projector. (Green flashing) • Unplug the power ...easily scratched, so do not rub it with projector • Unplug the power cord, and contact your projector dealership. one minute of a ceiling-mounted unit from your dealer. ⇒ The lamp cover is not correctly connected. • Disconnect the power plug and check the connection with local...


