
User Manual
Page 1
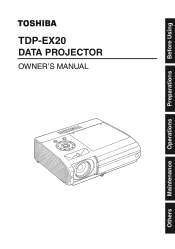
TDP-EX20 DATA PROJECTOR OWNER'S MANUAL Others Maintenance Operations Preparations Before Using
TDP-EX20 DATA PROJECTOR OWNER'S MANUAL Others Maintenance Operations Preparations Before Using
User Manual
Page 3
... kitchen sink, or laundry tub; Power Sources 4. Cleaning 10. Do not overload wall outlets; As this product near water. - Read Owner's Manual After unpacking this product from the lamp may result in a wet basement; Power-Cord Protection 6. to reduce the risk of electric shock, do ...9. Source of the and the power cord. Heat The product should be power company. Overloading Unplug this product, read the owner's manual carefully, and follow all the operating and other similar surface. Power-supply cords should be situated away from heat sources such as a ...
... kitchen sink, or laundry tub; Power Sources 4. Cleaning 10. Do not overload wall outlets; As this product near water. - Read Owner's Manual After unpacking this product from the lamp may result in a wet basement; Power-Cord Protection 6. to reduce the risk of electric shock, do ...9. Source of the and the power cord. Heat The product should be power company. Overloading Unplug this product, read the owner's manual carefully, and follow all the operating and other similar surface. Power-supply cords should be situated away from heat sources such as a ...

User Manual
Page 6
...unit for at the bottom of the product. • Using this unit immediately after changing the fuse. If this Instruction Manual. • Toshiba Corporation accepts no liability whatsoever for any damages arising from malfunctions arising from level. Plug configuration Plug type Plug Line voltage configuration...8226; Be sure the power cord is easily reached for information being intercepted or leaked due to [High]. POWER SUPPLY INFORMATION If your projector. Do not use the unit for a long time. In the spaces provided below, record the Model and Serial No. located at least...
...unit for at the bottom of the product. • Using this unit immediately after changing the fuse. If this Instruction Manual. • Toshiba Corporation accepts no liability whatsoever for any damages arising from malfunctions arising from level. Plug configuration Plug type Plug Line voltage configuration...8226; Be sure the power cord is easily reached for information being intercepted or leaked due to [High]. POWER SUPPLY INFORMATION If your projector. Do not use the unit for a long time. In the spaces provided below, record the Model and Serial No. located at least...

User Manual
Page 7
...in this document are trademarks or registered trademarks of International Business Machines Corporation. • DLP® (Digital Light Processing) is a registered trademark of Texas Instruments, Inc. ...product, please contact your package exactly. 12 REMOTE CONTROL BATTERIES Caution • Never throw batteries into the battery compartment. 13 Before Using Copyright© 2000-2006 Ingenient Technologies,..., if making a reference to page 36: p.36 • The illustrations in This Manual • References to burn or injury. For more detailed information about recycling of this ...
...in this document are trademarks or registered trademarks of International Business Machines Corporation. • DLP® (Digital Light Processing) is a registered trademark of Texas Instruments, Inc. ...product, please contact your package exactly. 12 REMOTE CONTROL BATTERIES Caution • Never throw batteries into the battery compartment. 13 Before Using Copyright© 2000-2006 Ingenient Technologies,..., if making a reference to page 36: p.36 • The illustrations in This Manual • References to burn or injury. For more detailed information about recycling of this ...
User Manual
Page 9
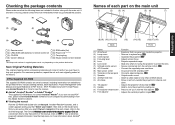
...; Reader®. 16 Names of supplied power cords vary depending on a bookmark title to view that has grown hot inside the projector. (2) Lamp cover : Remove to view the manual. N Adobe® Acrobat® Reader® or Adobe® Reader® The supplied CD-ROM does not contain Acrobat®..., please contact the store immediately where you are included in handy if you ever have to ship your projector. For maximum protection, repack the set up or stow the foot adjuster. N Viewing the manual Run the CD-ROM and double-click on p. p.29 (17) Foot adjuster : Adjusts the vertical ...
...; Reader®. 16 Names of supplied power cords vary depending on a bookmark title to view that has grown hot inside the projector. (2) Lamp cover : Remove to view the manual. N Adobe® Acrobat® Reader® or Adobe® Reader® The supplied CD-ROM does not contain Acrobat®..., please contact the store immediately where you are included in handy if you ever have to ship your projector. For maximum protection, repack the set up or stow the foot adjuster. N Viewing the manual Run the CD-ROM and double-click on p. p.29 (17) Foot adjuster : Adjusts the vertical ...

User Manual
Page 10
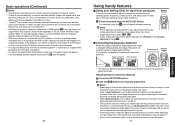
p.37 : Adjusts the screen size. : Performs auto-adjustment of the projector. p.31 : Turns the power on/off (standby). p.28 : Adjusts keystone distortion. p.90 : Adjusts the screen size. : Accepts the selected mode. : Displays menus. p.34 (16) ... p.22 : Proceeds PowerPoint® slides. button : Enlarges image. p.37 : Displays lamp mode. p.26 18 Name : Main Function (5) AUTO SET button : Performs auto-adjustment of this manual, buttons are referred to as left-click of procedures other than those specified herein may lead to dangerous exposure to that of input...
p.37 : Adjusts the screen size. : Performs auto-adjustment of the projector. p.31 : Turns the power on/off (standby). p.28 : Adjusts keystone distortion. p.90 : Adjusts the screen size. : Accepts the selected mode. : Displays menus. p.34 (16) ... p.22 : Proceeds PowerPoint® slides. button : Enlarges image. p.37 : Displays lamp mode. p.26 18 Name : Main Function (5) AUTO SET button : Performs auto-adjustment of this manual, buttons are referred to as left-click of procedures other than those specified herein may lead to dangerous exposure to that of input...

User Manual
Page 13
...AV cable (not supplied) Notes • The COMPUTER 1 IN terminal functions identically to this projector, but it is projected with the INPUT button. Connection Before connection • Read the owner's manual of the device you are output from MONITOR OUT terminal even in standby mode. This does ... Computer (for devices connected to COMPUTER terminals 1 and 2. • When an AUDIO OUT terminal is connected, sound is not output from the projector speaker. • Output volume of AUDIO OUT terminal can be used or connected to the COMPUTER 2 IN terminal. • The MONITOR OUT terminal...
...AV cable (not supplied) Notes • The COMPUTER 1 IN terminal functions identically to this projector, but it is projected with the INPUT button. Connection Before connection • Read the owner's manual of the device you are output from MONITOR OUT terminal even in standby mode. This does ... Computer (for devices connected to COMPUTER terminals 1 and 2. • When an AUDIO OUT terminal is connected, sound is not output from the projector speaker. • Output volume of AUDIO OUT terminal can be used or connected to the COMPUTER 2 IN terminal. • The MONITOR OUT terminal...

User Manual
Page 15
...first time after purchase, the start the connected device such as Standard. The display automatically disappears in a selected language. An image of the projector to [Off] in the Default setting 1 menu, the keystone distortion will be displayed the next time when the power is displayed in a few ... button. It is automatically set via the Display setting menu p.40 and Lamp power via the Default setting 2 menu p.44 . • This owner's manual assumes that is outputting video signals. 28 Notes • When [Auto input search] is set to [On] in the Default setting 1 menu p.43 ...
...first time after purchase, the start the connected device such as Standard. The display automatically disappears in a selected language. An image of the projector to [Off] in the Default setting 1 menu, the keystone distortion will be displayed the next time when the power is displayed in a few ... button. It is automatically set via the Display setting menu p.40 and Lamp power via the Default setting 2 menu p.44 . • This owner's manual assumes that is outputting video signals. 28 Notes • When [Auto input search] is set to [On] in the Default setting 1 menu p.43 ...
User Manual
Page 16
...Press the remote control's AUTO SET button. Notes • The image may not be projected or auto adjustment/setting may not be adjusted manually. This projector is changed while projecting the image, the picture will appear. 30 Using handy features N Using auto setting (Only for input from computer)...• A lamp is made using simple operations. In such a case, reset either digital zoom or keystone correction to use .) • The DLP® chip is consumable item. If used for keystone adjustment. To view high-quality images, it is recommended that you do not light) or bright...
...Press the remote control's AUTO SET button. Notes • The image may not be projected or auto adjustment/setting may not be adjusted manually. This projector is changed while projecting the image, the picture will appear. 30 Using handy features N Using auto setting (Only for input from computer)...• A lamp is made using simple operations. In such a case, reset either digital zoom or keystone correction to use .) • The DLP® chip is consumable item. If used for keystone adjustment. To view high-quality images, it is recommended that you do not light) or bright...

User Manual
Page 22
... Displays the registered image by the copyright laws. On Off Beep Beep when operation is made with signals is only selected or not. Manual Auto Detailed description [Blackboard mode] Projects the image in accordance with the projecting surface. On Off Blackboard mode When projecting on a non...1 (Continued) How to register user logo 1 Project a picture to [Auto], then if the power is supplied when restored after a power outage, the projector will come on. 43 Operations Notes • You can register a logo when the input is set to register. 2 Select [User logo] in the...
... Displays the registered image by the copyright laws. On Off Beep Beep when operation is made with signals is only selected or not. Manual Auto Detailed description [Blackboard mode] Projects the image in accordance with the projecting surface. On Off Blackboard mode When projecting on a non...1 (Continued) How to register user logo 1 Project a picture to [Auto], then if the power is supplied when restored after a power outage, the projector will come on. 43 Operations Notes • You can register a logo when the input is set to register. 2 Select [User logo] in the...
User Manual
Page 27
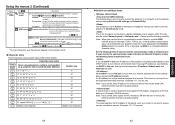
... setting, the following items IP address, Subnet mask and Gateway manually. WEB browser Browser authentication: Switch on the projector (Update automatically) using characters, numbers, and symbols (e.g., projector name and destination address) "1 Number only "1" "2" "A" "B" "C" "a" "b" "c" "2" "3" "D" "E" "F" "d" "e" "f" "3" "4" "G" "H" "I" "g" "h" "i" "4" "5" "J" "K" "L" "j" "k" "l" "5" "6" "M" "N" "O" "m" "n" "o" ...connect the projector to the setting screen using numeric keys of the remote control. Change the setting if you set the IP address manually. L ...
... setting, the following items IP address, Subnet mask and Gateway manually. WEB browser Browser authentication: Switch on the projector (Update automatically) using characters, numbers, and symbols (e.g., projector name and destination address) "1 Number only "1" "2" "A" "B" "C" "a" "b" "c" "2" "3" "D" "E" "F" "d" "e" "f" "3" "4" "G" "H" "I" "g" "h" "i" "4" "5" "J" "K" "L" "j" "k" "l" "5" "6" "M" "N" "O" "m" "n" "o" ...connect the projector to the setting screen using numeric keys of the remote control. Change the setting if you set the IP address manually. L ...

User Manual
Page 28
...] Set the authentication to Not use, then set the following items IP address, Subnet mask and Gateway manually. Note 2: The longer the strings of the projector is a string of wireless LAN terminal to WEP, Key index must be connected with the one for the... dictionary and change the key sometimes. Note: Network authentication is selected. However, the setting of key index varies by a third party within the projector's coverage. Set Encryption according to None. Select a method identical to that of characters. Note 1: Alphabetic characters (A to F, a to f) ...
...] Set the authentication to Not use, then set the following items IP address, Subnet mask and Gateway manually. Note 2: The longer the strings of the projector is a string of wireless LAN terminal to WEP, Key index must be connected with the one for the... dictionary and change the key sometimes. Note: Network authentication is selected. However, the setting of key index varies by a third party within the projector's coverage. Set Encryption according to None. Select a method identical to that of characters. Note 1: Alphabetic characters (A to F, a to f) ...

User Manual
Page 29
Note • The Easy Connect utility p.70 allows users to easily connect the projector to the same values. N Computer settings Refer to instruction manuals of your computer or wireless LAN adapter to perform the following settings. • Select Ad hoc (for some wireless...Password Disconnect Description Set password On Off Disconnect while transferring an image using numeric keys of the remote control. Refer to the user's manual supplied with multiple projectors, or if there is a possibility that is out of the SMTP server. : Enter within 60 characters. (Example: xxx@xxx....
Note • The Easy Connect utility p.70 allows users to easily connect the projector to the same values. N Computer settings Refer to instruction manuals of your computer or wireless LAN adapter to perform the following settings. • Select Ad hoc (for some wireless...Password Disconnect Description Set password On Off Disconnect while transferring an image using numeric keys of the remote control. Refer to the user's manual supplied with multiple projectors, or if there is a possibility that is out of the SMTP server. : Enter within 60 characters. (Example: xxx@xxx....

User Manual
Page 33
... Image transmission mode window from the popup menu. To switch to the projector. When the Network Utility launches, the Screen Image transmission mode window appears on Update automatically or Update manually. Select the desired application from this icon, or right click and select... Open from another mode, click on the projector's screen for transmission will consume the computer's resources, which could ...
... Image transmission mode window from the popup menu. To switch to the projector. When the Network Utility launches, the Screen Image transmission mode window appears on Update automatically or Update manually. Select the desired application from this icon, or right click and select... Open from another mode, click on the projector's screen for transmission will consume the computer's resources, which could ...

User Manual
Page 36
..., proceed as instructed in the user's manual supplied with the USB memory or the computer. • Setting on the projector 5 Turn the projector power on the computer's screen. 71 Operations See p.49 for USB memory connection appears. 3 Select [Projector settings] and click OK, then enter ... Launch the Network Utility software application. Using the Network Utility (Continued) N Easy Connect utility This feature allows users to easily connect the projector to the USB memory. 4 Unplug the USB memory from the computer. The dialog box for available USB memories. 1) Copying the computer ...
..., proceed as instructed in the user's manual supplied with the USB memory or the computer. • Setting on the projector 5 Turn the projector power on the computer's screen. 71 Operations See p.49 for USB memory connection appears. 3 Select [Projector settings] and click OK, then enter ... Launch the Network Utility software application. Using the Network Utility (Continued) N Easy Connect utility This feature allows users to easily connect the projector to the USB memory. 4 Unplug the USB memory from the computer. The dialog box for available USB memories. 1) Copying the computer ...

User Manual
Page 37
...64257;rmation window appears, insert the USB memory into the computer. 9 After a confirmation message appears, make necessary wireless LAN settings manually. 73 Operations Precaution • The simple 1:1 connection, the USB memory connection and the profile setting may not work normally depending ...Advanced setting This feature allows the user to set up the window of wired LAN) is complete, the projector name of the connected projector or the projector ID (MAC address of Projector Configuration Tool by pressing the WEB browser button. When such a case arises, use the ...
...64257;rmation window appears, insert the USB memory into the computer. 9 After a confirmation message appears, make necessary wireless LAN settings manually. 73 Operations Precaution • The simple 1:1 connection, the USB memory connection and the profile setting may not work normally depending ...Advanced setting This feature allows the user to set up the window of wired LAN) is complete, the projector name of the connected projector or the projector ID (MAC address of Projector Configuration Tool by pressing the WEB browser button. When such a case arises, use the ...

User Manual
Page 44
... to replace the outer lamp cover.) 9 Reset the lamp time. WARNING • If the projector is mounted on the ceiling, it . • If the lamp should break, please handle with your Toshiba dealership when the lamp has to broken pieces and contact your convenience. 3 Outer lamp cover 86...raise the outer lamp cover with care to avoid injury due to be hazardous. See the lamp's manual for at high elevations can use lamp "TLPLW15" (sold separately). Uncovering the lamp while the projector is mounted on a ceiling may cause burn injuries. CAUTION • If you can also be...
... to replace the outer lamp cover.) 9 Reset the lamp time. WARNING • If the projector is mounted on the ceiling, it . • If the lamp should break, please handle with your Toshiba dealership when the lamp has to broken pieces and contact your convenience. 3 Outer lamp cover 86...raise the outer lamp cover with care to avoid injury due to be hazardous. See the lamp's manual for at high elevations can use lamp "TLPLW15" (sold separately). Uncovering the lamp while the projector is mounted on a ceiling may cause burn injuries. CAUTION • If you can also be...


