
User Manual
Page 2
... BUSINESS, PROFITS, PROGRAMS, DATA, NETWORK SYSTEMS OR REMOVABLE STORAGE MEDIA ARISING OUT OF OR RESULTING FROM THE USE OF THE PRODUCT, EVEN IF ADVISED OF THE POSSIBILITY THEREOF. TOSHIBA DISCLAIMS ANY LIABILITY FOR THE FAILURE TO COPY OR TRANSFER THE DATA CORRECTLY. Model: Satellite Pro® S300/S300M Series Recordable and/or ReWritable Drive(s) and Associated Software Warranty The computer system you...
... BUSINESS, PROFITS, PROGRAMS, DATA, NETWORK SYSTEMS OR REMOVABLE STORAGE MEDIA ARISING OUT OF OR RESULTING FROM THE USE OF THE PRODUCT, EVEN IF ADVISED OF THE POSSIBILITY THEREOF. TOSHIBA DISCLAIMS ANY LIABILITY FOR THE FAILURE TO COPY OR TRANSFER THE DATA CORRECTLY. Model: Satellite Pro® S300/S300M Series Recordable and/or ReWritable Drive(s) and Associated Software Warranty The computer system you...
User Manual
Page 5
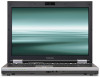
... necessary for them know of this change. 5 Connection to party line service is subject to provide you with this equipment, for repair or standard limited warranty information, please contact Toshiba Corporation, Toshiba America Information Systems, Inc. In order to do this, it may occasionally be a 900 number or any changes necessary to the fax software instructions installed on the first page of...
... necessary for them know of this change. 5 Connection to party line service is subject to provide you with this equipment, for repair or standard limited warranty information, please contact Toshiba Corporation, Toshiba America Information Systems, Inc. In order to do this, it may occasionally be a 900 number or any changes necessary to the fax software instructions installed on the first page of...

User Manual
Page 29
... 50 Opening the display panel 50 Your computer's features and specifications ....51 Turning on the power 51 Adding memory (optional 52 Installing a memory module 53 Removing a memory module 58 Checking total memory 60 Hard Drive Recovery Utilities 61 Creating Recovery DVDs 62 Hard Disk Drive Recovery options 63 Hard Disk Drive Recovery using the Recovery media 68 Checking the HDD operating status 70 Installing drivers and applications 70 Using the TouchPad 71 Scrolling with the TouchPad 71 Control buttons 72 Disabling or enabling the TouchPad 72 Using external display devices...
... 50 Opening the display panel 50 Your computer's features and specifications ....51 Turning on the power 51 Adding memory (optional 52 Installing a memory module 53 Removing a memory module 58 Checking total memory 60 Hard Drive Recovery Utilities 61 Creating Recovery DVDs 62 Hard Disk Drive Recovery options 63 Hard Disk Drive Recovery using the Recovery media 68 Checking the HDD operating status 70 Installing drivers and applications 70 Using the TouchPad 71 Scrolling with the TouchPad 71 Control buttons 72 Disabling or enabling the TouchPad 72 Using external display devices...

User Manual
Page 34
... configuration backup in the Windows® operating system 200 If you need further assistance 204 Before you contact Toshiba 204 Contacting Toshiba 205 Other Toshiba Internet Web sites 206 Toshiba's worldwide offices 206 Appendix A: Hot Keys/TOSHIBA Cards 208 Hot Key Cards 208 Using the Hot Key Cards 209 Application Cards 210 Using the Application Cards 211 Card Case 211 Hot key functions 212 Volume Mute 213 Lock (Instant security 214 Power plan 215 Sleep mode 216 Hibernation mode 217 Output (Display switch 218 Display brightness 219 Disabling or enabling wireless devices...
... configuration backup in the Windows® operating system 200 If you need further assistance 204 Before you contact Toshiba 204 Contacting Toshiba 205 Other Toshiba Internet Web sites 206 Toshiba's worldwide offices 206 Appendix A: Hot Keys/TOSHIBA Cards 208 Hot Key Cards 208 Using the Hot Key Cards 209 Application Cards 210 Using the Application Cards 211 Card Case 211 Hot key functions 212 Volume Mute 213 Lock (Instant security 214 Power plan 215 Sleep mode 216 Hibernation mode 217 Output (Display switch 218 Display brightness 219 Disabling or enabling wireless devices...
User Manual
Page 53
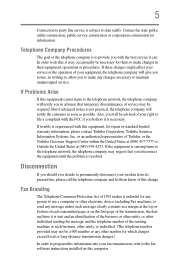
... be hot. If you install or remove a memory module, turn off the computer using the Start menu. If only one or two memory modules. Allow the module to cool to room temperature before they have cooled. The computer has two memory slots-Slot A and Slot B. Before you install or remove a memory module while the computer is the bottom slot. You will need a small Phillips screwdriver for this model Slot A is in Sleep or Hibernation mode, data...
... be hot. If you install or remove a memory module, turn off the computer using the Start menu. If only one or two memory modules. Allow the module to cool to room temperature before they have cooled. The computer has two memory slots-Slot A and Slot B. Before you install or remove a memory module while the computer is the bottom slot. You will need a small Phillips screwdriver for this model Slot A is in Sleep or Hibernation mode, data...
User Manual
Page 58
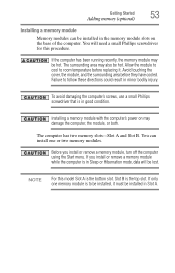
... memory (optional) 14 Replace the memory module slot cover and secure it on page 119. 16 Turn the computer right side up the computer. You can damage the computer and the memory module. In either of the above cases, the Sleep configuration will be saved. For more information on inserting the main battery, see "Inserting a charged battery" on and data in "Installing a memory module" on page 53 to remove a memory module...
... memory (optional) 14 Replace the memory module slot cover and secure it on page 119. 16 Turn the computer right side up the computer. You can damage the computer and the memory module. In either of the above cases, the Sleep configuration will be saved. For more information on inserting the main battery, see "Inserting a charged battery" on and data in "Installing a memory module" on page 53 to remove a memory module...
User Manual
Page 60
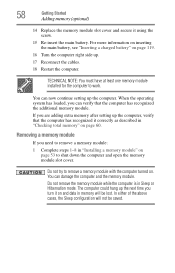
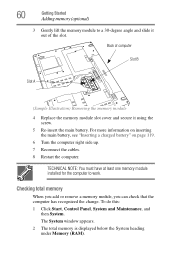
.... 2 The total memory is displayed below the System heading under Memory (RAM). To do this: 1 Click Start, Control Panel, System and Maintenance, and then System. TECHNICAL NOTE: You must have at least one memory module installed for the computer to a 30-degree angle and slide it using the screw. 5 Re-insert the main battery. Back of computer Slot B Slot A (Sample Illustration) Removing the memory module 4 Replace the memory module slot cover and secure...
.... 2 The total memory is displayed below the System heading under Memory (RAM). To do this: 1 Click Start, Control Panel, System and Maintenance, and then System. TECHNICAL NOTE: You must have at least one memory module installed for the computer to a 30-degree angle and slide it using the screw. 5 Re-insert the main battery. Back of computer Slot B Slot A (Sample Illustration) Removing the memory module 4 Replace the memory module slot cover and secure...
User Manual
Page 61
... Started Hard Drive Recovery Utilities 61 If the computer does not recognize the memory configuration, turn off the computer and remove the memory module slot cover (complete steps 1-8 in "Installing a memory module" on page 53), and then check that says, "Windows® needs your permission to continue." If you create recovery DVDs before using a writable drive. ❖ Recover your hard disk drive to the factory-set default. ❖ Recover just your C: drive, leaving any other partitions you may have created intact, for example, a D: drive. ❖ Recover...
... Started Hard Drive Recovery Utilities 61 If the computer does not recognize the memory configuration, turn off the computer and remove the memory module slot cover (complete steps 1-8 in "Installing a memory module" on page 53), and then check that says, "Windows® needs your permission to continue." If you create recovery DVDs before using a writable drive. ❖ Recover your hard disk drive to the factory-set default. ❖ Recover just your C: drive, leaving any other partitions you may have created intact, for example, a D: drive. ❖ Recover...
User Manual
Page 72
... external monitor or projector via the RGB (monitor) port. The function of the secondary (right-hand) button depends on the program you need to install new software. 2 Connect the monitor's video cable to the RGB (monitor) port on the back of the computer. 3 Connect the device's power cable to determine whether it uses the right mouse button. This hot key enables/disables the TouchPad. It usually corresponds to the item, then press and release the primary (left mouse button. Connecting an external monitor...
... external monitor or projector via the RGB (monitor) port. The function of the secondary (right-hand) button depends on the program you need to install new software. 2 Connect the monitor's video cable to the RGB (monitor) port on the back of the computer. 3 Connect the device's power cable to determine whether it uses the right mouse button. This hot key enables/disables the TouchPad. It usually corresponds to the item, then press and release the primary (left mouse button. Connecting an external monitor...
User Manual
Page 150
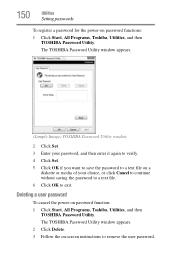
... password to a text file. 6 Click OK to remove the user password. The TOSHIBA Password Utility window appears. 2 Click Delete. 3 Follow the on a diskette or media of your password, and then enter it again to verify. 4 Click Set. 5 Click OK if you want to save the password to a text file on -screen instructions to exit. 150 Utilities Setting passwords To register a password for the power-on password function: 1 Click Start, All Programs, Toshiba, Utilities, and then TOSHIBA Password Utility...
... password to a text file. 6 Click OK to remove the user password. The TOSHIBA Password Utility window appears. 2 Click Delete. 3 Follow the on a diskette or media of your password, and then enter it again to verify. 4 Click Set. 5 Click OK if you want to save the password to a text file on -screen instructions to exit. 150 Utilities Setting passwords To register a password for the power-on password function: 1 Click Start, All Programs, Toshiba, Utilities, and then TOSHIBA Password Utility...

User Manual
Page 162
... is not connected to the computer, the battery of the computer will be supplied to compatible ports even when the power of the computer is turned OFF. ❖ USB bus power (DC 5V) is similarly supplied to the external devices which are two modes, Mode-1 and Mode-2 in Enabled. Changing the setting to Mode-1. However, some external devices cannot be stopped for safety reasons. USB Sleep and Charge function Settings-The default setting is Disabled. Metal...
... is not connected to the computer, the battery of the computer will be supplied to compatible ports even when the power of the computer is turned OFF. ❖ USB bus power (DC 5V) is similarly supplied to the external devices which are two modes, Mode-1 and Mode-2 in Enabled. Changing the setting to Mode-1. However, some external devices cannot be stopped for safety reasons. USB Sleep and Charge function Settings-The default setting is Disabled. Metal...
User Manual
Page 163
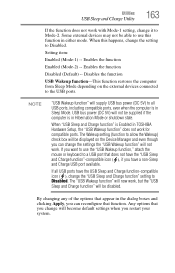
... Charge USB port available. By changing any of the options that appear in either mode. NOTE "USB Wakeup function" will not work. The Wakeup setting (function to allow the Wakeup) check box will be able to use the "USB Wakeup function," attach the mouse or keyboard to all USB ports have the USB Sleep and Charge function-compatible icon ( ), change the "USB Sleep and Charge function" setting to Mode-2. Enables the function Enabled (Mode-2) -- Some external devices may not be displayed on the external devices connected to Disabled. When this function...
... Charge USB port available. By changing any of the options that appear in either mode. NOTE "USB Wakeup function" will not work. The Wakeup setting (function to allow the Wakeup) check box will be able to use the "USB Wakeup function," attach the mouse or keyboard to all USB ports have the USB Sleep and Charge function-compatible icon ( ), change the "USB Sleep and Charge function" setting to Mode-2. Enables the function Enabled (Mode-2) -- Some external devices may not be displayed on the external devices connected to Disabled. When this function...
User Manual
Page 180
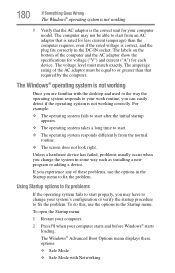
... working correctly. Using Startup options to fix problems If the operating system fails to start . ❖ The operating system responds differently from an AC adaptor that is rated for less current (amperage) than that the AC adaptor is the correct unit for each device. To do this, use the options in some way such as installing a new program or adding a device. The Windows® Advanced Boot Options menu displays these problems, use...
... working correctly. Using Startup options to fix problems If the operating system fails to start . ❖ The operating system responds differently from an AC adaptor that is rated for less current (amperage) than that the AC adaptor is the correct unit for each device. To do this, use the options in some way such as installing a new program or adding a device. The Windows® Advanced Boot Options menu displays these problems, use...
User Manual
Page 184
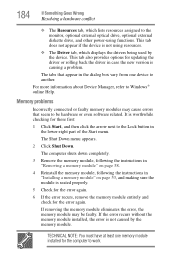
... more information about Device Manager, refer to work. The tabs that seem to the monitor, optional external optical drive, optional external diskette drive, and other power-using functions. Memory problems Incorrectly connected or faulty memory modules may be hardware or even software related. The computer shuts down completely. 3 Remove the memory module, following the instructions in "Removing a memory module" on page 58. 4 Reinstall the memory module, following the instructions in "Installing a memory module" on page 53, and making sure the module is not caused by...
... more information about Device Manager, refer to work. The tabs that seem to the monitor, optional external optical drive, optional external diskette drive, and other power-using functions. Memory problems Incorrectly connected or faulty memory modules may be hardware or even software related. The computer shuts down completely. 3 Remove the memory module, following the instructions in "Removing a memory module" on page 58. 4 Reinstall the memory module, following the instructions in "Installing a memory module" on page 53, and making sure the module is not caused by...
User Manual
Page 187
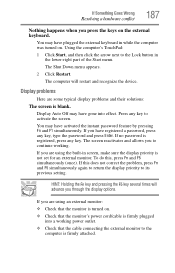
... you are using the built-in the lower-right part of the Start menu. If Something Goes Wrong Resolving a hardware conflict 187 Nothing happens when you through the display options. The computer will advance you press the keys on . Using the computer's TouchPad: 1 Click Start, and then click the arrow next to the Lock button in screen, make sure the display priority is not set for an external monitor.
... you are using the built-in the lower-right part of the Start menu. If Something Goes Wrong Resolving a hardware conflict 187 Nothing happens when you through the display options. The computer will advance you press the keys on . Using the computer's TouchPad: 1 Click Start, and then click the arrow next to the Lock button in screen, make sure the display priority is not set for an external monitor.
User Manual
Page 238
... to create a complete screen image. interlaced - Interlaced monitors take two passes to add or remove devices from a computer while the computer is refreshed. Memory cache installed on the network. When you turn on the screen that saves to the internal storage drive the current state of your work , including all open files and programs, when you use to interact with the Fn key can set system options or control...
... to create a complete screen image. interlaced - Interlaced monitors take two passes to add or remove devices from a computer while the computer is refreshed. Memory cache installed on the network. When you turn on the screen that saves to the internal storage drive the current state of your work , including all open files and programs, when you use to interact with the Fn key can set system options or control...
User Manual
Page 244
... charge indicator light 49, 111 charge not lasting 186 charging 47, 49 conserving power 114 disposal 122 low charge 113 monitoring power 49, 111 244 not charging 185 notifications 113 power plan 215 power plan hot key 116 real-time clock (RTC) 108 removing 117 BIOS Setup see TOSHIBA Hardware Setup Bridge Media Adapter inserting memory media 137 removing memory media 137 button power 52, 62 start 126 C CD, using 99 character keys 91 charging the battery 49 checking device properties 183 click 72 communications network connection...
... charge indicator light 49, 111 charge not lasting 186 charging 47, 49 conserving power 114 disposal 122 low charge 113 monitoring power 49, 111 244 not charging 185 notifications 113 power plan 215 power plan hot key 116 real-time clock (RTC) 108 removing 117 BIOS Setup see TOSHIBA Hardware Setup Bridge Media Adapter inserting memory media 137 removing memory media 137 button power 52, 62 start 126 C CD, using 99 character keys 91 charging the battery 49 checking device properties 183 click 72 communications network connection...
User Manual
Page 245
... connecting to a power source 47 connection set up 128 control buttons 72 Ctrl keys 92 D desktop creating new icon 125 major features 125 desktop exploration 124 desktop icons 125 Device Manager 183 checking properties 183 devices keyboard 74 mouse 74 Disk Defragmenter 190 disk drive corrupted/damaged data files 190 missing files/trouble accessing a disk 189 running slow 190 diskette drive cannot insert a diskette 190 cannot read a diskette 190 connecting 76 external, connecting 76 display...
... connecting to a power source 47 connection set up 128 control buttons 72 Ctrl keys 92 D desktop creating new icon 125 major features 125 desktop exploration 124 desktop icons 125 Device Manager 183 checking properties 183 devices keyboard 74 mouse 74 Disk Defragmenter 190 disk drive corrupted/damaged data files 190 missing files/trouble accessing a disk 189 running slow 190 diskette drive cannot insert a diskette 190 cannot read a diskette 190 connecting 76 external, connecting 76 display...
User Manual
Page 247
... monitor 72 connecting 72 not working 187 mouse installing 74 mouse utility 158 N network accessing 128 Connect to the Internet 128 networking wireless 127 Notification Area 126 O Opening the display panel 50 optical disc positioning 102 optical discs handling 102 inserting 101 removing 104 optical drive problems 191 troubleshooting 191 using 99 optical media recording 103 other documentation 40 overlay keys 93 P password deleting a supervisor 149 disabling a user 150 setting a user 149 supervisor set up 148 types 147 passwords instant, using 147 setting 147 PC Card...
... monitor 72 connecting 72 not working 187 mouse installing 74 mouse utility 158 N network accessing 128 Connect to the Internet 128 networking wireless 127 Notification Area 126 O Opening the display panel 50 optical disc positioning 102 optical discs handling 102 inserting 101 removing 104 optical drive problems 191 troubleshooting 191 using 99 optical media recording 103 other documentation 40 overlay keys 93 P password deleting a supervisor 149 disabling a user 150 setting a user 149 supervisor set up 148 types 147 passwords instant, using 147 setting 147 PC Card...
User Manual
Page 249
... 123 troubleshooting DVD player general problems 198 external keyboard 186 keyboard 186 keypad overlay 186 optical drive 191 turning on the computer 51 turning on the power 51 U USB Sleep and Charge Utility 161 user password, disabling 150 user password, setting 149 using 132 using a file extension 98 Utilities 140 V video projector adjusting display 74 W warranty standard limited warranty 40 Web 130 Web Camera 134 Web sites 205 Wi-Fi® wireless networking 127 Windows® Explorer 95 Windows® operating system...
... 123 troubleshooting DVD player general problems 198 external keyboard 186 keyboard 186 keypad overlay 186 optical drive 191 turning on the computer 51 turning on the power 51 U USB Sleep and Charge Utility 161 user password, disabling 150 user password, setting 149 using 132 using a file extension 98 Utilities 140 V video projector adjusting display 74 W warranty standard limited warranty 40 Web 130 Web Camera 134 Web sites 205 Wi-Fi® wireless networking 127 Windows® Explorer 95 Windows® operating system...


