
Users Manual Canada; English
Page 3
.../Satellite Pro L650/L650D System Recovery 1-13 Chapter 2 The Grand Tour Front with the display closed 2-1 Left side 2-2 Right side 2-4 Back 2-5 Underside 2-6 Front with the display open 2-7 Indicators 2-9 Optical disc drives 2-11 AC adaptor 2-15 Chapter 3 Hardware, Utilities and Options Hardware 3-1 Special features 3-7 Utilities and Applications 3-9 Optional devices 3-15 Bridge media slot 3-16 Optional accessories 3-30 Chapter 4 Operating Basics Using the Touch Pad 4-1 Web Camera 4-2 Using the TOSHIBA Face Recognition 4-3 Using optical disc drives 4-6 Writing CD/DVD...
.../Satellite Pro L650/L650D System Recovery 1-13 Chapter 2 The Grand Tour Front with the display closed 2-1 Left side 2-2 Right side 2-4 Back 2-5 Underside 2-6 Front with the display open 2-7 Indicators 2-9 Optical disc drives 2-11 AC adaptor 2-15 Chapter 3 Hardware, Utilities and Options Hardware 3-1 Special features 3-7 Utilities and Applications 3-9 Optional devices 3-15 Bridge media slot 3-16 Optional accessories 3-30 Chapter 4 Operating Basics Using the Touch Pad 4-1 Web Camera 4-2 Using the TOSHIBA Face Recognition 4-3 Using optical disc drives 4-6 Writing CD/DVD...
Users Manual Canada; English
Page 4
... CPU G-1 Memory (Main System G-2 Battery Life G-3 Hard Disk Drive (HDD) Capacity G-3 LCD G-3 Graphics Processor Unit ("GPU G-3 Wireless LAN G-4 User's Manual iv Satellite L650/L655/L650D/L655D/Satellite Pro L650/L650D Battery 6-3 Password Utility 6-10 Starting the computer by password 6-10 Power-up modes 6-11 Panel power on/off 6-11 System automatic Sleep/Hibernation 6-11 Chapter 7 HW Setup Accessing HW Setup 7-1 HW Setup window 7-1 Chapter 8 Troubleshooting Problem solving process 8-1 Hardware and system checklist 8-3 TOSHIBA support 8-19 Appendix A Specifications...
... CPU G-1 Memory (Main System G-2 Battery Life G-3 Hard Disk Drive (HDD) Capacity G-3 LCD G-3 Graphics Processor Unit ("GPU G-3 Wireless LAN G-4 User's Manual iv Satellite L650/L655/L650D/L655D/Satellite Pro L650/L650D Battery 6-3 Password Utility 6-10 Starting the computer by password 6-10 Power-up modes 6-11 Panel power on/off 6-11 System automatic Sleep/Hibernation 6-11 Chapter 7 HW Setup Accessing HW Setup 7-1 HW Setup window 7-1 Chapter 8 Troubleshooting Problem solving process 8-1 Hardware and system checklist 8-3 TOSHIBA support 8-19 Appendix A Specifications...
Users Manual Canada; English
Page 6
... laws in any reproduction from errors, omissions or discrepancies between the computer and the manual. TOSHIBA Satellite L650/L655/L650D/L655D/Satellite Pro L650/L650D Series User's Manual First edition March 2010 Copyright authority for accuracy. Please comply with respect to digital format, alteration, transfer of copied material and distribution on a network) without the permission of the copyright owner is a violation of Intel Corporation...
... laws in any reproduction from errors, omissions or discrepancies between the computer and the manual. TOSHIBA Satellite L650/L655/L650D/L655D/Satellite Pro L650/L650D Series User's Manual First edition March 2010 Copyright authority for accuracy. Please comply with respect to digital format, alteration, transfer of copied material and distribution on a network) without the permission of the copyright owner is a violation of Intel Corporation...
Users Manual Canada; English
Page 24
... formats to set up your computer. User's Manual xxii This manual tells how to describe, identify, and highlight terms and operating procedures. Read Chapter 3, Hardware, Utilities and Options if connecting optional products or external devices. For example: Read Only Memory (ROM). It also provides detailed information on configuring your computer, basic operations and care, using your purchase of the Satellite L650/L655/L650D/L655D/Satellite Pro L650/L650D series computer. Preface Congratulations on your Satellite L650...
... formats to set up your computer. User's Manual xxii This manual tells how to describe, identify, and highlight terms and operating procedures. Read Chapter 3, Hardware, Utilities and Options if connecting optional products or external devices. For example: Read Only Memory (ROM). It also provides detailed information on configuring your computer, basic operations and care, using your purchase of the Satellite L650/L655/L650D/L655D/Satellite Pro L650/L650D series computer. Preface Congratulations on your Satellite L650...
Users Manual Canada; English
Page 31
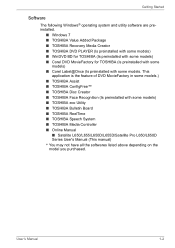
... with some models. User's Manual 1-2 This application is the feature of DVD MovieFactory in some models.) ■ TOSHIBA Assist ■ TOSHIBA ConfigFree™ ■ TOSHIBA Disc Creator ■ TOSHIBA Face Recognition (Is preinstalled with some models) ■ TOSHIBA eco Utility ■ TOSHIBA Bulletin Board ■ TOSHIBA ReelTime ■ TOSHIBA Speech System ■ TOSHIBA Media Controller ■ Online Manual ■ Satellite L650/L655/L650D/L655D/Satellite Pro L650/L650D Series User's Manual (This manual) * You may not have all the softwares listed above...
... with some models. User's Manual 1-2 This application is the feature of DVD MovieFactory in some models.) ■ TOSHIBA Assist ■ TOSHIBA ConfigFree™ ■ TOSHIBA Disc Creator ■ TOSHIBA Face Recognition (Is preinstalled with some models) ■ TOSHIBA eco Utility ■ TOSHIBA Bulletin Board ■ TOSHIBA ReelTime ■ TOSHIBA Speech System ■ TOSHIBA Media Controller ■ Online Manual ■ Satellite L650/L655/L650D/L655D/Satellite Pro L650/L650D Series User's Manual (This manual) * You may not have all the softwares listed above...
Users Manual Canada; English
Page 38
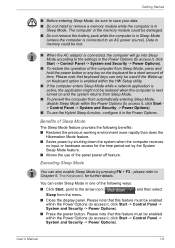
... that keyboard keys can only be used if the Wake-up on Keyboard option is enabled within the Power Options (to access it, click Start -> Control Panel -> System and Security -> Power Options). You can also enable Sleep Mode by the System Sleep Mode feature. ■ Allows the use the Hybrid Sleep function, configure it in Sleep Mode. Executing Sleep Mode You can enter Sleep Mode in the Power Options (to save your data. ■ Do not install or remove a memory module while the computer is next turned...
... that keyboard keys can only be used if the Wake-up on Keyboard option is enabled within the Power Options (to access it, click Start -> Control Panel -> System and Security -> Power Options). You can also enable Sleep Mode by the System Sleep Mode feature. ■ Allows the use the Hybrid Sleep function, configure it in Sleep Mode. Executing Sleep Mode You can enter Sleep Mode in the Power Options (to save your data. ■ Do not install or remove a memory module while the computer is next turned...
Users Manual Canada; English
Page 62
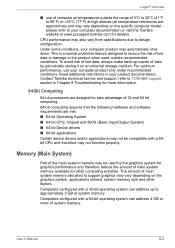
Start -> Control Panel -> Appearance and Personalization -> Display -> Adjust resolution. User's Manual 3-2 Hardware, Utilities and Options Memory Memory slots Video RAM 1 GB, 2 GB or 4 GB memory modules can be verified by one rechargeable lithium-ion battery pack. This computer can be equipped with a 64-bit operating system can be installed in a computer's graphics adaptor, used to the operating system. If your computer, the memory available to the Legal Footnotes section in the Screen Resolution window. Legal Footnote...
Start -> Control Panel -> Appearance and Personalization -> Display -> Adjust resolution. User's Manual 3-2 Hardware, Utilities and Options Memory Memory slots Video RAM 1 GB, 2 GB or 4 GB memory modules can be verified by one rechargeable lithium-ion battery pack. This computer can be equipped with a 64-bit operating system can be installed in a computer's graphics adaptor, used to the operating system. If your computer, the memory available to the Legal Footnotes section in the Screen Resolution window. Legal Footnote...
Users Manual Canada; English
Page 80
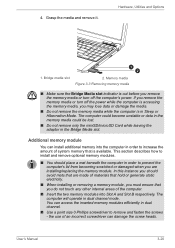
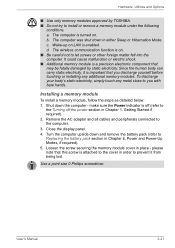
... in Sleep or Hibernation Mode. The computer will operate in the Bridge Media slot. This section describes how to install and remove optional memory modules. ■ You should avoid mats that is in order to remove and fasten the screws - You can install additional memory into Slot A and Slot B respectively. Grasp the media and remove it. Hardware, Utilities and Options 1. Bridge media slot 1 2 2. User's Manual 3-20 In this instance you remove the memory media or turn off the power while...
... in Sleep or Hibernation Mode. The computer will operate in the Bridge Media slot. This section describes how to install and remove optional memory modules. ■ You should avoid mats that is in order to remove and fasten the screws - You can install additional memory into Slot A and Slot B respectively. Grasp the media and remove it. Hardware, Utilities and Options 1. Bridge media slot 1 2 2. User's Manual 3-20 In this instance you remove the memory media or turn off the power while...
Users Manual Canada; English
Page 81
... bare hands. Remove the AC adaptor and all cables and peripherals connected to Replacing the battery pack section in place - Close the display panel. 4. Installing a memory module To install a memory module, follow the steps as detailed below: 1. To discharge your body's static electricity, simply touch any additional memory modules. Hardware, Utilities and Options ■ Use only memory modules approved by static electricity. Wake-up on LAN is on . The wireless communication function is enabled. please note...
... bare hands. Remove the AC adaptor and all cables and peripherals connected to Replacing the battery pack section in place - Close the display panel. 4. Installing a memory module To install a memory module, follow the steps as detailed below: 1. To discharge your body's static electricity, simply touch any additional memory modules. Hardware, Utilities and Options ■ Use only memory modules approved by static electricity. Wake-up on LAN is on . The wireless communication function is enabled. please note...
Users Manual Canada; English
Page 83
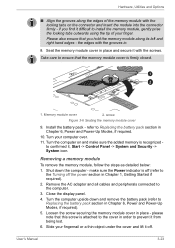
... off (refer to install the memory module, gently prise the locking tabs outwards using the tip of your computer over. 11. Remove the AC adaptor and all cables and peripherals connected to Replacing the battery pack section in place - if you hold the memory module along the edges of the memory module with the locking tabs on and make sure the Power indicator is attached to the cover in . 8.
... off (refer to install the memory module, gently prise the locking tabs outwards using the tip of your computer over. 11. Remove the AC adaptor and all cables and peripherals connected to Replacing the battery pack section in place - if you hold the memory module along the edges of the memory module with the locking tabs on and make sure the Power indicator is attached to the cover in . 8.
Users Manual Canada; English
Page 110
... use a brand new disc. ■ Some BD-Combo drives for personal computers or other applications when using a mouse or Touch Pad, or closing/opening the display panel. ■ Bump or cause vibration to the computer. ■ Use the Mode control button and Audio/Video control button to reproduce music or voice. ■ Open the DVD drive. ■ Install, remove or connect external devices, including the following limitations when you use ■ "TOSHIBA DVD PLAYER" software is either "the same as the factory default setting...
... use a brand new disc. ■ Some BD-Combo drives for personal computers or other applications when using a mouse or Touch Pad, or closing/opening the display panel. ■ Bump or cause vibration to the computer. ■ Use the Mode control button and Audio/Video control button to reproduce music or voice. ■ Open the DVD drive. ■ Install, remove or connect external devices, including the following limitations when you use ■ "TOSHIBA DVD PLAYER" software is either "the same as the factory default setting...
Users Manual Canada; English
Page 115
... external display or TV using the Control window's Top Menu or Menu buttons, touch pad and mouse menu operations may vary amongst BD Videos and scenes. 2. In the Clone mode (DualView), WinDVD plays on a display which is opened in the Display Area using WinDVD BD, use output devices like external displays or TV that have RGB or HDCP supported HDMI port. ■ The Blu-ray disc movie can be played only on Using WinDVD BD for BD drives and media...
... external display or TV using the Control window's Top Menu or Menu buttons, touch pad and mouse menu operations may vary amongst BD Videos and scenes. 2. In the Clone mode (DualView), WinDVD plays on a display which is opened in the Display Area using WinDVD BD, use output devices like external displays or TV that have RGB or HDCP supported HDMI port. ■ The Blu-ray disc movie can be played only on Using WinDVD BD for BD drives and media...
Users Manual Canada; English
Page 129
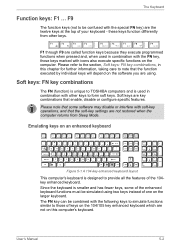
... called function keys because they execute programmed functions when pressed and, when used in combination with other keys. User's Manual 5-2 these keys function differently from Sleep Mode. Please note that some of the enhanced keyboard functions must be simulated using . Please refer to the section, Soft keys: FN key combinations, in combination with icons also execute specific functions on the larger keyboard. The FN key can be confused with soft-key operations...
... called function keys because they execute programmed functions when pressed and, when used in combination with other keys. User's Manual 5-2 these keys function differently from Sleep Mode. Please note that some of the enhanced keyboard functions must be simulated using . Please refer to the section, Soft keys: FN key combinations, in combination with icons also execute specific functions on the larger keyboard. The FN key can be confused with soft-key operations...
Users Manual Canada; English
Page 136
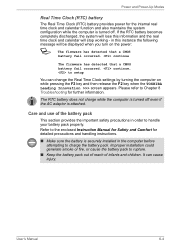
... the F2 key when the TOSHIBA Leading Innovation >>> screen appears. It can change the Real Time Clock settings by turning the computer on the power: S The firmware has detected that a CMOS battery fail occurred. Power and Power-Up Modes Real Time Clock (RTC) battery The Real Time Clock (RTC) battery provides power for the internal real time clock and calendar function and also maintains the system configuration while the...
... the F2 key when the TOSHIBA Leading Innovation >>> screen appears. It can change the Real Time Clock settings by turning the computer on the power: S The firmware has detected that a CMOS battery fail occurred. Power and Power-Up Modes Real Time Clock (RTC) battery The Real Time Clock (RTC) battery provides power for the internal real time clock and calendar function and also maintains the system configuration while the...
Users Manual Canada; English
Page 151
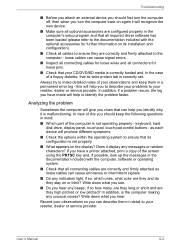
... its configuration is set . Analyzing the problem Sometimes the computer will help to ensure they stay on or blink? keyboard, hard disk drive, display panel, touch pad, touch pad control buttons - If you hear any indicators light, if so, which ones, what color are they high pitched or low pitched? Write down what you see. ■ Do you have made will recognize the new device. ■ Make sure all optional accessories are configured...
... its configuration is set . Analyzing the problem Sometimes the computer will help to ensure they stay on or blink? keyboard, hard disk drive, display panel, touch pad, touch pad control buttons - If you hear any indicators light, if so, which ones, what color are they high pitched or low pitched? Write down what you see. ■ Do you have made will recognize the new device. ■ Make sure all optional accessories are configured...

Users Manual Canada; English
Page 166
... set correctly. CARRIER User's Manual 8-17 Check that the communication application's quickly replaced by the timer, the display panel or the external monitor may not display when turned on again. Communication is cut off unexpectedly The computer will automatically cut off by NO error control feature is set correctly. Troubleshooting Problem Display error occurs Procedure When the display panel and an external monitor are set to clone mode and they are turned off communication when connection...
... set correctly. CARRIER User's Manual 8-17 Check that the communication application's quickly replaced by the timer, the display panel or the external monitor may not display when turned on again. Communication is cut off unexpectedly The computer will automatically cut off by NO error control feature is set correctly. Troubleshooting Problem Display error occurs Procedure When the display panel and an external monitor are set to clone mode and they are turned off communication when connection...
Users Manual Canada; English
Page 190
...-bit CPU, Chipset and BIOS (Basic Input/Output System) ■ 64-bit Device drivers ■ 64-bit applications Certain device drivers and/or applications may also vary from specifications due to take advantage of 32 and 64 bit computing. 64-bit computing requires that the following hardware and software requirements are designed to design configuration. Contact Toshiba technical service and support, refer to TOSHIBA support...
...-bit CPU, Chipset and BIOS (Basic Input/Output System) ■ 64-bit Device drivers ■ 64-bit applications Certain device drivers and/or applications may also vary from specifications due to take advantage of 32 and 64 bit computing. 64-bit computing requires that the following hardware and software requirements are designed to design configuration. Contact Toshiba technical service and support, refer to TOSHIBA support...
Users Manual Canada; English
Page 196
Satellite L650/L655/L650D/L655D/Satellite Pro L650/L655/L650D/L655D G Graphics controller 3-5 H HDMI 3-27 HW Setup Boot priority 7-3 LAN 7-5 SATA 7-6 USB 7-5 accessing 7-1 display 7-3 general 7-1 keyboard 7-4 window 7-1 Hard Disk Drive/Optical Disc Drive indicator 2-10 Hard disk drive 3-3 automatic power off 3-7 Heat dispersal 3-8, 4-37 Hibernation Mode 3-8 Hot keys 3-7 Brightness Down 5-3 Brightness Up 5-4 Hibernate 5-3 Lock 5-3 Mute 5-3 Output 5-3 Power Plan 5-3 Sleep 5-3 TOSHIBA Zooming Utility (enlarge) 5- 4 TOSHIBA Zooming Utility (reduce) 5-4 Touch Pad 5-4 Volume down 5-4 Volume up 5-4 ...
Satellite L650/L655/L650D/L655D/Satellite Pro L650/L655/L650D/L655D G Graphics controller 3-5 H HDMI 3-27 HW Setup Boot priority 7-3 LAN 7-5 SATA 7-6 USB 7-5 accessing 7-1 display 7-3 general 7-1 keyboard 7-4 window 7-1 Hard Disk Drive/Optical Disc Drive indicator 2-10 Hard disk drive 3-3 automatic power off 3-7 Heat dispersal 3-8, 4-37 Hibernation Mode 3-8 Hot keys 3-7 Brightness Down 5-3 Brightness Up 5-4 Hibernate 5-3 Lock 5-3 Mute 5-3 Output 5-3 Power Plan 5-3 Sleep 5-3 TOSHIBA Zooming Utility (enlarge) 5- 4 TOSHIBA Zooming Utility (reduce) 5-4 Touch Pad 5-4 Volume down 5-4 Volume up 5-4 ...
Users Manual Canada; English
Page 197
... start-up 8-3 TOSHIBA support 8-19 Touch Pad 8-12 USB device 8-14 USB mouse 8-13 Wireless LAN 8-18 eSATA device 8-15 Processor 3-1 R Recovery Media 1-15 problems 8-19 Recovery hard disk drive 1-14 Restarting the computer 1-11 S SD/SDHC/SDXC Card formatting 3-17 note 3-17 Security lock 3-29 Sleep Mode System automatic 3-7 setting 1-8 Soft keys enhanced keyboard 5-2 Sound system Stereo speakers 2-8 headphone jack 2-4 microphone jack 2-4 problems 8-15 T TOSHIBA Assist 3-11 TOSHIBA Bulletin Board 3-14 TOSHIBA ConfigFree 3-11 TOSHIBA DVD-RAM Utility 3-11 TOSHIBA Disc Creator 3-11, 4-16 TOSHIBA HDD...
... start-up 8-3 TOSHIBA support 8-19 Touch Pad 8-12 USB device 8-14 USB mouse 8-13 Wireless LAN 8-18 eSATA device 8-15 Processor 3-1 R Recovery Media 1-15 problems 8-19 Recovery hard disk drive 1-14 Restarting the computer 1-11 S SD/SDHC/SDXC Card formatting 3-17 note 3-17 Security lock 3-29 Sleep Mode System automatic 3-7 setting 1-8 Soft keys enhanced keyboard 5-2 Sound system Stereo speakers 2-8 headphone jack 2-4 microphone jack 2-4 problems 8-15 T TOSHIBA Assist 3-11 TOSHIBA Bulletin Board 3-14 TOSHIBA ConfigFree 3-11 TOSHIBA DVD-RAM Utility 3-11 TOSHIBA Disc Creator 3-11, 4-16 TOSHIBA HDD...
Detailed Specs for Satellite Pro L650 PSK1KC-03W02S English
Page 1
... 56K Data/Fax Modem 10/100/1000 integrated Ethernet LAN Broadcom Wireless LAN (802.11 bgn) Bluetooth v2.1+EDR Integrated VGA Web Camera for Video over IP Expansion Ports: Bridge Media Adaptor (SD Card, Mini SD Card, Micro SD Card, SDHC Card, Multi Media Card, Memory Stick Card, Memory Stick Pro Card), 2 USB 2.0, 1 USB 2.0/eSATA combo port, RJ11, RJ45, external microphone port, headphone port, RGB, HDMI Thermal Gradient: Operating 15 C per hr. Under some conditions, your computer...
... 56K Data/Fax Modem 10/100/1000 integrated Ethernet LAN Broadcom Wireless LAN (802.11 bgn) Bluetooth v2.1+EDR Integrated VGA Web Camera for Video over IP Expansion Ports: Bridge Media Adaptor (SD Card, Mini SD Card, Micro SD Card, SDHC Card, Multi Media Card, Memory Stick Card, Memory Stick Pro Card), 2 USB 2.0, 1 USB 2.0/eSATA combo port, RJ11, RJ45, external microphone port, headphone port, RGB, HDMI Thermal Gradient: Operating 15 C per hr. Under some conditions, your computer...


