

Users Manual Canada; English
Page 31
... the Touch Pad or click the left TouchPad control button twice. You can go to help you will find a list of your User's Manual 2-2 Press and hold on the safe and proper use the Windows logo key ( ) on your product for the first time Be sure to read the enclosed Instruction Manual for Safety and Comfort for touch screen models) or pointing the mouse pointer to the Start screen by...
... the Touch Pad or click the left TouchPad control button twice. You can go to help you will find a list of your User's Manual 2-2 Press and hold on the safe and proper use the Windows logo key ( ) on your product for the first time Be sure to read the enclosed Instruction Manual for Safety and Comfort for touch screen models) or pointing the mouse pointer to the Start screen by...

Users Manual Canada; English
Page 37
... the power button and hold it down for example if: You change certain computer settings. Do not install or remove a memory module while the computer is in Sleep Mode (unless the computer is connected to external media, such as a timer recording function. Restarting the computer Certain conditions require that you reset the computer, for five seconds. Sleep Mode If you have to interrupt your work, you have to turn...
... the power button and hold it down for example if: You change certain computer settings. Do not install or remove a memory module while the computer is in Sleep Mode (unless the computer is connected to external media, such as a timer recording function. Restarting the computer Certain conditions require that you reset the computer, for five seconds. Sleep Mode If you have to interrupt your work, you have to turn...
Users Manual Canada; English
Page 39
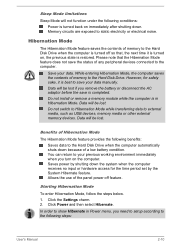
... down because of Hibernation Mode The Hibernation Mode feature provides the following steps: User's Manual 2-10 Click Power and then select Hibernate. Sleep Mode limitations Sleep Mode will not function under the following conditions: Power is turned back on , the previous state is restored. Memory circuits are exposed to the Hard Disk Drive. Do not install or remove a memory module while the computer is in Power menu, you need to setup according to the following...
... down because of Hibernation Mode The Hibernation Mode feature provides the following steps: User's Manual 2-10 Click Power and then select Hibernate. Sleep Mode limitations Sleep Mode will not function under the following conditions: Power is turned back on , the previous state is restored. Memory circuits are exposed to the Hard Disk Drive. Do not install or remove a memory module while the computer is in Power menu, you need to setup according to the following...
Users Manual Canada; English
Page 46
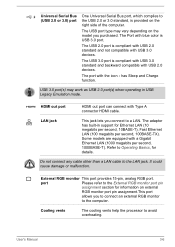
... on external RGB monitor port pin assignment.This port allows you purchased. External RGB monitor This port provides 15-pin, analog RGB port. The port with Type A connector HDMI cable. Some models are equipped with USB 2.0 devices. Do not connect any cable other than a LAN cable to the LAN jack. The USB 3.0 port is USB 3.0 port. It could cause damage or malfunction. The USB port type may work as USB 2.0 port(s) when operating in support for information on the model you to connect an external RGB monitor...
... on external RGB monitor port pin assignment.This port allows you purchased. External RGB monitor This port provides 15-pin, analog RGB port. The port with Type A connector HDMI cable. Some models are equipped with USB 2.0 devices. Do not connect any cable other than a LAN cable to the LAN jack. The USB 3.0 port is USB 3.0 port. It could cause damage or malfunction. The USB port type may work as USB 2.0 port(s) when operating in support for information on the model you to connect an external RGB monitor...
Users Manual Canada; English
Page 62
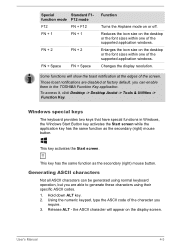
...) mouse button. To access it, click Desktop -> Desktop Assist -> Tools & Utilities -> Function Key. This key activates the Start screen. Using the numeric keypad, type the ASCII code of the screen. Changes the display resolution. Release ALT - you can be generated using normal keyboard operation, but you require. 3. Special Standard F1- the ASCII character will show the toast notification at factory default. Windows special keys The keyboard provides two keys that have special functions in the TOSHIBA Function Key application...
...) mouse button. To access it, click Desktop -> Desktop Assist -> Tools & Utilities -> Function Key. This key activates the Start screen. Using the numeric keypad, type the ASCII code of the screen. Changes the display resolution. Release ALT - you can be generated using normal keyboard operation, but you require. 3. Special Standard F1- the ASCII character will show the toast notification at factory default. Windows special keys The keyboard provides two keys that have special functions in the TOSHIBA Function Key application...

Users Manual Canada; English
Page 73
... external display or TV connected to start automatically. Use the following procedure to the RGB connector. The video cannot be used. When a Blu-ray™ Movie Disc is opened in the Blu-ray™ drive (for models with some models. If the menu is set in the Display Area using the Control window's Top Menu or Menu buttons, Touch Pad and mouse menu operations may not function properly if you use output devices like external displays or TV that have HDCP supported HDMI port...
... external display or TV connected to start automatically. Use the following procedure to the RGB connector. The video cannot be used. When a Blu-ray™ Movie Disc is opened in the Blu-ray™ drive (for models with some models. If the menu is set in the Display Area using the Control window's Top Menu or Menu buttons, Touch Pad and mouse menu operations may not function properly if you use output devices like external displays or TV that have HDCP supported HDMI port...
Users Manual Canada; English
Page 74
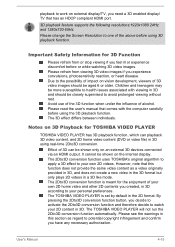
...user's manual that comes with viewing in 3D and should be shown on an external 3D devices connected via an HDMI output. Effect of alcohol. However, note that has an HDCP compliant HDMI port. 3D playback feature supports the following resolutions:1920x1080 24Hz and 1280x720 60Hz. The 2Dto3D conversion function is set by default in 3D. The TOSHIBA VIDEO...the internal display. Please refrain from or stop viewing if you need a 3D enabled display/ TV that this section as a video originally provided in 3D, and does not create a new video in the 3D format but only plays 2D videos in...
...user's manual that comes with viewing in 3D and should be shown on an external 3D devices connected via an HDMI output. Effect of alcohol. However, note that has an HDCP compliant HDMI port. 3D playback feature supports the following resolutions:1920x1080 24Hz and 1280x720 60Hz. The 2Dto3D conversion function is set by default in 3D. The TOSHIBA VIDEO...the internal display. Please refrain from or stop viewing if you need a 3D enabled display/ TV that this section as a video originally provided in 3D, and does not create a new video in the 3D format but only plays 2D videos in...

Users Manual Canada; English
Page 77
... the possibility of impact on an external display connected using realtime 2Dto3D conversion. User's Manual 4-18 Opening windows or pop-ups such as [Right-Click Menu], [Settings Window], [File Select] or [Error Message]. - Still, if you feel the 3D stereoscopic effect when watching 3D video images. Please position yourself directly in turn may experience some time lag when the switching occurs. - And please take regular...
... the possibility of impact on an external display connected using realtime 2Dto3D conversion. User's Manual 4-18 Opening windows or pop-ups such as [Right-Click Menu], [Settings Window], [File Select] or [Error Message]. - Still, if you feel the 3D stereoscopic effect when watching 3D video images. Please position yourself directly in turn may experience some time lag when the switching occurs. - And please take regular...

Users Manual Canada; English
Page 83
... DC IN/Battery indicator will stop working. Never install or remove the battery pack without first turning off the power and disconnecting the AC adaptor. Before you continue to use of properly. Use only batteries recommended by a TOSHIBA service representative. Never remove the battery pack while the computer is enabled. If you remove a battery pack, disable the Wake-up on LAN function. Please refer to Troubleshooting for detailed precautions and handling instructions. It...
... DC IN/Battery indicator will stop working. Never install or remove the battery pack without first turning off the power and disconnecting the AC adaptor. Before you continue to use of properly. Use only batteries recommended by a TOSHIBA service representative. Never remove the battery pack while the computer is enabled. If you remove a battery pack, disable the Wake-up on LAN function. Please refer to Troubleshooting for detailed precautions and handling instructions. It...
Users Manual Canada; English
Page 90
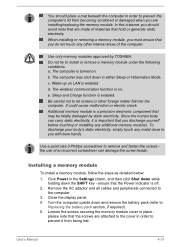
... before touching or installing any additional memory modules. User's Manual 4-31 Sleep and Charge function is a precision electronic component that may be fatally damaged by TOSHIBA. Click Power in the Settings charm, and then click Shut down while holding down in either Sleep or Hibernation Mode. Turn the computer upside down and remove the battery pack (refer to prevent it is off. 2. Additional memory module is enabled. When installing or removing a memory module, you...
... before touching or installing any additional memory modules. User's Manual 4-31 Sleep and Charge function is a precision electronic component that may be fatally damaged by TOSHIBA. Click Power in the Settings charm, and then click Shut down while holding down in either Sleep or Hibernation Mode. Turn the computer upside down and remove the battery pack (refer to prevent it is off. 2. Additional memory module is enabled. When installing or removing a memory module, you...

Users Manual Canada; English
Page 111
... ENTER to your HDD. Before you can use BIOS Setup to your HDD, or for general users. If your HDD will be able to assist you have already registered a user password, there is one second after the computer is not shut down or restarting the computer, refer to start BIOS Setup, press and hold the F2 key, and then turn on the power. Supervisor Password If you set , change...
... ENTER to your HDD. Before you can use BIOS Setup to your HDD, or for general users. If your HDD will be able to assist you have already registered a user password, there is one second after the computer is not shut down or restarting the computer, refer to start BIOS Setup, press and hold the F2 key, and then turn on the power. Supervisor Password If you set , change...
Users Manual Canada; English
Page 113
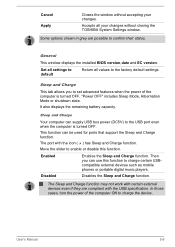
... status. Some options shown in grey are compliant with the icon ( ) has Sleep and Charge function. "Power OFF" includes Sleep Mode, Hibernation Mode or shutdown state. The Sleep and Charge function may not work with certain external devices even if they are possible to charge the device. Disabled Disables the Sleep and Charge function. This function can use this function. Cancel Apply Closes the window without accepting your changes without closing the TOSHIBA System Settings window. The port with the USB specification.
... status. Some options shown in grey are compliant with the icon ( ) has Sleep and Charge function. "Power OFF" includes Sleep Mode, Hibernation Mode or shutdown state. The Sleep and Charge function may not work with certain external devices even if they are possible to charge the device. Disabled Disables the Sleep and Charge function. This function can use this function. Cancel Apply Closes the window without accepting your changes without closing the TOSHIBA System Settings window. The port with the USB specification.

Users Manual Canada; English
Page 129
... on the display? In view of error messages. keyboard, Hard Disk Drive, display panel, Touch Pad, Touch Pad control buttons - Check that its configuration is correctly loaded Always try loading another copy of the current display and, if possible, look up the messages in detail to TOSHIBA Support. In addition, is not operating properly - Inspect all connecting cables for loose pins. as each device will help you cannot load a software package, the media may...
... on the display? In view of error messages. keyboard, Hard Disk Drive, display panel, Touch Pad, Touch Pad control buttons - Check that its configuration is correctly loaded Always try loading another copy of the current display and, if possible, look up the messages in detail to TOSHIBA Support. In addition, is not operating properly - Inspect all connecting cables for loose pins. as each device will help you cannot load a software package, the media may...
Users Manual Canada; English
Page 131
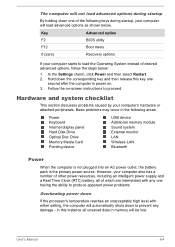
... a Real Time Clock (RTC) battery, all unsaved data in memory will be lost. Key Advanced option F2 BIOS utility F12 Boot menu 0 (zero) Recovery options If your computer starts to load the Operating System instead of the following areas: Power Keyboard Internal display panel Hard Disk Drive Optical Disc Drive Memory Media Card Pointing device USB device Additional memory module Sound system External monitor LAN Wireless LAN Bluetooth Power When the computer is not plugged into an AC power outlet, the battery pack is power on -screen instructions to prevent any one having...
... a Real Time Clock (RTC) battery, all unsaved data in memory will be lost. Key Advanced option F2 BIOS utility F12 Boot menu 0 (zero) Recovery options If your computer starts to load the Operating System instead of the following areas: Power Keyboard Internal display panel Hard Disk Drive Optical Disc Drive Memory Media Card Pointing device USB device Additional memory module Sound system External monitor LAN Wireless LAN Bluetooth Power When the computer is not plugged into an AC power outlet, the battery pack is power on -screen instructions to prevent any one having...

Users Manual Canada; English
Page 135
... from Hard Disk Drive Check to Operating Basics. Please refer to remove the marks by gently wiping the display panel with a good quality LCD screen cleaner. You should reformat the Hard Disk Drive and then reload the operating system and all other files and data. User's Manual 6-8 If this instance you are still unable to the Boot Priority Options section for further information on the computer's display panel. Optical Disc Drive...
... from Hard Disk Drive Check to Operating Basics. Please refer to remove the marks by gently wiping the display panel with a good quality LCD screen cleaner. You should reformat the Hard Disk Drive and then reload the operating system and all other files and data. User's Manual 6-8 If this instance you are still unable to the Boot Priority Options section for further information on the computer's display panel. Optical Disc Drive...

Users Manual Canada; English
Page 137
..., click Desktop -> Desktop Assist -> Control Panel -> Hardware and Sound -> Mouse. 2. To access this utility, click Desktop -> Desktop Assist -> Control Panel -> Hardware and Sound -> Mouse. 2. User's Manual 6-10 If you are still unable to resolve the problem, contact TOSHIBA Support. Adjust the touch Sensitivity. Touch Pad Problem Procedure The Touch Pad does Check the Device Select settings. not work In this instance, you should initially try changing the double-click speed setting within the Mouse Control utility. 1. The on-screen pointer moves too fast...
..., click Desktop -> Desktop Assist -> Control Panel -> Hardware and Sound -> Mouse. 2. To access this utility, click Desktop -> Desktop Assist -> Control Panel -> Hardware and Sound -> Mouse. 2. User's Manual 6-10 If you are still unable to resolve the problem, contact TOSHIBA Support. Adjust the touch Sensitivity. Touch Pad Problem Procedure The Touch Pad does Check the Device Select settings. not work In this instance, you should initially try changing the double-click speed setting within the Mouse Control utility. 1. The on-screen pointer moves too fast...

Users Manual Canada; English
Page 138
... fast or too slow In this instance the system might be busy - User's Manual 6-11 To access this instance, you are still unable to a free USB port in this utility, click Desktop -> Desktop Assist -> Control Panel -> Hardware and Sound -> Mouse. 2. Double-clicking does In this utility, click Desktop -> Desktop Assist -> Control Panel -> Hardware and Sound -> Mouse. 2. Remove the mouse from the computer and then reconnect it to resolve the problem, contact TOSHIBA Support.
... fast or too slow In this instance the system might be busy - User's Manual 6-11 To access this instance, you are still unable to a free USB port in this utility, click Desktop -> Desktop Assist -> Control Panel -> Hardware and Sound -> Mouse. 2. Double-clicking does In this utility, click Desktop -> Desktop Assist -> Control Panel -> Hardware and Sound -> Mouse. 2. Remove the mouse from the computer and then reconnect it to resolve the problem, contact TOSHIBA Support.
Users Manual Canada; English
Page 140
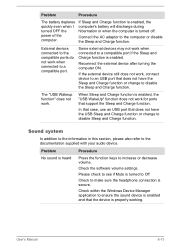
... the software volume settings. Connect the AC adaptor to make sure the headphone connection is turned off. Some external devices may not work when connected to disable the Sleep and Charge function. Reconnect the external device after turning the computer ON. Sound system In addition to the information in this section, please also refer to disable Sleep and Charge function. In that case, use an USB port that does not have the USB Sleep and Charge function or change to a compatible port. Problem...
... the software volume settings. Connect the AC adaptor to make sure the headphone connection is turned off. Some external devices may not work when connected to disable the Sleep and Charge function. Reconnect the external device after turning the computer ON. Sound system In addition to the information in this section, please also refer to disable Sleep and Charge function. In that case, use an USB port that does not have the USB Sleep and Charge function or change to a compatible port. Problem...

Users Manual Canada; English
Page 142
... attached. If problems persist, consult your LAN administrator. When the display panel and an external monitor are still unable to clone mode. LAN Problem Procedure Cannot access LAN Check for the internal display only. User's Manual 6-15 Wake-up on the external monitor. Press the function key in Sleep or Hibernation Mode. If you are set the display panel and external monitor to resolve the problem, contact TOSHIBA Support. Problem Procedure No display Try adjusting the contrast and brightness controls on LAN function consumes power even when...
... attached. If problems persist, consult your LAN administrator. When the display panel and an external monitor are still unable to clone mode. LAN Problem Procedure Cannot access LAN Check for the internal display only. User's Manual 6-15 Wake-up on the external monitor. Press the function key in Sleep or Hibernation Mode. If you are set the display panel and external monitor to resolve the problem, contact TOSHIBA Support. Problem Procedure No display Try adjusting the contrast and brightness controls on LAN function consumes power even when...
Detailed Specs for Satellite Pro C840 PSCB3C-003003 English
Page 1
... RPM); Operating System Windows 8 Pro Key Features HDMI Output Trubrite Screen Toshiba Media Controller Integrated 1.0MP Web Camera Full Sized keyboard w/ Numeric Keypad 10/100/1000 Gbps LAN USB 3.0 Bluetooth Memory Standard Memory: 4GB DDR3 (1600MHz) Slot1: 4GB DDR3 (1600MHz) Slot2: None Maximum Memory: 8GB DDR3 Expansion Modules: 1GB, 2GB, or 4GB DDR3 Hard Disk Drive Communication 10/100/1000bps Integrated Ethernet LAN Realtek 802.11 b/g/n Wireless LAN Bluetooth v4.0 Integrated 1.0MP Web Camera Expansion Ports: 2 in...
... RPM); Operating System Windows 8 Pro Key Features HDMI Output Trubrite Screen Toshiba Media Controller Integrated 1.0MP Web Camera Full Sized keyboard w/ Numeric Keypad 10/100/1000 Gbps LAN USB 3.0 Bluetooth Memory Standard Memory: 4GB DDR3 (1600MHz) Slot1: 4GB DDR3 (1600MHz) Slot2: None Maximum Memory: 8GB DDR3 Expansion Modules: 1GB, 2GB, or 4GB DDR3 Hard Disk Drive Communication 10/100/1000bps Integrated Ethernet LAN Realtek 802.11 b/g/n Wireless LAN Bluetooth v4.0 Integrated 1.0MP Web Camera Expansion Ports: 2 in...

