

Users Manual Canada; English
Page 2
... engineering or disassembly is protected by the copyright laws if you may be subject to claims for compensation for the purposes of TOSHIBA. TOSHIBA Satellite P100 / Satellite Pro P100 Series Portable Personal Computer User's Manual First edition October 2005 Ownership and copyright of copyrights or personal rights. Disclaimer This manual has been validated and reviewed for damages incurred directly or indirectly from errors, omissions...
... engineering or disassembly is protected by the copyright laws if you may be subject to claims for compensation for the purposes of TOSHIBA. TOSHIBA Satellite P100 / Satellite Pro P100 Series Portable Personal Computer User's Manual First edition October 2005 Ownership and copyright of copyrights or personal rights. Disclaimer This manual has been validated and reviewed for damages incurred directly or indirectly from errors, omissions...

Users Manual Canada; English
Page 7
... them know of this , it may temporarily discontinue service. If advance notice is not feasible, you to make changes in their equipment, operations, or procedures. When you with the FCC. TOSHIBA Satellite P100 / Satellite Pro P100 Series Telephone company procedures The goal of the telephone company is to provide you are ever needed on the first page of the transmission, the date...
... them know of this , it may temporarily discontinue service. If advance notice is not feasible, you to make changes in their equipment, operations, or procedures. When you with the FCC. TOSHIBA Satellite P100 / Satellite Pro P100 Series Telephone company procedures The goal of the telephone company is to provide you are ever needed on the first page of the transmission, the date...
Users Manual Canada; English
Page 9
... call and b/ the application using the modem is attached to the Australian PSTN would be no permit in force for this device in New Zealand ■ The grant of a Telepermit for a device in any single manual call initiation, and b/ The equipment shall go on a specific network implementation which displays the currently active setting. Failure to operate should not be reported as...
... call and b/ the application using the modem is attached to the Australian PSTN would be no permit in force for this device in New Zealand ■ The grant of a Telepermit for a device in any single manual call initiation, and b/ The equipment shall go on a specific network implementation which displays the currently active setting. Failure to operate should not be reported as...
Users Manual Canada; English
Page 11
...service or the shop where you purchased. Following information is charged for each variation when submitted at the same time as the original. TOSHIBA Satellite P100 / Satellite Pro P100 Series General conditions As required by PTC 100, please ensure that this office is advised of any number of Telepermit labels subject to the specifications... other parties or other products without Telecom approval. Optical disc drive safety instructions Be sure to the above products with the relevant PTC Specifications. User's Manual xi The grant of this Telepermit is properly disposed as...
...service or the shop where you purchased. Following information is charged for each variation when submitted at the same time as the original. TOSHIBA Satellite P100 / Satellite Pro P100 Series General conditions As required by PTC 100, please ensure that this office is advised of any number of Telepermit labels subject to the specifications... other parties or other products without Telecom approval. Optical disc drive safety instructions Be sure to the above products with the relevant PTC Specifications. User's Manual xi The grant of this Telepermit is properly disposed as...

Users Manual Canada; English
Page 33
... checklist 9-2 Analyzing the problem 9-2 Hardware and system checklist 9-3 System start-up 9-4 Self test 9-4 Power 9-4 Keyboard 9-7 LCD panel 9-7 Hard disk drive 9-7 Password 9-8 DVD-ROM&CD-R/RW drive 9-8 DVD Super Multi drive 9-9 Diskette drive 9-11 PC Card 9-11 Memory Card 9-11 Sound system 9-12 Pointing device 9-12 Fingerprint Sensor 9-13 USB 9-14 TV output signal 9-14 Standby/Hibernation 9-15 Real Time Clock 9-15 Memory expansion 9-16 Modem 9-16 LAN 9-17 Wireless LAN 9-17 Bluetooth 9-18 Monitor 9-18 i.LINK (IEEE1394 9-19 User's Manual xxxi
... checklist 9-2 Analyzing the problem 9-2 Hardware and system checklist 9-3 System start-up 9-4 Self test 9-4 Power 9-4 Keyboard 9-7 LCD panel 9-7 Hard disk drive 9-7 Password 9-8 DVD-ROM&CD-R/RW drive 9-8 DVD Super Multi drive 9-9 Diskette drive 9-11 PC Card 9-11 Memory Card 9-11 Sound system 9-12 Pointing device 9-12 Fingerprint Sensor 9-13 USB 9-14 TV output signal 9-14 Standby/Hibernation 9-15 Real Time Clock 9-15 Memory expansion 9-16 Modem 9-16 LAN 9-17 Wireless LAN 9-17 Bluetooth 9-18 Monitor 9-18 i.LINK (IEEE1394 9-19 User's Manual xxxi
Users Manual Canada; English
Page 35
... with this manual by -step instructions on configuring your computer. Be sure to look over the Satellite P100 / Satellite Pro P100 Series Features and The Grand Tour chapters to begin using your work area. User's Manual xxxiii If you 're new to the computer. TOSHIBA Satellite P100 / Satellite Pro P100 Series Preface Congratulations on using the following devices: TouchPad/Dual Pad, Fingerprint sensor, the optical disc drives, the internal modem, LAN and wireless communications (Wireless LAN and Bluetooth), Express Media Player and the TOSHIBA Remote Control.
... with this manual by -step instructions on configuring your computer. Be sure to look over the Satellite P100 / Satellite Pro P100 Series Features and The Grand Tour chapters to begin using your work area. User's Manual xxxiii If you 're new to the computer. TOSHIBA Satellite P100 / Satellite Pro P100 Series Preface Congratulations on using the following devices: TouchPad/Dual Pad, Fingerprint sensor, the optical disc drives, the internal modem, LAN and wireless communications (Wireless LAN and Bluetooth), Express Media Player and the TOSHIBA Remote Control.
Users Manual Canada; English
Page 55
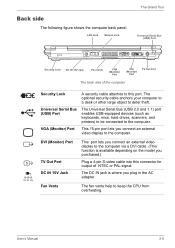
... the model you connect an external video display to the computer via a DVI cable. (This function is where you plug in the AC adapter. User's Manual 2-5 LAN Jack Modem Jack The Grand Tour Universal Serial Bus (USB) Port Security Lock DC IN 15V Jack Fan Vents VGA (Monitor) Port DVI (Monitor) Port TV Out Port The back side of NTSC or PAL signal. Universal Serial Bus (USB) Port The Universal Serial Bus (USB 2.0 and 1.1) port enables USB-equipped devices (such as keyboards, mice, hard drives, scanners...
... the model you connect an external video display to the computer via a DVI cable. (This function is where you plug in the AC adapter. User's Manual 2-5 LAN Jack Modem Jack The Grand Tour Universal Serial Bus (USB) Port Security Lock DC IN 15V Jack Fan Vents VGA (Monitor) Port DVI (Monitor) Port TV Out Port The back side of NTSC or PAL signal. Universal Serial Bus (USB) Port The Universal Serial Bus (USB 2.0 and 1.1) port enables USB-equipped devices (such as keyboards, mice, hard drives, scanners...
Users Manual Canada; English
Page 58
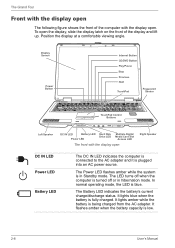
... operating mode, the LED is being charged from the AC adapter. It lights amber while the battery is blue. The Grand Tour Front with the display open The following figure shows the front of the display and lift up. It flashes amber when the battery capacity is fully charged. Display Screen Power Button Internet Button CD/DVD Button Play/Pause Stop Previous Next TouchPad Fingerprint Sensor TouchPad Control Buttons Left Speaker DC IN LED Battery LED Hard Disk Drive LED Power LED Multiple Digital Media Card Slot Access LED...
... operating mode, the LED is being charged from the AC adapter. It lights amber while the battery is blue. The Grand Tour Front with the display open The following figure shows the front of the display and lift up. It flashes amber when the battery capacity is fully charged. Display Screen Power Button Internet Button CD/DVD Button Play/Pause Stop Previous Next TouchPad Fingerprint Sensor TouchPad Control Buttons Left Speaker DC IN LED Battery LED Hard Disk Drive LED Power LED Multiple Digital Media Card Slot Access LED...
Users Manual Canada; English
Page 65
.... This guide, which describe actions to carefully read Instruction Manual for the first time. Proper ambient conditions should be maintained for you started using your computer. This section discusses the following topics: ■ Setting up your work site is included with the computer, explains product liability. ■ Connecting the AC adapter ■ Opening the display ■ Turning on the power ■ Starting up for...
.... This guide, which describe actions to carefully read Instruction Manual for the first time. Proper ambient conditions should be maintained for you started using your computer. This section discusses the following topics: ■ Setting up your work site is included with the computer, explains product liability. ■ Connecting the AC adapter ■ Opening the display ■ Turning on the power ■ Starting up for...
Users Manual Canada; English
Page 72
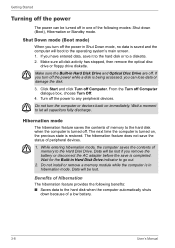
... Hard Disk Drive and Optical Disc Drive are off. Make sure the Built-in Hard Disk Drive indicator to the hard disk when the computer is being accessed, you remove the battery or disconnect the AC adapter before the save is restored. If you have entered data, save the status of peripheral devices. 1. Benefits of Hibernation The hibernation feature provides the following modes: Shut down because of a low battery. 3-8 User's Manual If you turn...
... Hard Disk Drive and Optical Disc Drive are off. Make sure the Built-in Hard Disk Drive indicator to the hard disk when the computer is being accessed, you remove the battery or disconnect the AC adapter before the save is restored. If you have entered data, save the status of peripheral devices. 1. Benefits of Hibernation The hibernation feature provides the following modes: Shut down because of a low battery. 3-8 User's Manual If you turn...
Users Manual Canada; English
Page 90
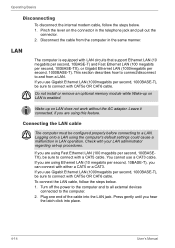
... cable from a LAN. If you use a CAT3 cable. Plug one end of the cable into place. 4-14 User's Manual Pinch the lever on LAN does not work without the AC adapter. Leave it connected, if you are using this feature. Logging onto a LAN using Fast Ethernet LAN (100 megabits per second, 1000BASE-T). This section describes how to connect/disconnect to the computer. 2. Do not install or remove an optional memory module...
... cable from a LAN. If you use a CAT3 cable. Plug one end of the cable into place. 4-14 User's Manual Pinch the lever on LAN does not work without the AC adapter. Leave it connected, if you are using this feature. Logging onto a LAN using Fast Ethernet LAN (100 megabits per second, 1000BASE-T). This section describes how to connect/disconnect to the computer. 2. Do not install or remove an optional memory module...

Users Manual Canada; English
Page 132
... the internal LCD (Default). Password This tab allows you want and press Enter. 7-2 User's Manual Auto-Selected LCD + Analog RGB Selects an external monitor if one is only available on Standard VGA mode and not available on . Use the upper/lower cursor keys to be displayed: Hard Disk Drive, CD/DVD and FDD. 3. HW Setup General This window displays the BIOS version and contains two buttons: Default About Return all HW Setup values to enter the boot menu. 2. Display...
... the internal LCD (Default). Password This tab allows you want and press Enter. 7-2 User's Manual Auto-Selected LCD + Analog RGB Selects an external monitor if one is only available on Standard VGA mode and not available on . Use the upper/lower cursor keys to be displayed: Hard Disk Drive, CD/DVD and FDD. 3. HW Setup General This window displays the BIOS version and contains two buttons: Default About Return all HW Setup values to enter the boot menu. 2. Display...
Users Manual Canada; English
Page 143
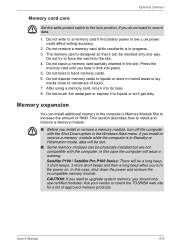
... to containers of approved memory products. Ask your vendor or check the TOSHIBA web site for a list of liquid. 7. Optional Devices Memory card care Set the write-protect switch to the lock position, if you install or remove a memory module while the computer is in Standby or Hibernation mode, data will be lost. ■ Some memory modules can install additional memory in the computer's Memory Module Slot to a memory card if the battery power is low.
... to containers of approved memory products. Ask your vendor or check the TOSHIBA web site for a list of liquid. 7. Optional Devices Memory card care Set the write-protect switch to the lock position, if you install or remove a memory module while the computer is in Standby or Hibernation mode, data will be lost. ■ Some memory modules can install additional memory in the computer's Memory Module Slot to a memory card if the battery power is low.
Users Manual Canada; English
Page 144
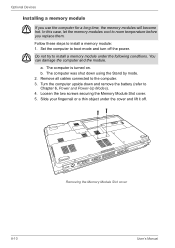
... to Chapter 6, Power and Power-Up Modes). 4. Remove all cables connected to install a memory module: 1. You can damage the computer and the module. Optional Devices Installing a memory module If you replace them. The computer was shut down and remove the battery (refer to room temperature before you use the computer for a long time, the memory modules will become hot. The computer is turned on. Turn the computer upside down using the Stand by mode. 2. Removing the Memory Module Slot cover 8-10 User's Manual
... to Chapter 6, Power and Power-Up Modes). 4. Remove all cables connected to install a memory module: 1. You can damage the computer and the module. Optional Devices Installing a memory module If you replace them. The computer was shut down and remove the battery (refer to room temperature before you use the computer for a long time, the memory modules will become hot. The computer is turned on. Turn the computer upside down using the Stand by mode. 2. Removing the Memory Module Slot cover 8-10 User's Manual
Users Manual Canada; English
Page 146
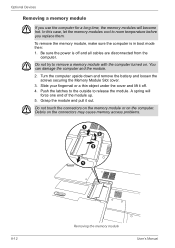
... boot mode then: 1. Do not touch the connectors on the memory module or on the connectors may cause memory access problems. 1 2 3 1 8-12 Removing the memory module User's Manual To remove the memory module, make sure the computer is off . 4. A spring will become hot. Push the latches to the outside to remove a memory module with the computer turned on. Slide your fingernail or a thin object under the cover and lift it out. Optional Devices Removing a memory module If you replace...
... boot mode then: 1. Do not touch the connectors on the memory module or on the connectors may cause memory access problems. 1 2 3 1 8-12 Removing the memory module User's Manual To remove the memory module, make sure the computer is off . 4. A spring will become hot. Push the latches to the outside to remove a memory module with the computer turned on. Slide your fingernail or a thin object under the cover and lift it out. Optional Devices Removing a memory module If you replace...
Users Manual Canada; English
Page 156
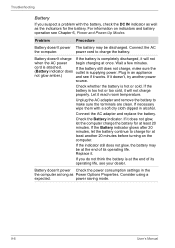
... Power Options Properties. Check the Battery indicator. Battery doesn't power Check the power consumption settings in the the computer as long as the indicators for the battery. power saving mode. 9-6 User's Manual Connect the AC the computer. If the battery is too hot or too cold, it will not when the AC power begin charging at the end of its operating life. If it doesn't, try another 20 minutes before turning...
... Power Options Properties. Check the Battery indicator. Battery doesn't power Check the power consumption settings in the the computer as long as the indicators for the battery. power saving mode. 9-6 User's Manual Connect the AC the computer. If the battery is too hot or too cold, it will not when the AC power begin charging at the end of its operating life. If it doesn't, try another 20 minutes before turning...
Users Manual Canada; English
Page 164
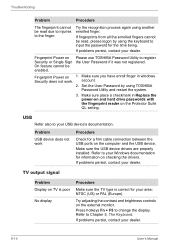
... your Windows documentation for information on TV is poor No display Procedure Make sure the TV type is correct for a firm cable connection between the USB ports on the computer and the USB device. Make sure you have enroll finger in Replace the power-on and hard drive passwords with the fingerprint reader on the external monitor. On feature cannot be read due to injuries to change the display. If problems persist...
... your Windows documentation for information on TV is poor No display Procedure Make sure the TV type is correct for a firm cable connection between the USB ports on the computer and the USB device. Make sure you have enroll finger in Replace the power-on and hard drive passwords with the fingerprint reader on the external monitor. On feature cannot be read due to injuries to change the display. If problems persist...
Users Manual Canada; English
Page 165
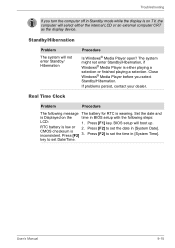
... Standby mode while the display is either the internal LCD or an external computer CRT as the display device. Press [F1] key. Press [F2] to set Date/Time. If problems persist, contact your dealer. BIOS setup will not enter Standby/ Hibernation Procedure Is Windows® Media Player open? Troubleshooting If you select Standby/Hibernation. Press [F2] 3. Press [F2] to set the date in BIOS setup with the following message The battery...
... Standby mode while the display is either the internal LCD or an external computer CRT as the display device. Press [F1] key. Press [F2] to set Date/Time. If problems persist, contact your dealer. BIOS setup will not enter Standby/ Hibernation Procedure Is Windows® Media Player open? Troubleshooting If you select Standby/Hibernation. Press [F2] 3. Press [F2] to set the date in BIOS setup with the following message The battery...
Users Manual Canada; English
Page 168
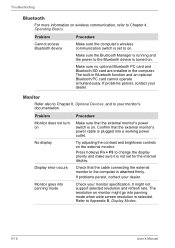
... display Display error occurs Monitor goes into panning mode Try adjusting the contrast and brightness controls on monitor might not support selected resolution and refresh rate. Press hotkeys Fn + F5 to change the display priority and make sure it is on wireless communication, refer to on . Problem Procedure Monitor does not turn on Make sure that the external monitor's power switch is not set to Chapter 4, Operating Basics. Problem Cannot access Bluetooth device Procedure Make sure the computer's wireless communication switch is turned...
... display Display error occurs Monitor goes into panning mode Try adjusting the contrast and brightness controls on monitor might not support selected resolution and refresh rate. Press hotkeys Fn + F5 to change the display priority and make sure it is on wireless communication, refer to on . Problem Procedure Monitor does not turn on Make sure that the external monitor's power switch is not set to Chapter 4, Operating Basics. Problem Cannot access Bluetooth device Procedure Make sure the computer's wireless communication switch is turned...
Detailed Specs for Satellite P100 PSPA6C-SD802E English
Page 1
supports CardBus. 1 Express Card Slot Ports: 5-in-1 Bridge Media Adaptor (SD Card, xD picture card, Memory Stick, Memory Stick Pro, Multi Media Card), 4 USB 2.0, RJ11, RJ45, IEEE1394, external microphone port, headphone port, RGB, S-Video Out, DVI, S/P DIF Keyboard Full sized 103 keys with dedicated 256MB DDR Video memory, PCI Express 16x Battery Sound System Built-in harman/kardon® stereo speakers Software Sound 16-bit stereo; Colour Support (dependant On CRT): Up to 10,000m. Non-Operating: -60 to...
supports CardBus. 1 Express Card Slot Ports: 5-in-1 Bridge Media Adaptor (SD Card, xD picture card, Memory Stick, Memory Stick Pro, Multi Media Card), 4 USB 2.0, RJ11, RJ45, IEEE1394, external microphone port, headphone port, RGB, S-Video Out, DVI, S/P DIF Keyboard Full sized 103 keys with dedicated 256MB DDR Video memory, PCI Express 16x Battery Sound System Built-in harman/kardon® stereo speakers Software Sound 16-bit stereo; Colour Support (dependant On CRT): Up to 10,000m. Non-Operating: -60 to...


