

Users Manual Canada; English
Page 2
.... Reverse engineering or disassembly is assumed, with respect to display enlarged images/ video at home only. Disclaimer This manual has been validated and reviewed for damages incurred directly or indirectly from errors, omissions or discrepancies between the computer and the manual. No patent liability is prohibited. TOSHIBA Satellite P100 / Satellite Pro P100 Series Copyright © 2005 by U.S. If, beyond the limitation above, you use the screen mode switching functions (e.g.
.... Reverse engineering or disassembly is assumed, with respect to display enlarged images/ video at home only. Disclaimer This manual has been validated and reviewed for damages incurred directly or indirectly from errors, omissions or discrepancies between the computer and the manual. No patent liability is prohibited. TOSHIBA Satellite P100 / Satellite Pro P100 Series Copyright © 2005 by U.S. If, beyond the limitation above, you use the screen mode switching functions (e.g.

Users Manual Canada; English
Page 7
... clearly contains in a margin at the top or bottom of each transmitted page or on your modem, they should complete the setup of your telephone line, as possible. User's Manual vii TOSHIBA Satellite P100 / Satellite Pro P100 Series Telephone company procedures The goal of the telephone company is to provide you to make changes in their equipment, operations, or procedures. In order to do this change...
... clearly contains in a margin at the top or bottom of each transmitted page or on your modem, they should complete the setup of your telephone line, as possible. User's Manual vii TOSHIBA Satellite P100 / Satellite Pro P100 Series Telephone company procedures The goal of the telephone company is to provide you to make changes in their equipment, operations, or procedures. In order to do this change...
Users Manual Canada; English
Page 9
... verify that device under all operating conditions. Notes for use of other country/region setting while the modem is only one attempt and the beginning of the next. TOSHIBA Satellite P100 / Satellite Pro P100 Series Notes for Users in no way indicates Telecom acceptance of responsibility for the correct operation of that the country/region is set , enter the command ATI9 which displays the currently active setting. To set the...
... verify that device under all operating conditions. Notes for use of other country/region setting while the modem is only one attempt and the beginning of the next. TOSHIBA Satellite P100 / Satellite Pro P100 Series Notes for Users in no way indicates Telecom acceptance of responsibility for the correct operation of that the country/region is set , enter the command ATI9 which displays the currently active setting. To set the...
Users Manual Canada; English
Page 11
... products which you purchased. TOSHIBA Satellite P100 / Satellite Pro P100 Series General conditions As required by PTC 100, please ensure that this office is advised of any number of Telepermit labels subject to the general instructions on format, size and colour on the product at the end of the product and in PTC 100. An additional charge of this product may...
... products which you purchased. TOSHIBA Satellite P100 / Satellite Pro P100 Series General conditions As required by PTC 100, please ensure that this office is advised of any number of Telepermit labels subject to the general instructions on format, size and colour on the product at the end of the product and in PTC 100. An additional charge of this product may...

Users Manual Canada; English
Page 33
... Installing a memory module 8-10 Removing a memory module 8-12 Additional battery pack 8-13 Additional AC adapter 8-13 External monitor 8-13 Television 8-13 i.LINK (IEEE1394 8-14 Precautions 8-14 Connecting 8-14 Disconnecting 8-15 Security lock 8-15 Chapter 9 Troubleshooting Problem solving process 9-1 Preliminary checklist 9-2 Analyzing the problem 9-2 Hardware and system checklist 9-3 System start-up 9-4 Self test 9-4 Power 9-4 Keyboard 9-7 LCD panel 9-7 Hard disk drive 9-7 Password 9-8 DVD-ROM&CD-R/RW drive 9-8 DVD Super Multi drive 9-9 Diskette drive 9-11 PC Card...
... Installing a memory module 8-10 Removing a memory module 8-12 Additional battery pack 8-13 Additional AC adapter 8-13 External monitor 8-13 Television 8-13 i.LINK (IEEE1394 8-14 Precautions 8-14 Connecting 8-14 Disconnecting 8-15 Security lock 8-15 Chapter 9 Troubleshooting Problem solving process 9-1 Preliminary checklist 9-2 Analyzing the problem 9-2 Hardware and system checklist 9-3 System start-up 9-4 Self test 9-4 Power 9-4 Keyboard 9-7 LCD panel 9-7 Hard disk drive 9-7 Password 9-8 DVD-ROM&CD-R/RW drive 9-8 DVD Super Multi drive 9-9 Diskette drive 9-11 PC Card...
Users Manual Canada; English
Page 35
... accessory devices. Chapter 4, Operating Basics, includes instructions on configuring your computer, basic operations and care, using optional devices and troubleshooting. It also provides detailed information on using your Satellite P100 / Satellite Pro P100 Series computer. If you are uncommon or unique to read Getting Started for step-by browsing through its pages. TOSHIBA Satellite P100 / Satellite Pro P100 Series Preface Congratulations on safety and designing your work area. Be sure to look over the Satellite P100 / Satellite Pro P100 Series Features...
... accessory devices. Chapter 4, Operating Basics, includes instructions on configuring your computer, basic operations and care, using optional devices and troubleshooting. It also provides detailed information on using your Satellite P100 / Satellite Pro P100 Series computer. If you are uncommon or unique to read Getting Started for step-by browsing through its pages. TOSHIBA Satellite P100 / Satellite Pro P100 Series Preface Congratulations on safety and designing your work area. Be sure to look over the Satellite P100 / Satellite Pro P100 Series Features...
Users Manual Canada; English
Page 55
... cable. (This function is available depending on the model you connect an external video display to keep the CPU from overheating. The optional security cable anchors your computer to a desk or other large object to the computer. User's Manual 2-5 DVI (Monitor) Port TV Out Port DC IN 15V Jack This port lets you plug in the AC adapter. Universal Serial Bus (USB) Port The Universal Serial Bus (USB 2.0 and 1.1) port enables USB-equipped devices (such as keyboards, mice, hard drives...
... cable. (This function is available depending on the model you connect an external video display to keep the CPU from overheating. The optional security cable anchors your computer to a desk or other large object to the computer. User's Manual 2-5 DVI (Monitor) Port TV Out Port DC IN 15V Jack This port lets you plug in the AC adapter. Universal Serial Bus (USB) Port The Universal Serial Bus (USB 2.0 and 1.1) port enables USB-equipped devices (such as keyboards, mice, hard drives...
Users Manual Canada; English
Page 58
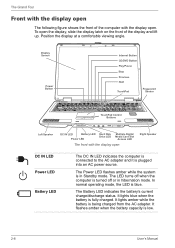
... the battery is low. 2-8 User's Manual Display Screen Power Button Internet Button CD/DVD Button Play/Pause Stop Previous Next TouchPad Fingerprint Sensor TouchPad Control Buttons Left Speaker DC IN LED Battery LED Hard Disk Drive LED Power LED Multiple Digital Media Card Slot Access LED The front with the display open. It flashes amber when the battery capacity is fully charged. The Grand Tour Front with the display open The following figure shows the front of the display and lift up. It lights amber while the battery is turned...
... the battery is low. 2-8 User's Manual Display Screen Power Button Internet Button CD/DVD Button Play/Pause Stop Previous Next TouchPad Fingerprint Sensor TouchPad Control Buttons Left Speaker DC IN LED Battery LED Hard Disk Drive LED Power LED Multiple Digital Media Card Slot Access LED The front with the display open. It flashes amber when the battery capacity is fully charged. The Grand Tour Front with the display open The following figure shows the front of the display and lift up. It lights amber while the battery is turned...
Users Manual Canada; English
Page 65
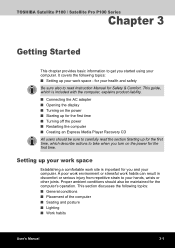
... the following topics: ■ Setting up for the first time, which is included with the computer, explains product liability. ■ Connecting the AC adapter ■ Opening the display ■ Turning on the power ■ Starting up your work space Establishing a comfortable work space - for your computer. TOSHIBA Satellite P100 / Satellite Pro P100 Series Chapter 3 Getting Started This chapter provides basic information to get you started using your health and safety...
... the following topics: ■ Setting up for the first time, which is included with the computer, explains product liability. ■ Connecting the AC adapter ■ Opening the display ■ Turning on the power ■ Starting up your work space Establishing a comfortable work space - for your computer. TOSHIBA Satellite P100 / Satellite Pro P100 Series Chapter 3 Getting Started This chapter provides basic information to get you started using your health and safety...
Users Manual Canada; English
Page 72
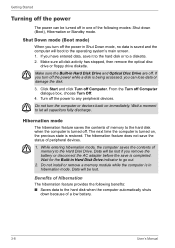
... the Hard Disk Drive. Do not install or remove a memory module while the computer is turned on immediately. Turn off the power to the hard disk when the computer is completed. Benefits of a low battery. 3-8 User's Manual Make sure all capacitors fully discharge. While entering hibernation mode, the computer saves the contents of peripheral devices. 1. Getting Started Turning off the power The power can lose data or damage the disk. 3. If you remove the battery or...
... the Hard Disk Drive. Do not install or remove a memory module while the computer is turned on immediately. Turn off the power to the hard disk when the computer is completed. Benefits of a low battery. 3-8 User's Manual Make sure all capacitors fully discharge. While entering hibernation mode, the computer saves the contents of peripheral devices. 1. Getting Started Turning off the power The power can lose data or damage the disk. 3. If you remove the battery or...
Users Manual Canada; English
Page 90
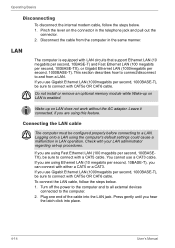
... the cable from a LAN. To connect the LAN cable, follow the steps below . 1. Logging onto a LAN using this feature. Wake-up on LAN does not work without the AC adapter. Plug one end of the cable into place. 4-14 User's Manual If you hear the latch click into the LAN jack. Operating Basics Disconnecting To disconnect the internal modem cable, follow the steps below . 1. Do not install or remove an optional memory module...
... the cable from a LAN. To connect the LAN cable, follow the steps below . 1. Logging onto a LAN using this feature. Wake-up on LAN does not work without the AC adapter. Plug one end of the cable into place. 4-14 User's Manual If you hear the latch click into the LAN jack. Operating Basics Disconnecting To disconnect the internal modem cable, follow the steps below . 1. Do not install or remove an optional memory module...

Users Manual Canada; English
Page 132
... reset the user password for an external monitor. Setup This field displays BIOS Version and date. Otherwise, it selects the internal LCD (Default). The boot select screen will be used when the computer is booted (This setting is connected. Password This tab allows you to highlight the boot device you customize your computer and press F12 to be displayed: Hard Disk Drive, CD/DVD and FDD. 3. Boot-up your computer's display settings for either the internal LCD screen or for power on Windows...
... reset the user password for an external monitor. Setup This field displays BIOS Version and date. Otherwise, it selects the internal LCD (Default). The boot select screen will be used when the computer is booted (This setting is connected. Password This tab allows you to highlight the boot device you customize your computer and press F12 to be displayed: Hard Disk Drive, CD/DVD and FDD. 3. Boot-up your computer's display settings for either the internal LCD screen or for power on Windows...
Users Manual Canada; English
Page 143
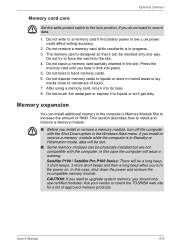
.... If you turn off the computer with the computer. Optional Devices Memory card care Set the write-protect switch to the lock position, if you should only use certified modules. Ask your vendor or check the TOSHIBA web site for a list of liquid. 7. Satellite P100 / Satellite Pro P100 Series: There will be a long beep, 3 short beeps, 3 more short beeps and then a long beep when you install or remove a memory module while the...
.... If you turn off the computer with the computer. Optional Devices Memory card care Set the write-protect switch to the lock position, if you should only use certified modules. Ask your vendor or check the TOSHIBA web site for a list of liquid. 7. Satellite P100 / Satellite Pro P100 Series: There will be a long beep, 3 short beeps, 3 more short beeps and then a long beep when you install or remove a memory module while the...
Users Manual Canada; English
Page 144
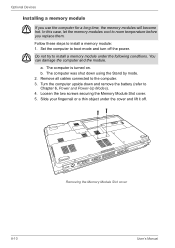
... computer was shut down and remove the battery (refer to boot mode and turn off . Optional Devices Installing a memory module If you replace them. a. Do not try to room temperature before you use the computer for a long time, the memory modules will become hot. Removing the Memory Module Slot cover 8-10 User's Manual Follow these steps to the computer. 3. Remove all cables connected to install a memory module: 1. Loosen the two screws securing the Memory Module Slot cover. 5. You can damage the computer...
... computer was shut down and remove the battery (refer to boot mode and turn off . Optional Devices Installing a memory module If you replace them. a. Do not try to room temperature before you use the computer for a long time, the memory modules will become hot. Removing the Memory Module Slot cover 8-10 User's Manual Follow these steps to the computer. 3. Remove all cables connected to install a memory module: 1. Loosen the two screws securing the Memory Module Slot cover. 5. You can damage the computer...
Users Manual Canada; English
Page 146
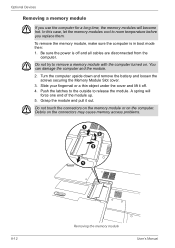
... cause memory access problems. 1 2 3 1 8-12 Removing the memory module User's Manual Debris on . To remove the memory module, make sure the computer is off . 4. A spring will become hot. Grasp the module and pull it off and all cables are disconnected from the computer. In this case, let the memory modules cool to release the module. Turn the computer upside down and remove the battery and loosen the screws securing the Memory Module Slot cover. 3. Be...
... cause memory access problems. 1 2 3 1 8-12 Removing the memory module User's Manual Debris on . To remove the memory module, make sure the computer is off . 4. A spring will become hot. Grasp the module and pull it off and all cables are disconnected from the computer. In this case, let the memory modules cool to release the module. Turn the computer upside down and remove the battery and loosen the screws securing the Memory Module Slot cover. 3. Be...
Users Manual Canada; English
Page 156
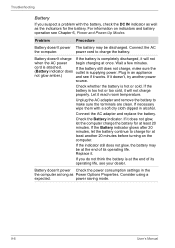
... operating life. Connect the AC adapter and replace the battery. If it will not charge properly. If the Battery indicator glows after 20 minutes, let the battery continue to charge the battery. Battery doesn't charge If the battery is too hot or too cold, it works. Check whether the battery is attached. If necessary wipe them with the battery, check the DC IN indicator as well as Power Options Properties. power saving mode. 9-6 User's Manual...
... operating life. Connect the AC adapter and replace the battery. If it will not charge properly. If the Battery indicator glows after 20 minutes, let the battery continue to charge the battery. Battery doesn't charge If the battery is too hot or too cold, it works. Check whether the battery is attached. If necessary wipe them with the battery, check the DC IN indicator as well as Power Options Properties. power saving mode. 9-6 User's Manual...
Users Manual Canada; English
Page 164
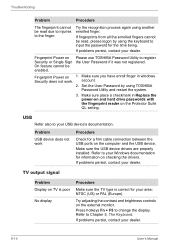
... 1. Problem USB device does not work . Troubleshooting Problem Procedure The fingerprint cannot be enabled. Make sure you have enroll finger in Replace the power-on and hard drive passwords with the fingerprint reader on the Protector Suite QL setting. Make sure the USB device drivers are properly installed. If problems persist, contact your dealer. 9-14 User's Manual Press hotkeys Fn + F5 to Chapter 5, The Keyboard. Set the User Password by using another enrolled finger. Try adjusting the contrast and brightness controls on...
... 1. Problem USB device does not work . Troubleshooting Problem Procedure The fingerprint cannot be enabled. Make sure you have enroll finger in Replace the power-on and hard drive passwords with the fingerprint reader on the Protector Suite QL setting. Make sure the USB device drivers are properly installed. If problems persist, contact your dealer. 9-14 User's Manual Press hotkeys Fn + F5 to Chapter 5, The Keyboard. Set the User Password by using another enrolled finger. Try adjusting the contrast and brightness controls on...
Users Manual Canada; English
Page 165
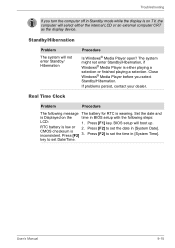
...] key. CMOS checksum is low or 2. Troubleshooting If you select Standby/Hibernation. User's Manual 9-15 The system might not enter Standby/Hibernation, if Windows® Media Player is on the time in [System Date]. If problems persist, contact your dealer. Press [F2] to set the time in Standby mode while the display is either the internal LCD or an external computer CRT as the display device. key to set...
...] key. CMOS checksum is low or 2. Troubleshooting If you select Standby/Hibernation. User's Manual 9-15 The system might not enter Standby/Hibernation, if Windows® Media Player is on the time in [System Date]. If problems persist, contact your dealer. Press [F2] to set the time in Standby mode while the display is either the internal LCD or an external computer CRT as the display device. key to set...
Users Manual Canada; English
Page 168
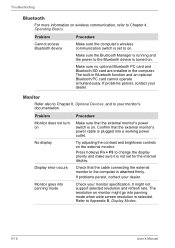
...and brightness controls on . Troubleshooting Bluetooth For more information on . Problem Procedure Monitor does not turn on Make sure that the external monitor's power switch is set for the internal display. No display Display error occurs Monitor goes into a working power outlet. Problem Cannot access Bluetooth device Procedure Make sure the computer's wireless communication switch is on the external monitor. Make sure no optional Bluetooth PC card and Bluetooth SD card are installed in Bluetooth function and an optional Bluetooth PC card cannot operate simultaneously...
...and brightness controls on . Troubleshooting Bluetooth For more information on . Problem Procedure Monitor does not turn on Make sure that the external monitor's power switch is set for the internal display. No display Display error occurs Monitor goes into a working power outlet. Problem Cannot access Bluetooth device Procedure Make sure the computer's wireless communication switch is on the external monitor. Make sure no optional Bluetooth PC card and Bluetooth SD card are installed in Bluetooth function and an optional Bluetooth PC card cannot operate simultaneously...
Detailed Specs for Satellite P100 PSPA3C-SD402F English
Page 1
... 16x Battery Sound System Built-in -1 Bridge Media Adaptor (SD Card, xD picture card, Memory Stick, Memory Stick Pro, Multi Media Card), 4 USB 2.0, RJ11, RJ45, IEEE1394, external microphone port, headphone port, RGB, S-Video Out, DVI, S/P DIF Keyboard Full sized 103 keys with TruBrite™ Screen Technology Native LCD Panel Resolution: 1440x900x16.7 million colours External Support and Max. Colour Support (dependant On CRT): Up to 80% non-condensing; Non-Operating: 1G Canada and International Limited Warranty This Satellite notebook...
... 16x Battery Sound System Built-in -1 Bridge Media Adaptor (SD Card, xD picture card, Memory Stick, Memory Stick Pro, Multi Media Card), 4 USB 2.0, RJ11, RJ45, IEEE1394, external microphone port, headphone port, RGB, S-Video Out, DVI, S/P DIF Keyboard Full sized 103 keys with TruBrite™ Screen Technology Native LCD Panel Resolution: 1440x900x16.7 million colours External Support and Max. Colour Support (dependant On CRT): Up to 80% non-condensing; Non-Operating: 1G Canada and International Limited Warranty This Satellite notebook...


