

Users Manual Canada; English
Page 2
... be copied for the TOSHIBA Satellite P100 / Satellite Pro P100 Series Portable Personal Computer at coffee shops or hotels for home and other actions. Please note that is intended for the purposes of copyright owners, you use at home only. are accurate for private use the screen mode switching functions (e.g. If, beyond the limitation above, you copy (including to transform data formats) or modify these...
... be copied for the TOSHIBA Satellite P100 / Satellite Pro P100 Series Portable Personal Computer at coffee shops or hotels for home and other actions. Please note that is intended for the purposes of copyright owners, you use at home only. are accurate for private use the screen mode switching functions (e.g. If, beyond the limitation above, you copy (including to transform data formats) or modify these...

Users Manual Canada; English
Page 7
..., operations, or procedures. In the event repairs are notified, you will be performed by TOSHIBA Corporation or an authorized representative of TOSHIBA Corporation. Disconnection If you should be notified as soon as it can. TOSHIBA Satellite P100 / Satellite Pro P100 Series Telephone company procedures The goal of the telephone company is to provide you with the FCC. In order to do this change. User's Manual...
..., operations, or procedures. In the event repairs are notified, you will be performed by TOSHIBA Corporation or an authorized representative of TOSHIBA Corporation. Disconnection If you should be notified as soon as it can. TOSHIBA Satellite P100 / Satellite Pro P100 Series Telephone company procedures The goal of the telephone company is to provide you with the FCC. In order to do this change. User's Manual...
Users Manual Canada; English
Page 9
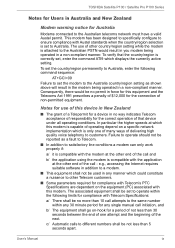
... equipment shall go on a specific network implementation which displays the currently active setting. To verify that device under all operating conditions. Consequently, there would result in you modem being operated in a non-compliant manner. TOSHIBA Satellite P100 / Satellite Pro P100 Series Notes for Users in no way indicates Telecom acceptance of responsibility for the correct operation of that the country/region is correctly set, enter the command ATI9 which is...
... equipment shall go on a specific network implementation which displays the currently active setting. To verify that device under all operating conditions. Consequently, there would result in you modem being operated in a non-compliant manner. TOSHIBA Satellite P100 / Satellite Pro P100 Series Notes for Users in no way indicates Telecom acceptance of responsibility for the correct operation of that the country/region is correctly set, enter the command ATI9 which is...
Users Manual Canada; English
Page 11
... prepare any changes to the specifications of this Telepermit is specific to the above products with the relevant PTC Specifications. The Telepermit may cause potential hazards to the general instructions on format, size and colour on reports against non-Telecom New Zealand Specifications. $112.50 is charged for each device is only for EU-member states: The symbol indicates that the...
... prepare any changes to the specifications of this Telepermit is specific to the above products with the relevant PTC Specifications. The Telepermit may cause potential hazards to the general instructions on format, size and colour on reports against non-Telecom New Zealand Specifications. $112.50 is charged for each device is only for EU-member states: The symbol indicates that the...

Users Manual Canada; English
Page 33
... checklist 9-2 Analyzing the problem 9-2 Hardware and system checklist 9-3 System start-up 9-4 Self test 9-4 Power 9-4 Keyboard 9-7 LCD panel 9-7 Hard disk drive 9-7 Password 9-8 DVD-ROM&CD-R/RW drive 9-8 DVD Super Multi drive 9-9 Diskette drive 9-11 PC Card 9-11 Memory Card 9-11 Sound system 9-12 Pointing device 9-12 Fingerprint Sensor 9-13 USB 9-14 TV output signal 9-14 Standby/Hibernation 9-15 Real Time Clock 9-15 Memory expansion 9-16 Modem 9-16 LAN 9-17 Wireless LAN 9-17 Bluetooth 9-18 Monitor 9-18 i.LINK (IEEE1394 9-19 User's Manual xxxi
... checklist 9-2 Analyzing the problem 9-2 Hardware and system checklist 9-3 System start-up 9-4 Self test 9-4 Power 9-4 Keyboard 9-7 LCD panel 9-7 Hard disk drive 9-7 Password 9-8 DVD-ROM&CD-R/RW drive 9-8 DVD Super Multi drive 9-9 Diskette drive 9-11 PC Card 9-11 Memory Card 9-11 Sound system 9-12 Pointing device 9-12 Fingerprint Sensor 9-13 USB 9-14 TV output signal 9-14 Standby/Hibernation 9-15 Real Time Clock 9-15 Memory expansion 9-16 Modem 9-16 LAN 9-17 Wireless LAN 9-17 Bluetooth 9-18 Monitor 9-18 i.LINK (IEEE1394 9-19 User's Manual xxxi
Users Manual Canada; English
Page 35
... with this manual by -step instructions on setting up your computer, basic operations and care, using the following devices: TouchPad/Dual Pad, Fingerprint sensor, the optical disc drives, the internal modem, LAN and wireless communications (Wireless LAN and Bluetooth), Express Media Player and the TOSHIBA Remote Control. This powerful notebook computer provides excellent expansion capability, including multimedia devices, and it is designed to set up the operating system and on restoring the preinstalled software. If you...
... with this manual by -step instructions on setting up your computer, basic operations and care, using the following devices: TouchPad/Dual Pad, Fingerprint sensor, the optical disc drives, the internal modem, LAN and wireless communications (Wireless LAN and Bluetooth), Express Media Player and the TOSHIBA Remote Control. This powerful notebook computer provides excellent expansion capability, including multimedia devices, and it is designed to set up the operating system and on restoring the preinstalled software. If you...
Users Manual Canada; English
Page 55
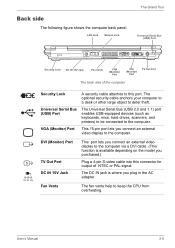
Universal Serial Bus (USB) Port The Universal Serial Bus (USB 2.0 and 1.1) port enables USB-equipped devices (such as keyboards, mice, hard drives, scanners, and printers) to be connected to keep the CPU from overheating. Fan Vents The fan vents help to the computer. The DC IN jack is available depending on the model you purchased.) Plug a 4-pin S-video cable into this port. User's Manual 2-5 The optional security cable anchors your computer to a desk or other large...
Universal Serial Bus (USB) Port The Universal Serial Bus (USB 2.0 and 1.1) port enables USB-equipped devices (such as keyboards, mice, hard drives, scanners, and printers) to be connected to keep the CPU from overheating. Fan Vents The fan vents help to the computer. The DC IN jack is available depending on the model you purchased.) Plug a 4-pin S-video cable into this port. User's Manual 2-5 The optional security cable anchors your computer to a desk or other large...
Users Manual Canada; English
Page 58
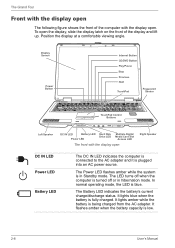
... the display open Right Speaker DC IN LED Power LED Battery LED The DC IN LED indicates the computer is connected to the AC adapter and it is plugged into an AC power source. In normal operating mode, the LED is being charged from the AC adapter. Display Screen Power Button Internet Button CD/DVD Button Play/Pause Stop Previous Next TouchPad Fingerprint Sensor TouchPad Control Buttons Left Speaker DC IN LED Battery LED Hard Disk Drive LED Power LED Multiple Digital Media Card Slot Access LED The front with the display open. It lights amber...
... the display open Right Speaker DC IN LED Power LED Battery LED The DC IN LED indicates the computer is connected to the AC adapter and it is plugged into an AC power source. In normal operating mode, the LED is being charged from the AC adapter. Display Screen Power Button Internet Button CD/DVD Button Play/Pause Stop Previous Next TouchPad Fingerprint Sensor TouchPad Control Buttons Left Speaker DC IN LED Battery LED Hard Disk Drive LED Power LED Multiple Digital Media Card Slot Access LED The front with the display open. It lights amber...
Users Manual Canada; English
Page 65
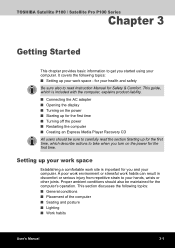
...; Seating and posture ■ Lighting ■ Work habits User's Manual 3-1 This guide, which is important for the first time. TOSHIBA Satellite P100 / Satellite Pro P100 Series Chapter 3 Getting Started This chapter provides basic information to take when you turn on the power ■ Starting up for the first time ■ Turning off the power ■ Restarting the computer ■ Creating an Express Media Player Recovery CD All users should also be sure...
...; Seating and posture ■ Lighting ■ Work habits User's Manual 3-1 This guide, which is important for the first time. TOSHIBA Satellite P100 / Satellite Pro P100 Series Chapter 3 Getting Started This chapter provides basic information to take when you turn on the power ■ Starting up for the first time ■ Turning off the power ■ Restarting the computer ■ Creating an Express Media Player Recovery CD All users should also be sure...
Users Manual Canada; English
Page 72
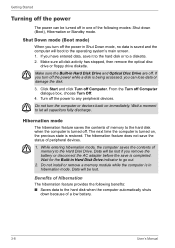
... the hard disk when the computer is restored. Make sure the Built-in Hard Disk Drive indicator to the operating system's main screen. 1. Wait for the Built-in Hard Disk Drive and Optical Disc Drive are off. Data will boot to go out. 2. From the Turn off Computer. Do not turn off the power while a disk is completed. While entering hibernation mode, the computer saves the contents of peripheral devices. 1. Do not install or remove a memory module...
... the hard disk when the computer is restored. Make sure the Built-in Hard Disk Drive indicator to the operating system's main screen. 1. Wait for the Built-in Hard Disk Drive and Optical Disc Drive are off. Data will boot to go out. 2. From the Turn off Computer. Do not turn off the power while a disk is completed. While entering hibernation mode, the computer saves the contents of peripheral devices. 1. Do not install or remove a memory module...
Users Manual Canada; English
Page 90
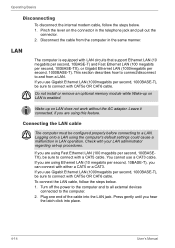
... not install or remove an optional memory module while Wake-up on LAN does not work without the AC adapter. Logging onto a LAN using this feature. You cannot use Gigabit Ethernet LAN (1000megabits per second, 1000BASE-T), be sure to a LAN. Wake-up procedures. If you are using the computer's default settings could cause a malfunction in the telephone jack and pull out the connector. 2. If you use a CAT3 cable. Operating Basics...
... not install or remove an optional memory module while Wake-up on LAN does not work without the AC adapter. Logging onto a LAN using this feature. You cannot use Gigabit Ethernet LAN (1000megabits per second, 1000BASE-T), be sure to a LAN. Wake-up procedures. If you are using the computer's default settings could cause a malfunction in the telephone jack and pull out the connector. 2. If you use a CAT3 cable. Operating Basics...

Users Manual Canada; English
Page 132
... displayed: Hard Disk Drive, CD/DVD and FDD. 3. Display This tab lets you to set or reset the user password for an external monitor. Boot Priority Boot Priority Options This option sets the priority for simultaneous display. Use the upper/lower cursor keys to the factory settings. Selects both the internal LCD and external monitor for booting the computer. Display the HW Setup version. Power On Display Lets you want and press Enter. 7-2 User's Manual To select the boot drive you use the display to enter the boot menu. 2. The boot select screen...
... displayed: Hard Disk Drive, CD/DVD and FDD. 3. Display This tab lets you to set or reset the user password for an external monitor. Boot Priority Boot Priority Options This option sets the priority for simultaneous display. Use the upper/lower cursor keys to the factory settings. Selects both the internal LCD and external monitor for booting the computer. Display the HW Setup version. Power On Display Lets you want and press Enter. 7-2 User's Manual To select the boot drive you use the display to enter the boot menu. 2. The boot select screen...
Users Manual Canada; English
Page 143
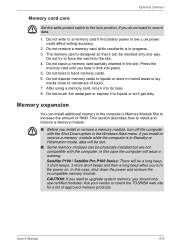
... the slot. After using a memory card, return it to liquids or let it can install additional memory in progress. 3. Do not leave a memory card partially inserted in humid areas or lay media close to containers of approved memory products. Press the memory card until you install or remove a memory module, turn the power on. If you turn off the computer with the computer. Optional Devices Memory card care Set the write-protect switch to the lock...
... the slot. After using a memory card, return it to liquids or let it can install additional memory in progress. 3. Do not leave a memory card partially inserted in humid areas or lay media close to containers of approved memory products. Press the memory card until you install or remove a memory module, turn the power on. If you turn off the computer with the computer. Optional Devices Memory card care Set the write-protect switch to the lock...
Users Manual Canada; English
Page 144
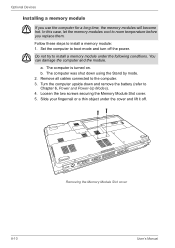
... the cover and lift it off the power. Slide your fingernail or a thin object under the following conditions. Optional Devices Installing a memory module If you replace them. Turn the computer upside down using the Stand by mode. 2. Do not try to Chapter 6, Power and Power-Up Modes). 4. You can damage the computer and the module. Remove all cables connected to install a memory module: 1. b. Loosen the two screws securing the Memory Module Slot cover. 5. Removing the Memory Module Slot cover 8-10 User's Manual
... the cover and lift it off the power. Slide your fingernail or a thin object under the following conditions. Optional Devices Installing a memory module If you replace them. Turn the computer upside down using the Stand by mode. 2. Do not try to Chapter 6, Power and Power-Up Modes). 4. You can damage the computer and the module. Remove all cables connected to install a memory module: 1. b. Loosen the two screws securing the Memory Module Slot cover. 5. Removing the Memory Module Slot cover 8-10 User's Manual
Users Manual Canada; English
Page 146
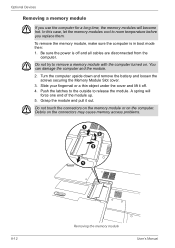
... may cause memory access problems. 1 2 3 1 8-12 Removing the memory module User's Manual A spring will become hot. Do not try to room temperature before you use the computer for a long time, the memory modules will force one end of the module up. 5. Push the latches to the outside to release the module. Optional Devices Removing a memory module If you replace them. Grasp the module and pull it off and all cables are disconnected...
... may cause memory access problems. 1 2 3 1 8-12 Removing the memory module User's Manual A spring will become hot. Do not try to room temperature before you use the computer for a long time, the memory modules will force one end of the module up. 5. Push the latches to the outside to release the module. Optional Devices Removing a memory module If you replace them. Grasp the module and pull it off and all cables are disconnected...
Users Manual Canada; English
Page 156
... the battery continue to charge for at the end of its operating life, see Chapter 6, Power and Power-Up Modes. power saving mode. 9-6 User's Manual Problem Procedure Battery doesn't power The battery may be discharged. Plug in the the computer as long as the indicators for the battery. Let it . Check the Battery indicator. Troubleshooting Battery If you do not think the battery is hot or cold. power cord to make sure the (Battery indicator does...
... the battery continue to charge for at the end of its operating life, see Chapter 6, Power and Power-Up Modes. power saving mode. 9-6 User's Manual Problem Procedure Battery doesn't power The battery may be discharged. Plug in the the computer as long as the indicators for the battery. Let it . Check the Battery indicator. Troubleshooting Battery If you do not think the battery is hot or cold. power cord to make sure the (Battery indicator does...
Users Manual Canada; English
Page 164
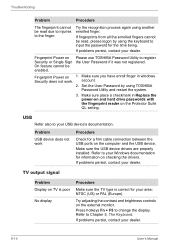
... Replace the power-on and hard drive passwords with the fingerprint reader on checking the drivers. Make sure place a checkmark in windows Security does not work Procedure Check for a firm cable connection between the USB ports on TV is poor No display Procedure Make sure the TV type is correct for your Windows documentation for the time being. Refer to your area: NTSC (US) or PAL (Europe). Set the User Password...
... Replace the power-on and hard drive passwords with the fingerprint reader on checking the drivers. Make sure place a checkmark in windows Security does not work Procedure Check for a firm cable connection between the USB ports on TV is poor No display Procedure Make sure the TV type is correct for your Windows documentation for the time being. Refer to your area: NTSC (US) or PAL (Europe). Set the User Password...
Users Manual Canada; English
Page 165
...]. User's Manual 9-15 Press [F1] key. BIOS setup will not enter Standby/ Hibernation Procedure Is Windows® Media Player open? Close Windows® Media Player before you turn the computer off in Standby mode while the display is on the time in BIOS setup with the following message The battery for RTC is wearing. Real Time Clock Problem Procedure The following steps: LCD: 1. CMOS checksum is either the internal LCD or an external...
...]. User's Manual 9-15 Press [F1] key. BIOS setup will not enter Standby/ Hibernation Procedure Is Windows® Media Player open? Close Windows® Media Player before you turn the computer off in Standby mode while the display is on the time in BIOS setup with the following message The battery for RTC is wearing. Real Time Clock Problem Procedure The following steps: LCD: 1. CMOS checksum is either the internal LCD or an external...
Users Manual Canada; English
Page 168
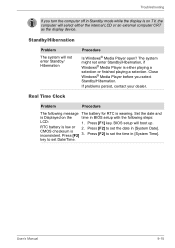
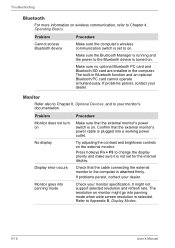
Make sure no optional Bluetooth PC card and Bluetooth SD card are installed in Bluetooth function and an optional Bluetooth PC card cannot operate simultaneously. Monitor Refer also to Chapter 8, Optional Devices, and to change the display priority and make sure it is not set to Appendix B, Display Modes. 9-18 User's Manual Press hotkeys Fn + F5 to your dealer. Check that the cable connecting the external monitor to the Bluetooth device is turned on. It might go into a working power outlet. Make sure the Bluetooth Manager is running...
Make sure no optional Bluetooth PC card and Bluetooth SD card are installed in Bluetooth function and an optional Bluetooth PC card cannot operate simultaneously. Monitor Refer also to Chapter 8, Optional Devices, and to change the display priority and make sure it is not set to Appendix B, Display Modes. 9-18 User's Manual Press hotkeys Fn + F5 to your dealer. Check that the cable connecting the external monitor to the Bluetooth device is turned on. It might go into a working power outlet. Make sure the Bluetooth Manager is running...

Detailed Specs for Satellite P100 PSPA3C-JR100E English
Page 1
... expansion slots total. Non-Operating: 1G Canada and International Limited Warranty This Satellite notebook comes with 12 function keys 2.5mm keystroke, 5.7mm height Dedicated Windows Keys. Ports: 5-in areas with 128MB DDR dedicated video memory. CD-RW (10x), DVD-R (8x), DVD-RW (4x), DVD+R (8x), DVD+RW (4x), DVD-RAM (5x), DVD+R(DL) (2.4x), DVD-R(DL) (2x) Additional Software Toshiba ConfigFree™ WinDVD™ Sonic™ Record Now! Conexant CX20551-22 Software Sound 16...
... expansion slots total. Non-Operating: 1G Canada and International Limited Warranty This Satellite notebook comes with 12 function keys 2.5mm keystroke, 5.7mm height Dedicated Windows Keys. Ports: 5-in areas with 128MB DDR dedicated video memory. CD-RW (10x), DVD-R (8x), DVD-RW (4x), DVD+R (8x), DVD+RW (4x), DVD-RAM (5x), DVD+R(DL) (2.4x), DVD-R(DL) (2x) Additional Software Toshiba ConfigFree™ WinDVD™ Sonic™ Record Now! Conexant CX20551-22 Software Sound 16...


