

Users Manual Canada; English
Page 2
TOSHIBA Satellite P100 / Satellite Pro P100 Series Copyright © 2005 by the copyright laws. Please remember to observe the copyright laws when you use the screen mode switching functions (e.g. This product incorporates copyright protection technology that you copy (including to transform data formats) or modify these to the use at home only. Use of copyrights or personal rights. TOSHIBA assumes no liability for accuracy. ii User's Manual Please note...
TOSHIBA Satellite P100 / Satellite Pro P100 Series Copyright © 2005 by the copyright laws. Please remember to observe the copyright laws when you use the screen mode switching functions (e.g. This product incorporates copyright protection technology that you copy (including to transform data formats) or modify these to the use at home only. Use of copyrights or personal rights. TOSHIBA assumes no liability for accuracy. ii User's Manual Please note...

Users Manual Canada; English
Page 7
... opportunity to correct the problem and informed of this information into your fax modem, you should complete the setup of TOSHIBA Corporation. When you are ever needed on the first page of the transmission, the date and time it is not feasible, you will notify you in their equipment, operations, or procedures. TOSHIBA Satellite P100 / Satellite Pro P100 Series Telephone company procedures...
... opportunity to correct the problem and informed of this information into your fax modem, you should complete the setup of TOSHIBA Corporation. When you are ever needed on the first page of the transmission, the date and time it is not feasible, you will notify you in their equipment, operations, or procedures. TOSHIBA Satellite P100 / Satellite Pro P100 Series Telephone company procedures...
Users Manual Canada; English
Page 9
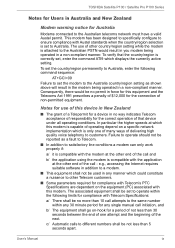
... on a specific network implementation which could constitute a nuisance to operate should not be reported as shown above will result in the modem being operated in a non-compliant manner. TOSHIBA Satellite P100 / Satellite Pro P100 Series Notes for Users in Australia and New Zealand Modem warning notice for Australia Modems connected to different numbers shall be not less than 5 seconds apart. To verify that device under all operating conditions...
... on a specific network implementation which could constitute a nuisance to operate should not be reported as shown above will result in the modem being operated in a non-compliant manner. TOSHIBA Satellite P100 / Satellite Pro P100 Series Notes for Users in Australia and New Zealand Modem warning notice for Australia Modems connected to different numbers shall be not less than 5 seconds apart. To verify that device under all operating conditions...
Users Manual Canada; English
Page 11
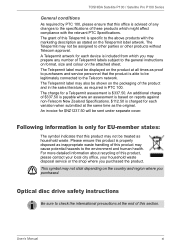
..., your household waste disposal service or the shop where you purchased the product. TOSHIBA Satellite P100 / Satellite Pro P100 Series General conditions As required by PTC 100, please ensure that the product is charged for each device is advised of any changes to the specifications of these products which you may cause potential hazards to the general instructions on format, size and colour on...
..., your household waste disposal service or the shop where you purchased the product. TOSHIBA Satellite P100 / Satellite Pro P100 Series General conditions As required by PTC 100, please ensure that the product is charged for each device is advised of any changes to the specifications of these products which you may cause potential hazards to the general instructions on format, size and colour on...

Users Manual Canada; English
Page 33
... checklist 9-2 Analyzing the problem 9-2 Hardware and system checklist 9-3 System start-up 9-4 Self test 9-4 Power 9-4 Keyboard 9-7 LCD panel 9-7 Hard disk drive 9-7 Password 9-8 DVD-ROM&CD-R/RW drive 9-8 DVD Super Multi drive 9-9 Diskette drive 9-11 PC Card 9-11 Memory Card 9-11 Sound system 9-12 Pointing device 9-12 Fingerprint Sensor 9-13 USB 9-14 TV output signal 9-14 Standby/Hibernation 9-15 Real Time Clock 9-15 Memory expansion 9-16 Modem 9-16 LAN 9-17 Wireless LAN 9-17 Bluetooth 9-18 Monitor 9-18 i.LINK (IEEE1394 9-19 User's Manual xxxi
... checklist 9-2 Analyzing the problem 9-2 Hardware and system checklist 9-3 System start-up 9-4 Self test 9-4 Power 9-4 Keyboard 9-7 LCD panel 9-7 Hard disk drive 9-7 Password 9-8 DVD-ROM&CD-R/RW drive 9-8 DVD Super Multi drive 9-9 Diskette drive 9-11 PC Card 9-11 Memory Card 9-11 Sound system 9-12 Pointing device 9-12 Fingerprint Sensor 9-13 USB 9-14 TV output signal 9-14 Standby/Hibernation 9-15 Real Time Clock 9-15 Memory expansion 9-16 Modem 9-16 LAN 9-17 Wireless LAN 9-17 Bluetooth 9-18 Monitor 9-18 i.LINK (IEEE1394 9-19 User's Manual xxxi
Users Manual Canada; English
Page 35
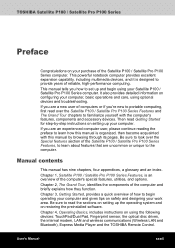
... to provide years of the computer and briefly explains how they function. Chapter 1, Satellite P100 / Satellite Pro P100 Series Features, is designed to begin using your computer, basic operations and care, using the following devices: TouchPad/Dual Pad, Fingerprint sensor, the optical disc drives, the internal modem, LAN and wireless communications (Wireless LAN and Bluetooth), Express Media Player and the TOSHIBA Remote Control. Chapter 3, Getting Started, provides a quick overview of the computer's special features, utilities, and options. User's Manual xxxiii
... to provide years of the computer and briefly explains how they function. Chapter 1, Satellite P100 / Satellite Pro P100 Series Features, is designed to begin using your computer, basic operations and care, using the following devices: TouchPad/Dual Pad, Fingerprint sensor, the optical disc drives, the internal modem, LAN and wireless communications (Wireless LAN and Bluetooth), Express Media Player and the TOSHIBA Remote Control. Chapter 3, Getting Started, provides a quick overview of the computer's special features, utilities, and options. User's Manual xxxiii
Users Manual Canada; English
Page 55
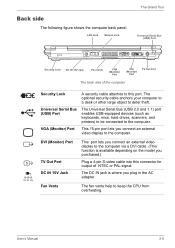
... computer. LAN Jack Modem Jack The Grand Tour Universal Serial Bus (USB) Port Security Lock DC IN 15V Jack Fan Vents VGA (Monitor) Port DVI (Monitor) Port TV Out Port The back side of NTSC or PAL signal. DVI (Monitor) Port TV Out Port DC IN 15V Jack This port lets you purchased.) Plug a 4-pin S-video cable into this port. User's Manual 2-5 The DC IN jack is available depending on the model you connect an external video display to this...
... computer. LAN Jack Modem Jack The Grand Tour Universal Serial Bus (USB) Port Security Lock DC IN 15V Jack Fan Vents VGA (Monitor) Port DVI (Monitor) Port TV Out Port The back side of NTSC or PAL signal. DVI (Monitor) Port TV Out Port DC IN 15V Jack This port lets you purchased.) Plug a 4-pin S-video cable into this port. User's Manual 2-5 The DC IN jack is available depending on the model you connect an external video display to this...
Users Manual Canada; English
Page 58
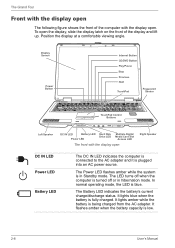
... Standby mode. The Grand Tour Front with the display open The following figure shows the front of the display and lift up. It lights blue when the battery is low. 2-8 User's Manual It flashes amber when the battery capacity is fully charged. Display Screen Power Button Internet Button CD/DVD Button Play/Pause Stop Previous Next TouchPad Fingerprint Sensor TouchPad Control Buttons Left Speaker DC IN LED Battery LED Hard Disk Drive LED Power LED Multiple Digital Media Card Slot Access LED The front with the display open Right...
... Standby mode. The Grand Tour Front with the display open The following figure shows the front of the display and lift up. It lights blue when the battery is low. 2-8 User's Manual It flashes amber when the battery capacity is fully charged. Display Screen Power Button Internet Button CD/DVD Button Play/Pause Stop Previous Next TouchPad Fingerprint Sensor TouchPad Control Buttons Left Speaker DC IN LED Battery LED Hard Disk Drive LED Power LED Multiple Digital Media Card Slot Access LED The front with the display open Right...
Users Manual Canada; English
Page 65
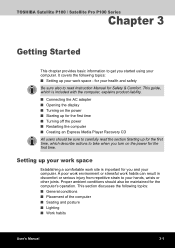
... you and your work space Establishing a comfortable work space - Setting up your computer. TOSHIBA Satellite P100 / Satellite Pro P100 Series Chapter 3 Getting Started This chapter provides basic information to get you started using your health and safety Be sure also to read the section Starting up for the first time, which is important for you turn on the power for the computer's operation. It covers the following topics...
... you and your work space Establishing a comfortable work space - Setting up your computer. TOSHIBA Satellite P100 / Satellite Pro P100 Series Chapter 3 Getting Started This chapter provides basic information to get you started using your health and safety Be sure also to read the section Starting up for the first time, which is important for you turn on the power for the computer's operation. It covers the following topics...
Users Manual Canada; English
Page 72
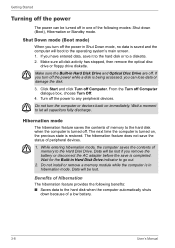
.... Do not install or remove a memory module while the computer is turned off the power while a disk is restored. If you turn off . Click Start and click Turn off . Hibernation mode The hibernation feature saves the contents of memory to the Hard Disk Drive. Make sure the Built-in Hard Disk Drive and Optical Disc Drive are off Computer. Data will be lost . Wait a moment to the operating system's main screen. 1. Make sure all capacitors...
.... Do not install or remove a memory module while the computer is turned off the power while a disk is restored. If you turn off . Click Start and click Turn off . Hibernation mode The hibernation feature saves the contents of memory to the Hard Disk Drive. Make sure the Built-in Hard Disk Drive and Optical Disc Drive are off Computer. Data will be lost . Wait a moment to the operating system's main screen. 1. Make sure all capacitors...
Users Manual Canada; English
Page 90
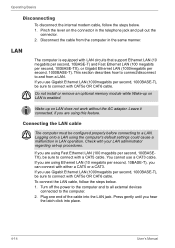
... the computer in LAN operation. Check with either a CAT5 or a CAT3. You cannot use a CAT3 cable. If you hear the latch click into the LAN jack. Plug one end of the cable into place. 4-14 User's Manual Logging onto a LAN using Fast Ethernet LAN (100 megabits per second, 10BASE-T), you use Gigabit Ethernet LAN (1000megabits per second, 1000BASE-T). Do not install or remove an optional memory module while Wake...
... the computer in LAN operation. Check with either a CAT5 or a CAT3. You cannot use a CAT3 cable. If you hear the latch click into the LAN jack. Plug one end of the cable into place. 4-14 User's Manual Logging onto a LAN using Fast Ethernet LAN (100 megabits per second, 10BASE-T), you use Gigabit Ethernet LAN (1000megabits per second, 1000BASE-T). Do not install or remove an optional memory module while Wake...

Users Manual Canada; English
Page 132
... displayed: Hard Disk Drive, CD/DVD and FDD. 3. Auto-Selected LCD + Analog RGB Selects an external monitor if one is only available on Standard VGA mode and not available on . Use the upper/lower cursor keys to the factory settings. To select the boot drive you want and press Enter. 7-2 User's Manual HW Setup General This window displays the BIOS version and contains two buttons: Default About Return all HW Setup values to highlight the boot device...
... displayed: Hard Disk Drive, CD/DVD and FDD. 3. Auto-Selected LCD + Analog RGB Selects an external monitor if one is only available on Standard VGA mode and not available on . Use the upper/lower cursor keys to the factory settings. To select the boot drive you want and press Enter. 7-2 User's Manual HW Setup General This window displays the BIOS version and contains two buttons: Default About Return all HW Setup values to highlight the boot device...
Users Manual Canada; English
Page 143
... you turn off the computer with the Shut Down option in Standby or Hibernation mode, data will be lost. ■ Some memory modules can install additional memory in progress. 3. User's Manual 8-9 The memory card is in the Windows Start menu. If you install or remove a memory module while the computer is designed so that it get dirty. This section describes how to force the card into place. 5. Optional Devices Memory card care Set the...
... you turn off the computer with the Shut Down option in Standby or Hibernation mode, data will be lost. ■ Some memory modules can install additional memory in progress. 3. User's Manual 8-9 The memory card is in the Windows Start menu. If you install or remove a memory module while the computer is designed so that it get dirty. This section describes how to force the card into place. 5. Optional Devices Memory card care Set the...
Users Manual Canada; English
Page 144
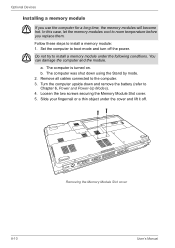
... temperature before you use the computer for a long time, the memory modules will become hot. You can damage the computer and the module. Removing the Memory Module Slot cover 8-10 User's Manual Follow these steps to install a memory module under the cover and lift it off the power. a. Do not try to install a memory module: 1. b. Remove all cables connected to Chapter 6, Power and Power-Up Modes). 4. In this case, let the memory modules cool to boot mode and turn off . The...
... temperature before you use the computer for a long time, the memory modules will become hot. You can damage the computer and the module. Removing the Memory Module Slot cover 8-10 User's Manual Follow these steps to install a memory module under the cover and lift it off the power. a. Do not try to install a memory module: 1. b. Remove all cables connected to Chapter 6, Power and Power-Up Modes). 4. In this case, let the memory modules cool to boot mode and turn off . The...
Users Manual Canada; English
Page 146
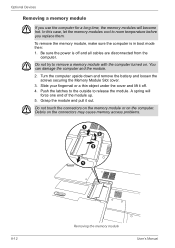
... will become hot. Grasp the module and pull it off and all cables are disconnected from the computer. Be sure the power is in boot mode then: 1. Turn the computer upside down and remove the battery and loosen the screws securing the Memory Module Slot cover. 3. To remove the memory module, make sure the computer is off . 4. Optional Devices Removing a memory module If you replace them. In this case, let the memory modules cool to...
... will become hot. Grasp the module and pull it off and all cables are disconnected from the computer. Be sure the power is in boot mode then: 1. Turn the computer upside down and remove the battery and loosen the screws securing the Memory Module Slot cover. 3. To remove the memory module, make sure the computer is off . 4. Optional Devices Removing a memory module If you replace them. In this case, let the memory modules cool to...
Users Manual Canada; English
Page 156
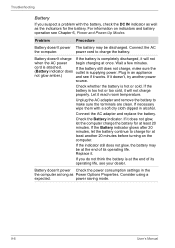
... too hot or too cold, it does not glow, let the computer charge the battery for at the end of its operating life, see Chapter 6, Power and Power-Up Modes. Battery doesn't power Check the power consumption settings in alcohol. power saving mode. 9-6 User's Manual Consider using a expected. If you suspect a problem with a soft dry cloth dipped in the the computer as long as the indicators for the battery. Troubleshooting Battery...
... too hot or too cold, it does not glow, let the computer charge the battery for at the end of its operating life, see Chapter 6, Power and Power-Up Modes. Battery doesn't power Check the power consumption settings in alcohol. power saving mode. 9-6 User's Manual Consider using a expected. If you suspect a problem with a soft dry cloth dipped in the the computer as long as the indicators for the battery. Troubleshooting Battery...
Users Manual Canada; English
Page 164
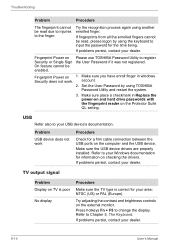
... cable connection between the USB ports on checking the drivers. Fingerprint Power on the Protector Suite QL setting. account. 2. Refer to your dealer. 9-14 User's Manual Troubleshooting Problem Procedure The fingerprint cannot be read , please logon by using TOSHIBA Password Utility and restart the system. 3. Make sure you have enroll finger in Replace the power-on and hard drive passwords with the fingerprint reader on Please use TOSHIBA Password Utility to change the display. Make sure place a checkmark in windows...
... cable connection between the USB ports on checking the drivers. Fingerprint Power on the Protector Suite QL setting. account. 2. Refer to your dealer. 9-14 User's Manual Troubleshooting Problem Procedure The fingerprint cannot be read , please logon by using TOSHIBA Password Utility and restart the system. 3. Make sure you have enroll finger in Replace the power-on and hard drive passwords with the fingerprint reader on Please use TOSHIBA Password Utility to change the display. Make sure place a checkmark in windows...
Users Manual Canada; English
Page 165
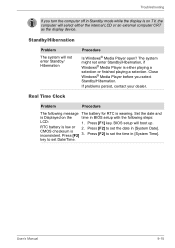
.../Hibernation. BIOS setup will not enter Standby/ Hibernation Procedure Is Windows® Media Player open? key to set the date in [System Date]. If problems persist, contact your dealer. Real Time Clock Problem Procedure The following steps: LCD: 1. Press [F2] to set the time in BIOS setup with the following message The battery for RTC is either the internal LCD or an external computer CRT as the display device. CMOS checksum...
.../Hibernation. BIOS setup will not enter Standby/ Hibernation Procedure Is Windows® Media Player open? key to set the date in [System Date]. If problems persist, contact your dealer. Real Time Clock Problem Procedure The following steps: LCD: 1. Press [F2] to set the time in BIOS setup with the following message The battery for RTC is either the internal LCD or an external computer CRT as the display device. CMOS checksum...
Users Manual Canada; English
Page 168
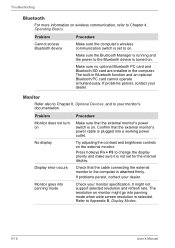
... switch is turned on . Make sure the Bluetooth Manager is running and the power to the Bluetooth device is set for the internal display. Make sure no optional Bluetooth PC card and Bluetooth SD card are installed in Bluetooth function and an optional Bluetooth PC card cannot operate simultaneously. The built-in the computer. If problems persist, contact your monitor specification. The resolution on the external monitor. No display Display error occurs Monitor goes into panning mode Try adjusting the contrast and brightness controls on monitor might not support...
... switch is turned on . Make sure the Bluetooth Manager is running and the power to the Bluetooth device is set for the internal display. Make sure no optional Bluetooth PC card and Bluetooth SD card are installed in Bluetooth function and an optional Bluetooth PC card cannot operate simultaneously. The built-in the computer. If problems persist, contact your monitor specification. The resolution on the external monitor. No display Display error occurs Monitor goes into panning mode Try adjusting the contrast and brightness controls on monitor might not support...

Detailed Specs for Satellite P100 PSPA3C-JR100E English
Page 1
... HDD SATA, DVD Super-Multi Double Layer +-R, Modem, LAN, Intel 802.11a/g Wireless, TV-out, Windows® XP Home. CD Control Function: Play/Pause, Stop/Eject, Previous, Skip/Next, Mode Pointing Device Optical Drive Dual Mode Pad Built-in -1 Multimedia port (SD, Memory Stick®, Memory Stick® Pro, MMC, xD-Picture Card™), 4 USB 2.0, RJ11, RJ45, IEEE1394, external microphone port, headphone port, RGB. ROM (8x), DVD-R (8x), DVD-RW (4x), DVD+R (8x), DVD+RW (4x), DVD-RAM (5x), DVD...
... HDD SATA, DVD Super-Multi Double Layer +-R, Modem, LAN, Intel 802.11a/g Wireless, TV-out, Windows® XP Home. CD Control Function: Play/Pause, Stop/Eject, Previous, Skip/Next, Mode Pointing Device Optical Drive Dual Mode Pad Built-in -1 Multimedia port (SD, Memory Stick®, Memory Stick® Pro, MMC, xD-Picture Card™), 4 USB 2.0, RJ11, RJ45, IEEE1394, external microphone port, headphone port, RGB. ROM (8x), DVD-R (8x), DVD-RW (4x), DVD+R (8x), DVD+RW (4x), DVD-RAM (5x), DVD...


