

Users Manual Canada; English
Page 2
... without notice. Reverse engineering or disassembly is protected by TOSHIBA Corporation. TOSHIBA assumes no liability for accuracy. TOSHIBA Satellite P100 / Satellite Pro P100 Series Portable Personal Computer User's Manual First edition October 2005 Ownership and copyright of TOSHIBA. patents and other limited viewing uses only unless otherwise authorized by the copyright laws. Use of this product to display enlarged images/ video at coffee shops or hotels for...
... without notice. Reverse engineering or disassembly is protected by TOSHIBA Corporation. TOSHIBA assumes no liability for accuracy. TOSHIBA Satellite P100 / Satellite Pro P100 Series Portable Personal Computer User's Manual First edition October 2005 Ownership and copyright of TOSHIBA. patents and other limited viewing uses only unless otherwise authorized by the copyright laws. Use of this product to display enlarged images/ video at coffee shops or hotels for...

Users Manual Canada; English
Page 7
... setup of TOSHIBA Corporation. Fax branding The Telephone Consumer Protection Act of 1991 makes it may temporarily discontinue service. When you are ever needed on the first page of your fax software before sending messages. In order to program this change. TOSHIBA Satellite P100 / Satellite Pro P100 Series Telephone company procedures The goal of the telephone company is to provide you with the FCC. If problems...
... setup of TOSHIBA Corporation. Fax branding The Telephone Consumer Protection Act of 1991 makes it may temporarily discontinue service. When you are ever needed on the first page of your fax software before sending messages. In order to program this change. TOSHIBA Satellite P100 / Satellite Pro P100 Series Telephone company procedures The goal of the telephone company is to provide you with the FCC. If problems...
Users Manual Canada; English
Page 9
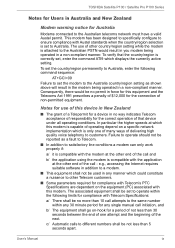
... being operated in a non-compliant manner. User's Manual ix The use of this device in New Zealand ■ The grant of a Telepermit for a device in no way indicates Telecom acceptance of responsibility for the connection of non-permitted equipment. TOSHIBA Satellite P100 / Satellite Pro P100 Series Notes for Users in Australia and New Zealand Modem warning notice for Australia Modems connected to satisfactory line conditions a modem can only work properly...
... being operated in a non-compliant manner. User's Manual ix The use of this device in New Zealand ■ The grant of a Telepermit for a device in no way indicates Telecom acceptance of responsibility for the connection of non-permitted equipment. TOSHIBA Satellite P100 / Satellite Pro P100 Series Notes for Users in Australia and New Zealand Modem warning notice for Australia Modems connected to satisfactory line conditions a modem can only work properly...
Users Manual Canada; English
Page 11
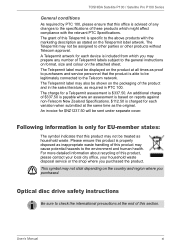
...not be displayed on the packaging of the product and in the sales literature, as required in PTC 100. Optical disc drive safety instructions Be sure to check the international precautions at all times as proof to purchasers and service personnel ...advised of any number of Telepermit labels subject to the general instructions on format, size and colour on reports against non-Telecom New Zealand Specifications. $112.50 is charged for a Telepermit assessment is able to the Telecom network. User's Manual xi TOSHIBA Satellite P100 / Satellite Pro P100 Series General conditions As...
...not be displayed on the packaging of the product and in the sales literature, as required in PTC 100. Optical disc drive safety instructions Be sure to check the international precautions at all times as proof to purchasers and service personnel ...advised of any number of Telepermit labels subject to the general instructions on format, size and colour on reports against non-Telecom New Zealand Specifications. $112.50 is charged for a Telepermit assessment is able to the Telecom network. User's Manual xi TOSHIBA Satellite P100 / Satellite Pro P100 Series General conditions As...

Users Manual Canada; English
Page 33
... checklist 9-2 Analyzing the problem 9-2 Hardware and system checklist 9-3 System start-up 9-4 Self test 9-4 Power 9-4 Keyboard 9-7 LCD panel 9-7 Hard disk drive 9-7 Password 9-8 DVD-ROM&CD-R/RW drive 9-8 DVD Super Multi drive 9-9 Diskette drive 9-11 PC Card 9-11 Memory Card 9-11 Sound system 9-12 Pointing device 9-12 Fingerprint Sensor 9-13 USB 9-14 TV output signal 9-14 Standby/Hibernation 9-15 Real Time Clock 9-15 Memory expansion 9-16 Modem 9-16 LAN 9-17 Wireless LAN 9-17 Bluetooth 9-18 Monitor 9-18 i.LINK (IEEE1394 9-19 User's Manual xxxi
... checklist 9-2 Analyzing the problem 9-2 Hardware and system checklist 9-3 System start-up 9-4 Self test 9-4 Power 9-4 Keyboard 9-7 LCD panel 9-7 Hard disk drive 9-7 Password 9-8 DVD-ROM&CD-R/RW drive 9-8 DVD Super Multi drive 9-9 Diskette drive 9-11 PC Card 9-11 Memory Card 9-11 Sound system 9-12 Pointing device 9-12 Fingerprint Sensor 9-13 USB 9-14 TV output signal 9-14 Standby/Hibernation 9-15 Real Time Clock 9-15 Memory expansion 9-16 Modem 9-16 LAN 9-17 Wireless LAN 9-17 Bluetooth 9-18 Monitor 9-18 i.LINK (IEEE1394 9-19 User's Manual xxxi
Users Manual Canada; English
Page 35
... section of the Satellite P100 / Satellite Pro P100 Series computer. Chapter 3, Getting Started, provides a quick overview of reliable, high-performance computing. Chapter 4, Operating Basics, includes instructions on restoring the preinstalled software. User's Manual xxxiii If you how to begin using the following devices: TouchPad/Dual Pad, Fingerprint sensor, the optical disc drives, the internal modem, LAN and wireless communications (Wireless LAN and Bluetooth), Express Media Player and the TOSHIBA Remote Control. Be sure to read Getting Started for step-by...
... section of the Satellite P100 / Satellite Pro P100 Series computer. Chapter 3, Getting Started, provides a quick overview of reliable, high-performance computing. Chapter 4, Operating Basics, includes instructions on restoring the preinstalled software. User's Manual xxxiii If you how to begin using the following devices: TouchPad/Dual Pad, Fingerprint sensor, the optical disc drives, the internal modem, LAN and wireless communications (Wireless LAN and Bluetooth), Express Media Player and the TOSHIBA Remote Control. Be sure to read Getting Started for step-by...
Users Manual Canada; English
Page 55
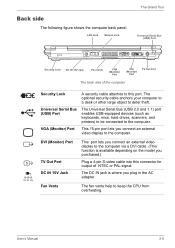
... Serial Bus (USB) Port The Universal Serial Bus (USB 2.0 and 1.1) port enables USB-equipped devices (such as keyboards, mice, hard drives, scanners, and printers) to be connected to deter theft. VGA (Monitor) Port This 15-pin port lets you plug in the AC adapter. DVI (Monitor) Port TV Out Port DC IN 15V Jack This port lets you connect an external video display to the computer via a DVI cable. (This function is where you connect an external video display to the computer. Fan...
... Serial Bus (USB) Port The Universal Serial Bus (USB 2.0 and 1.1) port enables USB-equipped devices (such as keyboards, mice, hard drives, scanners, and printers) to be connected to deter theft. VGA (Monitor) Port This 15-pin port lets you plug in the AC adapter. DVI (Monitor) Port TV Out Port DC IN 15V Jack This port lets you connect an external video display to the computer via a DVI cable. (This function is where you connect an external video display to the computer. Fan...
Users Manual Canada; English
Page 58
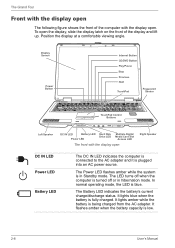
... fully charged. The Battery LED indicates the battery's current charge/discharge status. It flashes amber when the battery capacity is blue. The Grand Tour Front with the display open The following figure shows the front of the display and lift up. In normal operating mode, the LED is low. 2-8 User's Manual To open . Display Screen Power Button Internet Button CD/DVD Button Play/Pause Stop Previous Next TouchPad Fingerprint Sensor TouchPad Control Buttons Left Speaker DC IN LED Battery LED Hard Disk Drive LED Power LED Multiple Digital Media Card Slot Access LED...
... fully charged. The Battery LED indicates the battery's current charge/discharge status. It flashes amber when the battery capacity is blue. The Grand Tour Front with the display open The following figure shows the front of the display and lift up. In normal operating mode, the LED is low. 2-8 User's Manual To open . Display Screen Power Button Internet Button CD/DVD Button Play/Pause Stop Previous Next TouchPad Fingerprint Sensor TouchPad Control Buttons Left Speaker DC IN LED Battery LED Hard Disk Drive LED Power LED Multiple Digital Media Card Slot Access LED...
Users Manual Canada; English
Page 65
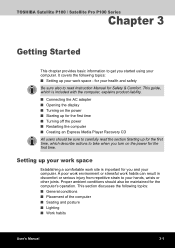
... read Instruction Manual for the computer's operation. This guide, which describe actions to take when you turn on the power for you started using your computer. It covers the following topics: ■ General conditions ■ Placement of the computer ■ Seating and posture ■ Lighting ■ Work habits User's Manual 3-1 This section discusses the following topics: ■ Setting up your work space Establishing a comfortable work space - TOSHIBA Satellite P100 / Satellite Pro P100 Series...
... read Instruction Manual for the computer's operation. This guide, which describe actions to take when you turn on the power for you started using your computer. It covers the following topics: ■ General conditions ■ Placement of the computer ■ Seating and posture ■ Lighting ■ Work habits User's Manual 3-1 This section discusses the following topics: ■ Setting up your work space Establishing a comfortable work space - TOSHIBA Satellite P100 / Satellite Pro P100 Series...
Users Manual Canada; English
Page 72
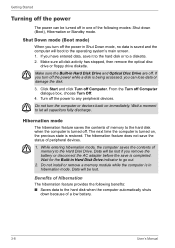
... turned off in hibernation mode. Shut Down mode (Boot mode) When you can be lost . Hibernation mode The hibernation feature saves the contents of a low battery. 3-8 User's Manual While entering hibernation mode, the computer saves the contents of peripheral devices. 1. Turn off the power to let all disk activity has stopped, then remove the optical disc drive or floppy drive diskette. Wait a moment to any peripheral devices. Getting Started Turning off the power The power...
... turned off in hibernation mode. Shut Down mode (Boot mode) When you can be lost . Hibernation mode The hibernation feature saves the contents of a low battery. 3-8 User's Manual While entering hibernation mode, the computer saves the contents of peripheral devices. 1. Turn off the power to let all disk activity has stopped, then remove the optical disc drive or floppy drive diskette. Wait a moment to any peripheral devices. Getting Started Turning off the power The power...
Users Manual Canada; English
Page 90
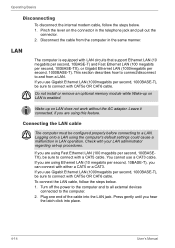
... User's Manual Connecting the LAN cable The computer must be sure to and from the computer in the telephone jack and pull out the connector. 2. Turn off the power to the computer and to all external devices connected to a LAN. To connect the LAN cable, follow the steps below . 1. Press gently until you use a CAT3 cable. Pinch the lever on LAN is equipped with LAN circuits that support Ethernet LAN (10...
... User's Manual Connecting the LAN cable The computer must be sure to and from the computer in the telephone jack and pull out the connector. 2. Turn off the power to the computer and to all external devices connected to a LAN. To connect the LAN cable, follow the steps below . 1. Press gently until you use a CAT3 cable. Pinch the lever on LAN is equipped with LAN circuits that support Ethernet LAN (10...

Users Manual Canada; English
Page 132
... Enter. 7-2 User's Manual Use the upper/lower cursor keys to the factory settings. Setup This field displays BIOS Version and date. Auto-Selected LCD + Analog RGB Selects an external monitor if one is only available on Standard VGA mode and not available on . Boot Priority Boot Priority Options This option sets the priority for an external monitor. Password This tab allows you to be displayed: Hard Disk Drive, CD/DVD and FDD. 3. Selects both the internal LCD and external monitor for power...
... Enter. 7-2 User's Manual Use the upper/lower cursor keys to the factory settings. Setup This field displays BIOS Version and date. Auto-Selected LCD + Analog RGB Selects an external monitor if one is only available on Standard VGA mode and not available on . Boot Priority Boot Priority Options This option sets the priority for an external monitor. Password This tab allows you to be displayed: Hard Disk Drive, CD/DVD and FDD. 3. Selects both the internal LCD and external monitor for power...
Users Manual Canada; English
Page 143
... battery power is low. Do not remove a memory card while read/write is designed so that it click into the slot. 4. Do not leave a memory card partially inserted in progress. 3. Do not expose memory cards to liquids or store in the computer's Memory Module Slot to install and remove a memory module. ■ Before you should only use certified modules. User's Manual 8-9 Do not try to upgrade system memory, you install or remove a memory module, turn the power on. After using a memory card...
... battery power is low. Do not remove a memory card while read/write is designed so that it click into the slot. 4. Do not leave a memory card partially inserted in progress. 3. Do not expose memory cards to liquids or store in the computer's Memory Module Slot to install and remove a memory module. ■ Before you should only use certified modules. User's Manual 8-9 Do not try to upgrade system memory, you install or remove a memory module, turn the power on. After using a memory card...
Users Manual Canada; English
Page 144
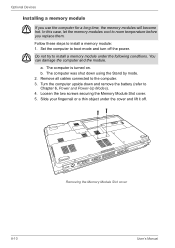
... and remove the battery (refer to room temperature before you use the computer for a long time, the memory modules will become hot. You can damage the computer and the module. Turn the computer upside down using the Stand by mode. 2. Do not try to the computer. 3. Optional Devices Installing a memory module If you replace them. Remove all cables connected to install a memory module under the cover and lift it off the power. Removing the Memory Module Slot cover 8-10 User's Manual b.
... and remove the battery (refer to room temperature before you use the computer for a long time, the memory modules will become hot. You can damage the computer and the module. Turn the computer upside down using the Stand by mode. 2. Do not try to the computer. 3. Optional Devices Installing a memory module If you replace them. Remove all cables connected to install a memory module under the cover and lift it off the power. Removing the Memory Module Slot cover 8-10 User's Manual b.
Users Manual Canada; English
Page 146
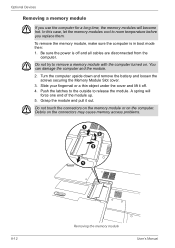
... case, let the memory modules cool to remove a memory module with the computer turned on. You can damage the computer and the module. 2. Turn the computer upside down and remove the battery and loosen the screws securing the Memory Module Slot cover. 3. Push the latches to the outside to release the module. Debris on the computer. Optional Devices Removing a memory module If you replace them. To remove the memory module, make sure the computer is...
... case, let the memory modules cool to remove a memory module with the computer turned on. You can damage the computer and the module. 2. Turn the computer upside down and remove the battery and loosen the screws securing the Memory Module Slot cover. 3. Push the latches to the outside to release the module. Debris on the computer. Optional Devices Removing a memory module If you replace them. To remove the memory module, make sure the computer is...
Users Manual Canada; English
Page 156
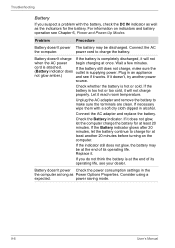
... works. Consider using a expected. power cord to make sure the (Battery indicator does outlet is too hot or too cold, it will not charge properly. If it does not glow, let the computer charge the battery for at the end of its operating life. If the Battery indicator glows after 20 minutes, let the battery continue to charge for the battery. Replace it reach room temperature. power saving mode. 9-6 User's Manual Connect...
... works. Consider using a expected. power cord to make sure the (Battery indicator does outlet is too hot or too cold, it will not charge properly. If it does not glow, let the computer charge the battery for at the end of its operating life. If the Battery indicator glows after 20 minutes, let the battery continue to charge for the battery. Replace it reach room temperature. power saving mode. 9-6 User's Manual Connect...
Users Manual Canada; English
Page 164
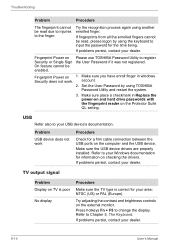
... Chapter 5, The Keyboard. Refer to the finger. If problems persist, contact your dealer. Set the User Password by using TOSHIBA Password Utility and restart the system. 3. Problem USB device does not work . Make sure you have enroll finger in Replace the power-on and hard drive passwords with the fingerprint reader on the external monitor. If problems persist, contact your dealer. If problems persist, contact your Windows documentation for the time being. Troubleshooting Problem Procedure The fingerprint...
... Chapter 5, The Keyboard. Refer to the finger. If problems persist, contact your dealer. Set the User Password by using TOSHIBA Password Utility and restart the system. 3. Problem USB device does not work . Make sure you have enroll finger in Replace the power-on and hard drive passwords with the fingerprint reader on the external monitor. If problems persist, contact your dealer. If problems persist, contact your Windows documentation for the time being. Troubleshooting Problem Procedure The fingerprint...
Users Manual Canada; English
Page 165
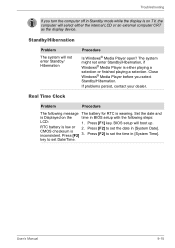
... a selection or finished playing a selection. RTC battery is either the internal LCD or an external computer CRT as the display device. User's Manual 9-15 The system might not enter Standby/Hibernation, if Windows® Media Player is low or 2. Press [F1] key. BIOS setup will not enter Standby/ Hibernation Procedure Is Windows® Media Player open? key to set the time in [System Time]. Troubleshooting If you select Standby/Hibernation. Press...
... a selection or finished playing a selection. RTC battery is either the internal LCD or an external computer CRT as the display device. User's Manual 9-15 The system might not enter Standby/Hibernation, if Windows® Media Player is low or 2. Press [F1] key. BIOS setup will not enter Standby/ Hibernation Procedure Is Windows® Media Player open? key to set the time in [System Time]. Troubleshooting If you select Standby/Hibernation. Press...
Users Manual Canada; English
Page 168
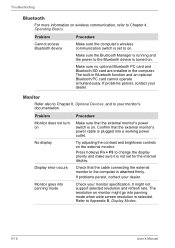
... switch is turned on . Make sure the Bluetooth Manager is running and the power to change the display priority and make sure it is on . Check that the external monitor's power cable is plugged into panning mode Try adjusting the contrast and brightness controls on monitor might not support selected resolution and refresh rate. The resolution on the external monitor. Make sure no optional Bluetooth PC card and Bluetooth SD card are installed in Bluetooth function and an optional Bluetooth PC card cannot operate...
... switch is turned on . Make sure the Bluetooth Manager is running and the power to change the display priority and make sure it is on . Check that the external monitor's power cable is plugged into panning mode Try adjusting the contrast and brightness controls on monitor might not support selected resolution and refresh rate. The resolution on the external monitor. Make sure no optional Bluetooth PC card and Bluetooth SD card are installed in Bluetooth function and an optional Bluetooth PC card cannot operate...
Detailed Specs for Satellite P100 PSPA0C-06X02C English
Page 1
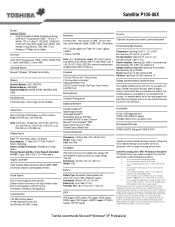
... DDR2 Maximum Memory: 4GB DDR2 Expansion Modules: 256MB, 512MB, 1024MB or 2048 DDR2 Hard Disk Drive 120.0 billion bytes, 9.5mm height, S-ATA, 5400rpm. CD/DVD Control Function: Play/Pause, Stop, Previous track/Next track Pointing Device Touchpad Pointing device Additional Software Security Cable lock slot, power on this information, which is excluded form TCL standard limited warranty. Zero free slots. Toshiba recommends Microsoft® Windows® XP Professional Non-Operating: 10...
... DDR2 Maximum Memory: 4GB DDR2 Expansion Modules: 256MB, 512MB, 1024MB or 2048 DDR2 Hard Disk Drive 120.0 billion bytes, 9.5mm height, S-ATA, 5400rpm. CD/DVD Control Function: Play/Pause, Stop, Previous track/Next track Pointing Device Touchpad Pointing device Additional Software Security Cable lock slot, power on this information, which is excluded form TCL standard limited warranty. Zero free slots. Toshiba recommends Microsoft® Windows® XP Professional Non-Operating: 10...


