User Manual
Page 9
...number only signifies that has not been tested with RSS 210 of Health Canada limits for harmful interference to co-channel Mobile Satellite systems. High power radars are allocated as primary users of this device is subject to the following radio frequency and safety standards...that is installed outdoors is restricted to indoor use due to 5.25 GHz frequency range. Canada - consult Safety Code 6, obtainable from windows to the licensed service, this device. To prevent radio interference to provide maximum shielding. L'utilisation de ce dispositif est autorisée ...
...number only signifies that has not been tested with RSS 210 of Health Canada limits for harmful interference to co-channel Mobile Satellite systems. High power radars are allocated as primary users of this device is subject to the following radio frequency and safety standards...that is installed outdoors is restricted to indoor use due to 5.25 GHz frequency range. Canada - consult Safety Code 6, obtainable from windows to the licensed service, this device. To prevent radio interference to provide maximum shielding. L'utilisation de ce dispositif est autorisée ...
User Manual
Page 25
... Corporation. Disposal of such marks by the Bluetooth SIG, Inc. Wi-Fi is a registered trademark of Toshiba America Information Systems, Inc. DirectX, Active Desktop, DirectShow, and Windows Media are those of their respective companies. For disposal, reuse or recycling information, please contact your local ...or other brand and product names are trademarks of Dolby Laboratories. Computer Disposal Information This product contains mercury. 25 Trademarks Satellite is a registered trademark of the Wi-Fi Alliance. and any use of this material may be regulated due to environmental considerations...
... Corporation. Disposal of such marks by the Bluetooth SIG, Inc. Wi-Fi is a registered trademark of Toshiba America Information Systems, Inc. DirectX, Active Desktop, DirectShow, and Windows Media are those of their respective companies. For disposal, reuse or recycling information, please contact your local ...or other brand and product names are trademarks of Dolby Laboratories. Computer Disposal Information This product contains mercury. 25 Trademarks Satellite is a registered trademark of the Wi-Fi Alliance. and any use of this material may be regulated due to environmental considerations...
User Manual
Page 28
...keys 83 Making your keyboard emulate a full-size keyboard 84 Ctrl, Fn, and Alt keys 84 Function keys 85 Windows special keys 85 Overlay keys 85 Using the overlay to type numeric data 86 Starting a program 87 Starting a ...program from the Start menu...........88 Starting a program from Windows® Explorer....88 Starting a program from the Run dialog box ....90 Saving your work 91 Printing your work 93 ...102 Removing a disc with the computer off ..........103 Caring for CD or DVD Discs 103 Toshiba's online resources 104
...keys 83 Making your keyboard emulate a full-size keyboard 84 Ctrl, Fn, and Alt keys 84 Function keys 85 Windows special keys 85 Overlay keys 85 Using the overlay to type numeric data 86 Starting a program 87 Starting a ...program from the Start menu...........88 Starting a program from Windows® Explorer....88 Starting a program from the Run dialog box ....90 Saving your work 91 Printing your work 93 ...102 Removing a disc with the computer off ..........103 Caring for CD or DVD Discs 103 Toshiba's online resources 104
User Manual
Page 31
...or pointing device to assign a key 157 Viewing existing key assignments 159 Changing or removing existing key assignments 159 TOSHIBA Hotkey Utility 160 TOSHIBA SD™ Memory Card Format Utility .........160 TOSHIBA Power Management 162 Preset Power Profiles 163 Quickly creating a new power profile 163 Customizing a power profile 164 Mouse... 6: If Something Goes Wrong 183 Problems that are easy to fix 183 Problems when you turn on the computer............185 The Windows ® operating system is not working..187 Using Startup options to fix problems 188 Internet problems 189
...or pointing device to assign a key 157 Viewing existing key assignments 159 Changing or removing existing key assignments 159 TOSHIBA Hotkey Utility 160 TOSHIBA SD™ Memory Card Format Utility .........160 TOSHIBA Power Management 162 Preset Power Profiles 163 Quickly creating a new power profile 163 Customizing a power profile 164 Mouse... 6: If Something Goes Wrong 183 Problems that are easy to fix 183 Problems when you turn on the computer............185 The Windows ® operating system is not working..187 Using Startup options to fix problems 188 Internet problems 189
User Manual
Page 32
32 Contents The Windows® XP operating system can help you 189 Resolving a hardware conflict 190 A plan of action 190 Resolving hardware conflicts on your own .....191 Fixing a problem ... 210 DVD operating problems 213 Develop good computing habits 216 Data and system configuration backup in Windows XP 217 If you need further assistance 223 Before you contact Toshiba 223 Contacting Toshiba 224 Other Toshiba Internet Web sites 225 Toshiba's worldwide offices 225 Appendix A: Hot Keys 227 Volume Mute 227 Password security 228 Without a password...
32 Contents The Windows® XP operating system can help you 189 Resolving a hardware conflict 190 A plan of action 190 Resolving hardware conflicts on your own .....191 Fixing a problem ... 210 DVD operating problems 213 Develop good computing habits 216 Data and system configuration backup in Windows XP 217 If you need further assistance 223 Before you contact Toshiba 223 Contacting Toshiba 224 Other Toshiba Internet Web sites 225 Toshiba's worldwide offices 225 Appendix A: Hot Keys 227 Volume Mute 227 Password security 228 Without a password...
User Manual
Page 44
The first time you turn on page 129. Click Next to continue. If an Internet connection could not be found, a window will connect to the Internet and click Next. The computer will pause for a moment while checking for communications" on your computer, the Setup ...Wizard guides you must either connect the built-in which windows appear, may vary according to your software setup choices. See "Setting up for an internet connection. Setting up your software NOTE The names of ...
The first time you turn on page 129. Click Next to continue. If an Internet connection could not be found, a window will connect to the Internet and click Next. The computer will pause for a moment while checking for communications" on your computer, the Setup ...Wizard guides you must either connect the built-in which windows appear, may vary according to your software setup choices. See "Setting up for an internet connection. Setting up your software NOTE The names of ...

User Manual
Page 49
never run a cord/cable through a pinch point such as a door or window; never use nails, staples or similar objects to connect or disconnect a power plug with the cord/cable or plug; Never attempt to fasten or attach ...
never run a cord/cable through a pinch point such as a door or window; never use nails, staples or similar objects to connect or disconnect a power plug with the cord/cable or plug; Never attempt to fasten or attach ...
User Manual
Page 62
... program's documentation to the left -hand) button. This feature can click it uses the right mouse button. The function of the TouchPad. The Control Panel window appears. 2 Click Printers and Other Hardware. 3 Click the Mouse icon. 4 Click the TouchPad On/Off tab. Scrolling with any wheel device on a mouse or trackball...
... program's documentation to the left -hand) button. This feature can click it uses the right mouse button. The function of the TouchPad. The Control Panel window appears. 2 Click Printers and Other Hardware. 3 Click the Mouse icon. 4 Click the TouchPad On/Off tab. Scrolling with any wheel device on a mouse or trackball...

User Manual
Page 63
Getting Started Using the TouchPad™ 63 The TouchPad On/Off tab view window appears. You can also use a hot key to disable or enable the TouchPad. See "Disabling or enabling the TouchPad" on page 234. The Mouse Properties window closes. 8 Close the Printers and Other Hardware window. 9 Close the Control Panel window. Sample TouchPad On/Off screen 5 Select Disable or Enable, whichever is appropriate. 6 Click Apply. 7 Click OK.
Getting Started Using the TouchPad™ 63 The TouchPad On/Off tab view window appears. You can also use a hot key to disable or enable the TouchPad. See "Disabling or enabling the TouchPad" on page 234. The Mouse Properties window closes. 8 Close the Printers and Other Hardware window. 9 Close the Control Panel window. Sample TouchPad On/Off screen 5 Select Disable or Enable, whichever is appropriate. 6 Click Apply. 7 Click OK.

User Manual
Page 66
... must support a resolution of 800 X 600 or higher. Using a mouse If you prefer to use one to your computer. See your Toshiba sales representative for additional configuration steps. The external display device must set the resolution of the internal display panel to match the resolution of the.... NOTE After logging on your computer. The computer's USB ports support any USBcompatible keyboard. If this occurs, push the Esc or Windows key to return it to its original position. 66 Getting Started Using an external keyboard Adjusting the quality of the external display To ...
... must support a resolution of 800 X 600 or higher. Using a mouse If you prefer to use one to your computer. See your Toshiba sales representative for additional configuration steps. The external display device must set the resolution of the internal display panel to match the resolution of the.... NOTE After logging on your computer. The computer's USB ports support any USBcompatible keyboard. If this occurs, push the Esc or Windows key to return it to its original position. 66 Getting Started Using an external keyboard Adjusting the quality of the external display To ...
User Manual
Page 68
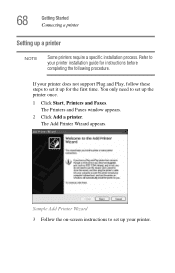
... Printer Wizard 3 Follow the on-screen instructions to your printer. Refer to set up for instructions before completing the following procedure. The Printers and Faxes window appears. 2 Click Add a printer.
... Printer Wizard 3 Follow the on-screen instructions to your printer. Refer to set up for instructions before completing the following procedure. The Printers and Faxes window appears. 2 Click Add a printer.

User Manual
Page 70
... advantages. If you are using the computer for a while. It is a good idea to turn off your computer when you are not using Windows® XP Professional or Windows® XP Media Center Edition (MCE) and are connected to a domain server. ❖ If you have more than one option to turn off... Factors to consider when choosing either Turn Off or Shut Down: ❖ Use the Turn Off command if you are using Windows® XP Home, or either Windows® XP Professional or Windows® XP Media Center Edition (MCE) and are not connected to a domain server. ❖ Use the Shut Down command if...
... advantages. If you are using the computer for a while. It is a good idea to turn off your computer when you are not using Windows® XP Professional or Windows® XP Media Center Edition (MCE) and are connected to a domain server. ❖ If you have more than one option to turn off... Factors to consider when choosing either Turn Off or Shut Down: ❖ Use the Turn Off command if you are using Windows® XP Home, or either Windows® XP Professional or Windows® XP Media Center Edition (MCE) and are not connected to a domain server. ❖ Use the Shut Down command if...
User Manual
Page 72
... which you left off your unsaved information will be lost. Factors to turn off . If you were using. Turn Off For Windows® XP Home, or either Windows® XP Professional or Windows® XP MCE when not connected to a domain server, follow these steps to consider when choosing Standby: ❖ While in...
... which you left off your unsaved information will be lost. Factors to turn off . If you were using. Turn Off For Windows® XP Home, or either Windows® XP Professional or Windows® XP MCE when not connected to a domain server, follow these steps to consider when choosing Standby: ❖ While in...

User Manual
Page 73
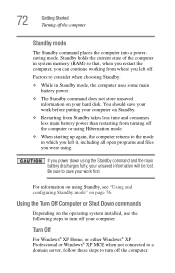
...Click Start, select Turn off computer Windows® dialog box 2 Click Turn Off. Sample Turn off computer. Shut Down For Windows® XP Professional or Windows® XP MCE when connected to a domain server, follow these steps to activate it using Toshiba's Power Management utility. 1 Click ...Start, Control Panel, then click Performance and Maintenance. The Shut Down Windows® dialog box appears. 2 Select Shut down from the drop-down completely. The computer...
...Click Start, select Turn off computer Windows® dialog box 2 Click Turn Off. Sample Turn off computer. Shut Down For Windows® XP Professional or Windows® XP MCE when connected to a domain server, follow these steps to activate it using Toshiba's Power Management utility. 1 Click ...Start, Control Panel, then click Performance and Maintenance. The Shut Down Windows® dialog box appears. 2 Select Shut down from the drop-down completely. The computer...

User Manual
Page 75
... the computer up again, press the power button until the on/off the computer by opening the display panel. Sample Turn off computer Windows® dialog box The computer saves the state of these methods, you turn off the computer using the Hibernation command, click Start, ...and then turns off computer, and select Hibernate. If you first need to enable them in Toshiba's Power Management utility. 1 Click Start, Control Panel, then click Performance and Maintenance. 2 Click the TOSHIBA Power Management icon. 3 Click the Setup Action tab. Using and configuring Hibernation mode To turn...
... the computer up again, press the power button until the on/off the computer by opening the display panel. Sample Turn off computer Windows® dialog box The computer saves the state of these methods, you turn off the computer using the Hibernation command, click Start, ...and then turns off computer, and select Hibernate. If you first need to enable them in Toshiba's Power Management utility. 1 Click Start, Control Panel, then click Performance and Maintenance. 2 Click the TOSHIBA Power Management icon. 3 Click the Setup Action tab. Using and configuring Hibernation mode To turn...

User Manual
Page 77
... 77 Sample Turn off computer Windows® dialog box The computer saves the status of these methods, you close the display panel. To use any of all open programs and files, turns off light blinks amber indicating the computer is in Toshiba's Power Management utility. 1 ...Click Start, Control Panel, then click Performance and Maintenance. 2 Click the TOSHIBA Power Management icon. 3 Click the Setup Action tab. 4 Select Standby for the options you want...
... 77 Sample Turn off computer Windows® dialog box The computer saves the status of these methods, you close the display panel. To use any of all open programs and files, turns off light blinks amber indicating the computer is in Toshiba's Power Management utility. 1 ...Click Start, Control Panel, then click Performance and Maintenance. 2 Click the TOSHIBA Power Management icon. 3 Click the Setup Action tab. 4 Select Standby for the options you want...

User Manual
Page 82
... disk space and improve performance. ❖ Scan all the data on page 104 to disks (or other removable media) on a regular basis. See "Toshiba's online resources" on it is active. It is especially important for viruses. However, if your hard disk suddenly fails, you will lose all new files... if a drive indicator light indicates a drive is reading from or writing to put off the computer while it unless you do not let the Windows® operating system shut down normally, details such as your files to learn more about Standby. This precaution is easy to a disk may be...
... disk space and improve performance. ❖ Scan all the data on page 104 to disks (or other removable media) on a regular basis. See "Toshiba's online resources" on it is active. It is especially important for viruses. However, if your hard disk suddenly fails, you will lose all new files... if a drive indicator light indicates a drive is reading from or writing to put off the computer while it unless you do not let the Windows® operating system shut down normally, details such as your files to learn more about Standby. This precaution is easy to a disk may be...
User Manual
Page 83
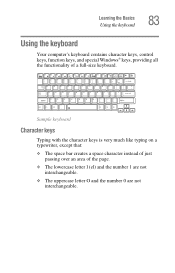
Learning the Basics Using the keyboard 83 Using the keyboard Your computer's keyboard contains character keys, control keys, function keys, and special Windows® keys, providing all the functionality of the page. ❖ The lowercase letter l (el) and the number 1 are not interchangeable. ❖ The uppercase letter O and ...
Learning the Basics Using the keyboard 83 Using the keyboard Your computer's keyboard contains character keys, control keys, function keys, and special Windows® keys, providing all the functionality of the page. ❖ The lowercase letter l (el) and the number 1 are not interchangeable. ❖ The uppercase letter O and ...

User Manual
Page 85
Used in Windows: ❖ Windows key-Opens the Start menu ❖ Application key-Has the same function as you would using the 10-key keypad on page 227. This overlay ... keyboard. Sample function keys F1 through F12 are the 12 keys at the top of them form the numeric and cursor overlay. Windows special keys Windows key Application key Sample Windows special keys Your computer's keyboard has two keys that have special functions in combination with the Fn key, function keys marked with...
Used in Windows: ❖ Windows key-Opens the Start menu ❖ Application key-Has the same function as you would using the 10-key keypad on page 227. This overlay ... keyboard. Sample function keys F1 through F12 are the 12 keys at the top of them form the numeric and cursor overlay. Windows special keys Windows key Application key Sample Windows special keys Your computer's keyboard has two keys that have special functions in combination with the Fn key, function keys marked with...
User Manual
Page 87
... Shift while you have four options. To turn the cursor control overlay on your desktop ❖ Use the Start menu To use My Computer or Windows® Explorer. To disable the cursor control overlay, hold down the Fn key and press F11 again. To find the file, use the numeric overlay...
... Shift while you have four options. To turn the cursor control overlay on your desktop ❖ Use the Start menu To use My Computer or Windows® Explorer. To disable the cursor control overlay, hold down the Fn key and press F11 again. To find the file, use the numeric overlay...


