User Guide
Page 60
... (optional) NOTE The following screen may need to go into Safe Mode, then shut down and restart the system, at which time Windows® should boot back up slightly. The memory module pops up normally. NOTE If your internal storage drive for errors or defragment the drive. When Safe Mode is...
... (optional) NOTE The following screen may need to go into Safe Mode, then shut down and restart the system, at which time Windows® should boot back up slightly. The memory module pops up normally. NOTE If your internal storage drive for errors or defragment the drive. When Safe Mode is...
User Guide
Page 64
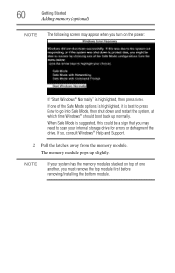
... the ENTER key. 4 If your system offers a choice of Windows® 7 32-bit or 64-bit operating system, select one at this time. The boot menu appears. 3 Using the arrow keys to its out-of -box state deletes all partitions on your computer's internal storage drive or using the first... see "Restoring from recovery DVDs/media" on page 76. Be sure to save your work " on your computer, press the F12 key when the initial TOSHIBA screen displays. To recover using recovery DVDs/media, if you have created such media. To recover using the utilities on your computer's internal storage drive...
... the ENTER key. 4 If your system offers a choice of Windows® 7 32-bit or 64-bit operating system, select one at this time. The boot menu appears. 3 Using the arrow keys to its out-of -box state deletes all partitions on your computer's internal storage drive or using the first... see "Restoring from recovery DVDs/media" on page 76. Be sure to save your work " on your computer, press the F12 key when the initial TOSHIBA screen displays. To recover using recovery DVDs/media, if you have created such media. To recover using the utilities on your computer's internal storage drive...
User Guide
Page 67
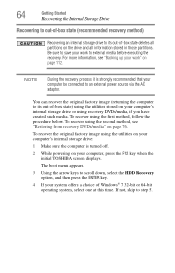
The boot menu appears. 3 Using the arrow keys to step 5. 5 A warning screen appears, stating that when the recovery is executed, all data will be deleted and rewritten ..., skip to scroll down, select the HDD Recovery option, and then press the ENTER key. 4 If your computer, press the F12 key when the initial TOSHIBA screen displays. Click Yes to this time. The directory structure will be retained, however all of the data will be moved to continue. (Sample Image...
The boot menu appears. 3 Using the arrow keys to step 5. 5 A warning screen appears, stating that when the recovery is executed, all data will be deleted and rewritten ..., skip to scroll down, select the HDD Recovery option, and then press the ENTER key. 4 If your computer, press the F12 key when the initial TOSHIBA screen displays. Click Yes to this time. The directory structure will be retained, however all of the data will be moved to continue. (Sample Image...
User Guide
Page 70
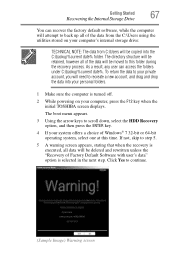
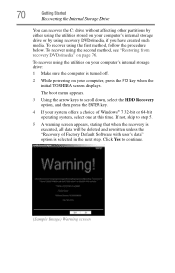
To recover using the first method, follow the procedure below. To recover using the utilities on your computer, press the F12 key when the initial TOSHIBA screen displays. If not, skip to step 5. 5 A warning screen appears, stating that when the recovery is selected in the next step. ... press the ENTER key. 4 If your computer's internal storage drive or by using recovery DVDs/media, if you have created such media. The boot menu appears. 3 Using the arrow keys to continue. (Sample Image) Warning screen 70 Getting Started Recovering the Internal Storage Drive You can recover the...
To recover using the first method, follow the procedure below. To recover using the utilities on your computer, press the F12 key when the initial TOSHIBA screen displays. If not, skip to step 5. 5 A warning screen appears, stating that when the recovery is selected in the next step. ... press the ENTER key. 4 If your computer's internal storage drive or by using recovery DVDs/media, if you have created such media. The boot menu appears. 3 Using the arrow keys to continue. (Sample Image) Warning screen 70 Getting Started Recovering the Internal Storage Drive You can recover the...
User Guide
Page 72
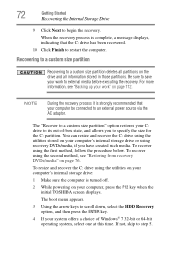
...drive or using the second method, see "Backing up your system offers a choice of -box state, and allows you have created such media. The boot menu appears. 3 Using the arrow keys to scroll down, select the HDD Recovery option, and then press the ENTER key. 4 If your work... computer's internal storage drive: 1 Make sure the computer is turned off. 2 While powering on your computer, press the F12 key when the initial TOSHIBA screen displays. Recovering to a custom size partition Recovering to step 5. To recover using recovery DVDs/media, if you to an external power source via...
...drive or using the second method, see "Backing up your system offers a choice of -box state, and allows you have created such media. The boot menu appears. 3 Using the arrow keys to scroll down, select the HDD Recovery option, and then press the ENTER key. 4 If your work... computer's internal storage drive: 1 Make sure the computer is turned off. 2 While powering on your computer, press the F12 key when the initial TOSHIBA screen displays. Recovering to a custom size partition Recovering to step 5. To recover using recovery DVDs/media, if you to an external power source via...
User Guide
Page 77
The boot menu displays. 4 Using the arrow keys, select the DVD option or the USB Flash option,...to a custom size partition For more information, see "Recovering the Internal Storage Drive" on page 62. When the initial TOSHIBA screen displays, press the F12 key on your work" on page 112. Any files that when the recovery is executed all... that you created are on a USB flash drive, connect the USB flash drive to continue. 6 When the Toshiba Recovery Wizard opens and the "Selecting a process" screen displays, select Recovery of Factory Default Software, and then click Next.
The boot menu displays. 4 Using the arrow keys, select the DVD option or the USB Flash option,...to a custom size partition For more information, see "Recovering the Internal Storage Drive" on page 62. When the initial TOSHIBA screen displays, press the F12 key on your work" on page 112. Any files that when the recovery is executed all... that you created are on a USB flash drive, connect the USB flash drive to continue. 6 When the Toshiba Recovery Wizard opens and the "Selecting a process" screen displays, select Recovery of Factory Default Software, and then click Next.
User Guide
Page 78
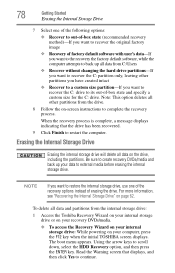
... before erasing the internal storage drive. Read the Warning screen that the drive has been recovered. 9 Click Finish to restart the computer. The boot menu appears. Be sure to create recovery DVDs/media and back up all other partitions you have created intact ❖ Recover to a custom ...you want to the recovery the factory default software, while the computer attempts to back up your computer, press the F12 key when the initial TOSHIBA screen displays. Note: This option deletes all data from C:\Users ❖ Recover without changing the hard drive partitions-If you want to recover ...
... before erasing the internal storage drive. Read the Warning screen that the drive has been recovered. 9 Click Finish to restart the computer. The boot menu appears. Be sure to create recovery DVDs/media and back up all other partitions you have created intact ❖ Recover to a custom ...you want to the recovery the factory default software, while the computer attempts to back up your computer, press the F12 key when the initial TOSHIBA screen displays. Note: This option deletes all data from C:\Users ❖ Recover without changing the hard drive partitions-If you want to recover ...
User Guide
Page 79
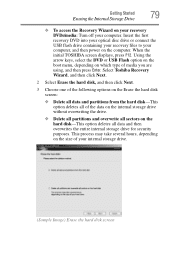
Using the arrow keys, select the DVD or USB Flash option on the boot menu, depending on the hard disk-This option deletes all sectors on ...DVD into your optical disc drive or connect the USB flash drive containing your recovery files to your computer. Select Toshiba Recovery Wizard, and then click Next. 2 Select Erase the hard disk, and then click Next. 3 Choose ...Wizard on your recovery DVDs/media: Turn off your computer, and then power on the computer. When the initial TOSHIBA screen displays, press F12. This process may take several hours, depending on the size of the data on ...
Using the arrow keys, select the DVD or USB Flash option on the boot menu, depending on the hard disk-This option deletes all sectors on ...DVD into your optical disc drive or connect the USB flash drive containing your recovery files to your computer. Select Toshiba Recovery Wizard, and then click Next. 2 Select Erase the hard disk, and then click Next. 3 Choose ...Wizard on your recovery DVDs/media: Turn off your computer, and then power on the computer. When the initial TOSHIBA screen displays, press F12. This process may take several hours, depending on the size of the data on ...
User Guide
Page 160
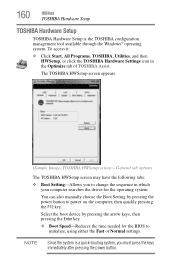
... it: ❖ Click Start, All Programs, TOSHIBA, Utilities, and then HWSetup, or click the TOSHIBA Hardware Settings icon in which your computer searches the drives for the operating system You can also manually choose the Boot Setting by pressing the arrow keys, then pressing ... pressing the F12 key. NOTE Since the system is the TOSHIBA configuration management tool available through the Windows® operating system. 160 Utilities TOSHIBA Hardware Setup TOSHIBA Hardware Setup TOSHIBA Hardware Setup is a quick-booting system, you to change the sequence in the Optimize tab of...
... it: ❖ Click Start, All Programs, TOSHIBA, Utilities, and then HWSetup, or click the TOSHIBA Hardware Settings icon in which your computer searches the drives for the operating system You can also manually choose the Boot Setting by pressing the arrow keys, then pressing ... pressing the F12 key. NOTE Since the system is the TOSHIBA configuration management tool available through the Windows® operating system. 160 Utilities TOSHIBA Hardware Setup TOSHIBA Hardware Setup TOSHIBA Hardware Setup is a quick-booting system, you to change the sequence in the Optimize tab of...
User Guide
Page 174
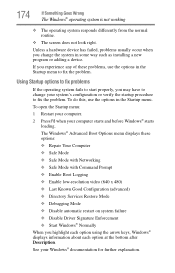
...of these options: ❖ Repair Your Computer ❖ Safe Mode ❖ Safe Mode with Networking ❖ Safe Mode with Command Prompt ❖ Enable Boot Logging ❖ Enable low-resolution video (640 x 480) ❖ Last Known Good Configuration (advanced) ❖ Directory Services Restore Mode ❖ Debugging...starts and before Windows® starts loading. To do this, use the options in the Startup menu. The Windows® Advanced Boot Options menu displays these problems, use the options in the Startup menu to fix the problem. 174 If Something Goes Wrong The Windows...
...of these options: ❖ Repair Your Computer ❖ Safe Mode ❖ Safe Mode with Networking ❖ Safe Mode with Command Prompt ❖ Enable Boot Logging ❖ Enable low-resolution video (640 x 480) ❖ Last Known Good Configuration (advanced) ❖ Directory Services Restore Mode ❖ Debugging...starts and before Windows® starts loading. To do this, use the options in the Startup menu. The Windows® Advanced Boot Options menu displays these problems, use the options in the Startup menu to fix the problem. 174 If Something Goes Wrong The Windows...
User Guide
Page 215
Blu-ray Disc (BD)-Offering more storage capacity than DVDs, the format was developed to another. See also baud rate. See also reboot. boot setting (startup sequence)-The order in which a communication device, such as the video adapter, disk drives, and ports. baud rate-The speed at which the ...per second). bus speed-The speed at which information is similar, but not identical, to locate the startup files. See also bus speed, frontside bus. boot-To start up by its internal storage drives to the baud rate. Baud rate is the number of signal changes per second.
Blu-ray Disc (BD)-Offering more storage capacity than DVDs, the format was developed to another. See also baud rate. See also reboot. boot setting (startup sequence)-The order in which a communication device, such as the video adapter, disk drives, and ports. baud rate-The speed at which the ...per second). bus speed-The speed at which information is similar, but not identical, to locate the startup files. See also bus speed, frontside bus. boot-To start up by its internal storage drives to the baud rate. Baud rate is the number of signal changes per second.

User Guide
Page 224
removable disk-A disk that can be produced by a printer or displayed on a screen. For a screen, it up. See also boot. Compare RAM. In communications, it . On your computer's BIOS, which is receiving power. resolution-A measure of the sharpness of pixels available .... S Secure Digital (SD)-A small, portable, non-volatile memory card used to connect a computer to perform some operation on most U.S. reboot-See boot, restart. To reset the computer by mixing red, green, and blue light in various combinations. RJ11 connector-A modular connector used to store and transfer...
removable disk-A disk that can be produced by a printer or displayed on a screen. For a screen, it up. See also boot. Compare RAM. In communications, it . On your computer's BIOS, which is receiving power. resolution-A measure of the sharpness of pixels available .... S Secure Digital (SD)-A small, portable, non-volatile memory card used to connect a computer to perform some operation on most U.S. reboot-See boot, restart. To reset the computer by mixing red, green, and blue light in various combinations. RJ11 connector-A modular connector used to store and transfer...


