User Guide
Page 29
..., reuse or recycling information, please contact your local government or the Electronic Industries Alliance at www.eiae.org. Computer Disposal Information The LCD display lamp in the United States and other brand and product names are those of their respective companies. None of the licenses extend to environmental ...whether such product is under the AVC, the VC-1 and the MPEG-4 Part 2 Visual patent portfolio licenses for any other countries. and/or Toshiba Corporation. 29 Trademarks Satellite, Satellite Pro, and eco Utility are trademarks of SD Card Association.
..., reuse or recycling information, please contact your local government or the Electronic Industries Alliance at www.eiae.org. Computer Disposal Information The LCD display lamp in the United States and other brand and product names are those of their respective companies. None of the licenses extend to environmental ...whether such product is under the AVC, the VC-1 and the MPEG-4 Part 2 Visual patent portfolio licenses for any other countries. and/or Toshiba Corporation. 29 Trademarks Satellite, Satellite Pro, and eco Utility are trademarks of SD Card Association.
User Guide
Page 30
Contents Introduction 37 This guide 39 Safety icons 40 Other icons used 40 Your computer's features and specifications ....41 Other documentation 41 Service options 41 Chapter 1: Getting Started 42 Selecting a place to work 42 Setting up a work environment 42 Keeping yourself comfortable 43 Precautions 43 Important information on your computer's cooling fan 45 Setting up your computer 45 Connecting to a power source 46 Charging the main battery 48 Using the computer for the first time 49 Opening the display panel 49 30
Contents Introduction 37 This guide 39 Safety icons 40 Other icons used 40 Your computer's features and specifications ....41 Other documentation 41 Service options 41 Chapter 1: Getting Started 42 Selecting a place to work 42 Setting up a work environment 42 Keeping yourself comfortable 43 Precautions 43 Important information on your computer's cooling fan 45 Setting up your computer 45 Connecting to a power source 46 Charging the main battery 48 Using the computer for the first time 49 Opening the display panel 49 30
User Guide
Page 31
Contents 31 Turning on the power 50 Setting up your software 50 Registering your computer with Toshiba 51 Adding optional external devices 51 Adding memory (optional 52 Installing a memory module 52 Removing a memory module 59 Checking total memory 62 ... settings 84 Disabling or enabling the touch pad 84 Using external display devices 85 Selecting video cables 85 Connecting an HDMI™-compatible television or external display device............85 Connecting an external monitor or projector 86 Directing the display output when you turn on the computer 86 Adjusting the quality ...
Contents 31 Turning on the power 50 Setting up your software 50 Registering your computer with Toshiba 51 Adding optional external devices 51 Adding memory (optional 52 Installing a memory module 52 Removing a memory module 59 Checking total memory 62 ... settings 84 Disabling or enabling the touch pad 84 Using external display devices 85 Selecting video cables 85 Connecting an HDMI™-compatible television or external display device............85 Connecting an external monitor or projector 86 Directing the display output when you turn on the computer 86 Adjusting the quality ...
User Guide
Page 32
... turning off the computer 90 Using the Shut down command 92 Using and configuring Hibernation mode .........94 Using and configuring Sleep mode 97 Closing the display panel 100 Customizing your computer's settings 100 Caring for your computer 100 Cleaning the computer 100 Moving the computer 101 Using a computer lock 101 Chapter...
... turning off the computer 90 Using the Shut down command 92 Using and configuring Hibernation mode .........94 Using and configuring Sleep mode 97 Closing the display panel 100 Customizing your computer's settings 100 Caring for your computer 100 Cleaning the computer 100 Moving the computer 101 Using a computer lock 101 Chapter...
User Guide
Page 35
...help you 175 Fixing a problem with Device Manager 176 Checking device properties 176 Memory problems 177 Power and the batteries 177 Keyboard problems 179 Display problems 179 Disk or storage drive problems 181 Error-checking 181 Optical disc drive problems 182 Sound system problems 185 Printer problems 185 Wireless networking... habits 189 Data and system configuration backup in the Windows® operating system 190 If you need further assistance 194 Before you contact Toshiba 194 Contacting Toshiba 195 Other Toshiba Internet Web sites 195 Toshiba's worldwide offices 196
...help you 175 Fixing a problem with Device Manager 176 Checking device properties 176 Memory problems 177 Power and the batteries 177 Keyboard problems 179 Display problems 179 Disk or storage drive problems 181 Error-checking 181 Optical disc drive problems 182 Sound system problems 185 Printer problems 185 Wireless networking... habits 189 Data and system configuration backup in the Windows® operating system 190 If you need further assistance 194 Before you contact Toshiba 194 Contacting Toshiba 195 Other Toshiba Internet Web sites 195 Toshiba's worldwide offices 196
User Guide
Page 36
36 Contents Appendix A: Hot Keys/TOSHIBA Cards 198 Hot Key Cards 198 Using the Hot Key Cards 199 Hot key functions 199 Volume Mute 200 Lock (Instant security 201 Power plan 202 Sleep mode 203 Hibernation mode 204 Output (Display switch 205 Display brightness 206 Disabling or enabling wireless devices............207 Disabling or enabling the touch pad 208 Zoom (Display resolution 209 Keyboard hot key functions 210 Appendix B: Power Cord/Cable Connectors 211 Glossary 212 Index 227
36 Contents Appendix A: Hot Keys/TOSHIBA Cards 198 Hot Key Cards 198 Using the Hot Key Cards 199 Hot key functions 199 Volume Mute 200 Lock (Instant security 201 Power plan 202 Sleep mode 203 Hibernation mode 204 Output (Display switch 205 Display brightness 206 Disabling or enabling wireless devices............207 Disabling or enabling the touch pad 208 Zoom (Display resolution 209 Keyboard hot key functions 210 Appendix B: Power Cord/Cable Connectors 211 Glossary 212 Index 227
User Guide
Page 37
... is qualified, it is labeled with the power management options preset to enter the low-power Sleep mode which shuts down the system and display within 15 minutes of inactivity in the Environmental Protection Agency's (EPA) ENERGY STAR® Program and has designed this and other energy saving...at its maximum energy efficiency. Your computer ships with the ENERGY STAR® logo on using power management settings to the world of the Toshiba User's Guide for energy efficiency. You can accompany you wherever you leave this computer to meet the latest ENERGY STAR® guidelines for ...
... is qualified, it is labeled with the power management options preset to enter the low-power Sleep mode which shuts down the system and display within 15 minutes of inactivity in the Environmental Protection Agency's (EPA) ENERGY STAR® Program and has designed this and other energy saving...at its maximum energy efficiency. Your computer ships with the ENERGY STAR® logo on using power management settings to the world of the Toshiba User's Guide for energy efficiency. You can accompany you wherever you leave this computer to meet the latest ENERGY STAR® guidelines for ...
User Guide
Page 49
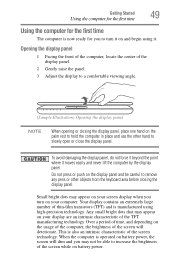
..., do not force it beyond the point where it moves easily and never lift the computer by the display panel. Your display contains an extremely large number of thin-film transistors (TFT) and is manufactured using it. When the computer is operated on battery power, the screen ... you to turn on the palm rest to hold the computer in place and use the other objects from the keyboard area before closing the display panel, place one hand on your screen display when you turn it on the usage of the computer, the brightness of the screen technology. Opening the...
..., do not force it beyond the point where it moves easily and never lift the computer by the display panel. Your display contains an extremely large number of thin-film transistors (TFT) and is manufactured using it. When the computer is operated on battery power, the screen ... you to turn on the palm rest to hold the computer in place and use the other objects from the keyboard area before closing the display panel, place one hand on your screen display when you turn it on the usage of the computer, the brightness of the screen technology. Opening the...
User Guide
Page 50
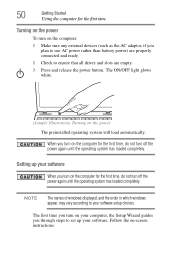
... your computer, the Setup Wizard guides you through steps to set up your software When you turn on -screen instructions. NOTE The names of windows displayed, and the order in which windows appear, may vary according to ensure that all drives and slots are properly connected and ready. 2 Check to your...
... your computer, the Setup Wizard guides you through steps to set up your software When you turn on -screen instructions. NOTE The names of windows displayed, and the order in which windows appear, may vary according to ensure that all drives and slots are properly connected and ready. 2 Check to your...
User Guide
Page 51
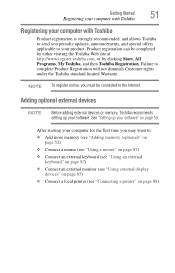
... ❖ Connect an external keyboard (see "Using an external keyboard" on page 87) ❖ Connect an external monitor (see "Using external display devices" on page 85) ❖ Connect a local printer (see "Connecting a printer" on page 50. After starting your computer for the ... "Setting up your software" on page 88) Getting Started 51 Registering your computer with Toshiba Registering your computer with Toshiba Product registration is strongly recommended, and allows Toshiba to send you periodic updates, announcements, and special offers applicable to the Internet. Adding ...
... ❖ Connect an external keyboard (see "Using an external keyboard" on page 87) ❖ Connect an external monitor (see "Using external display devices" on page 85) ❖ Connect a local printer (see "Connecting a printer" on page 50. After starting your computer for the ... "Setting up your software" on page 88) Getting Started 51 Registering your computer with Toshiba Registering your computer with Toshiba Product registration is strongly recommended, and allows Toshiba to send you periodic updates, announcements, and special offers applicable to the Internet. Adding ...
User Guide
Page 62
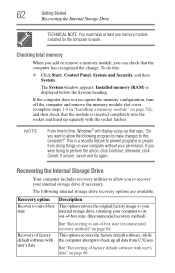
...and lined up squarely with user's data See "Recovering to recover your internal storage drive if necessary. The System window appears. This is displayed below the System heading. See "Recovering of -box state Description This option restores the original factory image to your internal storage drive, returning... your permission. Checking total memory When you add or remove a memory module, you were trying to time, Windows® will display a pop-up all data from doing things on page 66. If unsure, cancel and try again. NOTE From time to perform the action,...
...and lined up squarely with user's data See "Recovering to recover your internal storage drive if necessary. The System window appears. This is displayed below the System heading. See "Recovering of -box state Description This option restores the original factory image to your internal storage drive, returning... your permission. Checking total memory When you add or remove a memory module, you were trying to time, Windows® will display a pop-up all data from doing things on page 66. If unsure, cancel and try again. NOTE From time to perform the action,...
User Guide
Page 64
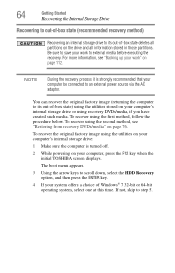
... external media before executing the recovery. For more information, see "Restoring from recovery DVDs/media" on your computer, press the F12 key when the initial TOSHIBA screen displays. If not, skip to step 5. NOTE During the recovery process it is turned off. 2 While powering on the drive and all partitions on your...
... external media before executing the recovery. For more information, see "Restoring from recovery DVDs/media" on your computer, press the F12 key when the initial TOSHIBA screen displays. If not, skip to step 5. NOTE During the recovery process it is turned off. 2 While powering on the drive and all partitions on your...

User Guide
Page 65
Click Yes to continue. (Sample Image) Warning screen 6 When the Toshiba Recovery Wizard opens and the "Selecting a process" screen displays, select Recovery of Factory Default Software with user's data" option is selected in the next step. Getting Started 65 Recovering the Internal Storage Drive 5 A warning screen appears, stating that when the recovery is executed, all data will be deleted and rewritten unless the "Recovery of Factory Default Software, and then click Next. (Sample Image) Selecting a process screen
Click Yes to continue. (Sample Image) Warning screen 6 When the Toshiba Recovery Wizard opens and the "Selecting a process" screen displays, select Recovery of Factory Default Software with user's data" option is selected in the next step. Getting Started 65 Recovering the Internal Storage Drive 5 A warning screen appears, stating that when the recovery is executed, all data will be deleted and rewritten unless the "Recovery of Factory Default Software, and then click Next. (Sample Image) Selecting a process screen
User Guide
Page 66
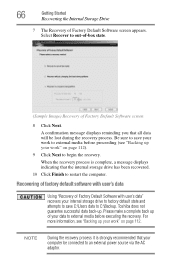
...your computer be lost during the recovery process. When the recovery process is strongly recommended that your work " on page 112. Toshiba does not guarantee successful data back-up of Factory Default Software with user's data" recovers your internal storage drive to factory default... media before proceeding (see "Backing up your work " on page 112). 9 Click Next to begin the recovery. A confirmation message displays reminding you that the internal storage drive has been recovered. 10 Click Finish to external media before executing the recovery. Please make a ...
...your computer be lost during the recovery process. When the recovery process is strongly recommended that your work " on page 112. Toshiba does not guarantee successful data back-up of Factory Default Software with user's data" recovers your internal storage drive to factory default... media before proceeding (see "Backing up your work " on page 112). 9 Click Next to begin the recovery. A confirmation message displays reminding you that the internal storage drive has been recovered. 10 Click Finish to external media before executing the recovery. Please make a ...
User Guide
Page 67
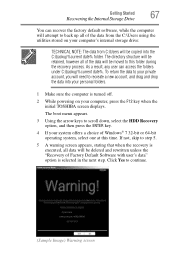
.... 3 Using the arrow keys to continue. (Sample Image) Warning screen To return the data to your computer, press the F12 key when the initial TOSHIBA screen displays. Getting Started 67 Recovering the Internal Storage Drive You can access the folders under C:\backup%current date%. As a result, any user can recover the factory...
.... 3 Using the arrow keys to continue. (Sample Image) Warning screen To return the data to your computer, press the F12 key when the initial TOSHIBA screen displays. Getting Started 67 Recovering the Internal Storage Drive You can access the folders under C:\backup%current date%. As a result, any user can recover the factory...
User Guide
Page 68
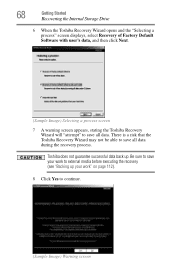
68 Getting Started Recovering the Internal Storage Drive 6 When the Toshiba Recovery Wizard opens and the "Selecting a process" screen displays, select Recovery of Factory Default Software with user's data, and then click Next. (Sample Image) Selecting a process screen 7 A warning screen appears, stating the Toshiba Recovery Wizard will "attempt" to save all data during the...
68 Getting Started Recovering the Internal Storage Drive 6 When the Toshiba Recovery Wizard opens and the "Selecting a process" screen displays, select Recovery of Factory Default Software with user's data, and then click Next. (Sample Image) Selecting a process screen 7 A warning screen appears, stating the Toshiba Recovery Wizard will "attempt" to save all data during the...
User Guide
Page 70
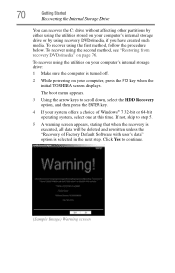
... created such media. To recover using the second method, see "Restoring from recovery DVDs/media" on your computer, press the F12 key when the initial TOSHIBA screen displays. To recover using the first method, follow the procedure below.
... created such media. To recover using the second method, see "Restoring from recovery DVDs/media" on your computer, press the F12 key when the initial TOSHIBA screen displays. To recover using the first method, follow the procedure below.
User Guide
Page 71
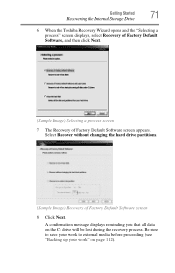
... work" on the C: drive will be lost during the recovery process. Getting Started 71 Recovering the Internal Storage Drive 6 When the Toshiba Recovery Wizard opens and the "Selecting a process" screen displays, select Recovery of Factory Default Software, and then click Next. (Sample Image) Selecting a process screen 7 The Recovery of Factory Default Software...
... work" on the C: drive will be lost during the recovery process. Getting Started 71 Recovering the Internal Storage Drive 6 When the Toshiba Recovery Wizard opens and the "Selecting a process" screen displays, select Recovery of Factory Default Software, and then click Next. (Sample Image) Selecting a process screen 7 The Recovery of Factory Default Software...
User Guide
Page 72
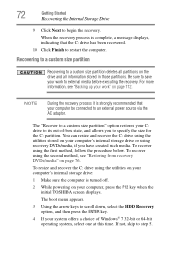
... "Restoring from recovery DVDs/media" on your computer be connected to step 5. When the recovery process is complete, a message displays, indicating that your computer, press the F12 key when the initial TOSHIBA screen displays. The boot menu appears. 3 Using the arrow keys to restart the computer. Recovering to a custom size partition Recovering to...
... "Restoring from recovery DVDs/media" on your computer be connected to step 5. When the recovery process is complete, a message displays, indicating that your computer, press the F12 key when the initial TOSHIBA screen displays. The boot menu appears. 3 Using the arrow keys to restart the computer. Recovering to a custom size partition Recovering to...
User Guide
Page 73
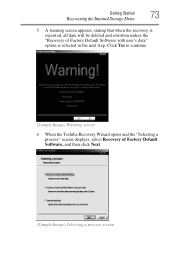
Getting Started 73 Recovering the Internal Storage Drive 5 A warning screen appears, stating that when the recovery is selected in the next step. Click Yes to continue. (Sample Image) Warning screen 6 When the Toshiba Recovery Wizard opens and the "Selecting a process" screen displays, select Recovery of Factory Default Software with user's data" option is executed, all data will be deleted and rewritten unless the "Recovery of Factory Default Software, and then click Next. (Sample Image) Selecting a process screen
Getting Started 73 Recovering the Internal Storage Drive 5 A warning screen appears, stating that when the recovery is selected in the next step. Click Yes to continue. (Sample Image) Warning screen 6 When the Toshiba Recovery Wizard opens and the "Selecting a process" screen displays, select Recovery of Factory Default Software with user's data" option is executed, all data will be deleted and rewritten unless the "Recovery of Factory Default Software, and then click Next. (Sample Image) Selecting a process screen


