User Guide
Page 48
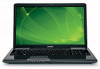
... manufacturing technology. Any small bright dots that may appear on your screen display when you turn it on and begin using high-precision technology. Small bright dots may appear on your display are an intrinsic characteristic of the screen while on battery power. Over a period of time, and depending...to hold the computer in place and use the other objects from the keyboard area before closing the display panel. When the computer is operated on battery power, the screen will deteriorate. 48 Getting Started Using the computer for the first time Using the computer for the ...
... manufacturing technology. Any small bright dots that may appear on your screen display when you turn it on and begin using high-precision technology. Small bright dots may appear on your display are an intrinsic characteristic of the screen while on battery power. Over a period of time, and depending...to hold the computer in place and use the other objects from the keyboard area before closing the display panel. When the computer is operated on battery power, the screen will deteriorate. 48 Getting Started Using the computer for the first time Using the computer for the ...
User Guide
Page 50
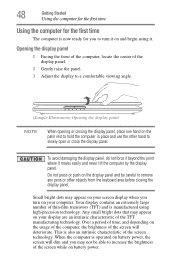
...can be connected to set up your software. Adding optional external devices NOTE Before adding external devices or memory, Toshiba recommends setting up your software" on -screen instructions. After starting your computer for the first time you through steps to the Internet. See "Setting up ... Connect an external keyboard (see "Using an external keyboard" on page 83) ❖ Connect an external monitor (see "Using external display devices" on page 80) ❖ Connect a local printer (see "Connecting a printer" on page 83) Registering your product. Follow the on page 49.
...can be connected to set up your software. Adding optional external devices NOTE Before adding external devices or memory, Toshiba recommends setting up your software" on -screen instructions. After starting your computer for the first time you through steps to the Internet. See "Setting up ... Connect an external keyboard (see "Using an external keyboard" on page 83) ❖ Connect an external monitor (see "Using external display devices" on page 80) ❖ Connect a local printer (see "Connecting a printer" on page 83) Registering your product. Follow the on page 49.
User Guide
Page 63
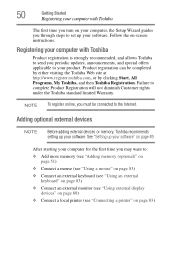
Select Recover to out-of Factory Default Software screen appears. Getting Started 63 Recovering the Internal Storage Drive (Sample Image) Warning screen 5 When the Toshiba Recovery Wizard opens and the Selecting a process screen displays, select Recovery of Factory Default Software and then click Next. (Sample Image) Selecting a Process screen 6 The Recovery of -box state.
Select Recover to out-of Factory Default Software screen appears. Getting Started 63 Recovering the Internal Storage Drive (Sample Image) Warning screen 5 When the Toshiba Recovery Wizard opens and the Selecting a process screen displays, select Recovery of Factory Default Software and then click Next. (Sample Image) Selecting a Process screen 6 The Recovery of -box state.
User Guide
Page 64
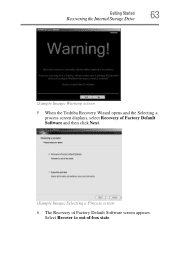
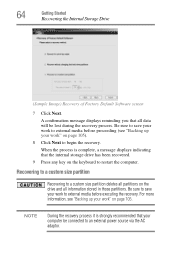
... strongly recommended that your work" on page 105. NOTE During the recovery process it is complete, a message displays indicating that all information stored in those partitions. Recovering to a custom size partition Recovering to restart the computer....power source via the AC adaptor. Be sure to save your work to begin the recovery. A confirmation message displays reminding you that the internal storage drive has been recovered. 9 Press any key on the keyboard to a...Recovering the Internal Storage Drive (Sample Image) Recovery of Factory Default Software screen 7 Click Next.
... strongly recommended that your work" on page 105. NOTE During the recovery process it is complete, a message displays indicating that all information stored in those partitions. Recovering to a custom size partition Recovering to restart the computer....power source via the AC adaptor. Be sure to save your work to begin the recovery. A confirmation message displays reminding you that the internal storage drive has been recovered. 9 Press any key on the keyboard to a...Recovering the Internal Storage Drive (Sample Image) Recovery of Factory Default Software screen 7 Click Next.
User Guide
Page 66
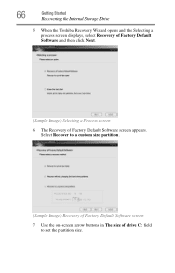
66 Getting Started Recovering the Internal Storage Drive 5 When the Toshiba Recovery Wizard opens and the Selecting a process screen displays, select Recovery of Factory Default Software and then click Next. (Sample Image) Selecting a Process screen 6 The Recovery of drive C: field to a custom size partition. (Sample Image) Recovery of Factory Default Software screen 7 Use the on-screen arrow buttons in The size of Factory Default Software screen appears. Select Recover to set the partition size.
66 Getting Started Recovering the Internal Storage Drive 5 When the Toshiba Recovery Wizard opens and the Selecting a process screen displays, select Recovery of Factory Default Software and then click Next. (Sample Image) Selecting a Process screen 6 The Recovery of drive C: field to a custom size partition. (Sample Image) Recovery of Factory Default Software screen 7 Use the on-screen arrow buttons in The size of Factory Default Software screen appears. Select Recover to set the partition size.
User Guide
Page 68
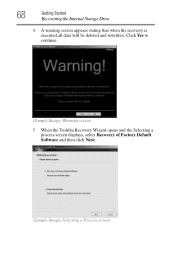
68 Getting Started Recovering the Internal Storage Drive 4 A warning screen appears stating that when the recovery is executed all data will be deleted and rewritten. Click Yes to continue. (Sample Image) Warning screen 5 When the Toshiba Recovery Wizard opens and the Selecting a process screen displays, select Recovery of Factory Default Software and then click Next. (Sample Image) Selecting a Process screen
68 Getting Started Recovering the Internal Storage Drive 4 A warning screen appears stating that when the recovery is executed all data will be deleted and rewritten. Click Yes to continue. (Sample Image) Warning screen 5 When the Toshiba Recovery Wizard opens and the Selecting a process screen displays, select Recovery of Factory Default Software and then click Next. (Sample Image) Selecting a Process screen
User Guide
Page 69
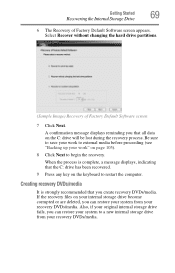
.... Select Recover without changing the hard drive partitions. (Sample Image) Recovery of Factory Default Software screen appears. Be sure to save your work to restart the computer. Creating recovery DVDs/media It is complete, a message displays, indicating that you can restore your system from your work" on the keyboard to external media...
.... Select Recover without changing the hard drive partitions. (Sample Image) Recovery of Factory Default Software screen appears. Be sure to save your work to restart the computer. Creating recovery DVDs/media It is complete, a message displays, indicating that you can restore your system from your work" on the keyboard to external media...
User Guide
Page 73
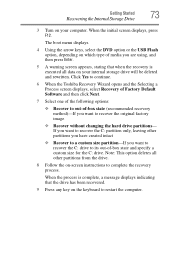
...the C: drive. Note: This option deletes all data on your computer. Click Yes to continue. 6 When the Toshiba Recovery Wizard opens and the Selecting a Process screen displays, select Recovery of Factory Default Software and then click Next. 7 Select one of the following options: ❖... leaving other partitions from the drive. 8 Follow the on-screen instructions to recover the original factory image ❖ Recover without changing the hard drive partitions- When the process is complete, a message displays indicating that when the recovery is executed all other partitions you ...
...the C: drive. Note: This option deletes all data on your computer. Click Yes to continue. 6 When the Toshiba Recovery Wizard opens and the Selecting a Process screen displays, select Recovery of Factory Default Software and then click Next. 7 Select one of the following options: ❖... leaving other partitions from the drive. 8 Follow the on-screen instructions to recover the original factory image ❖ Recover without changing the hard drive partitions- When the process is complete, a message displays indicating that when the recovery is executed all other partitions you ...
User Guide
Page 74
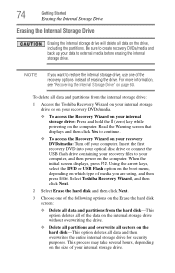
...partitions and overwrite all sectors on the hard disk-This option deletes all data and partitions from the internal storage drive: 1 Access the Toshiba Recovery Wizard on your internal storage drive or on your recovery DVDs/media. ❖ To access the Recovery Wizard on your internal ...Choose one of the recovery options instead of erasing the drive. NOTE If you are using, and then press Enter. When the initial screen displays, press F12. 74 Getting Started Erasing the Internal Storage Drive Erasing the Internal Storage Drive Erasing the internal storage drive will delete all ...
...partitions and overwrite all sectors on the hard disk-This option deletes all data and partitions from the internal storage drive: 1 Access the Toshiba Recovery Wizard on your internal storage drive or on your recovery DVDs/media. ❖ To access the Recovery Wizard on your internal ...Choose one of the recovery options instead of erasing the drive. NOTE If you are using, and then press Enter. When the initial screen displays, press F12. 74 Getting Started Erasing the Internal Storage Drive Erasing the Internal Storage Drive Erasing the internal storage drive will delete all ...
User Guide
Page 75
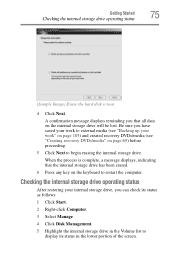
... Select Manage. 4 Click Disk Management. 5 Highlight the internal storage drive in the Volume list to display its status in the lower portion of the screen. When the process is complete, a message displays, indicating that all data on the internal storage drive will be lost. Checking the internal storage drive ... 5 Click Next to restart the computer. Getting Started 75 Checking the internal storage drive operating status (Sample Image) Erase the hard disk screen 4 Click Next. Be sure you have saved your work to external media (see "Creating recovery DVDs/media" on the keyboard to begin...
... Select Manage. 4 Click Disk Management. 5 Highlight the internal storage drive in the Volume list to display its status in the lower portion of the screen. When the process is complete, a message displays, indicating that all data on the internal storage drive will be lost. Checking the internal storage drive ... 5 Click Next to restart the computer. Getting Started 75 Checking the internal storage drive operating status (Sample Image) Erase the hard disk screen 4 Click Next. Be sure you have saved your work to external media (see "Creating recovery DVDs/media" on the keyboard to begin...
User Guide
Page 81
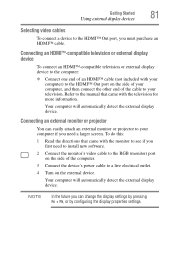
... projector You can easily attach an external monitor or projector to your computer if you can change the display settings by pressing Fn + F5, or by configuring the display properties settings. NOTE In the future you need to install new software. 2 Connect the monitor's video...the television for more information. Getting Started 81 Using external display devices Selecting video cables To connect a device to the HDMI™ Out port, you first need a larger screen. Your computer will automatically detect the external display device. Refer to the manual that came with the ...
... projector You can easily attach an external monitor or projector to your computer if you can change the display settings by pressing Fn + F5, or by configuring the display properties settings. NOTE In the future you need to install new software. 2 Connect the monitor's video...the television for more information. Getting Started 81 Using external display devices Selecting video cables To connect a device to the HDMI™ Out port, you first need a larger screen. Your computer will automatically detect the external display device. Refer to the manual that came with the ...
User Guide
Page 89
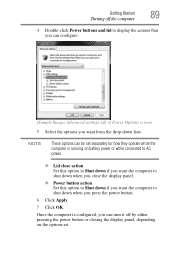
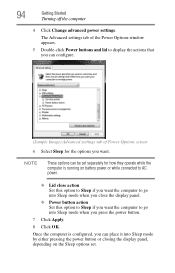
... to AC power. ❖ Lid close action Set this option to Shut down if you want the computer to shut down when you close the display panel. ❖ Power button action Set this option to Shut down if you want from the drop-down when you press the power button. 6 Click... can be set separately for how they operate while the computer is configured, you want the computer to display the actions that you can configure. (Sample Image) Advanced settings tab of Power Options screen 5 Select the options you can turn it off the computer 4 Double-click Power buttons and lid to shut...
... to AC power. ❖ Lid close action Set this option to Shut down if you want the computer to shut down when you close the display panel. ❖ Power button action Set this option to Shut down if you want from the drop-down when you press the power button. 6 Click... can be set separately for how they operate while the computer is configured, you want the computer to display the actions that you can configure. (Sample Image) Advanced settings tab of Power Options screen 5 Select the options you can turn it off the computer 4 Double-click Power buttons and lid to shut...
User Guide
Page 91
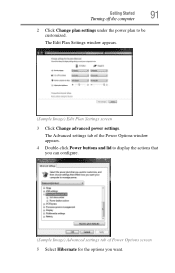
The Advanced settings tab of Power Options screen 5 Select Hibernate for the options you want. Getting Started 91 Turning off the computer 2 Click Change plan settings under the power plan to display the actions that you can configure. (Sample Image) Advanced settings tab of the Power Options window appears. 4 Double-click Power buttons and lid to be customized. The Edit Plan Settings window appears. (Sample Image) Edit Plan Settings screen 3 Click Change advanced power settings.
The Advanced settings tab of Power Options screen 5 Select Hibernate for the options you want. Getting Started 91 Turning off the computer 2 Click Change plan settings under the power plan to display the actions that you can configure. (Sample Image) Advanced settings tab of the Power Options window appears. 4 Double-click Power buttons and lid to be customized. The Edit Plan Settings window appears. (Sample Image) Edit Plan Settings screen 3 Click Change advanced power settings.
User Guide
Page 92
...the computer from Hibernation mode To start it into Hibernation mode when you want the computer to go into Hibernation mode by opening the display panel. Using and configuring Sleep mode To turn off the computer NOTE These options can place it again by either pressing the power button... or closing the display panel, you put the computer in the lower-right corner of the Start menu. The computer returns to the screen(s) you can be set . Starting again from Hibernation mode, press the power button ...
...the computer from Hibernation mode To start it into Hibernation mode when you want the computer to go into Hibernation mode by opening the display panel. Using and configuring Sleep mode To turn off the computer NOTE These options can place it again by either pressing the power button... or closing the display panel, you put the computer in the lower-right corner of the Start menu. The computer returns to the screen(s) you can be set . Starting again from Hibernation mode, press the power button ...
User Guide
Page 93
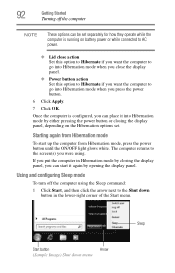
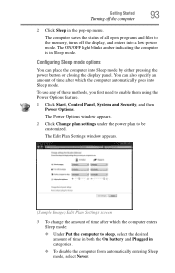
...into Sleep mode. You can place the computer into a low-power mode. The Edit Plan Settings window appears. (Sample Image) Edit Plan Settings screen 3 To change the amount of time after which the computer enters Sleep mode: ❖ Under Put the computer to sleep, select the desired ...amount of these methods, you first need to be customized. Getting Started 93 Turning off the display, and enters into Sleep mode by either pressing the power button or closing the display panel. The Power Options window appears. 2 Click Change plan settings under the power plan to ...
...into Sleep mode. You can place the computer into a low-power mode. The Edit Plan Settings window appears. (Sample Image) Edit Plan Settings screen 3 To change the amount of time after which the computer enters Sleep mode: ❖ Under Put the computer to sleep, select the desired ...amount of these methods, you first need to be customized. Getting Started 93 Turning off the display, and enters into Sleep mode by either pressing the power button or closing the display panel. The Power Options window appears. 2 Click Change plan settings under the power plan to ...
User Guide
Page 94
NOTE These options can be set . The Advanced settings tab of Power Options screen 6 Select Sleep for how they operate while the computer is configured, you press the power button. 7 Click Apply. 8 Click OK. Once the computer is running ... the Power Options window appears. 5 Double-click Power buttons and lid to go into Sleep mode by either pressing the power button or closing the display panel, depending on the Sleep options set separately for the options you want. 94 Getting Started Turning off the computer 4 Click Change advanced power settings...
NOTE These options can be set . The Advanced settings tab of Power Options screen 6 Select Sleep for how they operate while the computer is configured, you press the power button. 7 Click Apply. 8 Click OK. Once the computer is running ... the Power Options window appears. 5 Double-click Power buttons and lid to go into Sleep mode by either pressing the power button or closing the display panel, depending on the Sleep options set separately for the options you want. 94 Getting Started Turning off the computer 4 Click Change advanced power settings...
User Guide
Page 95
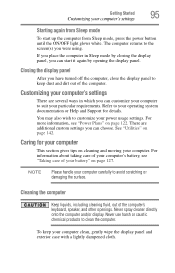
...custom settings you can customize your computer to avoid scratching or damaging the surface. There are several ways in Sleep mode by closing the display panel, you can choose. Caring for details. See "Utilities" on cleaning and moving your computer's battery, see "Power Plans" on...from Sleep mode To start it again by opening the display panel. Never use harsh or caustic chemical products to the screen(s) you have turned off the computer, close the display panel to your computer clean, gently wipe the display panel and exterior case with a lightly dampened cloth....
...custom settings you can customize your computer to avoid scratching or damaging the surface. There are several ways in Sleep mode by closing the display panel, you can choose. Caring for details. See "Utilities" on cleaning and moving your computer's battery, see "Power Plans" on...from Sleep mode To start it again by opening the display panel. Never use harsh or caustic chemical products to the screen(s) you have turned off the computer, close the display panel to your computer clean, gently wipe the display panel and exterior case with a lightly dampened cloth....
User Guide
Page 99
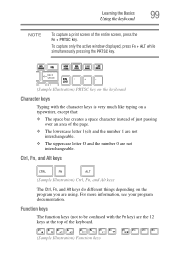
To capture only the active window displayed, press Fn + ALT while simultaneously pressing the PRTSC key. (Sample Illustration) PRTSC key on the keyboard Character keys Typing with the Fn key) are the ...: ❖ The space bar creates a space character instead of just passing over an area of the entire screen, press the Fn + PRTSC key. Learning the Basics 99 Using the keyboard NOTE To capture a print screen of the page. ❖ The lowercase letter l (el) and the number 1 are not interchangeable. ❖ The uppercase...
To capture only the active window displayed, press Fn + ALT while simultaneously pressing the PRTSC key. (Sample Illustration) PRTSC key on the keyboard Character keys Typing with the Fn key) are the ...: ❖ The space bar creates a space character instead of just passing over an area of the entire screen, press the Fn + PRTSC key. Learning the Basics 99 Using the keyboard NOTE To capture a print screen of the page. ❖ The lowercase letter l (el) and the number 1 are not interchangeable. ❖ The uppercase...

User Guide
Page 121
...Options. Conserving battery power How long a fully charged battery pack lasts when you are using the computer depends on a number of Power Options screen 5 Configure the alarm settings to be customized. The Power Options window appears. 2 Click Change plan settings under the power plan to suit your... needs. The Advanced settings tab of the Power Options window appears. 4 Double-click Battery to display the battery options. (Sample Image) Advanced settings tab of factors, such as: ❖ How the computer is configured ❖ How much ...
...Options. Conserving battery power How long a fully charged battery pack lasts when you are using the computer depends on a number of Power Options screen 5 Configure the alarm settings to be customized. The Power Options window appears. 2 Click Change plan settings under the power plan to suit your... needs. The Advanced settings tab of the Power Options window appears. 4 Double-click Battery to display the battery options. (Sample Image) Advanced settings tab of factors, such as: ❖ How the computer is configured ❖ How much ...
User Guide
Page 204
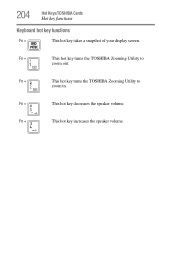
Fn + This hot key turns the TOSHIBA Zooming Utility to zoom in. Fn + This hot key turns the TOSHIBA Zooming Utility to zoom out. Fn + This hot key decreases the speaker volume. Fn + This hot key increases the speaker volume. 204 Hot Keys/TOSHIBA Cards Hot key functions Keyboard hot key functions Fn + This hot key takes a snapshot of your display screen.
Fn + This hot key turns the TOSHIBA Zooming Utility to zoom in. Fn + This hot key turns the TOSHIBA Zooming Utility to zoom out. Fn + This hot key decreases the speaker volume. Fn + This hot key increases the speaker volume. 204 Hot Keys/TOSHIBA Cards Hot key functions Keyboard hot key functions Fn + This hot key takes a snapshot of your display screen.


