
User Guide
Page 9
... to be used indoors for frequency range 5.15 GHz to 5.25 GHz to reduce the potential for harmful interference to co-channel Mobile Satellite systems. High power radars are allocated as primary users of Health Canada limits for the general population; Operation is subject to 5.25 GHz... licensed service, this radio equipment must accept any other transmitter that the Industry Canada technical specifications were met. consult Safety Code 6, obtainable from windows to be co-located with RSS 210 of this device. Equipment (or its operation in excess of the 5.25 GHz to 5.35 GHz ...
... to be used indoors for frequency range 5.15 GHz to 5.25 GHz to reduce the potential for harmful interference to co-channel Mobile Satellite systems. High power radars are allocated as primary users of Health Canada limits for the general population; Operation is subject to 5.25 GHz... licensed service, this radio equipment must accept any other transmitter that the Industry Canada technical specifications were met. consult Safety Code 6, obtainable from windows to be co-located with RSS 210 of this device. Equipment (or its operation in excess of the 5.25 GHz to 5.35 GHz ...

User Guide
Page 29
... regulated due to preserving the environment, Toshiba supports various trade-in and recycling programs. Visit www.ToshibaDirect.com and select Recycling & Trade-in Programs, or enter Recycle in the search bar. 29 Trademarks Satellite and ConfigFree are registered trademarks of MultiMediaCard... Association. Memory Stick, Memory Stick PRO, and Memory Stick PRO Duo are trademarks or registered trademarks of Microsoft Corporation. and any use of such marks by the Bluetooth SIG, Inc. Microsoft, Outlook, Windows, and Windows...
... regulated due to preserving the environment, Toshiba supports various trade-in and recycling programs. Visit www.ToshibaDirect.com and select Recycling & Trade-in Programs, or enter Recycle in the search bar. 29 Trademarks Satellite and ConfigFree are registered trademarks of MultiMediaCard... Association. Memory Stick, Memory Stick PRO, and Memory Stick PRO Duo are trademarks or registered trademarks of Microsoft Corporation. and any use of such marks by the Bluetooth SIG, Inc. Microsoft, Outlook, Windows, and Windows...
User Guide
Page 32
... Using the keyboard 94 Character keys 94 Ctrl, Fn, and Alt keys 95 Function keys 95 Special Windows® keys 95 Starting a program 96 Starting a program from the Start menu...........96 Starting a program from Windows® Explorer ...97 Starting a program using the Start Search field 98 Saving your work 98 Printing your... media 106 Recording optical media 106 Removing a disc with the computer on...........107 Removing a disc with the computer off ..........107 Caring for optical discs 108 Toshiba's online resources 108
... Using the keyboard 94 Character keys 94 Ctrl, Fn, and Alt keys 95 Function keys 95 Special Windows® keys 95 Starting a program 96 Starting a program from the Start menu...........96 Starting a program from Windows® Explorer ...97 Starting a program using the Start Search field 98 Saving your work 98 Printing your... media 106 Recording optical media 106 Removing a disc with the computer on...........107 Removing a disc with the computer off ..........107 Caring for optical discs 108 Toshiba's online resources 108

User Guide
Page 35
... problems 185 Modem problems 186 Wireless networking problems 186 DVD operating problems 188 Develop good computing habits 189 Data and system configuration backup in the Windows® operating system 190 If you need further assistance 195 Before you contact Toshiba 195 Contacting Toshiba 195 Other Toshiba Internet Web sites 196 Toshiba's worldwide offices 196
... problems 185 Modem problems 186 Wireless networking problems 186 DVD operating problems 188 Develop good computing habits 189 Data and system configuration backup in the Windows® operating system 190 If you need further assistance 195 Before you contact Toshiba 195 Contacting Toshiba 195 Other Toshiba Internet Web sites 196 Toshiba's worldwide offices 196
User Guide
Page 51
...screen click Next to enter the Setup Wizard. 2 Confirm acceptance of windows displayed, and the order in which windows appear, may restart your desktop and then double-clicking Toshiba Registration. The Windows® operating system checks the system's performance, and then may vary... according to complete Product Registration will not diminish Customer rights under the Toshiba standard limited Warranty. Registering your computer with...
...screen click Next to enter the Setup Wizard. 2 Confirm acceptance of windows displayed, and the order in which windows appear, may restart your desktop and then double-clicking Toshiba Registration. The Windows® operating system checks the system's performance, and then may vary... according to complete Product Registration will not diminish Customer rights under the Toshiba standard limited Warranty. Registering your computer with...
User Guide
Page 59
... Started Adding memory (optional) 59 NOTE The following screen may need to scan your system has the memory modules stacked on the power: If "Start Windows® Normally" is best to press Enter to go into Safe Mode, then shut down and restart the system, at which time... Windows® should boot back up slightly. If one of one another, you turn on top of the Safe Mode options is highlighted, it is highlighted, ...
... Started Adding memory (optional) 59 NOTE The following screen may need to scan your system has the memory modules stacked on the power: If "Start Windows® Normally" is best to press Enter to go into Safe Mode, then shut down and restart the system, at which time... Windows® should boot back up slightly. If one of one another, you turn on top of the Safe Mode options is highlighted, it is highlighted, ...
User Guide
Page 60
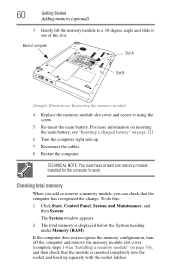
... main battery, see "Inserting a charged battery" on page 53), and then check that the computer has recognized the change. Back of the slot. The System window appears. 2 The total memory is inserted completely into the socket and lined up . 7 Reconnect the cables. 8 Restart the computer. If the computer does not recognize...
... main battery, see "Inserting a charged battery" on page 53), and then check that the computer has recognized the change. Back of the slot. The System window appears. 2 The total memory is inserted completely into the socket and lined up . 7 Reconnect the cables. 8 Restart the computer. If the computer does not recognize...

User Guide
Page 61
... a custom size for example, a D: drive) storage drive partitions intact. Getting Started Recovering the Internal Storage Drive 61 NOTE From time to time, Windows® will display a pop-up that says, "Windows® needs your C: drive to its outof-box state. (Recommended recovery method) Recover to a custom size partition See "Recovering to out...
... a custom size for example, a D: drive) storage drive partitions intact. Getting Started Recovering the Internal Storage Drive 61 NOTE From time to time, Windows® will display a pop-up that says, "Windows® needs your C: drive to its outof-box state. (Recommended recovery method) Recover to a custom size partition See "Recovering to out...

User Guide
Page 62
... power source via the AC adaptor. To recover using the second method, see "Creating recovery media" on page 69. ❖ The Toshiba Recovery Wizard also provides the option of Windows Vista® 32-bit or 64-bit operating system, select one at this time. 62 Getting Started Recovering the Internal Storage Drive...
... power source via the AC adaptor. To recover using the second method, see "Creating recovery media" on page 69. ❖ The Toshiba Recovery Wizard also provides the option of Windows Vista® 32-bit or 64-bit operating system, select one at this time. 62 Getting Started Recovering the Internal Storage Drive...
User Guide
Page 65
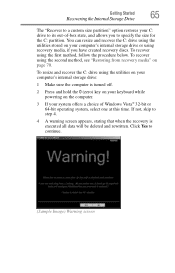
... on your computer's internal storage drive: 1 Make sure the computer is executed all data will be deleted and rewritten. Click Yes to its out-of Windows Vista® 32-bit or 64-bit operating system, select one at this time. Getting Started Recovering the Internal Storage Drive 65 The "Recover to...
... on your computer's internal storage drive: 1 Make sure the computer is executed all data will be deleted and rewritten. Click Yes to its out-of Windows Vista® 32-bit or 64-bit operating system, select one at this time. Getting Started Recovering the Internal Storage Drive 65 The "Recover to...
User Guide
Page 67
... sure the computer is strongly recommended that the C: drive has been recovered. 10 Press any information on the computer. 3 If your system offers a choice of Windows Vista® 32-bit or 64-bit operating system, select one at this time. If not, skip to begin the recovery. Be sure to save...
... sure the computer is strongly recommended that the C: drive has been recovered. 10 Press any information on the computer. 3 If your system offers a choice of Windows Vista® 32-bit or 64-bit operating system, select one at this time. If not, skip to begin the recovery. Be sure to save...
User Guide
Page 71
...utilities burned to DVDs: 1 Insert the first recovery DVD into your system offers a choice of Windows Vista® 32-bit or 64-bit operating system, select one of the following options: &#...you want to recover the C: partition only, leaving other partitions from the drive. Select Toshiba Recovery Wizard and then click Next. 5 If your optical drive and power on page 61. Click Yes to... continue. 7 When the Toshiba Recovery Wizard opens and the Selecting a Process screen displays, select Recovery of Factory Default Software and...
...utilities burned to DVDs: 1 Insert the first recovery DVD into your system offers a choice of Windows Vista® 32-bit or 64-bit operating system, select one of the following options: &#...you want to recover the C: partition only, leaving other partitions from the drive. Select Toshiba Recovery Wizard and then click Next. 5 If your optical drive and power on page 61. Click Yes to... continue. 7 When the Toshiba Recovery Wizard opens and the Selecting a Process screen displays, select Recovery of Factory Default Software and...
User Guide
Page 72
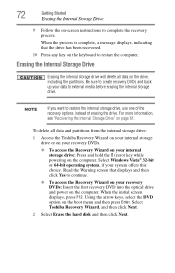
... NOTE If you want to external media before erasing the internal storage drive. To delete all data on the drive, including the partitions. Select Windows Vista® 32-bit or 64-bit operating system, if your internal storage drive: Press and hold the 0 (zero) key while powering .... Erasing the Internal Storage Drive Erasing the internal storage drive will delete all data and partitions from the internal storage drive: 1 Access the Toshiba Recovery Wizard on your internal storage drive or on your recovery DVDs. ❖ To access the Recovery Wizard on your system offers this choice...
... NOTE If you want to external media before erasing the internal storage drive. To delete all data on the drive, including the partitions. Select Windows Vista® 32-bit or 64-bit operating system, if your internal storage drive: Press and hold the 0 (zero) key while powering .... Erasing the Internal Storage Drive Erasing the internal storage drive will delete all data and partitions from the internal storage drive: 1 Access the Toshiba Recovery Wizard on your internal storage drive or on your recovery DVDs. ❖ To access the Recovery Wizard on your system offers this choice...
User Guide
Page 78
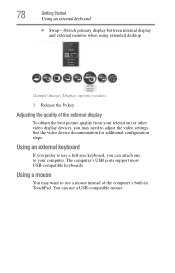
... Getting Started Using an external keyboard ❖ Swap-Switch primary display between internal display and external monitor when using extended desktop (Sample Image) Display options window 3 Release the Fn key.
... Getting Started Using an external keyboard ❖ Swap-Switch primary display between internal display and external monitor when using extended desktop (Sample Image) Display options window 3 Release the Fn key.
User Guide
Page 80
... drive light and the drive-in-use light are off your work. If you are not using the computer for instructions before shutting down the Windows® operating system could cause you may lose data or damage the disk/disc and/or drive. If you are using it up your printer...
... drive light and the drive-in-use light are off your work. If you are not using the computer for instructions before shutting down the Windows® operating system could cause you may lose data or damage the disk/disc and/or drive. If you are using it up your printer...
User Guide
Page 82
... Sleep mode" on page 85. Sleep mode The Sleep command places the computer into a power-saving mode. Sleep saves the current state of time, the Windows® operating system may save your work first.
... Sleep mode" on page 85. Sleep mode The Sleep command places the computer into a power-saving mode. Sleep saves the current state of time, the Windows® operating system may save your work first.
User Guide
Page 83
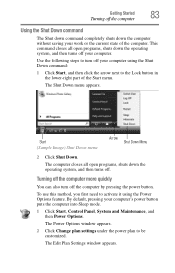
... command: 1 Click Start, and then click the arrow next to the Lock button in the lower-right part of the computer. The Power Options window appears. 2 Click Change plan settings under the power plan to turn off . The Shut Down menu appears. Use the following steps to be customized.... The Edit Plan Settings window appears. This command closes all open programs, shuts down the operating system, and then turns off the computer by pressing the power button. By...
... command: 1 Click Start, and then click the arrow next to the Lock button in the lower-right part of the computer. The Power Options window appears. 2 Click Change plan settings under the power plan to turn off . The Shut Down menu appears. Use the following steps to be customized.... The Edit Plan Settings window appears. This command closes all open programs, shuts down the operating system, and then turns off the computer by pressing the power button. By...
User Guide
Page 84
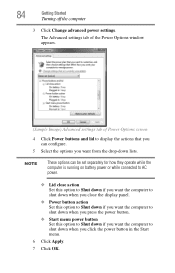
... option to shut down lists. 84 Getting Started Turning off the computer 3 Click Change advanced power settings. The Advanced settings tab of the Power Options window appears. (Sample Image) Advanced settings tab of Power Options screen 4 Click Power buttons and lid to display the actions that you can be set separately...
... option to shut down lists. 84 Getting Started Turning off the computer 3 Click Change advanced power settings. The Advanced settings tab of the Power Options window appears. (Sample Image) Advanced settings tab of Power Options screen 4 Click Power buttons and lid to display the actions that you can be set separately...
User Guide
Page 86
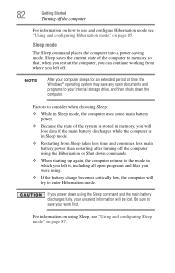
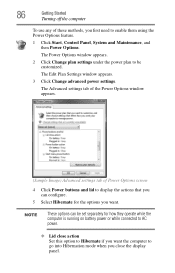
... mode when you close action Set this option to be customized. The Edit Plan Settings window appears. 3 Click Change advanced power settings. The Advanced settings tab of the Power Options window appears. (Sample Image) Advanced settings tab of these methods, you want . The Power... Options window appears. 2 Click Change plan settings under the power plan to Hibernate if you first need...
... mode when you close action Set this option to be customized. The Edit Plan Settings window appears. 3 Click Change advanced power settings. The Advanced settings tab of the Power Options window appears. (Sample Image) Advanced settings tab of these methods, you want . The Power... Options window appears. 2 Click Change plan settings under the power plan to Hibernate if you first need...
User Guide
Page 88
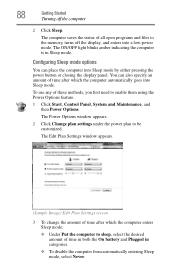
...these methods, you first need to sleep, select the desired amount of time after which the computer automatically goes into Sleep mode. The Power Options window appears. 2 Click Change plan settings under the power plan to the memory, turns off the computer 2 Click Sleep. The Edit Plan Settings... window appears. (Sample Image) Edit Plan Settings screen 3 To change the amount of time after which the computer enters Sleep mode: ❖ Under Put the ...
...these methods, you first need to sleep, select the desired amount of time after which the computer automatically goes into Sleep mode. The Power Options window appears. 2 Click Change plan settings under the power plan to the memory, turns off the computer 2 Click Sleep. The Edit Plan Settings... window appears. (Sample Image) Edit Plan Settings screen 3 To change the amount of time after which the computer enters Sleep mode: ❖ Under Put the ...


