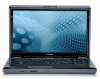
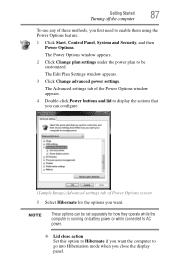
Satellite L500 Series (PSLU0U, PSLV0U, PSLV6U) User's Guide
Page 50
... power rather than battery power) are properly connected and ready. 2 Check to increase the brightness of the screen while on battery power. When the computer is operated on battery power, the screen will deteriorate. When you turn off the power again until the operating system has loaded completely. This is ... computer: 1 Make sure any external devices (such as the AC adaptor, if you may not be able to ensure that may appear on your screen display when you turn on the computer for the first time Small bright dots may appear on your display are an intrinsic characteristic of the...
Satellite L500 Series (PSLU0U, PSLV0U, PSLV6U) User's Guide
Page 51
...77) ❖ Connect a local printer (see "Connecting a printer" on -screen instructions. The first time you turn on page 51. Adding optional external devices NOTE Before adding external devices or memory, Toshiba recommends setting up your software. Follow the on page 80) Product registration can...power again until the operating system has loaded completely. Failure to complete Product Registration will not diminish Customer rights under the Toshiba standard limited Warranty. After starting your computer for the first time, do not turn on the computer for the first...
Satellite L500 Series (PSLU0U, PSLV0U, PSLV6U) User's Guide
Page 59
... from the memory module. NOTE If your internal storage drive for errors or defragment the drive. Getting Started Adding memory (optional) 59 NOTE The following screen may need to go into Safe Mode, then shut down and restart the system, at which time Windows® should boot back up slightly. Back...
Satellite L500 Series (PSLU0U, PSLV0U, PSLV6U) User's Guide
Page 63
Click Yes to continue. (Sample Image) Warning screen 5 When the Toshiba Recovery Wizard opens and the Selecting a process screen displays, select Recovery of Factory Default Software and then click Next. (Sample Image) Selecting a Process screen Getting Started Recovering the Internal Storage Drive 63 4 A warning screen appears, stating that when the recovery is executed all data will be deleted and rewritten.
Satellite L500 Series (PSLU0U, PSLV0U, PSLV6U) User's Guide
Page 64
... recovered. 9 Press any key on the drive and all data will be connected to out-of-box state. (Sample Image) Recovery of Factory Default Software screen appears. Be sure to save your work to external media before proceeding. 8 Click Next to external media before executing the recovery. NOTE During the recovery... complete, a message displays indicating that all information stored in those partitions. 64 Getting Started Recovering the Internal Storage Drive 6 The Recovery of Factory Default Software screen 7 Click Next.
Satellite L500 Series (PSLU0U, PSLV0U, PSLV6U) User's Guide
Page 65
.... Click Yes to specify the size for the C: partition. To recover using recovery DVDs/media, if you to continue. (Sample Image) Warning screen If not, skip to step 4. 4 A warning screen appears, stating that when the recovery is turned off. 2 Press and hold the 0 (zero) key on your keyboard while powering on page...
Satellite L500 Series (PSLU0U, PSLV0U, PSLV6U) User's Guide
Page 66
... data will be lost during the recovery process. 66 Getting Started Recovering the Internal Storage Drive 5 When the Toshiba Recovery Wizard opens and the Selecting a process screen displays, select Recovery of Factory Default Software and then click Next. (Sample Image) Selecting a Process screen 6 The Recovery of drive C: field to external media before proceeding.
Satellite L500 Series (PSLU0U, PSLV0U, PSLV6U) User's Guide
Page 68
Click Yes to continue. (Sample Image) Warning screen 5 When the Toshiba Recovery Wizard opens and the Selecting a process screen displays, select Recovery of Factory Default Software and then click Next. (Sample Image) Selecting a Process screen 68 Getting Started Recovering the Internal Storage Drive 4 A warning screen appears stating that when the recovery is executed all data will be deleted and rewritten.
Satellite L500 Series (PSLU0U, PSLV0U, PSLV6U) User's Guide
Page 69
Getting Started Recovering the Internal Storage Drive 69 6 The Recovery of Factory Default Software screen 7 Click Next. A confirmation message displays reminding you that the C: drive has been recovered. 9 Press any key on the C: drive will prompt you have ...configuration, you may be lost during the recovery process. Select Recover without changing the hard drive partitions. (Sample Image) Recovery of Factory Default Software screen appears. The Toshiba Customer Support Center in the United States is (800) 457-7777 outside the United States it is not a writable drive, contact...
Satellite L500 Series (PSLU0U, PSLV0U, PSLV6U) User's Guide
Page 70
.... For information on using the recovery DVDs/media you will know in which order to insert the discs during recovery. 6 Follow the on-screen prompts to complete the copy process. If you have created recovery DVDs/media for your system, you can recover your system even if the ...external power source via the AC adaptor. 70 Getting Started Recovering the Internal Storage Drive To create recovery DVDs/media: 1 Click Start, All Programs, My Toshiba, and then Recovery Media Creator. 2 Select DVD (to create Recovery media on DVD). 3 Select the items you have created with the preceding steps, ...
Satellite L500 Series (PSLU0U, PSLV0U, PSLV6U) User's Guide
Page 71
.... The boot menu appears. 3 Using the arrow keys, select the DVD option and press Enter. 4 The Selecting a Process screen appears. Click Yes to continue. 7 When the Toshiba Recovery Wizard opens and the Selecting a Process screen displays, select Recovery of Factory Default Software and then click Next. 8 Select one at this time. If you...
Satellite L500 Series (PSLU0U, PSLV0U, PSLV6U) User's Guide
Page 72
... storage drive, use one of the following options on the Erase the hard disk screen: ❖ Delete all data and then overwrites the entire internal storage drive for security purposes. When the initial screen displays, press F12. 72 Getting Started Erasing the Internal Storage Drive 10 Press any... the Recovery Wizard on your internal storage drive: Press and hold the 0 (zero) key while powering on the drive, including the partitions. Select Toshiba Recovery Wizard, and then click Next. 2 Select Erase the hard disk and then click Next. 3 Choose one of the recovery options instead of ...
Satellite L500 Series (PSLU0U, PSLV0U, PSLV6U) User's Guide
Page 73
.... 2 Right-click Computer. 3 Select Manage. 4 Click Disk Management. 5 Highlight the internal storage drive in the lower portion of the screen. Checking the internal storage drive operating status After restoring your work to external media before proceeding. 5 Click Next to begin erasing the internal storage... drive. Getting Started Checking the internal storage drive operating status 73 (Sample Image) Erase the hard disk screen 4 Click Next. Be sure you have saved your internal storage drive, you that the internal storage drive has been erased. 6 Press...
Satellite L500 Series (PSLU0U, PSLV0U, PSLV6U) User's Guide
Page 74
...and the adjacent control buttons to complete the installation process. To reinstall drivers and applications: 1 Click Start, All Programs, My Toshiba, and then TOSHIBA Application Installer. 2 Click Next. 3 Click the item you to reinstall the drivers and applications that were originally bundled with ... drivers and applications The Toshiba Application Installer allows you want to install. 4 Click Install. 5 Follow the on-screen prompts to : ❖ Move the pointer on the screen ❖ Select an item on the screen ❖ Open or activate an item on the screen ❖ Scroll through ...
Satellite L500 Series (PSLU0U, PSLV0U, PSLV6U) User's Guide
Page 75
NOTE The pointer is the icon (usually an arrow) that moves on the screen when you want to move the pointer. Getting Started Using the TouchPad™ 75 Refer to the table below for specific instructions on right-clicking.... (Sample Illustration) Click the secondary (righthand) control button Check your program documentation for specific instructions on -screen Slide your finger across the TouchPad in the pointer direction you slide your finger across the TouchPad or move the pointer a longer distance, slide your...
Satellite L500 Series (PSLU0U, PSLV0U, PSLV6U) User's Guide
Page 76
...more of the following : Example: Slide your finger along the bottom edge of the TouchPad in the direction you are typing, the on-screen pointer may also seem to random locations on the TouchPad. ❖ Adjust the sensitivity of the TouchPad, so that it is less ...scrolling active area Adjusting TouchPad™ settings While you want to scroll a longer distance. See "Disabling or enabling the TouchPad™" on the screen, and potentially the item or text may be replaced by itself" to automatically select text, click buttons, and activate other user interface elements....
Satellite L500 Series (PSLU0U, PSLV0U, PSLV6U) User's Guide
Page 78
.../DVD player to the computer: ❖ Connect one end of an HDMI cable (not included with the monitor to see if you first need a larger screen. NOTE In the future you can easily attach an external monitor or projector to your television. 78 Getting Started Using external display devices Selecting video...
Satellite L500 Series (PSLU0U, PSLV0U, PSLV6U) User's Guide
Page 81
...® operating system could cause you to set it up your printer. The Add Printer Wizard appears. (Sample Image) Add Printer Wizard 2 Follow the on-screen instructions to lose your work. Setting up the printer once. 1 Click Start, Control Panel, Hardware and Sound, and then under Devices and Printers, click Add...
Satellite L500 Series (PSLU0U, PSLV0U, PSLV6U) User's Guide
Page 85
... if you want the computer to go into Sleep mode when you want from the drop-down lists. The Advanced settings tab of Power Options screen 5 Select the options you press the power button.
Satellite L500 Series (PSLU0U, PSLV0U, PSLV6U) User's Guide
Page 87
... Options. The Edit Plan Settings window appears. 3 Click Change advanced power settings. Getting Started Turning off the computer 87 To use any of Power Options screen 5 Select Hibernate for how they operate while the computer is running on battery power or while connected to AC power. ❖ Lid close action Set...